Ricoh Aficio MP C2551 Support Question
Ricoh Aficio MP C2551 Support Question
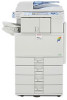
Find answers below for this question about Ricoh Aficio MP C2551.Need a Ricoh Aficio MP C2551 manual? We have 1 online manual for this item!
Question posted by supertrini2000 on October 8th, 2012
Printer Drivers
Documents sent to printer in clor are printed in black and white. The manual says to change the settings on the "Printer drivers" tab. How do you navigate to find the printer driver tab in the menu?
Current Answers
Answer #1: Posted by freginold on October 8th, 2012 3:14 PM
freginold

Member since:
December 20th, 2011 Points: 23,253,885

Member since:
December 20th, 2011 Points: 23,253,885
Hi, the instructions for getting to that tab will depend on what operating system and print driver you're using. In general, on a Windows computer, go into the Printers applet in the Control Panel, right click on the Ricoh driver, and select either Properties or Preferences. Either the first tab (General) or the Color/Color Management tab will have the black and white/color setting -- change it to Color and then click Apply.
Related Ricoh Aficio MP C2551 Manual Pages
Quick Use Guide - Page 3
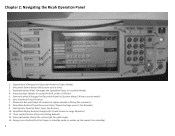
Printer button (Access to Large Graphics) 11. Clear/Stop button (Stops the current Job / Clears the Page count / Fax Number) 9. Simplified display button (Changes the Touch Screen to Locked Print & Online / Off Line) 5. Clear modes button (Clears all setting default) 12. Energy saver button (Put the Copier in Standby mode or wakes up the copier...
Quick Use Guide - Page 8
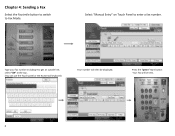
Chapter 4: Sending a Fax
Select the Facsimile button to switch to enter a fax number. Select "Manual Entry" on Touch Panel to Fax Mode.
Press the "green" Start button Your Fax will then be Sent.
8
Type your fax number including 9 to get an outside line, select "OK" at the top . (You can use the Touch panel or the Numerical keyboard)
Your number will be displayed.
Quick Use Guide - Page 9
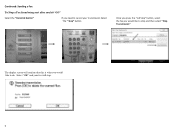
Continued: Sending a Fax
To Stop a Fax from being sent after you hit "GO"
Select the "Facsimile button"
IF you would like to stop .
9 Select "OK" and your transmission Select The " Stop" button. Once you ...
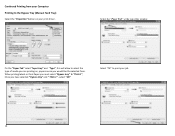
Quick Use Guide - Page 10
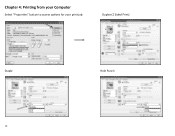
Chapter 4: Printing from your Computer
Select "Properties" button to access options for your print job.
Duplex (2 Sided Print)
Staple
10
Hole Punch
Quick Use Guide - Page 11
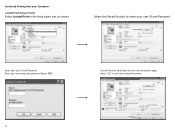
Select "OK" to your main properties page. Continued Printing from your Computer
Locked Print (Secure Print)
Select Locked Print in the drop down box as shown
Select the Details button to enter your user ID and Password
Enter your user ID and Password Enter your user name and password Select "OK"
You will then be taken back to print you locked document.
11
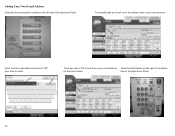
Quick Use Guide - Page 12
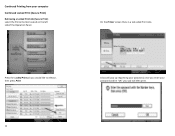
On the Printer screen there is a tab called Print Jobs
Press the Locked Print job you enter your password and hit "OK" your computer
Continued Locked Print (Secure Print)
Retrieving a Locked Print Job (Secure Print) select the Printer button located on the left sideof the Operation Panel. Continued Printing from your job will pop up requesting your password, once you would...
Quick Use Guide - Page 13
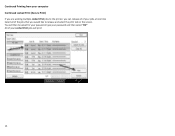
..." All of your jobs at one time Select all of the jobs that you can release all of your Locked Print jobs will print
13 Continued Printing from your computer Continued Locked Print (Secure Print)
If you are sending mulitple Locked Print jobs to the printer, you would like to release and select the print tab on the screen.
Quick Use Guide - Page 14
... like the selected from your Computer Printing to the Bypass Tray (Manual Feed Tray)
Select the "Properties" button on , paper source you have selected " Bypass tray" and " Thick 1" , select "OK"
Select "OK" to select the type of the window
On the "Paper Tab" select "Input tray" and "Type", this will allow to print your print driver.
Quick Use Guide - Page 15
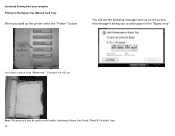
Continued Printing from your computer Printing to the Bypass Tray (Manual Feed Tray)
When you walk up the printer select the "Printer" button
You will see the following message come up on the screen, this message is asking you to place paper in the "Bypass tray" Your print job will start. Note: This process is placed in...
Quick Use Guide - Page 19
... the Scanner button located on the main screen.
Once you select "OK' you will see your scan to email.
To manually add an e‐mail not in the address book, select manual entry
Enter the full e‐mail address and press "OK" your e‐mail address Press the Start Button on the...
Similar Questions


For Ricoh Aficio Mp C5000, How Do I Hold Print Job
(Posted by Huveve 10 years ago)
How To Install A Ricoh Aficio Mp C2551 Pcl 5c Driver
(Posted by shivaaravi 10 years ago)

How Do I Change The Printer Setting So It Prints Black & White Too ?
Hi Printer: Ricoh Aficio C2050 one of our computers (out of 4) only prints in color even though th...
Hi Printer: Ricoh Aficio C2050 one of our computers (out of 4) only prints in color even though th...
(Posted by gila 11 years ago)

Problem Connecting Usb 3.0 External Harde Disk. Please Solve.
When I connect my USB 3.0 external hard disk, it is saying Incompatible hard disk . Do v need to ins...
When I connect my USB 3.0 external hard disk, it is saying Incompatible hard disk . Do v need to ins...
(Posted by ramuiily 11 years ago)