
User Guide
Page 4
... power cord into the wall outlet. Always check the power plug and make sure that the area around any way, call for cuts or other problems. 2. Make sure the power cord is damaged in any object such as a table leg. Power Plug and Power Cord 1. Clean it is fully completely into...
... power cord into the wall outlet. Always check the power plug and make sure that the area around any way, call for cuts or other problems. 2. Make sure the power cord is damaged in any object such as a table leg. Power Plug and Power Cord 1. Clean it is fully completely into...
User Guide
Page 51
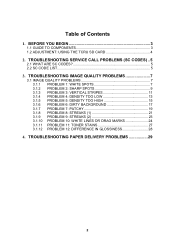
... SD CARD 4 2. TROUBLESHOOTING IMAGE QUALITY PROBLEMS 7 3.1 IMAGE QUALITY PROBLEMS 7 3.1.1 PROBLEM 1: WHITE SPOTS 7 3.1.2 PROBLEM 2: SHARP SPOTS 9 3.1.3 PROBLEM 3: VERTICAL STRIPES 11 3.1.4 PROBLEM 4: DENSITY TOO LOW 13 3.1.5 PROBLEM 5: DENSITY TOO HIGH 15 3.1.6 PROBLEM 6: DIRTY BACKGROUND 17 3.1.7 PROBLEM 7: PATCHY 19 3.1.8 PROBLEM 8: STREAKS (1 21 3.1.9 PROBLEM 9: STREAKS (2 23 3.1.10 PROBLEM 10: WHITE LINES OR DRAG MARKS 24 3.1.11 PROBLEM 11: TONER STAINS 27 3.1.12 PROBLEM 12: DIFFERENCE IN GLOSSINESS 28...
... SD CARD 4 2. TROUBLESHOOTING IMAGE QUALITY PROBLEMS 7 3.1 IMAGE QUALITY PROBLEMS 7 3.1.1 PROBLEM 1: WHITE SPOTS 7 3.1.2 PROBLEM 2: SHARP SPOTS 9 3.1.3 PROBLEM 3: VERTICAL STRIPES 11 3.1.4 PROBLEM 4: DENSITY TOO LOW 13 3.1.5 PROBLEM 5: DENSITY TOO HIGH 15 3.1.6 PROBLEM 6: DIRTY BACKGROUND 17 3.1.7 PROBLEM 7: PATCHY 19 3.1.8 PROBLEM 8: STREAKS (1 21 3.1.9 PROBLEM 9: STREAKS (2 23 3.1.10 PROBLEM 10: WHITE LINES OR DRAG MARKS 24 3.1.11 PROBLEM 11: TONER STAINS 27 3.1.12 PROBLEM 12: DIFFERENCE IN GLOSSINESS 28...
User Guide
Page 52
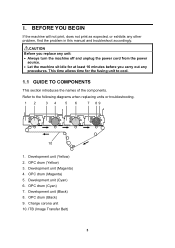
... when replacing units or troubleshooting. 12 34 56 7 89 10 1. This time allows time for at least 10 minutes before you replace any other problem, find the problem in this manual and troubleshoot accordingly. Development unit (Yellow) 2. OPC drum (Cyan) 7. Development unit (Black) 8. OPC drum (Magenta) 5. Development unit (Cyan) 6. Charge corona unit...
... when replacing units or troubleshooting. 12 34 56 7 89 10 1. This time allows time for at least 10 minutes before you replace any other problem, find the problem in this manual and troubleshoot accordingly. Development unit (Yellow) 2. OPC drum (Cyan) 7. Development unit (Black) 8. OPC drum (Magenta) 5. Development unit (Cyan) 6. Charge corona unit...
User Guide
Page 54
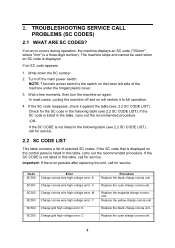
... high voltage error: K SC305 Charge grid high voltage error: C Procedure Replace the black charge corona unit Replace the cyan charge corona unit. TROUBLESHOOTING SERVICE CALL PROBLEMS (SC CODES) 2.1 WHAT ARE SC CODES? In most cases, cycling the machine off the main power switch. If the SC code reappears, check it to...
... high voltage error: K SC305 Charge grid high voltage error: C Procedure Replace the black charge corona unit Replace the cyan charge corona unit. TROUBLESHOOTING SERVICE CALL PROBLEMS (SC CODES) 2.1 WHAT ARE SC CODES? In most cases, cycling the machine off the main power switch. If the SC code reappears, check it to...
User Guide
Page 56
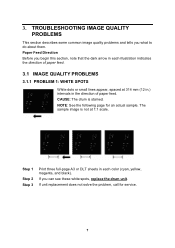
... tells you can see these white spots, replace the drum unit. If unit replacement does not solve the problem, call for an actual sample. Paper Feed Direction Before you begin this section, note that the dark arrow in each color (cyan, yellow, magenta, and ... page for service. 7 CAUSE: The drum is not at 314 mm (12 in.) intervals in each illustration indicates the direction of paper feed. 3.1 IMAGE QUALITY PROBLEMS 3.1.1 PROBLEM 1: WHITE SPOTS White dots or small lines appear, spaced at 1:1 scale. The sample image is stained. Step 1 Step 2 Step 3 Print three full-page A3 or...
... tells you can see these white spots, replace the drum unit. If unit replacement does not solve the problem, call for an actual sample. Paper Feed Direction Before you begin this section, note that the dark arrow in each color (cyan, yellow, magenta, and ... page for service. 7 CAUSE: The drum is not at 314 mm (12 in.) intervals in each illustration indicates the direction of paper feed. 3.1 IMAGE QUALITY PROBLEMS 3.1.1 PROBLEM 1: WHITE SPOTS White dots or small lines appear, spaced at 1:1 scale. The sample image is stained. Step 1 Step 2 Step 3 Print three full-page A3 or...
User Guide
Page 58
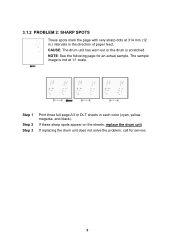
If replacing the drum unit does not solve the problem, call for an actual sample. 3.1.2 PROBLEM 2: SHARP SPOTS These spots mark the page with very sharp dots at 1:1 scale. NOTE: See the following page for service. 9 If these sharp spots appear on the sheets, replace the drum unit. CAUSE: The drum unit has worn out or the drum is not at 314 mm (12 in.) intervals in each color (cyan, yellow, magenta, and black). Step 1 Step 2 Step 3 Print three full-page A3 or DLT sheets in the direction of paper feed. The sample image is scratched.
If replacing the drum unit does not solve the problem, call for an actual sample. 3.1.2 PROBLEM 2: SHARP SPOTS These spots mark the page with very sharp dots at 1:1 scale. NOTE: See the following page for service. 9 If these sharp spots appear on the sheets, replace the drum unit. CAUSE: The drum unit has worn out or the drum is not at 314 mm (12 in.) intervals in each color (cyan, yellow, magenta, and black). Step 1 Step 2 Step 3 Print three full-page A3 or DLT sheets in the direction of paper feed. The sample image is scratched.
User Guide
Page 60
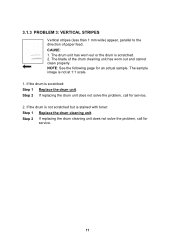
... scratched: Step 1 Replace the drum unit. If the drum is not at 1:1 scale. 1. Step 2 If replacing the drum unit does not solve the problem, call for service. 11 3.1.3 PROBLEM 3: VERTICAL STRIPES Vertical stripes (less than 1 mm wide) appear, parallel to the direction of the drum cleaning unit has worn out and cannot...
... scratched: Step 1 Replace the drum unit. If the drum is not at 1:1 scale. 1. Step 2 If replacing the drum unit does not solve the problem, call for service. 11 3.1.3 PROBLEM 3: VERTICAL STRIPES Vertical stripes (less than 1 mm wide) appear, parallel to the direction of the drum cleaning unit has worn out and cannot...
User Guide
Page 62
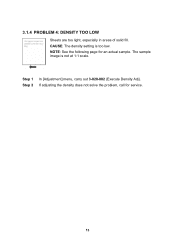
NOTE: See the following page for service. 13 Step 2 If adjusting the density does not solve the problem, call for an actual sample. The sample image is too low. CAUSE: The density setting is not at 1:1 scale. Step 1 In [Adjustment] menu, carry out 3-820-002 (Execute Density Adj). 3.1.4 PROBLEM 4: DENSITY TOO LOW Sheets are too light, especially in areas of solid fill.
NOTE: See the following page for service. 13 Step 2 If adjusting the density does not solve the problem, call for an actual sample. The sample image is too low. CAUSE: The density setting is not at 1:1 scale. Step 1 In [Adjustment] menu, carry out 3-820-002 (Execute Density Adj). 3.1.4 PROBLEM 4: DENSITY TOO LOW Sheets are too light, especially in areas of solid fill.
User Guide
Page 64
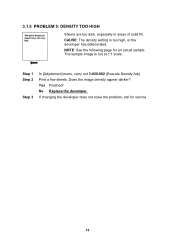
Step 1 Step 2 Step 3 In [Adjustment] menu, carry out 3-820-002 (Execute Density Adj). Does the image density appear darker? If changing the developer does not solve the problem, call for an actual sample. CAUSE: The density setting is not at 1:1 scale. No Replace the developer. Print a few sheets. The sample image is too high, or the developer has deteriorated. NOTE: See the following page for service. 15 Yes Finished! 3.1.5 PROBLEM 5: DENSITY TOO HIGH Sheets are too dark, especially in areas of solid fill.
Step 1 Step 2 Step 3 In [Adjustment] menu, carry out 3-820-002 (Execute Density Adj). Does the image density appear darker? If changing the developer does not solve the problem, call for an actual sample. CAUSE: The density setting is not at 1:1 scale. No Replace the developer. Print a few sheets. The sample image is too high, or the developer has deteriorated. NOTE: See the following page for service. 15 Yes Finished! 3.1.5 PROBLEM 5: DENSITY TOO HIGH Sheets are too dark, especially in areas of solid fill.
User Guide
Page 66
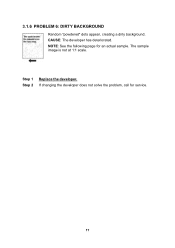
The sample image is not at 1:1 scale. Step 1 Replace the developer. Step 2 If changing the developer does not solve the problem, call for an actual sample. NOTE: See the following page for service. 17 CAUSE: The developer has deteriorated. 3.1.6 PROBLEM 6: DIRTY BACKGROUND Random "powdered" dots appear, creating a dirty background.
The sample image is not at 1:1 scale. Step 1 Replace the developer. Step 2 If changing the developer does not solve the problem, call for an actual sample. NOTE: See the following page for service. 17 CAUSE: The developer has deteriorated. 3.1.6 PROBLEM 6: DIRTY BACKGROUND Random "powdered" dots appear, creating a dirty background.
User Guide
Page 68
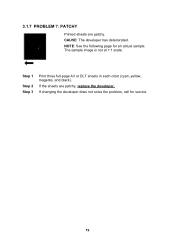
Step 1 Step 2 Step 3 Print three full-page A3 or DLT sheets in each color (cyan, yellow, magenta, and black). If changing the developer does not solve the problem, call for an actual sample. CAUSE: The developer has deteriorated. NOTE: See the following page for service. 19 3.1.7 PROBLEM 7: PATCHY Printed sheets are patchy, replace the developer. If the sheets are patchy. The sample image is not at 1:1 scale.
Step 1 Step 2 Step 3 Print three full-page A3 or DLT sheets in each color (cyan, yellow, magenta, and black). If changing the developer does not solve the problem, call for an actual sample. CAUSE: The developer has deteriorated. NOTE: See the following page for service. 19 3.1.7 PROBLEM 7: PATCHY Printed sheets are patchy, replace the developer. If the sheets are patchy. The sample image is not at 1:1 scale.

User Guide
Page 70
...-002 (Execute Density Adj). CAUSE: The electrical discharge from the charge corona unit is not at 1:1 scale. Print a few sheets. Is the problem solved? 3.1.8 PROBLEM 8: STREAKS (1) Wide streaks appear in the direction of paper feed. The sample image is not constant. Yes Finished! If replacing the charge corona ...unit does not solve the problem, call for an actual sample. NOTE: If you carry out "Execute Density Adj", the machine cleans the charge corona unit. No Replace ...
...-002 (Execute Density Adj). CAUSE: The electrical discharge from the charge corona unit is not at 1:1 scale. Print a few sheets. Is the problem solved? 3.1.8 PROBLEM 8: STREAKS (1) Wide streaks appear in the direction of paper feed. The sample image is not constant. Yes Finished! If replacing the charge corona ...unit does not solve the problem, call for an actual sample. NOTE: If you carry out "Execute Density Adj", the machine cleans the charge corona unit. No Replace ...
User Guide
Page 72
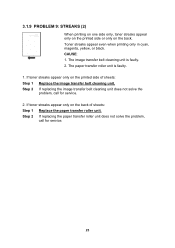
CAUSE: 1. If toner streaks appear only on the back. 3.1.9 PROBLEM 9: STREAKS (2) When printing on one side only, toner streaks appear only on the printed side or only on the printed side of sheets: Step 1 Replace ... image transfer belt cleaning unit. Step 2 If replacing the paper transfer roller unit does not solve the problem, call for service. 23 Step 2 If replacing the image transfer belt cleaning unit does not solve the problem, call for service. 2. The image transfer belt cleaning unit is faulty. 1. The paper transfer roller unit...
CAUSE: 1. If toner streaks appear only on the back. 3.1.9 PROBLEM 9: STREAKS (2) When printing on one side only, toner streaks appear only on the printed side or only on the printed side of sheets: Step 1 Replace ... image transfer belt cleaning unit. Step 2 If replacing the paper transfer roller unit does not solve the problem, call for service. 23 Step 2 If replacing the image transfer belt cleaning unit does not solve the problem, call for service. 2. The image transfer belt cleaning unit is faulty. 1. The paper transfer roller unit...
User Guide
Page 73
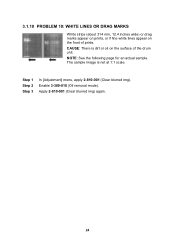
The sample image is dirt or oil on the front of the drum unit. Enable 3-309-010 (Oil removal mode). CAUSE: There is not at 1:1 scale. Step 1 Step 2 Step 3 In [Adjustment] menu, apply 2-810-001 (Clear blurred img). 3.1.10 PROBLEM 10: WHITE LINES OR DRAG MARKS White strips (about 314 mm, 12.4 inches wide) or drag marks appear on prints, or if fine white lines appear on the surface of prints. NOTE: See the following page for an actual sample. Apply 2-810-001 (Clear blurred img) again. 24
The sample image is dirt or oil on the front of the drum unit. Enable 3-309-010 (Oil removal mode). CAUSE: There is not at 1:1 scale. Step 1 Step 2 Step 3 In [Adjustment] menu, apply 2-810-001 (Clear blurred img). 3.1.10 PROBLEM 10: WHITE LINES OR DRAG MARKS White strips (about 314 mm, 12.4 inches wide) or drag marks appear on prints, or if fine white lines appear on the surface of prints. NOTE: See the following page for an actual sample. Apply 2-810-001 (Clear blurred img) again. 24
User Guide
Page 76
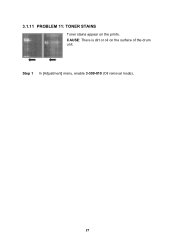
Step 1 In [Adjustment] menu, enable 3-309-010 (Oil removal mode). 27 CAUSE: There is dirt or oil on the prints. 3.1.11 PROBLEM 11: TONER STAINS Toner stains appear on the surface of the drum unit.
Step 1 In [Adjustment] menu, enable 3-309-010 (Oil removal mode). 27 CAUSE: There is dirt or oil on the prints. 3.1.11 PROBLEM 11: TONER STAINS Toner stains appear on the surface of the drum unit.
User Guide
Page 77
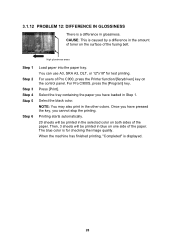
...the other colors. Then, 3 sheets will be printed in blue on the control panel. The blue color is displayed. 28 For users of Pro C900, press the Printer function/[fierydriven] key on one side of the paper. Select the tray containing the paper you have pressed the key, you...the image quality. Once you cannot stop the printing. Select the black color. For Pro C900S, press the [Program] key. High glossiness areas Step 1 Step 2 Step 3 Step 4 Step 5 Step 6 Load paper into the paper tray. 3.1.12 PROBLEM 12: DIFFERENCE IN GLOSSINESS There is caused by a difference in the amount of ...
...the other colors. Then, 3 sheets will be printed in blue on the control panel. The blue color is displayed. 28 For users of Pro C900, press the Printer function/[fierydriven] key on one side of the paper. Select the tray containing the paper you have pressed the key, you...the image quality. Once you cannot stop the printing. Select the black color. For Pro C900S, press the [Program] key. High glossiness areas Step 1 Step 2 Step 3 Step 4 Step 5 Step 6 Load paper into the paper tray. 3.1.12 PROBLEM 12: DIFFERENCE IN GLOSSINESS There is caused by a difference in the amount of ...
User Guide
Page 78
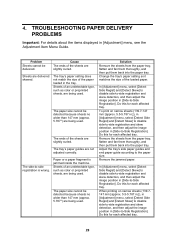
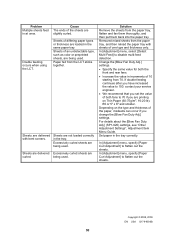
... paper guide according to -Side Registration]. Sheets of the sheets are not adjusted correctly. Remove the jammed paper. TROUBLESHOOTING PAPER DELIVERY PROBLEMS Important: For details about the items displayed in [Side-to -side registration is jammed inside the machine. To print on narrow sheets... wrong. Remove the sheets from the paper tray, flatten and fan them thoroughly, and then put them back into the paper tray. Problem Sheets cannot be detected because sheets no wider than 147 mm (approx. 5.787") are being used . The paper size cannot be delivered...
... paper guide according to -Side Registration]. Sheets of the sheets are not adjusted correctly. Remove the jammed paper. TROUBLESHOOTING PAPER DELIVERY PROBLEMS Important: For details about the items displayed in [Side-to -side registration is jammed inside the machine. To print on narrow sheets... wrong. Remove the sheets from the paper tray, flatten and fan them thoroughly, and then put them back into the paper tray. Problem Sheets cannot be detected because sheets no wider than 147 mm (approx. 5.787") are being used . The paper size cannot be delivered...
User Guide
Page 79
... the same value for both fans to flatten out the sheets. Depending on Thin Paper (60-75g/m2, 16-20 lb), B5 or 5" x 8" and smaller. Problem Multiple sheets feed in the tray correctly. Cause The ends of the sheets are printing on the type and thickness of one type and thickness...
... the same value for both fans to flatten out the sheets. Depending on Thin Paper (60-75g/m2, 16-20 lb), B5 or 5" x 8" and smaller. Problem Multiple sheets feed in the tray correctly. Cause The ends of the sheets are printing on the type and thickness of one type and thickness...


