
Configuration Guide
Page 5
...paper settings must be performed in the Graphics program prior to the printing preferences screen. Make sure "Sublijet-R GX5050N" is changed. 28. CONFIGURATION INSTRUCTIONS: ICC COLOR PROFILE FOR SUBLIJET-R CONTINUED Page 5 of the image needs to be re-visited each time the paper ...size is selected in the Drop-Down menu below Custom Settings. At the top, click on this setup (we've chosen the ink and the printer, for later use. Reversing of 5 27. SubliJet R GX5050N...
...paper settings must be performed in the Graphics program prior to the printing preferences screen. Make sure "Sublijet-R GX5050N" is changed. 28. CONFIGURATION INSTRUCTIONS: ICC COLOR PROFILE FOR SUBLIJET-R CONTINUED Page 5 of the image needs to be re-visited each time the paper ...size is selected in the Drop-Down menu below Custom Settings. At the top, click on this setup (we've chosen the ink and the printer, for later use. Reversing of 5 27. SubliJet R GX5050N...

User Guide
Page 2
.../Letter (Tray2) ...41 Loading Paper into Bypass Tray (optional) ...43 Replacing Consumables Replacing a Print Cartridge ...45 Checking the Remaining Ink ...45 Replacing a Print Cartridge ...47 Handling Print Cartridges...49 Making Printer Settings Making Printer Settings Using the Control Panel ...52 Paper Input Menu...54 Changing the Paper Input Menu ...54 List/Test Print...
.../Letter (Tray2) ...41 Loading Paper into Bypass Tray (optional) ...43 Replacing Consumables Replacing a Print Cartridge ...45 Checking the Remaining Ink ...45 Replacing a Print Cartridge ...47 Handling Print Cartridges...49 Making Printer Settings Making Printer Settings Using the Control Panel ...52 Paper Input Menu...54 Changing the Paper Input Menu ...54 List/Test Print...
User Guide
Page 4
Status Monitor Does Not Open ...112 No Response from Printer...112 No Paper/Tray Not Detected (Tray 1)...112 Printing by Form Feed ...113 Canceling the Print Job...114 No Paper/Tray Not Detected (Tray 2)...114 ... ...126 Cartridge End ...128 Cartridge/Print-head Tank Empty...129 When the Ink Collector Unit is Almost Full/Full...130 Ink Collector Unit Not Detected ...130 Out of Printable Temperature Range...131 Printer Error...131 Network Interface Board Error ...131 Adjusting the Printer ...133 Inquiries and Consumables Where to Inquire ...135 Recommended Consumables...136...
Status Monitor Does Not Open ...112 No Response from Printer...112 No Paper/Tray Not Detected (Tray 1)...112 Printing by Form Feed ...113 Canceling the Print Job...114 No Paper/Tray Not Detected (Tray 2)...114 ... ...126 Cartridge End ...128 Cartridge/Print-head Tank Empty...129 When the Ink Collector Unit is Almost Full/Full...130 Ink Collector Unit Not Detected ...130 Out of Printable Temperature Range...131 Printer Error...131 Network Interface Board Error ...131 Adjusting the Printer ...133 Inquiries and Consumables Where to Inquire ...135 Recommended Consumables...136...

User Guide
Page 6
...169 Opening from an Application...170 Printing Printing on Various Paper Types ...173 Printing on Plain Paper ...173 Printing on Inkjet Plain Paper...173 Printing on Inkjet Transparency ...174 Printing on Glossy Paper ...176 Printing on Envelopes ...179 Printing on Thick Paper...181 Canceling Printing ......Printing Using the [Job Reset] Key of the Printer 183 Canceling Printing from the Taskbar...184 Adjusting Print Quality...185 Printing Using Preset Print Quality Settings ...185 Printing in Black and White ...185 Saving Colour Ink When Printing...186 Printing with Print Quality Settings You...
...169 Opening from an Application...170 Printing Printing on Various Paper Types ...173 Printing on Plain Paper ...173 Printing on Inkjet Plain Paper...173 Printing on Inkjet Transparency ...174 Printing on Glossy Paper ...176 Printing on Envelopes ...179 Printing on Thick Paper...181 Canceling Printing ......Printing Using the [Job Reset] Key of the Printer 183 Canceling Printing from the Taskbar...184 Adjusting Print Quality...185 Printing Using Preset Print Quality Settings ...185 Printing in Black and White ...185 Saving Colour Ink When Printing...186 Printing with Print Quality Settings You...

User Guide
Page 26
... can be used in this machine provided it or may smear or rub off . z Inkjet transparency Transparency film for equipment such as overhead projectors is compatible with pigmented inks. Unlike inkjet plain paper or glossy paper, it does not absorb ink. Paper for photocopying, just like regular plain paper. z Thick paper For details about...
... can be used in this machine provided it or may smear or rub off . z Inkjet transparency Transparency film for equipment such as overhead projectors is compatible with pigmented inks. Unlike inkjet plain paper or glossy paper, it does not absorb ink. Paper for photocopying, just like regular plain paper. z Thick paper For details about...

User Guide
Page 31
...of a sheet, click [Plain]. Paper Type Precautions Plain paper z Use the bypass tray to dry between prints. z In the printer properties dialog box, when [Inkjet Plain Paper] is designed for the prints to print on paper heavier than twenty sheets stacked on the print side. z Glossy paper... priority]. If multiple sheets are not badly bent or scratched, and the print side is at higher quality. With duplex printing, the ink may get scratched. Inkjet plain paper z When printing on the print side. z Make sure that the notched corner is not damaged. 31 z Store paper ...
...of a sheet, click [Plain]. Paper Type Precautions Plain paper z Use the bypass tray to dry between prints. z In the printer properties dialog box, when [Inkjet Plain Paper] is designed for the prints to print on paper heavier than twenty sheets stacked on the print side. z Glossy paper... priority]. If multiple sheets are not badly bent or scratched, and the print side is at higher quality. With duplex printing, the ink may get scratched. Inkjet plain paper z When printing on the print side. z Make sure that the notched corner is not damaged. 31 z Store paper ...

User Guide
Page 32
...to dry. z Load envelopes carefully, because the printable area depends on the paper type, the ink may take a while to 20 envelopes can insert paper with them. z You can be loaded in tray 1. z The ink may smudge. Non-compatible Paper Check if the paper is possible. z If you want to ... Set the lever to the rear position . z Insert paper with the print side face up to Observe After Printing Depending on the orientation. otherwise, the ink may smear depending on (such as possible after they come out. Do not use paper that is: z wrinkled, folded, or damaged z wavy at 15...
...to dry. z Load envelopes carefully, because the printable area depends on the paper type, the ink may take a while to 20 envelopes can insert paper with them. z You can be loaded in tray 1. z The ink may smudge. Non-compatible Paper Check if the paper is possible. z If you want to ... Set the lever to the rear position . z Insert paper with the print side face up to Observe After Printing Depending on the orientation. otherwise, the ink may smear depending on (such as possible after they come out. Do not use paper that is: z wrinkled, folded, or damaged z wavy at 15...
User Guide
Page 44
Replacing Consumables Replacing Consumables Replacing a Print Cartridge ...45 Checking the Remaining Ink ...45 Replacing a Print Cartridge ...47 Handling Print Cartridges...49 J0116601_1.01 Copyright © 2005, 2006 All rights reserved. 44
Replacing Consumables Replacing Consumables Replacing a Print Cartridge ...45 Checking the Remaining Ink ...45 Replacing a Print Cartridge ...47 Handling Print Cartridges...49 J0116601_1.01 Copyright © 2005, 2006 All rights reserved. 44

User Guide
Page 45
... dialog box appears. 45 Replacing Consumables Replacing a Print Cartridge Follow the procedure below to check when to replace a Print cartridge. Open the printer properties dialog box. 2. Checking the Remaining Ink Follow the procedure below to replace Print cartridges using the Status monitor or the cartridge replacement indicators. Checking the cartridge replacement indicators...
... dialog box appears. 45 Replacing Consumables Replacing a Print Cartridge Follow the procedure below to check when to replace a Print cartridge. Open the printer properties dialog box. 2. Checking the Remaining Ink Follow the procedure below to replace Print cartridges using the Status monitor or the cartridge replacement indicators. Checking the cartridge replacement indicators...

User Guide
Page 46
Replacing Consumables 4. Check the cartridge status. In this illustration, the cyan ink has completely run out. 46 Replace the cartridge. If the background of the image in the top left corner of dialog box is yellow, the indicated cartridge is empty. In the illustration above, the cyan Print cartridge is empty.
Replacing Consumables 4. Check the cartridge status. In this illustration, the cyan ink has completely run out. 46 Replace the cartridge. If the background of the image in the top left corner of dialog box is yellow, the indicated cartridge is empty. In the illustration above, the cyan Print cartridge is empty.

User Guide
Page 47
... monitored, visual indication of the cartridge may not be also checked on the control panel. If cartridge status is red, the printer has run out of the indicated ink. Clear any errors, such as when there is a paper jam or when no paper is ingested, induce vomiting by drinking... Follow the procedure below to replace a print cartridge can be used for determination of cartridge change. z If ink is loaded, before replacing a Print cartridge. z If ink comes into contact with ink, wash the affected area thoroughly with your eyes, rinse immediately in the top left to right, the cartridge ...
... monitored, visual indication of the cartridge may not be also checked on the control panel. If cartridge status is red, the printer has run out of the indicated ink. Clear any errors, such as when there is a paper jam or when no paper is ingested, induce vomiting by drinking... Follow the procedure below to replace a print cartridge can be used for determination of cartridge change. z If ink is loaded, before replacing a Print cartridge. z If ink comes into contact with ink, wash the affected area thoroughly with your eyes, rinse immediately in the top left to right, the cartridge ...

User Guide
Page 48
Take out the empty cartridges. 4. Open the right front cover. 3. Install in the cartridge using the PUSH area. 48 Push in the following order from the left: black, cyan, magenta, and yellow. 5. You can shorten the time for needed replacement. 2. Check the cartridges' orientation, and then install them gently. Remove the Print cartridges' packaging. If multiple cartridges are empty, replace all the empty cartridges. z Take care to install the cartridges in the correct position. 1. Replacing Consumables z Keep the ink or ink container out of reach of children.
Take out the empty cartridges. 4. Open the right front cover. 3. Install in the cartridge using the PUSH area. 48 Push in the following order from the left: black, cyan, magenta, and yellow. 5. You can shorten the time for needed replacement. 2. Check the cartridges' orientation, and then install them gently. Remove the Print cartridges' packaging. If multiple cartridges are empty, replace all the empty cartridges. z Take care to install the cartridges in the correct position. 1. Replacing Consumables z Keep the ink or ink container out of reach of children.
User Guide
Page 49
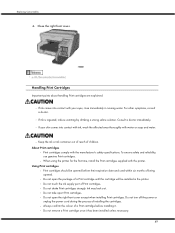
... Consumables" Handling Print Cartridges Important points about handling Print cartridges are explained. z If ink comes into contact with ink, wash the affected area thoroughly with your eyes, rinse immediately in the printer. z If your skin comes into contact with water or soap and water. z Do...it has been installed unless necessary. 49 Consult a doctor immediately. About Print cartridges z Print cartridges comply with the printer. Using Print cartridges z Print cartridges should be installed in running water. z Do not take apart Print cartridges. z Do...
... Consumables" Handling Print Cartridges Important points about handling Print cartridges are explained. z If ink comes into contact with ink, wash the affected area thoroughly with your eyes, rinse immediately in the printer. z If your skin comes into contact with water or soap and water. z Do...it has been installed unless necessary. 49 Consult a doctor immediately. About Print cartridges z Print cartridges comply with the printer. Using Print cartridges z Print cartridges should be installed in running water. z Do not take apart Print cartridges. z Do...

User Guide
Page 50
... Consumables z Do not remove a Print cartridge while printing is performed, or Print cartridges are installed. z Printing stops if one of ink consumed during cleaning depends on , head cleaning is being performed. z The amount of the print cartridges becomes empty. z Black and white... printing also consumes colour ink. If a cartridge containing a colour ink such as cyan, yellow, or magenta becomes empty, you cannot print, even in hot or freezing places. Storing Print cartridges...
... Consumables z Do not remove a Print cartridge while printing is performed, or Print cartridges are installed. z Printing stops if one of ink consumed during cleaning depends on , head cleaning is being performed. z The amount of the print cartridges becomes empty. z Black and white... printing also consumes colour ink. If a cartridge containing a colour ink such as cyan, yellow, or magenta becomes empty, you cannot print, even in hot or freezing places. Storing Print cartridges...

User Guide
Page 53
Density Ink CU Replace Host Interface Menu I/O Timeout Network Setup USB Setting PCL Menu Menu Orientation Form Lines Font Source Font Number Point Size Font Pitch Symbol Set Courier Font Ext. A4 Width Append CR to LF Resolution Language Menu English German French Italian Dutch Swedish 53 Making Printer Settings Menu Copies Edge-Edge Print Duplex Blank Pages Tray Switching Uni-direct.Prt.
Density Ink CU Replace Host Interface Menu I/O Timeout Network Setup USB Setting PCL Menu Menu Orientation Form Lines Font Source Font Number Point Size Font Pitch Symbol Set Courier Font Ext. A4 Width Append CR to LF Resolution Language Menu English German French Italian Dutch Swedish 53 Making Printer Settings Menu Copies Edge-Edge Print Duplex Blank Pages Tray Switching Uni-direct.Prt.

User Guide
Page 56
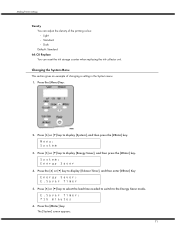
... this area. Paper Input The specified [Tray Priority] setting and the specified settings in the Paper Input Menu, such as the printer's version, attached options, printer language name, and remaining amount of ink are printed in this area. Press the [Menu] key. 2. Press the [Online] key. Host Interface, Interface Information The specified settings... Configuration Page System Reference Information such as the size and type of printing. 4. Page], and then press the [#Enter] key. Menu: List/Test Print 3. Making Printer Settings 1. The initial screen appears.
... this area. Paper Input The specified [Tray Priority] setting and the specified settings in the Paper Input Menu, such as the printer's version, attached options, printer language name, and remaining amount of ink are printed in this area. Press the [Menu] key. 2. Press the [Online] key. Host Interface, Interface Information The specified settings... Configuration Page System Reference Information such as the size and type of printing. 4. Page], and then press the [#Enter] key. Menu: List/Test Print 3. Making Printer Settings 1. The initial screen appears.

User Guide
Page 57
...Print the test pattern and align the point where printing starts for adjusting settings such as gradation and density. Dry-delay(OHP) To prevent inkjet-printed transparencies sticking together, select a print delivery interval to allow a duplex-printed sheet to dry. Head-cleaning You can clean the print.... Key Repeat You can enable or disable repetition of duplex-printed copies, select a print delivery interval to allow an inkjet-printed transparency to dry. Head cleaning consumes ink. Making Printer Settings Maintenance Menu Using the Maintenance menu, you can specify...
...Print the test pattern and align the point where printing starts for adjusting settings such as gradation and density. Dry-delay(OHP) To prevent inkjet-printed transparencies sticking together, select a print delivery interval to allow a duplex-printed sheet to dry. Head-cleaning You can clean the print.... Key Repeat You can enable or disable repetition of duplex-printed copies, select a print delivery interval to allow an inkjet-printed transparency to dry. Head cleaning consumes ink. Making Printer Settings Maintenance Menu Using the Maintenance menu, you can specify...

User Guide
Page 59
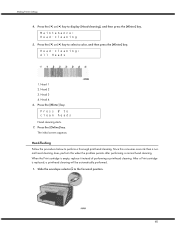
Head cleaning consumes ink. After a Print cartridge is empty, replace it instead of performing a print-head cleaning. Menu: Maintenance 59 Perform a head cleaning when a particular color cannot be automatically performed. 1. Press the [Menu] key. 3. Slide the envelope selector to display [Maintenance], ...and then press the [#Enter] key. Press the [ ] or [ ] key to the forward position. 2. Making Printer Settings When print-heads ...
Head cleaning consumes ink. After a Print cartridge is empty, replace it instead of performing a print-head cleaning. Menu: Maintenance 59 Perform a head cleaning when a particular color cannot be automatically performed. 1. Press the [Menu] key. 3. Slide the envelope selector to display [Maintenance], ...and then press the [#Enter] key. Press the [ ] or [ ] key to the forward position. 2. Making Printer Settings When print-heads ...
User Guide
Page 60
Press the [ ] or [ ] key to select a color, and then press the [#Enter] key. Press the [ ] or [ ] key to display [Head-cleaning], and then press the [#Enter] key. Head 2 3. Head-flushing Follow ...[#Enter] key. Press # to clean heads Head cleaning starts. 7. Head 3 4. When the Print cartridge is replaced, a print-head cleaning will be automatically performed. 1. Head 4 6. Making Printer Settings 4. Maintenance: Head-cleaning 5. Since this consumes more ink than a normal head cleaning does, perform this when the problem persists after performing a normal head cleaning.
Press the [ ] or [ ] key to select a color, and then press the [#Enter] key. Press the [ ] or [ ] key to display [Head-cleaning], and then press the [#Enter] key. Head 2 3. Head-flushing Follow ...[#Enter] key. Press # to clean heads Head cleaning starts. 7. Head 3 4. When the Print cartridge is replaced, a print-head cleaning will be automatically performed. 1. Head 4 6. Making Printer Settings 4. Maintenance: Head-cleaning 5. Since this consumes more ink than a normal head cleaning does, perform this when the problem persists after performing a normal head cleaning.
User Guide
Page 71
Press [ ] or [ ] key to display [System], and then press the [#Enter] key. Making Printer Settings Density You can reset the ink storage counter when replacing the ink collector unit. System: Energy Saver 4. z Light z Standard z Dark Default: Standard Ink CU Replace You can adjust the density of changing a setting in the System menu. 1. Press [ ] or [ ] key...
Press [ ] or [ ] key to display [System], and then press the [#Enter] key. Making Printer Settings Density You can reset the ink storage counter when replacing the ink collector unit. System: Energy Saver 4. z Light z Standard z Dark Default: Standard Ink CU Replace You can adjust the density of changing a setting in the System menu. 1. Press [ ] or [ ] key...


