
User Guide
Page 2
... Epson, Epson Stylus, UltraChrome, and MicroWeave are service marks of this product or unauthorized modifications, repairs, or alterations to this information as applied to strictly comply with these Epson printers. and Epson Preferred and myEpsonPrinter.com are registered trademarks and Epson Exceed... marks. UltraSmooth and Piezo Pro are for any damages or problems arising from the use with Seiko Epson Corporation's operating and maintenance instructions. Epson disclaims any use of Seiko Epson Corporation. Legal Notices Neither Seiko Epson Corporation nor its affiliates shall...
... Epson, Epson Stylus, UltraChrome, and MicroWeave are service marks of this product or unauthorized modifications, repairs, or alterations to this information as applied to strictly comply with these Epson printers. and Epson Preferred and myEpsonPrinter.com are registered trademarks and Epson Exceed... marks. UltraSmooth and Piezo Pro are for any damages or problems arising from the use with Seiko Epson Corporation's operating and maintenance instructions. Epson disclaims any use of Seiko Epson Corporation. Legal Notices Neither Seiko Epson Corporation nor its affiliates shall...
User Guide
Page 5
... 18 Control Panel 19 LCD Display 19 1 Setting Up the Printer Unpacking and Assembling the Printer 21 Unpacking and Assembling the Stand 22 Unpacking the Printer and Mounting It on the Stand 25 Attaching the Paper Basket (Epson Stylus Pro 7700 27 Attaching the Paper Basket (Epson Stylus Pro 9700 34 Completing Setup and Connecting the Power Cord 42 Installing...
... 18 Control Panel 19 LCD Display 19 1 Setting Up the Printer Unpacking and Assembling the Printer 21 Unpacking and Assembling the Stand 22 Unpacking the Printer and Mounting It on the Stand 25 Attaching the Paper Basket (Epson Stylus Pro 7700 27 Attaching the Paper Basket (Epson Stylus Pro 9700 34 Completing Setup and Connecting the Power Cord 42 Installing...
User Guide
Page 6
...the Platen Gap for Thick or Thin Paper 76 Using the Paper Basket 77 Catching Printouts in Front of the Printer 77 Catching Printouts Under the Printer 79 Storing the Paper Basket 81 Optimizing the Settings for Your Paper 82 Creating Paper Configurations 82 Printing Your ...Paper Configurations 84 Selecting Paper Configurations 84 3 Printing With Epson Drivers for Windows Sizing Images for Borderless Printing on Roll Paper 86 ...
...the Platen Gap for Thick or Thin Paper 76 Using the Paper Basket 77 Catching Printouts in Front of the Printer 77 Catching Printouts Under the Printer 79 Storing the Paper Basket 81 Optimizing the Settings for Your Paper 82 Creating Paper Configurations 82 Printing Your ...Paper Configurations 84 Selecting Paper Configurations 84 3 Printing With Epson Drivers for Windows Sizing Images for Borderless Printing on Roll Paper 86 ...
User Guide
Page 11
...Introduction This User's Guide provides important information on setting up and using your printer on a network. Tips contain additional hints on the CD-ROM provides instructions for setting up and using your printer. 11 For additional information, see the following: • The Quick Reference... how to maintain your printer. Attach it working at its best, and provides troubleshooting tips in case you use and printer maintenance-loading paper, replacing ink cartridges and other components, cleaning and aligning the print head, and using the Epson printer drivers, and replacing ink...
...Introduction This User's Guide provides important information on setting up and using your printer on a network. Tips contain additional hints on the CD-ROM provides instructions for setting up and using your printer. 11 For additional information, see the following: • The Quick Reference... how to maintain your printer. Attach it working at its best, and provides troubleshooting tips in case you use and printer maintenance-loading paper, replacing ink cartridges and other components, cleaning and aligning the print head, and using the Epson printer drivers, and replacing ink...

User Guide
Page 13
...your printer in either a stand-alone or peer-to-peer network environment, your system should meet these requirements: • Mac OS® X 10.4.11 or higher 13 If you do not have your service contract, please visit the Ricoh Americas Corporation website at http://www.ricoh-usa... files • Quad-speed (4×) CD-ROM or DVD drive for installing the printer software • For USB connection: a Windows-compliant USB Hi-Speed 2.0 port and a shielded USB "AB" cable from Epson's U.S. For technical support and service-related questions, please contact your local service provider ...
...your printer in either a stand-alone or peer-to-peer network environment, your system should meet these requirements: • Mac OS® X 10.4.11 or higher 13 If you do not have your service contract, please visit the Ricoh Americas Corporation website at http://www.ricoh-usa... files • Quad-speed (4×) CD-ROM or DVD drive for installing the printer software • For USB connection: a Windows-compliant USB Hi-Speed 2.0 port and a shielded USB "AB" cable from Epson's U.S. For technical support and service-related questions, please contact your local service provider ...
User Guide
Page 15
... a photocopier or air control system that comes with other equipment may need more space behind the printer if you use the equipment safely and effectively. • The Epson Stylus Pro 7700 weighs about 186 lb (84.5 kg) and the Epson Stylus Pro 9700 weighs about 256 lb (116 kg) without the stand, paper basket, ink, or paper. You...
... a photocopier or air control system that comes with other equipment may need more space behind the printer if you use the equipment safely and effectively. • The Epson Stylus Pro 7700 weighs about 186 lb (84.5 kg) and the Epson Stylus Pro 9700 weighs about 256 lb (116 kg) without the stand, paper basket, ink, or paper. You...
User Guide
Page 18
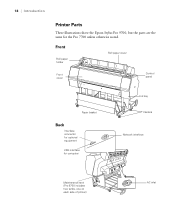
18 | Introduction Printer Parts These illustrations show the Epson Stylus Pro 9700, but the parts are the same for computer Ink bay Casters Network interface Maintenance tank (Pro 9700 includes two tanks, one on each side of printer) 18 AC inlet Front Roll paper holder Roll paper cover Front cover Control panel Paper basket Back Interface connector for optional equipment USB interface for the Pro 7700 unless otherwise noted.
18 | Introduction Printer Parts These illustrations show the Epson Stylus Pro 9700, but the parts are the same for computer Ink bay Casters Network interface Maintenance tank (Pro 9700 includes two tanks, one on each side of printer) 18 AC inlet Front Roll paper holder Roll paper cover Front cover Control panel Paper basket Back Interface connector for optional equipment USB interface for the Pro 7700 unless otherwise noted.
User Guide
Page 21
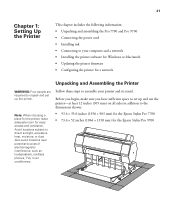
....6 inches (1356 × 903 mm) for the Epson Stylus Pro 7700 • 73.4 × 52 inches (1864 × 1318 mm) for the Epson Stylus Pro 9700 21 Follow these steps to direct sunlight, excessive heat, moisture, or dust. Avoid locations subject to assemble your computer and a network • Installing the printer software for Windows or Macintosh • Updating...
....6 inches (1356 × 903 mm) for the Epson Stylus Pro 7700 • 73.4 × 52 inches (1864 × 1318 mm) for the Epson Stylus Pro 9700 21 Follow these steps to direct sunlight, excessive heat, moisture, or dust. Avoid locations subject to assemble your computer and a network • Installing the printer software for Windows or Macintosh • Updating...
User Guide
Page 22
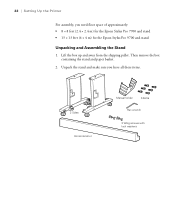
Unpack the stand and make sure you need floor space of approximately: • 8 × 8 feet (2.4 × 2.4 m) for the Epson Stylus Pro 7700 and stand • 13 × 13 feet (4 × 4 m) for the Epson Stylus Pro 9700 and stand Unpacking and Assembling the Stand 1. Then remove the box containing the stand and paper basket. 2. Lift the box up and away from the shipping pallet. 22 | Setting Up the Printer For assembly, you have all these items. 2 Sides Horizontal strut Manual holder 6 Bolts Hex wrench 2 Wing screws with lock washers 22
Unpack the stand and make sure you need floor space of approximately: • 8 × 8 feet (2.4 × 2.4 m) for the Epson Stylus Pro 7700 and stand • 13 × 13 feet (4 × 4 m) for the Epson Stylus Pro 9700 and stand Unpacking and Assembling the Stand 1. Then remove the box containing the stand and paper basket. 2. Lift the box up and away from the shipping pallet. 22 | Setting Up the Printer For assembly, you have all these items. 2 Sides Horizontal strut Manual holder 6 Bolts Hex wrench 2 Wing screws with lock washers 22
User Guide
Page 27
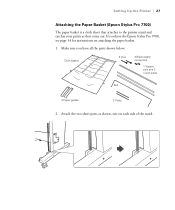
Make sure you have all the parts shown below: Cloth basket 2 Pins 2 Black plastic connectors 1 Square pole and 2 round poles Rod 2 Paper guides 2 Posts 2. If you have the Epson Stylus Pro 9700, see page 34 for instructions on each side of the stand. 27 Attach the two short posts as they come out. Setting Up the Printer | 27 Attaching the Paper Basket (Epson Stylus Pro 7700) The paper basket is a cloth sheet that attaches to the printer stand and catches your prints as shown, one on attaching the paper basket. 1.
Make sure you have all the parts shown below: Cloth basket 2 Pins 2 Black plastic connectors 1 Square pole and 2 round poles Rod 2 Paper guides 2 Posts 2. If you have the Epson Stylus Pro 9700, see page 34 for instructions on each side of the stand. 27 Attach the two short posts as they come out. Setting Up the Printer | 27 Attaching the Paper Basket (Epson Stylus Pro 7700) The paper basket is a cloth sheet that attaches to the printer stand and catches your prints as shown, one on attaching the paper basket. 1.
User Guide
Page 34
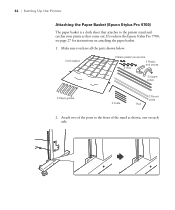
Attach two of the stand as they come out. Make sure you have all the parts shown below. Cloth basket 2 Black plastic connectors 4 Pins 2 Plastic end pieces 3 Square poles 5 Paper guides 4 Posts 2 Round poles Rod 2. If you have the Epson Stylus Pro 7700, see page 27 for instructions on each side. 34 34 | Setting Up the Printer Attaching the Paper Basket (Epson Stylus Pro 9700) The paper basket is a cloth sheet that attaches to the front of the posts to the printer stand and catches your prints as shown, one on attaching the paper basket. 1.
Attach two of the stand as they come out. Make sure you have all the parts shown below. Cloth basket 2 Black plastic connectors 4 Pins 2 Plastic end pieces 3 Square poles 5 Paper guides 4 Posts 2 Round poles Rod 2. If you have the Epson Stylus Pro 7700, see page 27 for instructions on each side. 34 34 | Setting Up the Printer Attaching the Paper Basket (Epson Stylus Pro 9700) The paper basket is a cloth sheet that attaches to the front of the posts to the printer stand and catches your prints as shown, one on attaching the paper basket. 1.
User Guide
Page 56
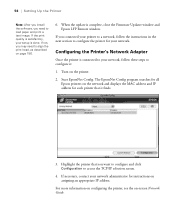
... configure it finds. 3. When the update is connected to your setup is done. For more information on configuring the printer, see the on the printer. 2. The EpsonNet Config program searches for all Epson printers on the network and displays the MAC address and IP address for instructions on assigning an appropriate IP address. If...
... configure it finds. 3. When the update is connected to your setup is done. For more information on configuring the printer, see the on the printer. 2. The EpsonNet Config program searches for all Epson printers on the network and displays the MAC address and IP address for instructions on assigning an appropriate IP address. If...
User Guide
Page 82
...then press r. Press l twice to go back to configure is loaded in your Epson printer software, the driver automatically determines the best settings for your paper. However, you may want to fine-tune how the printer handles various media-especially if you want to the previous menu. 7. Use the...82 Press d or u to 10). Press OK to save the number setting. 4. You can also create paper configurations using the Epson LFP Remote Panel installed from the printer software CD. Then follow these steps: 1. Press r to print the paper thickness pattern. 82 | Handling Paper and Other Media ...
...then press r. Press l twice to go back to configure is loaded in your Epson printer software, the driver automatically determines the best settings for your paper. However, you may want to fine-tune how the printer handles various media-especially if you want to the previous menu. 7. Use the...82 Press d or u to 10). Press OK to save the number setting. 4. You can also create paper configurations using the Epson LFP Remote Panel installed from the printer software CD. Then follow these steps: 1. Press r to print the paper thickness pattern. 82 | Handling Paper and Other Media ...
User Guide
Page 85
85 Chapter 3: Printing With Epson Drivers for Windows Your Epson Stylus Pro 7700 or Pro 9700 comes with drivers and utilities that may become available. Make sure any profiles you print and manage print jobs. Make sure you can use are ...page 141 for instructions. Tip: Check the Epson Pro Imaging website at www.proimaging.epson. You can have installed the Epson driver and utilities from your image correctly. When you can create your own profiles if you have the required hardware and software, or you install the Epson printer driver, the ready-made profiles are included...
85 Chapter 3: Printing With Epson Drivers for Windows Your Epson Stylus Pro 7700 or Pro 9700 comes with drivers and utilities that may become available. Make sure any profiles you print and manage print jobs. Make sure you can use are ...page 141 for instructions. Tip: Check the Epson Pro Imaging website at www.proimaging.epson. You can have installed the Epson driver and utilities from your image correctly. When you can create your own profiles if you have the required hardware and software, or you install the Epson printer driver, the ready-made profiles are included...
User Guide
Page 111
... and set up the printer in the Printer Setup Utility. 111 Chapter 4: Printing With Epson Drivers for Macintosh Your Epson Stylus Pro 7700 or Pro 9700 comes with drivers and utilities that may become available. Tip: Check the Epson Pro Imaging website at www.proimaging.epson. For instructions on page...11, you have them created by a color specialist. If you can have installed the Epson printer driver and utilities from your operating system. When you install the Epson printer driver, the ready-made profiles are automatically copied to use color management features in Adobe®...
... and set up the printer in the Printer Setup Utility. 111 Chapter 4: Printing With Epson Drivers for Macintosh Your Epson Stylus Pro 7700 or Pro 9700 comes with drivers and utilities that may become available. Tip: Check the Epson Pro Imaging website at www.proimaging.epson. For instructions on page...11, you have them created by a color specialist. If you can have installed the Epson printer driver and utilities from your operating system. When you install the Epson printer driver, the ready-made profiles are automatically copied to use color management features in Adobe®...

User Guide
Page 151
...select Hardware and Sound, and click Printers. Double-click Printers and Faxes. Select your Applications folder. For more information about the Printer Status menu, see page 217. See page 110 to exit the menu. Click the Utility tab. • Mac OS X: Open the EPSON Printer Utility3 in the print job window or... the icon on the printer settings screen. Tip: On a Macintosh, you can right-click it and select any utility you check the levels ...
...select Hardware and Sound, and click Printers. Double-click Printers and Faxes. Select your Applications folder. For more information about the Printer Status menu, see page 217. See page 110 to exit the menu. Click the Utility tab. • Mac OS X: Open the EPSON Printer Utility3 in the print job window or... the icon on the printer settings screen. Tip: On a Macintosh, you can right-click it and select any utility you check the levels ...

User Guide
Page 153
... examine it. • If the pattern looks good, as shown below , run a cleaning cycle as described on page 155. Maintaining and Transporting the Printer | 153 • Windows XP: Click Start and select Control Panel. After the pattern is printed, use at least a 10× eye loupe to...8226; If the nozzles are missing or deflected, as described on the screen. 4. Click the Utility tab. • Mac OS X: Open the EPSON Printer Utility3 in the printer. • If any dots or segments are still clogged after three cleaning cycles, run a cleaning cycle while thick media is clean. You see a...
... examine it. • If the pattern looks good, as shown below , run a cleaning cycle as described on page 155. Maintaining and Transporting the Printer | 153 • Windows XP: Click Start and select Control Panel. After the pattern is printed, use at least a 10× eye loupe to...8226; If the nozzles are missing or deflected, as described on the screen. 4. Click the Utility tab. • Mac OS X: Open the EPSON Printer Utility3 in the printer. • If any dots or segments are still clogged after three cleaning cycles, run a cleaning cycle while thick media is clean. You see a...
User Guide
Page 175
... until the problem is caused by the printer itself, print a status sheet from the control panel. This chapter provides instructions for the following the guidelines in this chapter or check the FAQs at www.proimaging.epson.com for more information. • To... Uninstalling and reinstalling the printer driver Diagnosing Problems The printer includes a number of the suggested solutions in this chapter solve your software for more information. • If you're using the Epson printer driver and Status Monitor utility, check your problem, contact Epson as described under "Where...
... until the problem is caused by the printer itself, print a status sheet from the control panel. This chapter provides instructions for the following the guidelines in this chapter or check the FAQs at www.proimaging.epson.com for more information. • To... Uninstalling and reinstalling the printer driver Diagnosing Problems The printer includes a number of the suggested solutions in this chapter solve your software for more information. • If you're using the Epson printer driver and Status Monitor utility, check your problem, contact Epson as described under "Where...

User Guide
Page 194
.... Open the Applications folder, then the Utilities folder. 2. Select EPSON Printer Software in the program list and click Change/Remove. 2. Windows XP: Click Start > Control Panel > Add or Remove Programs. Select EPSON Printer Software in the program list. Then follow the instructions on page 49... to reinstall your printer software, restart your software. 3. Follow the on-screen instructions to install the software....
.... Open the Applications folder, then the Utilities folder. 2. Select EPSON Printer Software in the program list and click Change/Remove. 2. Windows XP: Click Start > Control Panel > Add or Remove Programs. Select EPSON Printer Software in the program list. Then follow the instructions on page 49... to reinstall your printer software, restart your software. 3. Follow the on-screen instructions to install the software....

Network Guide
Page 8
Features of the Network Interface ❏ Connects your Epson printer using a built-in Ethernet interface, which is called the network interface in this manual, to the network. ❏ Supports multiple protocols, such as TCP/IP ...
Features of the Network Interface ❏ Connects your Epson printer using a built-in Ethernet interface, which is called the network interface in this manual, to the network. ❏ Supports multiple protocols, such as TCP/IP ...


