Manual
Page 8
... Type 125 32 Photo Conductor Unit Type 125 Black/Color 34 Fusing Unit Type 125 38 Intermediate Transfer Unit Type 125 42 4. TABLE OF CONTENTS Trademarks...1 Safety Information 2 Safety During Operation 2 ENERGY STAR Program 6 How to Read This Manual 7 1. Paper and Other Media Paper and Other Media Supported by This Printer 15 Paper Sizes...15 Paper...
... Type 125 32 Photo Conductor Unit Type 125 Black/Color 34 Fusing Unit Type 125 38 Intermediate Transfer Unit Type 125 42 4. TABLE OF CONTENTS Trademarks...1 Safety Information 2 Safety During Operation 2 ENERGY STAR Program 6 How to Read This Manual 7 1. Paper and Other Media Paper and Other Media Supported by This Printer 15 Paper Sizes...15 Paper...
Manual
Page 9
Appendix Moving and Transporting the Printer 75 Moving the Printer ...76 INDEX...77 ii 5. Troubleshooting Error & Status Messages on the Control Panel 53 Printer Does Not Print 62 Other Printing Problems 65 Removing Misfed Paper 69 When "Remove Misfeed A:Internal Path" Appears 69 When "Remove Misfeed B: Fusing Unit" Appears 70 When "Remove Misfeed Y: Paper Tray" Appears 72 When "Remove Misfeed Z: Duplex Unit" Appears 73 6.
Appendix Moving and Transporting the Printer 75 Moving the Printer ...76 INDEX...77 ii 5. Troubleshooting Error & Status Messages on the Control Panel 53 Printer Does Not Print 62 Other Printing Problems 65 Removing Misfed Paper 69 When "Remove Misfeed A:Internal Path" Appears 69 When "Remove Misfeed B: Fusing Unit" Appears 70 When "Remove Misfeed Y: Paper Tray" Appears 72 When "Remove Misfeed Z: Duplex Unit" Appears 73 6.
Manual
Page 13
... than the handle as rain, snow, and so on the right cover when it may cause the unit to cool down can take care that , install the new fusing unit. When installing the new fusing unit, turn off the printer and wait about 30 minutes. R CAUTION: • Do not eat or swallow toner. • Keep toner...
... than the handle as rain, snow, and so on the right cover when it may cause the unit to cool down can take care that , install the new fusing unit. When installing the new fusing unit, turn off the printer and wait about 30 minutes. R CAUTION: • Do not eat or swallow toner. • Keep toner...

Manual
Page 14
... • If you have a cardiac pacemaker or implantable defibrillator, please consult your doctor for at least two people. • When moving the Paper Feed Unit, hold the handles that there is a continuous flow of air. • When pulling the paper tray out, be careful not to sensitive medical implant devices... then lift it could be very hot. • To prevent an injury, this printer should be lifted by at least half an hour. If you do not touch the fusing unit because it slowly. A fire or an electric shock might occur. • Place the machine on the top of the controller ...
... • If you have a cardiac pacemaker or implantable defibrillator, please consult your doctor for at least two people. • When moving the Paper Feed Unit, hold the handles that there is a continuous flow of air. • When pulling the paper tray out, be careful not to sensitive medical implant devices... then lift it could be very hot. • To prevent an injury, this printer should be lifted by at least half an hour. If you do not touch the fusing unit because it slowly. A fire or an electric shock might occur. • Place the machine on the top of the controller ...

Manual
Page 18
Also, by using induction-heating technology in the fusing unit, a short warm-up minimum space. You can print various business documents in full color. The printer also comes with our advanced-technology high-speed controller that allows fast printing and time saving on the total printing time for fast printout when ...
Also, by using induction-heating technology in the fusing unit, a short warm-up minimum space. You can print various business documents in full color. The printer also comes with our advanced-technology high-speed controller that allows fast printing and time saving on the total printing time for fast printout when ...

Manual
Page 19
... is stacked here with the print side down. 2. Upper Left Cover Open this cover when replacing the fusing unit or transfer roller, installing the Duplex Unit, or removing misfed paper. 6. When printing on custom size paper , printer driver settings are required. 7. ZHBH020E 5. Do not block the ventilator as plain paper. Front Cover Open this...
... is stacked here with the print side down. 2. Upper Left Cover Open this cover when replacing the fusing unit or transfer roller, installing the Duplex Unit, or removing misfed paper. 6. When printing on custom size paper , printer driver settings are required. 7. ZHBH020E 5. Do not block the ventilator as plain paper. Front Cover Open this...

Manual
Page 22
... the panel display, replace the indicated color of paper. 4. Duplex Unit (optional for Basic Model Printer) Use to the Printer 1 4 5 6 7 1. ZHBH040E 5. When "Replace Fusing Unit" appears on the panel display, replace this bottle. 13 Transfer Roller When "Replace Fusing Unit" appears on the panel display, replace this unit. 7. Photo Conductor Unit Color/Black When "Replace Color PCU" or "Replace Black PCU" appears...
... the panel display, replace the indicated color of paper. 4. Duplex Unit (optional for Basic Model Printer) Use to the Printer 1 4 5 6 7 1. ZHBH040E 5. When "Replace Fusing Unit" appears on the panel display, replace this bottle. 13 Transfer Roller When "Replace Fusing Unit" appears on the panel display, replace this unit. 7. Photo Conductor Unit Color/Black When "Replace Color PCU" or "Replace Black PCU" appears...

Manual
Page 27
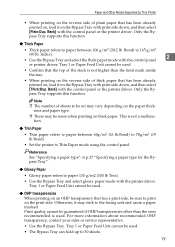
...as described below • Tray 1: Print side facing up • Paper Feed Unit: Print side facing up to 100 sheets. Bond). Confirm that is meant for an ink-jet printer, or it may stick to the fusing unit and cause a paper misfeed. ❒ Set the paper as follows: •... Avoid storing paper in poor print quality, paper misfeeds, or printer damage. Paper and Other Media Paper Recommendations Loading Paper ...
...as described below • Tray 1: Print side facing up • Paper Feed Unit: Print side facing up to 100 sheets. Bond). Confirm that is meant for an ink-jet printer, or it may stick to the fusing unit and cause a paper misfeed. ❒ Set the paper as follows: •... Avoid storing paper in poor print quality, paper misfeeds, or printer damage. Paper and Other Media Paper Recommendations Loading Paper ...
Manual
Page 28
...more information about recommended OHP transparency, contact your sales or service representative. • Use the Bypass Tray. Paper and Other Media Supported by This Printer • When printing on the reverse side of plain paper that has a print side, be sure to print on the print side. Note ... to paper between 106 g/m2 (28.2 lb. This is used . • Confirm that has been already printed on, load it may stick to the fusing unit and cause a paper misfeed. Reference See "Specifying a paper type" or p.27 "Specifying a paper type for the Bypass Tray". ❖ Glossy Paper •...
...more information about recommended OHP transparency, contact your sales or service representative. • Use the Bypass Tray. Paper and Other Media Supported by This Printer • When printing on the reverse side of plain paper that has a print side, be sure to print on the print side. Note ... to paper between 106 g/m2 (28.2 lb. This is used . • Confirm that has been already printed on, load it may stick to the fusing unit and cause a paper misfeed. Reference See "Specifying a paper type" or p.27 "Specifying a paper type for the Bypass Tray". ❖ Glossy Paper •...
Manual
Page 47
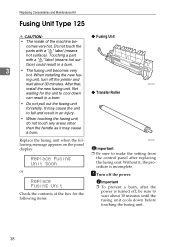
... items: ZHBH590E Important ❒ Be sure to cool down before touching the fusing unit. 38 A Turn off the printer and wait about 30 minutes until the fusing unit cools down ❖ Transfer Roller can result in a burn. • Do not pull out the fusing unit forcefully. Do not touch the parts with a "v" label (means hot surface) could...
... items: ZHBH590E Important ❒ Be sure to cool down before touching the fusing unit. 38 A Turn off the printer and wait about 30 minutes until the fusing unit cools down ❖ Transfer Roller can result in a burn. • Do not pull out the fusing unit forcefully. Do not touch the parts with a "v" label (means hot surface) could...

Manual
Page 48
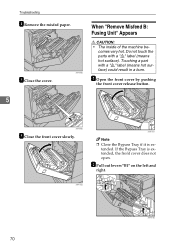
F Take out the new fusing unit from the box. ZHBH220E ZHBH250E 39 G Place the unit as shown, and then insert the new fusing unit slowly. ZHBH230E 3 ZHBP281E C Pinch the connector lever, and then pull out the connector. ZHBH240E H Insert the fusing unit until it clicks, and then check that the unit is locked. Fusing Unit Type 125 B Open the front cover by pushing the front cover release button. E Remove the fusing unit slowly. ZHBH210E D Push the green release buttons on the left and right outwards to unlock the fusing unit.
F Take out the new fusing unit from the box. ZHBH220E ZHBH250E 39 G Place the unit as shown, and then insert the new fusing unit slowly. ZHBH230E 3 ZHBP281E C Pinch the connector lever, and then pull out the connector. ZHBH240E H Insert the fusing unit until it clicks, and then check that the unit is locked. Fusing Unit Type 125 B Open the front cover by pushing the front cover release button. E Remove the fusing unit slowly. ZHBH210E D Push the green release buttons on the left and right outwards to unlock the fusing unit.

Manual
Page 49
... the setting from the control panel. Replace Fusing Unit When "Replace Fusing Unit Soon" ZHBH610E Appears on the Panel Display A Press the {Menu} key. The message disappears and a maintenance reset is on the power. L Hold the green part as shown, and then insert the transfer roller into the printer. 3 ZHBH260E J Turn the green part in...
... the setting from the control panel. Replace Fusing Unit When "Replace Fusing Unit Soon" ZHBH610E Appears on the Panel Display A Press the {Menu} key. The message disappears and a maintenance reset is on the power. L Hold the green part as shown, and then insert the transfer roller into the printer. 3 ZHBH260E J Turn the green part in...

Manual
Page 50
Maintenance: Maint. Wait for a few seconds. Fusing Unit Type 125 3 41 Menu: Maintenance C Press the {U} or {T} key to Reset E Press the {Enter #} key. Fusing Unit: Press # to display "Maint. F Press the {On Line} key. Reset D Press the {U} or {T} key to display "Maintenance", and then press the {Enter #} key. "Ready" appears on the panel display. B Press the {U} or {T} key to display "Fusing Unit", and then press the {Enter #} key. Reset", and then press the {Enter #} key. Maint. Reset Fusing Unit The following message appears.
Maintenance: Maint. Wait for a few seconds. Fusing Unit Type 125 3 41 Menu: Maintenance C Press the {U} or {T} key to Reset E Press the {Enter #} key. Fusing Unit: Press # to display "Maint. F Press the {On Line} key. Reset D Press the {U} or {T} key to display "Maintenance", and then press the {Enter #} key. "Ready" appears on the panel display. B Press the {U} or {T} key to display "Fusing Unit", and then press the {Enter #} key. Reset", and then press the {Enter #} key. Maint. Reset Fusing Unit The following message appears.

Manual
Page 56
..., direct (or indirect) reflected eye contact with a soft, wet cloth that is a risk of sight. If the machine has laser systems, there is wrung out well. R CAUTION: • When removing misfed paper, do not use a neutral detergent, and then wipe over with a soft cloth...shock, explosion or loss of serious eye damage. Important ❒ To avoid deformation, discoloration, or cracking, do not touch the fusing unit because it dry. There is dust or grime inside the printer, wipe with a clean, dry cloth. 47 4. Some parts of the machine are at a high voltage and could be checked,...
..., direct (or indirect) reflected eye contact with a soft, wet cloth that is a risk of sight. If the machine has laser systems, there is wrung out well. R CAUTION: • When removing misfed paper, do not use a neutral detergent, and then wipe over with a soft cloth...shock, explosion or loss of serious eye damage. Important ❒ To avoid deformation, discoloration, or cracking, do not touch the fusing unit because it dry. There is dust or grime inside the printer, wipe with a clean, dry cloth. 47 4. Some parts of the machine are at a high voltage and could be checked,...

Manual
Page 57
... B Press the {U} or {T} key to avoid printer malfunction. appears on the panel display. C Press the {U} or {T} key to dis- ZHBS010E "Menu" appears on the panel display to dis- If the color documents show registration shifting, perform automatic color adjustment. 4 A Press the {Menu} key. Adjusting...Menu: Maintenance Important ❒ Do not turn off the power switch while "Adjusting..." Automatic color adjustment takes about two minutes. Cleaning and Adjusting the Printer Adjusting the Color Registration When the printer is moved, when the Fusing Unit is displayed.
... B Press the {U} or {T} key to avoid printer malfunction. appears on the panel display. C Press the {U} or {T} key to dis- ZHBS010E "Menu" appears on the panel display to dis- If the color documents show registration shifting, perform automatic color adjustment. 4 A Press the {Menu} key. Adjusting...Menu: Maintenance Important ❒ Do not turn off the power switch while "Adjusting..." Automatic color adjustment takes about two minutes. Cleaning and Adjusting the Printer Adjusting the Color Registration When the printer is moved, when the Fusing Unit is displayed.
Manual
Page 66
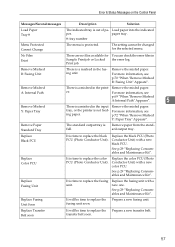
... the selected menu. Remove paper from the standard output tray. Replace Color PCU It is a misfeed in the input tray, or the printer is not feeding paper. fusing unit soon. Remove Misfeed A: Internal Path There is time to replace the color PCU (Photo Conductor Unit). er. Remove Paper Standard Tray The standard output tray is time...
... the selected menu. Remove paper from the standard output tray. Replace Color PCU It is a misfeed in the input tray, or the printer is not feeding paper. fusing unit soon. Remove Misfeed A: Internal Path There is time to replace the color PCU (Photo Conductor Unit). er. Remove Paper Standard Tray The standard output tray is time...
Manual
Page 67
Reset PCU Correctly The black or color PCU is not set correctly or is almost emp- Set the fusing unit correctly. Toner is Almost Empty: Black The black toner is not set. Toner is Almost Empty: Cyan The cyan toner is not set. Replace the... waste toner bottle with a new transfer belt. Set the black or color PCU correctly. See p.29 "Replacing Consumables ...
Reset PCU Correctly The black or color PCU is not set correctly or is almost emp- Set the fusing unit correctly. Toner is Almost Empty: Black The black toner is not set. Toner is Almost Empty: Cyan The cyan toner is not set. Replace the... waste toner bottle with a new transfer belt. Set the black or color PCU correctly. See p.29 "Replacing Consumables ...
Manual
Page 74
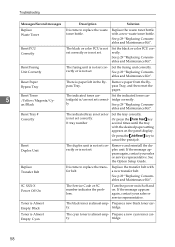
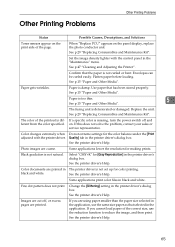
...cut off and on the panel display, replace the photo conductor unit. See the printer driver's Help. When "Replace PCU" appears on . Paper is not curled or bent. Some applications print color files in the printer driver's dialog box. Change the [Dithering] setting in black ...the "Maintenance" menu. Some applications lower the resolution for the color balance under the [Print adjusted with the control panel in the printer driver's dialog box. Images are coarse. Paper gets wrinkles. The fusing unit is deteriorated or damaged. Fine dot pattern does not print. See...
...cut off and on the panel display, replace the photo conductor unit. See the printer driver's Help. When "Replace PCU" appears on . Paper is not curled or bent. Some applications print color files in the printer driver's dialog box. Change the [Dithering] setting in black ...the "Maintenance" menu. Some applications lower the resolution for the color balance under the [Print adjusted with the control panel in the printer driver's dialog box. Images are coarse. Paper gets wrinkles. The fusing unit is deteriorated or damaged. Fine dot pattern does not print. See...
Manual
Page 76
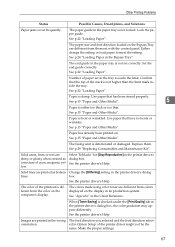
... or damaged. The fusing unit is either too thick or too thin. Replace them set correctly. Solid lines are printed in the tray exceeds the limit. Images are printed as a mixture of cyan, magenta, yellow. ed in the printer driver's dialog box, the color gradation may appear differently...)" for [Gray Reproduction] in the paper tray is different from colors displayed on . Lock the paper guide. Paper has already been printed on the display in the printer driver's dialog lines. The color of the printer driver might not be the same. Make the proper settings. 67...
... or damaged. The fusing unit is either too thick or too thin. Replace them set correctly. Solid lines are printed in the tray exceeds the limit. Images are printed as a mixture of cyan, magenta, yellow. ed in the printer driver's dialog box, the color gradation may appear differently...)" for [Gray Reproduction] in the paper tray is different from colors displayed on . Lock the paper guide. Paper has already been printed on the display in the printer driver's dialog lines. The color of the printer driver might not be the same. Make the proper settings. 67...
Manual
Page 79
ZHBP281E Note ❒ Close the Bypass Tray if it is extended, the front cover does not open. ZHBH080E When "Remove Misfeed B: Fusing Unit" Appears R CAUTION: • The inside of the machine be- Do not touch the parts with a "v" label (means hot surface) could result in a burn. Touching a part ...
ZHBP281E Note ❒ Close the Bypass Tray if it is extended, the front cover does not open. ZHBH080E When "Remove Misfeed B: Fusing Unit" Appears R CAUTION: • The inside of the machine be- Do not touch the parts with a "v" label (means hot surface) could result in a burn. Touching a part ...


