Manual
Page 8
... in the Bypass Tray 24 3. Getting Started Features of this Printer 9 Guide to Take When Cleaning 47 Adjusting the Color Registration 48 Adjusting the Image Density 49 Adjusting the Tray Registration 51 ...Printer Exterior: Rear View 11 Network Standard Model Exterior: Rear View 12 Inside...13 Control Panel ...14 2. TABLE OF CONTENTS Trademarks...1 Safety Information 2 Safety During Operation 2 ENERGY STAR Program 6 How to Read This Manual 7 1. Replacing Consumables and Maintenance Kit Toner Cartridge ...29 Waste Toner Bottle Type 125 32 Photo Conductor Unit Type 125 Black/Color...
... in the Bypass Tray 24 3. Getting Started Features of this Printer 9 Guide to Take When Cleaning 47 Adjusting the Color Registration 48 Adjusting the Image Density 49 Adjusting the Tray Registration 51 ...Printer Exterior: Rear View 11 Network Standard Model Exterior: Rear View 12 Inside...13 Control Panel ...14 2. TABLE OF CONTENTS Trademarks...1 Safety Information 2 Safety During Operation 2 ENERGY STAR Program 6 How to Read This Manual 7 1. Replacing Consumables and Maintenance Kit Toner Cartridge ...29 Waste Toner Bottle Type 125 32 Photo Conductor Unit Type 125 Black/Color...
Manual
Page 13
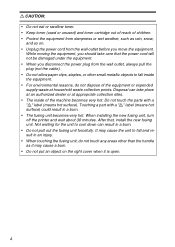
... equipment. • For environmental reasons, do not touch any areas other small metallic objects to fall inside of the equipment or expended supply waste at household waste collection points. Do not touch the parts with a "v" label (means hot surface) could result in an injury. • When touching the...the printer and wait about 30 minutes. Not waiting for the unit to cool down can take care that , install the new fusing unit. Disposal can result in a burn. • Do not pull out the fusing unit forcefully. R CAUTION: • Do not eat or swallow toner. • Keep toner (...
... equipment. • For environmental reasons, do not touch any areas other small metallic objects to fall inside of the equipment or expended supply waste at household waste collection points. Do not touch the parts with a "v" label (means hot surface) could result in an injury. • When touching the...the printer and wait about 30 minutes. Not waiting for the unit to cool down can take care that , install the new fusing unit. Disposal can result in a burn. • Do not pull out the fusing unit forcefully. R CAUTION: • Do not eat or swallow toner. • Keep toner (...
Manual
Page 20
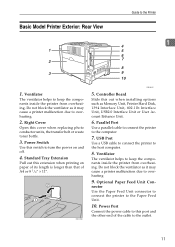
... USB Port Use a USB cable to connect the printer to the Printer Basic Model Printer Exterior: Rear View 1 4 1 5 6 2 7 8 3 9 10 1. Optional Paper Feed Unit Con- Parallel Port Use a parallel cable to connect the printer to the Paper Feed Unit. 10. Do not ...printer malfunction due to keep the components inside the printer from overheating. ZHBH700E ZHBH031E 5. Ventilator The ventilator helps to overheating 9. Do not block the ventilator as it may cause a printer malfunction due to this cover when replacing photo conductor units, the transfer belt or waste toner...
... USB Port Use a USB cable to connect the printer to the Printer Basic Model Printer Exterior: Rear View 1 4 1 5 6 2 7 8 3 9 10 1. Optional Paper Feed Unit Con- Parallel Port Use a parallel cable to connect the printer to the Paper Feed Unit. 10. Do not ...printer malfunction due to keep the components inside the printer from overheating. ZHBH700E ZHBH031E 5. Ventilator The ventilator helps to overheating 9. Do not block the ventilator as it may cause a printer malfunction due to this cover when replacing photo conductor units, the transfer belt or waste toner...
Manual
Page 21
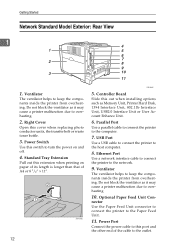
.... 9. Standard Tray Extension Pull out this cover when replacing photo conductor units, the transfer belt or waste toner bottle. 3. Do not block the ventilator as Memory Unit, Printer Hard Disk, 1394 Interface Unit, 802.11b Interface Unit, USB2.0 Interface Unit or User Account Enhance Unit...The ventilator helps to the outlet. nector Use the Paper Feed Unit connector to connect the printer to the computer. 7. Power Switch Use this switch to keep the components inside the printer from overheating. Getting Started Network Standard Model Exterior: Rear View 1 1 2 3 1. Optional...
.... 9. Standard Tray Extension Pull out this cover when replacing photo conductor units, the transfer belt or waste toner bottle. 3. Do not block the ventilator as Memory Unit, Printer Hard Disk, 1394 Interface Unit, 802.11b Interface Unit, USB2.0 Interface Unit or User Account Enhance Unit...The ventilator helps to the outlet. nector Use the Paper Feed Unit connector to connect the printer to the computer. 7. Power Switch Use this switch to keep the components inside the printer from overheating. Getting Started Network Standard Model Exterior: Rear View 1 1 2 3 1. Optional...

Manual
Page 22
..." or "Replace Black PCU" appears on the panel display, replace this unit. 2. When "Replace Waste Toner" appears on both sides of the toner cartridge. Duplex Unit (optional for Basic Model Printer) Use to the Printer 1 4 5 6 7 1. Toner Cartridges When "Add Toner (color)" appears on the panel display, replace this unit. 7. Transfer Belt When "Replace Transfer Belt" appears on the...
..." or "Replace Black PCU" appears on the panel display, replace this unit. 2. When "Replace Waste Toner" appears on both sides of the toner cartridge. Duplex Unit (optional for Basic Model Printer) Use to the Printer 1 4 5 6 7 1. Toner Cartridges When "Add Toner (color)" appears on the panel display, replace this unit. 7. Transfer Belt When "Replace Transfer Belt" appears on the...
Manual
Page 41
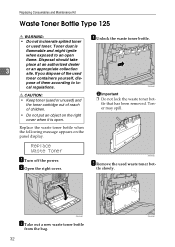
...not put an object on the panel display. ZHBH630E R CAUTION: • Keep toner (used toner containers yourself, dis- Replace Waste Toner A Turn off the power. ZHBH640E E Remove the used toner. cal regulations. Replace the waste toner bottle when the following message appears on the right cover when it is flammable and ...might ignite when exposed to lo- or used waste toner bot- If you dispose of the used or unused) and the toner cartridge out of reach of them according to an open . B Open the right cover. Important...
...not put an object on the panel display. ZHBH630E R CAUTION: • Keep toner (used toner containers yourself, dis- Replace Waste Toner A Turn off the power. ZHBH640E E Remove the used toner. cal regulations. Replace the waste toner bottle when the following message appears on the right cover when it is flammable and ...might ignite when exposed to lo- or used waste toner bot- If you dispose of the used or unused) and the toner cartridge out of reach of them according to an open . B Open the right cover. Important...
Manual
Page 42
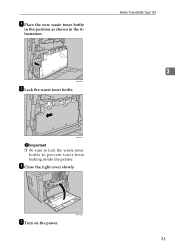
Waste Toner Bottle Type 125 3 ZHBH670E Important ❒ Be sure to lock the waste toner bottle to prevent toner from leaking inside the printer. I Turn on the power. F Place the new waste toner bottle in the position as shown in the illustration. ZHBH660E G Lock the waste toner bottle. H Close the right cover slowly. ZHBH430E 33
Waste Toner Bottle Type 125 3 ZHBH670E Important ❒ Be sure to lock the waste toner bottle to prevent toner from leaking inside the printer. I Turn on the power. F Place the new waste toner bottle in the position as shown in the illustration. ZHBH660E G Lock the waste toner bottle. H Close the right cover slowly. ZHBH430E 33
Manual
Page 51
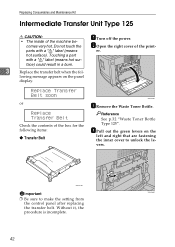
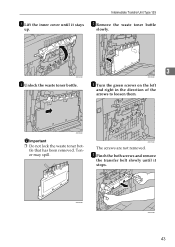
... and Maintenance Kit Intermediate Transfer Unit Type 125 R CAUTION: • The inside of the box for the following items: ❖ Transfer Belt ZHBH290E C Remove the Waste Toner Bottle. Touching a part with a "v" label (means hot surface). er. 3 Replace the transfer belt when the fol- Without it, the procedure is incomplete. 42 comes very... not touch the parts with a "v" label (means hot surface) could result in a burn. D Pull out the green levers on the panel display. Reference See p.32 "Waste Toner Bottle Type 125".
... and Maintenance Kit Intermediate Transfer Unit Type 125 R CAUTION: • The inside of the box for the following items: ❖ Transfer Belt ZHBH290E C Remove the Waste Toner Bottle. Touching a part with a "v" label (means hot surface). er. 3 Replace the transfer belt when the fol- Without it, the procedure is incomplete. 42 comes very... not touch the parts with a "v" label (means hot surface) could result in a burn. D Pull out the green levers on the panel display. Reference See p.32 "Waste Toner Bottle Type 125".
Manual
Page 52
ZHBH630E Important ❒ Do not lock the waste toner bot- ZHBH640E ZHBH530E 43 Toner may spill. ZHBH520E The screws are not removed. tle that has been removed. H Turn the green screws on the left and right in the direction of the arrows to loosen them. G Remove the waste toner bottle slowly. 3 ZHBH310E ZHBH650E F Unlock the waste toner bottle. I Pinch the both screws and remove the transfer belt slowly until it stops. Intermediate Transfer Unit Type 125 E Lift the inner cover until it stays up.
ZHBH630E Important ❒ Do not lock the waste toner bot- ZHBH640E ZHBH530E 43 Toner may spill. ZHBH520E The screws are not removed. tle that has been removed. H Turn the green screws on the left and right in the direction of the arrows to loosen them. G Remove the waste toner bottle slowly. 3 ZHBH310E ZHBH650E F Unlock the waste toner bottle. I Pinch the both screws and remove the transfer belt slowly until it stops. Intermediate Transfer Unit Type 125 E Lift the inner cover until it stays up.
Manual
Page 53
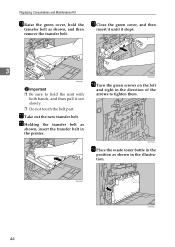
... hands, and then pull it stops. 3 ZHBH920E ZHBH540E Important ❒ Be sure to tighten them. ❒ Do not touch the belt part. ZHBH580E O Place the waste toner bottle in the position as shown, and then remove the transfer belt. L Holding the transfer belt as shown, insert the transfer belt in the illustration... 44 N Turn the green screws on the left and right in the direction of the arrows to hold the transfer belt as shown in the printer. M Close the green cover, and then insert it until it out slowly. K Take out the new transfer belt.
... hands, and then pull it stops. 3 ZHBH920E ZHBH540E Important ❒ Be sure to tighten them. ❒ Do not touch the belt part. ZHBH580E O Place the waste toner bottle in the position as shown, and then remove the transfer belt. L Holding the transfer belt as shown, insert the transfer belt in the illustration... 44 N Turn the green screws on the left and right in the direction of the arrows to hold the transfer belt as shown in the printer. M Close the green cover, and then insert it until it out slowly. K Take out the new transfer belt.
Manual
Page 54
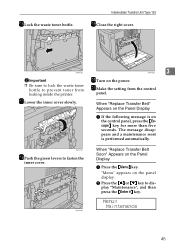
... key. ZHBH420E When "Replace Transfer Belt Soon" Appears on the power. ZHBH670E ZHBH430E 3 Important ❒ Be sure to lock the waste toner bottle to prevent toner from the control panel. Q Lower the inner cover slowly. When "Replace Transfer Belt" Appears on the Panel Display A If the ...maintenance reset is on the panel display. U Make the setting from leaking inside the printer. T Turn on the Panel Display A Press the {Menu} key. Menu: Maintenance 45 "Menu" appears on the control panel, press the {Escape} key for more than five seconds. P Lock the waste toner bottle.
... key. ZHBH420E When "Replace Transfer Belt Soon" Appears on the power. ZHBH670E ZHBH430E 3 Important ❒ Be sure to lock the waste toner bottle to prevent toner from the control panel. Q Lower the inner cover slowly. When "Replace Transfer Belt" Appears on the Panel Display A If the ...maintenance reset is on the panel display. U Make the setting from leaking inside the printer. T Turn on the Panel Display A Press the {Menu} key. Menu: Maintenance 45 "Menu" appears on the control panel, press the {Escape} key for more than five seconds. P Lock the waste toner bottle.
Manual
Page 67
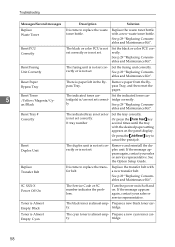
... then reset the paper. tridge correctly. See p.29 "Replacing Consumables and Maintenance Kit". Reset PCU Correctly The black or color PCU is not set correctly or is not set . Replace the waste toner bottle with a new transfer belt. Reset Fusing Unit Correctly The fusing unit is not set correctly or is not set...
... then reset the paper. tridge correctly. See p.29 "Replacing Consumables and Maintenance Kit". Reset PCU Correctly The black or color PCU is not set correctly or is not set . Replace the waste toner bottle with a new transfer belt. Reset Fusing Unit Correctly The fusing unit is not set correctly or is not set...
Manual
Page 84
... during shipment. ❒ If the optional Paper Feed Unit is a precision piece of the Toners, Photo Conductor Units, nor the Waste Toner Bottle to avoid a fire or an electric shock. • When you move them separately. 75 6. Repack the printer in its original packing materials for transporting. Important ❒ Be sure to disconnect all...
... during shipment. ❒ If the optional Paper Feed Unit is a precision piece of the Toners, Photo Conductor Units, nor the Waste Toner Bottle to avoid a fire or an electric shock. • When you move them separately. 75 6. Repack the printer in its original packing materials for transporting. Important ❒ Be sure to disconnect all...
Manual
Page 87
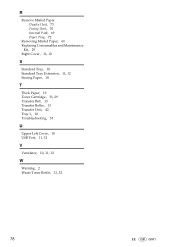
R Remove Misfed Paper Duplex Unit, 73 Fusing Unit, 70 Internal Path, 69 Paper Tray, 72 Removing Misfed Paper, 69 Replacing Consumables and Maintenance Kit, 29 Right Cover, 11, 12 S Standard Tray, 10 Standard Tray Extension, 11, 12 Storing Paper, 18 T Thick Paper, 19 Toner Cartridge, 13, 29 Transfer Belt, 13 Transfer Roller, 13 Transfer Unit, 42 Tray 1, 10 Troubleshooting, 53 U Upper Left Cover, 10 USB Port, 11, 12 V Ventilator, 10, 11, 12 W Warning, 2 Waste Toner Bottle, 13, 32 78 EE GB G081
R Remove Misfed Paper Duplex Unit, 73 Fusing Unit, 70 Internal Path, 69 Paper Tray, 72 Removing Misfed Paper, 69 Replacing Consumables and Maintenance Kit, 29 Right Cover, 11, 12 S Standard Tray, 10 Standard Tray Extension, 11, 12 Storing Paper, 18 T Thick Paper, 19 Toner Cartridge, 13, 29 Transfer Belt, 13 Transfer Roller, 13 Transfer Unit, 42 Tray 1, 10 Troubleshooting, 53 U Upper Left Cover, 10 USB Port, 11, 12 V Ventilator, 10, 11, 12 W Warning, 2 Waste Toner Bottle, 13, 32 78 EE GB G081
Manual
Page 394
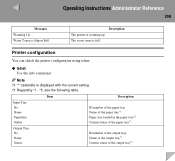
The waste toner is warming up. Waste Toner is Almost Full Description The printer is full. Note ❒ "*" (asterisk) is displayed with the current setting. ❒ Regarding *1 - *5, see the following table. Name PaperSize Status Output Tray No. Printer configuration You can check the printer configuration using telnet. ❖ telnet Use the info command. Name Status Item Description ID...
The waste toner is warming up. Waste Toner is Almost Full Description The printer is full. Note ❒ "*" (asterisk) is displayed with the current setting. ❒ Regarding *1 - *5, see the following table. Name PaperSize Status Output Tray No. Printer configuration You can check the printer configuration using telnet. ❖ telnet Use the info command. Name Status Item Description ID...


