Hardware Guide
Page 5
... Jammed Staples...188 When the Booklet Finisher is Installed...188 When the 2 Tray Finisher is Installed...191 Removing Punch Waste...194 When the Booklet Finisher is Installed...147 7. Replacing the Waste Toner Bottle...132 Replacing the Fusing Unit and Transfer Roller 137 Replacing the Fusing Unit...137 Replacing the Transfer Roller...140 Adding Staples...142 When the...
... Jammed Staples...188 When the Booklet Finisher is Installed...188 When the 2 Tray Finisher is Installed...191 Removing Punch Waste...194 When the Booklet Finisher is Installed...147 7. Replacing the Waste Toner Bottle...132 Replacing the Fusing Unit and Transfer Roller 137 Replacing the Fusing Unit...137 Replacing the Transfer Roller...140 Adding Staples...142 When the...
Hardware Guide
Page 6
...Moving and Transporting the Printer...223 Moving the Printer...223 Consumables...226 Toner...226 Photo Conductor Unit...227 Waste Toner Bottle...227 Staple Cartridge...227 Intermediate Transfer Unit...228 Fusing Unit...228 Specifications...229 ...Mainframe...229 Options...231 INDEX...243 4 Removing Misfed Paper Removing Misfed Paper...197 Paper Misfeed Message (A)...198 Paper Misfeed Message (B)...200 Paper Misfeed Message (C)...202 Paper Misfeed Message (D)...205 Paper Misfeed Message (R)...207 When the Booklet Finisher is Installed...
...Moving and Transporting the Printer...223 Moving the Printer...223 Consumables...226 Toner...226 Photo Conductor Unit...227 Waste Toner Bottle...227 Staple Cartridge...227 Intermediate Transfer Unit...228 Fusing Unit...228 Specifications...229 ...Mainframe...229 Options...231 INDEX...243 4 Removing Misfed Paper Removing Misfed Paper...197 Paper Misfeed Message (A)...198 Paper Misfeed Message (B)...200 Paper Misfeed Message (C)...202 Paper Misfeed Message (D)...205 Paper Misfeed Message (R)...207 When the Booklet Finisher is Installed...
Hardware Guide
Page 15
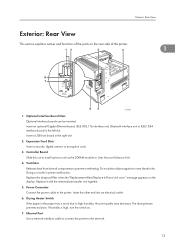
Power Connector Connect the power cable to install options such as the SDRAM module or User Account Enhance Unit. 4. Drying Heater Switch If the paper in printer malfunction. If humidity is moist due to high humidity, the print quality may decrease. Insert a USB host board in... encryption card. 3. Do not place objects against or near these holes. message appears on the rear side of the printer. 1 ATU002S 1. Replace it with the intermediate transfer unit together. 5. Exterior: Rear View Exterior: Rear View This section explains names and functions of the parts on the display...
Power Connector Connect the power cable to install options such as the SDRAM module or User Account Enhance Unit. 4. Drying Heater Switch If the paper in printer malfunction. If humidity is moist due to high humidity, the print quality may decrease. Insert a USB host board in... encryption card. 3. Do not place objects against or near these holes. message appears on the rear side of the printer. 1 ATU002S 1. Replace it with the intermediate transfer unit together. 5. Exterior: Rear View Exterior: Rear View This section explains names and functions of the parts on the display...
Hardware Guide
Page 17
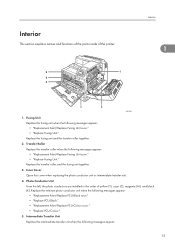
... Fusing Unit soon." • "Replace Fusing Unit." Replace the fusing unit and the transfer roller together. 2. Interior This section explains names and functions of the parts inside of yellow (Y), cyan (C), magenta (M), and black (K). Interior 1 ASZ006S 1. Photo Conductor Unit From the left, the photo conductors are installed in the order of the printer. Fusing Unit Replace the fusing unit when...
... Fusing Unit soon." • "Replace Fusing Unit." Replace the fusing unit and the transfer roller together. 2. Interior This section explains names and functions of the parts inside of yellow (Y), cyan (C), magenta (M), and black (K). Interior 1 ASZ006S 1. Photo Conductor Unit From the left, the photo conductors are installed in the order of the printer. Fusing Unit Replace the fusing unit when...

Hardware Guide
Page 126
... these parts will result in a row, "SC443" appears on the control panel. Reinstall the intermediate transfer unit. Turn off the printer and unplug the power cable. 124 If installation fails three times in burns. • If the intermediate transfer unit is not installed correctly, a message appears on the control panel. Do not touch parts labeled " " (indicating a hot...
... these parts will result in a row, "SC443" appears on the control panel. Reinstall the intermediate transfer unit. Turn off the printer and unplug the power cable. 124 If installation fails three times in burns. • If the intermediate transfer unit is not installed correctly, a message appears on the control panel. Do not touch parts labeled " " (indicating a hot...

Hardware Guide
Page 127
Turn the two green levers counterclockwise. 6 ASZ252S 4. Pulling the handle, slowly open the front cover. ASZ056S 3. Replacing the Intermediate Transfer Unit and Dustproof Filter 2. ASZ295S The intermediate transfer unit is installed as shown below. 125 Holding the left and right side grips, carefully open the inner cover.
Turn the two green levers counterclockwise. 6 ASZ252S 4. Pulling the handle, slowly open the front cover. ASZ056S 3. Replacing the Intermediate Transfer Unit and Dustproof Filter 2. ASZ295S The intermediate transfer unit is installed as shown below. 125 Holding the left and right side grips, carefully open the inner cover.
Hardware Guide
Page 139
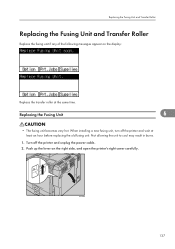
... wait at the same time. When installing a new fusing unit, turn off the printer and unplug the power cable. 2. ATU098S 137 Replacing the Fusing Unit and Transfer Roller Replacing the Fusing Unit and Transfer Roller Replace the fusing unit if any of the following messages appear on the right side, and open the printer's right cover carefully. Push up...
... wait at the same time. When installing a new fusing unit, turn off the printer and unplug the power cable. 2. ATU098S 137 Replacing the Fusing Unit and Transfer Roller Replacing the Fusing Unit and Transfer Roller Replace the fusing unit if any of the following messages appear on the right side, and open the printer's right cover carefully. Push up...
Hardware Guide
Page 174
... and ask your network administrator for intermediate transfer unit installation. Connect failed:IEEE802.11b / Turn power off and re-install the transfer unit. Install the correct board properly. 9 For details, see p.52 "Installing the IEEE 1284 Interface Board" Printer Font Error There are problems with the printer's font file. 172 Parallel I/F Error The printer's self diagnostic test failed due to print...
... and ask your network administrator for intermediate transfer unit installation. Connect failed:IEEE802.11b / Turn power off and re-install the transfer unit. Install the correct board properly. 9 For details, see p.52 "Installing the IEEE 1284 Interface Board" Printer Font Error There are problems with the printer's font file. 172 Parallel I/F Error The printer's self diagnostic test failed due to print...

Hardware Guide
Page 245
... Ethernet Board 43 Glossy Paper 91 Guide to the Printer 11, 13, 15, 17 I IEE 1284 Interface Board 66 IEEE 284 Interface Board 52 IEEE 802.11b Interface Unit 23, 46 Inner Cover 15 Installing Options 21, 23 Interior 15 Intermediate Transfer Unit 15, 228 IP Address 67 J Job Reset Key...INDEX 1000-sheet Paper Feed Unit 23, 30, 97 1284 Interface Board 23 2 tray finisher 23 2000-sheet Paper Feed Unit 23, 30, 105 500-sheet paper feed unit 23, 28, 30, 97 A Adding Staples 142 Adjust printing position 167 Adjusting the Printer Adjusting the color registration 159 Alert Indicator 17...
... Ethernet Board 43 Glossy Paper 91 Guide to the Printer 11, 13, 15, 17 I IEE 1284 Interface Board 66 IEEE 284 Interface Board 52 IEEE 802.11b Interface Unit 23, 46 Inner Cover 15 Installing Options 21, 23 Interior 15 Intermediate Transfer Unit 15, 228 IP Address 67 J Job Reset Key...INDEX 1000-sheet Paper Feed Unit 23, 30, 97 1284 Interface Board 23 2 tray finisher 23 2000-sheet Paper Feed Unit 23, 30, 105 500-sheet paper feed unit 23, 28, 30, 97 A Adding Staples 142 Adjust printing position 167 Adjusting the Printer Adjusting the color registration 159 Alert Indicator 17...

