User Guide
Page 1
For safe and correct use, be sure to the Machine 2 Getting Started 3 Using the Printer Function 4 Using the Copier Function 5 Using the Scanner Function 6 Using the Fax Function 7 Configuring the Machine Using the Control Panel 8 Configuring the Machine Using Web Image Monitor 9 Troubleshooting 10 Maintenance 11 Appendix Read this machine and keep it handy for future reference. User Guide 1 Guide to read "Safety Information" before you use this manual carefully before using the machine.
For safe and correct use, be sure to the Machine 2 Getting Started 3 Using the Printer Function 4 Using the Copier Function 5 Using the Scanner Function 6 Using the Fax Function 7 Configuring the Machine Using the Control Panel 8 Configuring the Machine Using Web Image Monitor 9 Troubleshooting 10 Maintenance 11 Appendix Read this machine and keep it handy for future reference. User Guide 1 Guide to read "Safety Information" before you use this manual carefully before using the machine.
User Guide
Page 13
... information about troubleshooting and basic operations for making photocopies, scanning, and sending faxes. To avoid injury and prevent damage to the machine, be found in User Guide. ❖ User Guide Provides information about general operation and covers the topics listed below. • Installing options • Suitable paper types • Procedures to a computer. ❖ Scanning...
... information about troubleshooting and basic operations for making photocopies, scanning, and sending faxes. To avoid injury and prevent damage to the machine, be found in User Guide. ❖ User Guide Provides information about general operation and covers the topics listed below. • Installing options • Suitable paper types • Procedures to a computer. ❖ Scanning...
User Guide
Page 359
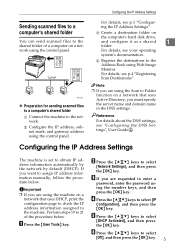
...to the Address Book using the control panel. Perform steps 19 to select [IP Configuration], and then press the {OK} key. A Press the {User Tools} key. D Press the {U}{T} keys to 21 of a computer on the computer's hard disk drive, and configure it as a shared 1 folder...computer's shared folder You can send scanned files to assign IP address information manually, follow the procedure below . For details, see "Configuring the DNS Settings", User Guide . B Press the {U}{T} keys to select [Off], and then press the {OK} key. 3 F Press the {U}{T} keys to select [Network Settings...
...to the Address Book using the control panel. Perform steps 19 to select [IP Configuration], and then press the {OK} key. A Press the {User Tools} key. D Press the {U}{T} keys to 21 of a computer on the computer's hard disk drive, and configure it as a shared 1 folder...computer's shared folder You can send scanned files to assign IP address information manually, follow the procedure below . For details, see "Configuring the DNS Settings", User Guide . B Press the {U}{T} keys to select [Off], and then press the {OK} key. 3 F Press the {U}{T} keys to select [Network Settings...

User Guide
Page 365
...that match the characters you have been scanned, press {2} to scroll the address book. B Place the original on the exposure glass or in color, press the {Color Start} key. D Search for scanning using the control panel is sent via email (Scan to E-mail), to an FTP server (Scan to ...scanned. A Press the {Scanner} key. Reference For details about SMTP and DNS settings, see "Configuring the DNS Settings" and "Configuring the SMTP Settings", User Guide . To scan in black and white, press the {B&W Start} key. ating systems: Windows 2000/XP/Vista, Windows Server 2003/2003 1 R2/2008, or...
...that match the characters you have been scanned, press {2} to scroll the address book. B Place the original on the exposure glass or in color, press the {Color Start} key. D Search for scanning using the control panel is sent via email (Scan to E-mail), to an FTP server (Scan to ...scanned. A Press the {Scanner} key. Reference For details about SMTP and DNS settings, see "Configuring the DNS Settings" and "Configuring the SMTP Settings", User Guide . To scan in black and white, press the {B&W Start} key. ating systems: Windows 2000/XP/Vista, Windows Server 2003/2003 1 R2/2008, or...
User Guide
Page 366
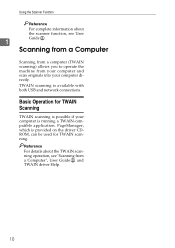
... for TWAIN Scanning TWAIN scanning is possible if your computer directly. Using the Scanner Function Reference For complete information about the TWAIN scanning operation, see User Guide . 1 Scanning from a Computer Scanning from a computer (TWAIN scanning) allows you to operate the machine from a Computer...
... for TWAIN Scanning TWAIN scanning is possible if your computer directly. Using the Scanner Function Reference For complete information about the TWAIN scanning operation, see User Guide . 1 Scanning from a Computer Scanning from a computer (TWAIN scanning) allows you to operate the machine from a Computer...
User Guide
Page 368
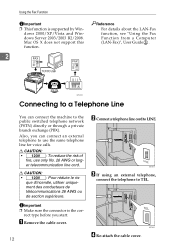
... Win- Mac OS X does not support this function. 2 Reference For details about the LAN-Fax function, see "Using the Fax Function from a Computer (LAN-Fax)", User Guide . A Remove the cable cover. 12 B Connect a telephone line cord to TEL. er telecommunication line cord. BPC400S Connecting to a Telephone Line You can connect an external...
... Win- Mac OS X does not support this function. 2 Reference For details about the LAN-Fax function, see "Using the Fax Function from a Computer (LAN-Fax)", User Guide . A Remove the cable cover. 12 B Connect a telephone line cord to TEL. er telecommunication line cord. BPC400S Connecting to a Telephone Line You can connect an external...
User Guide
Page 372
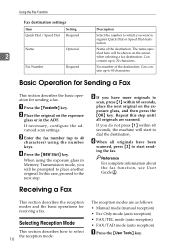
... This section describes the basic operation for receiving a fax. D Press the {B&W Start} key. Reference For complete information about the fax function, see User Guide . A Press the {Facsimile} key. Name of the destination. Can contain up to 40 characters) using the exposure glass in the ADF. C...• Fax Only mode (auto reception) • FAX/TEL mode (auto reception) • FAX/TAD mode (auto reception) A Press the {User Tools} key. When using the number keys. If you will start sending the fax. B Place the original on the exposure glass or in Memory ...
... This section describes the basic operation for receiving a fax. D Press the {B&W Start} key. Reference For complete information about the fax function, see User Guide . A Press the {Facsimile} key. Name of the destination. Can contain up to 40 characters) using the exposure glass in the ADF. C...• Fax Only mode (auto reception) • FAX/TEL mode (auto reception) • FAX/TAD mode (auto reception) A Press the {User Tools} key. When using the number keys. If you will start sending the fax. B Place the original on the exposure glass or in Memory ...
User Guide
Page 377
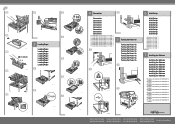
...machine. For more Unpacking Unpacking Unpacking Unpacking Unpacking Unpacking Unpacking Unpacking Unpacking BPC301S BPC302S BPC316S SP C231SF/C232SF BAA460S BPC303S BPC304S BPC305S BPC306S BPC307S BPC308S BPC315S This manual briefly describes the procedure for installing... User Guide in the manuals CD-ROM and the instructions provided on the driver CD-ROM. Quick Installation Guide Quick Installation Guide Quick Installation Guide Quick Installation Guide Quick Installation Guide Quick Installation Guide Quick Installation Guide Quick Installation Guide Quick Installation Guide ...
...machine. For more Unpacking Unpacking Unpacking Unpacking Unpacking Unpacking Unpacking Unpacking Unpacking BPC301S BPC302S BPC316S SP C231SF/C232SF BAA460S BPC303S BPC304S BPC305S BPC306S BPC307S BPC308S BPC315S This manual briefly describes the procedure for installing... User Guide in the manuals CD-ROM and the instructions provided on the driver CD-ROM. Quick Installation Guide Quick Installation Guide Quick Installation Guide Quick Installation Guide Quick Installation Guide Quick Installation Guide Quick Installation Guide Quick Installation Guide Quick Installation Guide ...
User Guide
Page 378
... Setup Initial Setup Initial Setup • For details, see User Guide . • For details, see User Guide . • For details, see User Guide . • For details, see User Guide . • For details, see User Guide . • For details, see User Guide . • For details, see User Guide . • For details, see User Guide . • For details, see User Guide . BAA421S BAA424S Copyright © 2008 GB GB EN USA...
... Setup Initial Setup Initial Setup • For details, see User Guide . • For details, see User Guide . • For details, see User Guide . • For details, see User Guide . • For details, see User Guide . • For details, see User Guide . • For details, see User Guide . • For details, see User Guide . • For details, see User Guide . BAA421S BAA424S Copyright © 2008 GB GB EN USA...
User Guide
Page 386
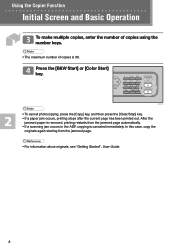
Press the [B&W Start] or [Color Start] key. BPC201S • To cancel photocopying, press the [Copy] key, and then press the [Clear/Stop] key. • If a paper jam occurs, printing stops ... of copies is canceled immediately. After the jammed paper is removed, printing restarts from the jammed page. • For information about originals, see "Getting Started", User Guide. 8 In this case, copy the originals again starting from the jammed page automatically. • If a scanning jam occurs in the ADF, copying is 99...
Press the [B&W Start] or [Color Start] key. BPC201S • To cancel photocopying, press the [Copy] key, and then press the [Clear/Stop] key. • If a paper jam occurs, printing stops ... of copies is canceled immediately. After the jammed paper is removed, printing restarts from the jammed page. • For information about originals, see "Getting Started", User Guide. 8 In this case, copy the originals again starting from the jammed page automatically. • If a scanning jam occurs in the ADF, copying is 99...

User Guide
Page 389
... with text only Photo for originals with photographs only • For more details about the copier function, see "Configuring the Machine Using the Control Panel", User Guide. 11 Press the [Density] key or [ ][ ] keys to change the default settings of the machine, see "Using the Copier Function...", User Guide. • If you would like to select the desired density level, and then press the [OK] key. (Lightest) (Darkest) ❖ Selecting the Document Type You ...
... with text only Photo for originals with photographs only • For more details about the copier function, see "Configuring the Machine Using the Control Panel", User Guide. 11 Press the [Density] key or [ ][ ] keys to change the default settings of the machine, see "Using the Copier Function...", User Guide. • If you would like to select the desired density level, and then press the [OK] key. (Lightest) (Darkest) ❖ Selecting the Document Type You ...
User Guide
Page 390
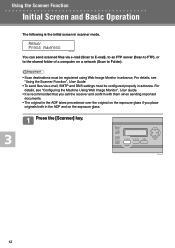
...the shared folder of a computer on the exposure glass. Press the [Scanner] key. For details, see "Configuring the Machine Using Web Image Monitor", User Guide. • It is the initial screen in scanner mode. BPC203S 12 BPC236S You can send scanned files via e-mail, SMTP and DNS settings must... be configured properly in advance. For details, see "Using the Scanner Function", User Guide. • To send files via e-mail (Scan to E-mail), to an FTP server (Scan to FTP), or to Folder). • Scan destinations...
...the shared folder of a computer on the exposure glass. Press the [Scanner] key. For details, see "Configuring the Machine Using Web Image Monitor", User Guide. • It is the initial screen in scanner mode. BPC203S 12 BPC236S You can send scanned files via e-mail, SMTP and DNS settings must... be configured properly in advance. For details, see "Using the Scanner Function", User Guide. • To send files via e-mail (Scan to E-mail), to an FTP server (Scan to FTP), or to Folder). • Scan destinations...
User Guide
Page 392
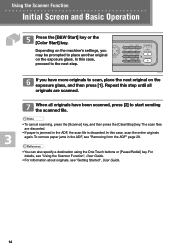
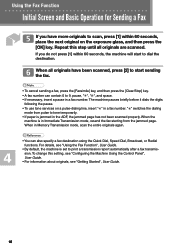
.... • To cancel scanning, press the [Scanner] key, and then press the [Clear/Stop] key. For details, see "Using the Scanner Function", User Guide. • For information about originals, see "Removing from the ADF" page 29. • You can also specify a destination using the One Touch buttons or... jams in the ADF, the scan file is jammed in the ADF, see "Getting Started", User Guide. 14 Using the Scanner Function Initial Screen and Basic Operation Press the [B&W Start] key or the [Color Start] key. The scan files are scanned. In this case, proceed to place another original...
.... • To cancel scanning, press the [Scanner] key, and then press the [Clear/Stop] key. For details, see "Using the Scanner Function", User Guide. • For information about originals, see "Removing from the ADF" page 29. • You can also specify a destination using the One Touch buttons or... jams in the ADF, the scan file is jammed in the ADF, see "Getting Started", User Guide. 14 Using the Scanner Function Initial Screen and Basic Operation Press the [B&W Start] key or the [Color Start] key. The scan files are scanned. In this case, proceed to place another original...
User Guide
Page 393
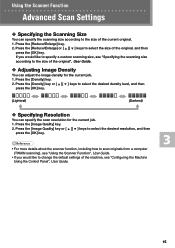
Press the [Reduce/Enlarge] or [ ][ ] keys to the size of the original", User Guide. ❖ Adjusting Image Density You can specify the scan resolution for the current job. 1. If you would like to change the default settings of the ... the [OK] key. • For more details about the scanner function, including how to scan originals from a computer (TWAIN scanning), see "Using the Scanner Function", User Guide. • If you would like to specify a custom scanning size, see "Configuring the Machine Using the Control Panel...
Press the [Reduce/Enlarge] or [ ][ ] keys to the size of the original", User Guide. ❖ Adjusting Image Density You can specify the scan resolution for the current job. 1. If you would like to change the default settings of the ... the [OK] key. • For more details about the scanner function, including how to scan originals from a computer (TWAIN scanning), see "Using the Scanner Function", User Guide. • If you would like to specify a custom scanning size, see "Configuring the Machine Using the Control Panel...
User Guide
Page 396
... scanned. " " switches the dialing mode from the jammed page. Repeat this setting, see "Configuring the Machine Using the Control Panel", User Guide. • For information about originals, see "Using the Fax Function", User Guide. • By default, the machine is jammed in the ADF, the jammed page has not been scanned properly. The machine... If you do not press [1] within 60 seconds, place the next original on a pulse-dialing line, insert " " in a fax number. For details, see "Getting Started", User Guide. 18
... scanned. " " switches the dialing mode from the jammed page. Repeat this setting, see "Configuring the Machine Using the Control Panel", User Guide. • For information about originals, see "Using the Fax Function", User Guide. • By default, the machine is jammed in the ADF, the jammed page has not been scanned properly. The machine... If you do not press [1] within 60 seconds, place the next original on a pulse-dialing line, insert " " in a fax number. For details, see "Getting Started", User Guide. 18

User Guide
Page 397
... small print Photo for originals with images • For more details about the fax function, see "Configuring the Machine Using the Control Panel", User Guide. 19 Press the [Image Quality] key. 2. Normal Dark Light ❖ Specifying Resolution You can adjust the image density for the current job.... 1. Press the [Image Quality] or [ ][ ] keys to change the default settings of the machine, see "Using the Fax Function", User Guide. • If you would like to select the desired resolution setting, and then press the [OK] key. Press the [Density] key. 2. Press ...
... small print Photo for originals with images • For more details about the fax function, see "Configuring the Machine Using the Control Panel", User Guide. 19 Press the [Image Quality] key. 2. Normal Dark Light ❖ Specifying Resolution You can adjust the image density for the current job.... 1. Press the [Image Quality] or [ ][ ] keys to change the default settings of the machine, see "Using the Fax Function", User Guide. • If you would like to select the desired resolution setting, and then press the [OK] key. Press the [Density] key. 2. Press ...
User Guide
Page 398
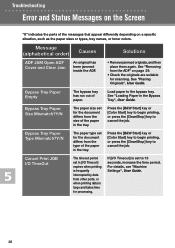
... the time period. Bypass Tray Paper Empty The bypass tray has run out of paper. For details, see "Machine Settings", User Guide. 20 See "Placing Originals", User Gudie. Press the [B&W Start] key or [Color Start] key to begin printing, or press the [Clear/Stop] key to the bypass tray. Troubleshooting Error and Status Messages...
... the time period. Bypass Tray Paper Empty The bypass tray has run out of paper. For details, see "Machine Settings", User Guide. 20 See "Placing Originals", User Gudie. Press the [B&W Start] key or [Color Start] key to begin printing, or press the [Clear/Stop] key to the bypass tray. Troubleshooting Error and Status Messages...
User Guide
Page 400
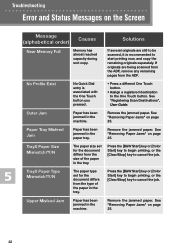
... "Removing Paper Jams" on page 25. Paper Tray Misfeed Jam Paper has been jammed in the tray. Press the [B&W Start] key or [Color Start] key to begin printing, or the [Clear/Stop] key to start printing now, and copy the remaining originals separately. If originals are ...Full Memory has almost reached capacity during sort copy. Remove the jammed paper. Press the [B&W Start] key or [Color Start] key to begin printing, or the [Clear/Stop] key to the One Touch button. See "Registering Scan Destinations", User Guide. Troubleshooting Error and Status Messages on page 25. 22
... "Removing Paper Jams" on page 25. Paper Tray Misfeed Jam Paper has been jammed in the tray. Press the [B&W Start] key or [Color Start] key to begin printing, or the [Clear/Stop] key to start printing now, and copy the remaining originals separately. If originals are ...Full Memory has almost reached capacity during sort copy. Remove the jammed paper. Press the [B&W Start] key or [Color Start] key to begin printing, or the [Clear/Stop] key to the One Touch button. See "Registering Scan Destinations", User Guide. Troubleshooting Error and Status Messages on page 25. 22
User Guide
Page 401
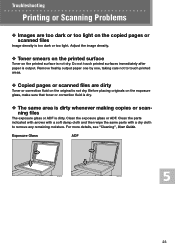
... freshly output paper one by one, taking care not to remove any remaining moisture. Clean the exposure glass or ADF. For more details, see "Cleaning", User Guide. Exposure Glass ADF BAA083S BAA084S 23 Troubleshooting Printing or Scanning Problems ❖ Images are dirty Toner or correction fluid on the printed surface is not...
... freshly output paper one by one, taking care not to remove any remaining moisture. Clean the exposure glass or ADF. For more details, see "Cleaning", User Guide. Exposure Glass ADF BAA083S BAA084S 23 Troubleshooting Printing or Scanning Problems ❖ Images are dirty Toner or correction fluid on the printed surface is not...
User Guide
Page 402
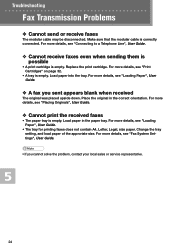
...faxes • The paper tray is empty. Place the original in the paper tray. For more details, see "Connecting to a Telephone Line", User Guide. ❖ Cannot receive faxes even when sending them is possible • A print cartridge is empty. Make sure that the modular cable is ..., Legal, size paper. Change the tray setting, and load paper of the approriate size. For more details, see "Fax System Settings", User Guide. • If you sent appears blank when received The original was placed upside down. Troubleshooting Fax Transmission Problems ❖ Cannot send or ...
...faxes • The paper tray is empty. Place the original in the paper tray. For more details, see "Connecting to a Telephone Line", User Guide. ❖ Cannot receive faxes even when sending them is possible • A print cartridge is empty. Make sure that the modular cable is ..., Legal, size paper. Change the tray setting, and load paper of the approriate size. For more details, see "Fax System Settings", User Guide. • If you sent appears blank when received The original was placed upside down. Troubleshooting Fax Transmission Problems ❖ Cannot send or ...


