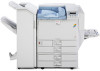
Hardware Guide
Page 9
.... To avoid injury and prevent damage to the machine, be sure to prevent data tampering or unauthorized use of this machine, its software, and its driver. Safety Information Contains information about paper and procedures such as required. Hardware Guide (this manual) Contains information about safe usage of the machine.
.... To avoid injury and prevent damage to the machine, be sure to prevent data tampering or unauthorized use of this machine, its software, and its driver. Safety Information Contains information about paper and procedures such as required. Hardware Guide (this manual) Contains information about safe usage of the machine.

Hardware Guide
Page 12
Installing the Operating Instructions The CD-ROM "Manuals" provided with this case, launch "Setup.exe" in the [Start] menu, select this printer driver, and then click [Uninstall]. Quit all applications currently running. 2. The installer starts. In this printer contains HTML version Operating Instructions. Click [Finish] when the installation ...
Installing the Operating Instructions The CD-ROM "Manuals" provided with this case, launch "Setup.exe" in the [Start] menu, select this printer driver, and then click [Uninstall]. Quit all applications currently running. 2. The installer starts. In this printer contains HTML version Operating Instructions. Click [Finish] when the installation ...
Hardware Guide
Page 33
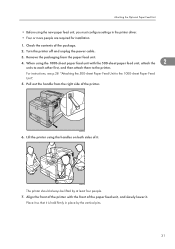
... to the 1000-sheet Paper Feed Unit". 5. Check the contents of the paper feed unit, and slowly lower it is held firmly in the printer driver. • Four or more people are required for installation. 1.
... to the 1000-sheet Paper Feed Unit". 5. Check the contents of the paper feed unit, and slowly lower it is held firmly in the printer driver. • Four or more people are required for installation. 1.
Hardware Guide
Page 37
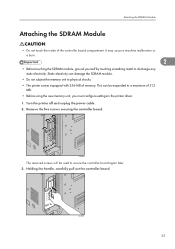
..., ground yourself by touching something metal to a maximum of 512 MB. • Before using the new memory unit, you must configure settings in the printer driver. 1. Remove the five screws securing the controller board. This can damage the SDRAM module. • Do not subject the memory unit to secure the controller...
..., ground yourself by touching something metal to a maximum of 512 MB. • Before using the new memory unit, you must configure settings in the printer driver. 1. Remove the five screws securing the controller board. This can damage the SDRAM module. • Do not subject the memory unit to secure the controller...

Hardware Guide
Page 64
...; A USB cable is now connected to the computer. The Plug and Play screen appears on the left side of the printer. See "Installing the Printer Driver Using USB", Software Guide for details. 62 ATU036S • Connecting the USB cable to the Gigabit Ethernet board USB port Connect the smaller connector of...
...; A USB cable is now connected to the computer. The Plug and Play screen appears on the left side of the printer. See "Installing the Printer Driver Using USB", Software Guide for details. 62 ATU036S • Connecting the USB cable to the Gigabit Ethernet board USB port Connect the smaller connector of...

Hardware Guide
Page 65
USB Cable Connection • "Installing the Printer Driver Using USB", Software Guide • p.43 "Installing the Gigabit Ethernet Board" Digital Camera Connection This printer supports direct printing, which you to print images taken ...
USB Cable Connection • "Installing the Printer Driver Using USB", Software Guide • p.43 "Installing the Gigabit Ethernet Board" Digital Camera Connection This printer supports direct printing, which you to print images taken ...
Hardware Guide
Page 68
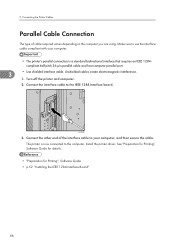
... Printer Cables Parallel Cable Connection The type of the interface cable to the IEEE 1284 interface board. Unshielded cables create electromagnetic interference. 1. Install the printer driver.
... Printer Cables Parallel Cable Connection The type of the interface cable to the IEEE 1284 interface board. Unshielded cables create electromagnetic interference. 1. Install the printer driver.
Hardware Guide
Page 84
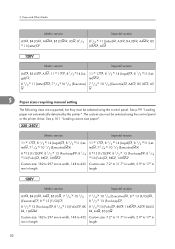
... , B5 JIS , A5 5 Paper sizes requiring manual setting The following sizes are supported, but they must be selected using the control panel or the printer driver. The custom size must be selected using the control panel. See p.101 "Loading custom size paper". Metric version Imperial version 11 17 , 8 1/2 14 (Legal) , 8 1/2 11...
... , B5 JIS , A5 5 Paper sizes requiring manual setting The following sizes are supported, but they must be selected using the control panel or the printer driver. The custom size must be selected using the control panel. See p.101 "Loading custom size paper". Metric version Imperial version 11 17 , 8 1/2 14 (Legal) , 8 1/2 11...
Hardware Guide
Page 85
... for Each Tray A4 8 1/2 11(Letter) • The paper tray guides are supported, but they must be selected using the control panel or the printer driver. Metric version B4 JIS , A4 , B5 JIS , A5 , B6 JIS , 11 17 , 12 18 , 8 1/2 14 (Legal) , 8 1/2 11 (Letter) , 5 1/2 8 1/2 (Half Letter) , 7 1/4 10 1/2 (Ex- If you can...
... for Each Tray A4 8 1/2 11(Letter) • The paper tray guides are supported, but they must be selected using the control panel or the printer driver. Metric version B4 JIS , A4 , B5 JIS , A5 , B6 JIS , 11 17 , 12 18 , 8 1/2 14 (Legal) , 8 1/2 11 (Letter) , 5 1/2 8 1/2 (Half Letter) , 7 1/4 10 1/2 (Ex- If you can...

Hardware Guide
Page 89
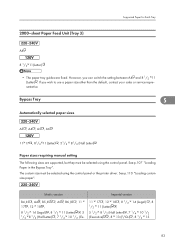
Plain paper Paper thickness Printer setup Printer driver setup Supported paper feeding tray Paper capacity Duplex printing Additional cautions Paper Recommendations 60 to 105g/m2 (16 to 28lb.) • [Plain Paper]: 60 to ....Back] using the bypass tray, make sure paper is not stacked higher than the upper limit mark ( ) inside it. When using control panel or printer driver. 87 Any input tray can be used. • Tray 1 or tray 2: 550 • Tray 3: 550 (500/1000-sheet paper feed unit) or 2000 (2000-sheet...
Plain paper Paper thickness Printer setup Printer driver setup Supported paper feeding tray Paper capacity Duplex printing Additional cautions Paper Recommendations 60 to 105g/m2 (16 to 28lb.) • [Plain Paper]: 60 to ....Back] using the bypass tray, make sure paper is not stacked higher than the upper limit mark ( ) inside it. When using control panel or printer driver. 87 Any input tray can be used. • Tray 1 or tray 2: 550 • Tray 3: 550 (500/1000-sheet paper feed unit) or 2000 (2000-sheet...

Hardware Guide
Page 90
... slower than the paper guides inside the tray. Select [Thick Paper 1] to [Thick Paper 3]. Paper and Other Media Thick paper Paper thickness Printer setup 5 Printer driver setup Supported paper feeding tray Duplex printing Additional cautions 106 to 253 g/m2 • [Thick Paper 1]: 106 to 169 g/m2 (28 to 45 lb.) •... is already printed on, select [Paper Type: XXX] (XXX: Tray 1 to 5, Bypass Tray) [Thick 1:Dup.Back] or [Thick 2:Dup.Back] using control panel or printer driver. 88
... slower than the paper guides inside the tray. Select [Thick Paper 1] to [Thick Paper 3]. Paper and Other Media Thick paper Paper thickness Printer setup 5 Printer driver setup Supported paper feeding tray Duplex printing Additional cautions 106 to 253 g/m2 • [Thick Paper 1]: 106 to 169 g/m2 (28 to 45 lb.) •... is already printed on, select [Paper Type: XXX] (XXX: Tray 1 to 5, Bypass Tray) [Thick 1:Dup.Back] or [Thick 2:Dup.Back] using control panel or printer driver. 88
Hardware Guide
Page 91
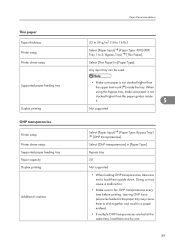
... it. 5 Not supported Select [Paper Input] [Paper Type: Bypass Tray] [OHP transparencies]. Thin paper Paper thickness Printer setup Printer driver setup Supported paper feeding tray Duplex printing OHP transparencies Printer setup Printer driver setup Supported paper feeding tray Paper capacity Duplex printing Additional cautions Paper Recommendations 52 to 59 g/m2 (14 to...
... it. 5 Not supported Select [Paper Input] [Paper Type: Bypass Tray] [OHP transparencies]. Thin paper Paper thickness Printer setup Printer driver setup Supported paper feeding tray Duplex printing OHP transparencies Printer setup Printer driver setup Supported paper feeding tray Paper capacity Duplex printing Additional cautions Paper Recommendations 52 to 59 g/m2 (14 to...
Hardware Guide
Page 92
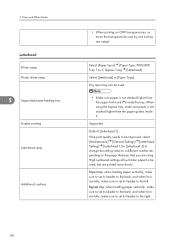
... paper guides inside the tray. Supported Default: [Letterhead 1] If the print quality needs to 5, Bypass Tray) [Letterhead]. Paper and Other Media Letterhead Printer setup Printer driver setup 5 Supported paper feeding tray Duplex printing Letterhead setup Additional cautions • When printing on the paper thickness that you are output. 5.
... paper guides inside the tray. Supported Default: [Letterhead 1] If the print quality needs to 5, Bypass Tray) [Letterhead]. Paper and Other Media Letterhead Printer setup Printer driver setup 5 Supported paper feeding tray Duplex printing Letterhead setup Additional cautions • When printing on the paper thickness that you are output. 5.

Hardware Guide
Page 93
... not stacked higher than the upper limit mark ( ) inside the bypass tray. Label paper Printer setup Printer driver setup Supported paper feeding tray Duplex printing Label paper setup Additional cautions Glossy paper Printer setup Printer driver setup Supported paper feeding tray Paper Recommendations Select [Paper Input] [Paper Type: Bypass Tray] [Label Paper...
... not stacked higher than the upper limit mark ( ) inside the bypass tray. Label paper Printer setup Printer driver setup Supported paper feeding tray Duplex printing Label paper setup Additional cautions Glossy paper Printer setup Printer driver setup Supported paper feeding tray Paper Recommendations Select [Paper Input] [Paper Type: Bypass Tray] [Label Paper...

Hardware Guide
Page 94
... sure paper is not stacked higher than when using . Paper and Other Media Duplex printing Glossy paper setup Additional cautions 5 Coated paper Printer setup Printer driver setup Supported paper feeding tray Duplex printing Coated paper setup 92 stacked higher than the paper guides inside it . Not supported Default: [Coated Paper 1] If...
... sure paper is not stacked higher than when using . Paper and Other Media Duplex printing Glossy paper setup Additional cautions 5 Coated paper Printer setup Printer driver setup Supported paper feeding tray Duplex printing Coated paper setup 92 stacked higher than the paper guides inside it . Not supported Default: [Coated Paper 1] If...

Hardware Guide
Page 95
... depending on the type, select [Coated Paper 5] to [Coated Paper 7]. Additional cautions Special paper Special paper standard Printer setup Printer driver setup Supported paper feeding tray Duplex printing Envelopes Printer setup Printer driver setup Supported paper feeding tray Paper Recommendations per type settings, set special paper. 5 Select [Paper Input] [Paper Type: XXX...
... depending on the type, select [Coated Paper 5] to [Coated Paper 7]. Additional cautions Special paper Special paper standard Printer setup Printer driver setup Supported paper feeding tray Duplex printing Envelopes Printer setup Printer driver setup Supported paper feeding tray Paper Recommendations per type settings, set special paper. 5 Select [Paper Input] [Paper Type: XXX...
Hardware Guide
Page 96
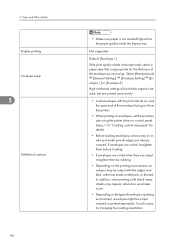
... Setting] [Envelope 1] to be output creased or printed improperly. In addition, when printing solid black areas, streaks may be used, but are using the printer driver or control panel. High numbered settings allow thicker paper to be output with the edges wrinkled, with the print side down, and the open end...
... Setting] [Envelope 1] to be output creased or printed improperly. In addition, when printing solid black areas, streaks may be used, but are using the printer driver or control panel. High numbered settings allow thicker paper to be output with the edges wrinkled, with the print side down, and the open end...
Hardware Guide
Page 98
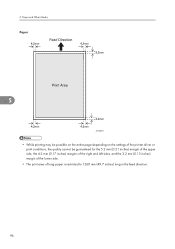
Paper and Other Media Paper 5 ATU087S • While printing may be possible on the entire page depending on the settings of the printer driver or print conditions, the quality cannot be guaranteed for the 5.2 mm (0.21 inches) margin of the upper side, the 4.2 mm (0.17 inches) margins of the right and left sides, and the 3.2 mm (0.13 inches) margin of the lower side. • The print area of long paper is restricted to 1260 mm (49.7 inches) long in the feed direction. 96 5.
Paper and Other Media Paper 5 ATU087S • While printing may be possible on the entire page depending on the settings of the printer driver or print conditions, the quality cannot be guaranteed for the 5.2 mm (0.21 inches) margin of the upper side, the 4.2 mm (0.17 inches) margins of the right and left sides, and the 3.2 mm (0.13 inches) margin of the lower side. • The print area of long paper is restricted to 1260 mm (49.7 inches) long in the feed direction. 96 5.
Hardware Guide
Page 103
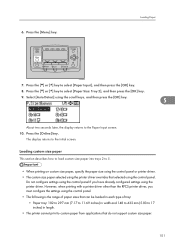
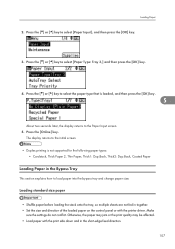
... to 5. • When printing on custom size paper, specify the paper size using the control panel or printer driver. • The custom size paper selected using the printer driver overrides that selected using the scroll keys, and then press the [OK] key. 5 About two seconds later,... not configure settings using the control panel if you must configure the settings using the printer driver. Press the [Online] key. However, when printing with a printer driver other than the RPCS printer driver, you have already configured settings using the control panel. • The following is the ...
... to 5. • When printing on custom size paper, specify the paper size using the control panel or printer driver. • The custom size paper selected using the printer driver overrides that selected using the scroll keys, and then press the [OK] key. 5 About two seconds later,... not configure settings using the control panel if you must configure the settings using the printer driver. Press the [Online] key. However, when printing with a printer driver other than the RPCS printer driver, you have already configured settings using the control panel. • The following is the ...
Hardware Guide
Page 109
... the print side down and in together. • Set the size and direction of the loaded paper on the control panel or with the printer driver. Press the [ ] or [ ] key to select [Paper Type: Tray 3,] and then press the [OK] key. 4.
... the print side down and in together. • Set the size and direction of the loaded paper on the control panel or with the printer driver. Press the [ ] or [ ] key to select [Paper Type: Tray 3,] and then press the [OK] key. 4.


