Software Installation Guide
Page 9
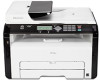
...following instructions. (1) Configuring the Machine Settings to Obtain an IPv4 Address Automatically [Network Quick Install (DHCP)] (2) Configuring the Machine's IPv4 Address Manually [Network Quick Install (Fixed IP)] (3) Configuring the Machine Settings to launch Web Image Monitor, see "Changing the IP Address Settings Using the Control Panel (SP 202SN/203SFN/204SFN/204SN only)". • In an IPv6 environment, specify an IP address using the control panel before installing the driver. Turn on the type and method of IP address configuration selected in the User Guide . CFT052...
...following instructions. (1) Configuring the Machine Settings to Obtain an IPv4 Address Automatically [Network Quick Install (DHCP)] (2) Configuring the Machine's IPv4 Address Manually [Network Quick Install (Fixed IP)] (3) Configuring the Machine Settings to launch Web Image Monitor, see "Changing the IP Address Settings Using the Control Panel (SP 202SN/203SFN/204SFN/204SN only)". • In an IPv6 environment, specify an IP address using the control panel before installing the driver. Turn on the type and method of IP address configuration selected in the User Guide . CFT052...

Software Installation Guide
Page 14
Enter the machine's IPv4 address using the number keys. Specify the subnet mask and default gateway address as required in all fields, and then press the [OK] key. When this setting, the machine automatically reboots itself . • For details about configuring the IPv6 address, see the User Guide . • You cannot configure the network settings while the machine is operating (printing, receiving a fax, etc.). Press the [ ] or [ ] key to select [IP Address] , and then press the...
Enter the machine's IPv4 address using the number keys. Specify the subnet mask and default gateway address as required in all fields, and then press the [OK] key. When this setting, the machine automatically reboots itself . • For details about configuring the IPv6 address, see the User Guide . • You cannot configure the network settings while the machine is operating (printing, receiving a fax, etc.). Press the [ ] or [ ] key to select [IP Address] , and then press the...
User Guide
Page 4
... Copier Mode Screen...49 Basic Operation...50 Canceling a Copy...51 Making Enlarged or Reduced Copies...52 Specifying Reduce/Enlarge...53 Combining Multiple Pages...54 Specifying Combine for Copying...55 Copying Both Sides of an ID Card onto One Side of Sheets...44 Canceling a Print Job...45 If a Paper Mismatch Occurs...47 Continuing Printing Using Mismatched Paper 47 Resetting the Print Job...47 4. Printing Documents Basic Operation...43 Printing on the Exposure Glass 41 Placing Originals in the Auto Document Feeder 41 3. Specifying Paper Type and Paper Size Using Control Panel...
... Copier Mode Screen...49 Basic Operation...50 Canceling a Copy...51 Making Enlarged or Reduced Copies...52 Specifying Reduce/Enlarge...53 Combining Multiple Pages...54 Specifying Combine for Copying...55 Copying Both Sides of an ID Card onto One Side of Sheets...44 Canceling a Print Job...45 If a Paper Mismatch Occurs...47 Continuing Printing Using Mismatched Paper 47 Resetting the Print Job...47 4. Printing Documents Basic Operation...43 Printing on the Exposure Glass 41 Placing Originals in the Auto Document Feeder 41 3. Specifying Paper Type and Paper Size Using Control Panel...
User Guide
Page 6
...Cleaning the Inside of Report...123 Printer Features Settings...125 Network Settings...126 8. Configuring the Machine Using the Control Panel Basic Operation...103 Copier Features Settings...104 Fax Features Settings...107 Scanner Features Settings...113 Address Book Settings...116 System Settings...117 Printing Lists/Reports...123 Printing the Configuration Page...123 Types of the Machine...148 Cleaning the Exposure Glass...149 Cleaning the Auto Document Feeder...150 10. Troubleshooting Common Problems...151 Paper Feed Problems...152 4 Configuring the Machine Using Utilities Using Web Image...
...Cleaning the Inside of Report...123 Printer Features Settings...125 Network Settings...126 8. Configuring the Machine Using the Control Panel Basic Operation...103 Copier Features Settings...104 Fax Features Settings...107 Scanner Features Settings...113 Address Book Settings...116 System Settings...117 Printing Lists/Reports...123 Printing the Configuration Page...123 Types of the Machine...148 Cleaning the Exposure Glass...149 Cleaning the Auto Document Feeder...150 10. Troubleshooting Common Problems...151 Paper Feed Problems...152 4 Configuring the Machine Using Utilities Using Web Image...

User Guide
Page 20
... turned on -hook dialing. 5. [User Tools] Key Press to display the menu for configuring the machine's system settings. 6. [OK] Key Use this key to cancel or stop a print job, document copying, scanning, fax transmission/reception, and other errors occur. Scroll Keys Press these keys to enter numerical values when specifying settings such as fax numbers and copy quantities, or enter letters when specifying names. 18 1. It flashes when a print job is received and while printing, scanning, or fax transmission/reception is in fax mode, use this key to switch the machine...
... turned on -hook dialing. 5. [User Tools] Key Press to display the menu for configuring the machine's system settings. 6. [OK] Key Use this key to cancel or stop a print job, document copying, scanning, fax transmission/reception, and other errors occur. Scroll Keys Press these keys to enter numerical values when specifying settings such as fax numbers and copy quantities, or enter letters when specifying names. 18 1. It flashes when a print job is received and while printing, scanning, or fax transmission/reception is in fax mode, use this key to switch the machine...
User Guide
Page 22
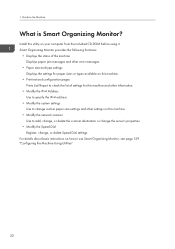
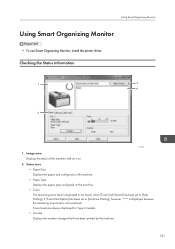
... CD-ROM before using it. Guide to add, change, or delete the scanner destination or change the server's properties. • Modify the Speed Dial Register, change, or delete Speed Dial settings. 1. Smart Organizing Monitor provides the following functions: • Displays the status of the machine Displays paper jam messages and other error messages. • Paper size and type settings Displays the settings for paper sizes or types available on this machine. • Print test and configuration pages Prints List/Report to check the list of settings for this machine and other information...
... CD-ROM before using it. Guide to add, change, or delete the scanner destination or change the server's properties. • Modify the Speed Dial Register, change, or delete Speed Dial settings. 1. Smart Organizing Monitor provides the following functions: • Displays the status of the machine Displays paper jam messages and other error messages. • Paper size and type settings Displays the settings for paper sizes or types available on this machine. • Print test and configuration pages Prints List/Report to check the list of settings for this machine and other information...

User Guide
Page 39
... [ ] or [ ] key to select [Tray 1 Ppr Settings], and then press the [OK] key. To specify the size of paper in the bypass tray, select [Bypass Ppr Settings], and then press the [OK] key. 4. Specifying Paper Type and Paper Size Using Smart Organizing Monitor The procedure in this section is an example based on the operating system you are using. Loading Paper CTT129 2. Specifying a custom paper size 1. Press the [User Tools] key. Press...
... [ ] or [ ] key to select [Tray 1 Ppr Settings], and then press the [OK] key. To specify the size of paper in the bypass tray, select [Bypass Ppr Settings], and then press the [OK] key. 4. Specifying Paper Type and Paper Size Using Smart Organizing Monitor The procedure in this section is an example based on the operating system you are using. Loading Paper CTT129 2. Specifying a custom paper size 1. Press the [User Tools] key. Press...

User Guide
Page 45
... multiple sheets • Printing on both sides of sheets • Not having blank pages printed • Having prints sorted • Saving printer driver settings as a file • Recalling and deleting saved printer properties settings • Printing on a custom size paper • Printing a large paper size document on smaller size paper • Reducing and enlarging a document size • Changing the print resolution • Saving on toner when printing • Changing the dithering pattern • Having text stamped on prints For details about each setting items, click [Help...
... multiple sheets • Printing on both sides of sheets • Not having blank pages printed • Having prints sorted • Saving printer driver settings as a file • Recalling and deleting saved printer properties settings • Printing on a custom size paper • Printing a large paper size document on smaller size paper • Reducing and enlarging a document size • Changing the print resolution • Saving on toner when printing • Changing the dithering pattern • Having text stamped on prints For details about each setting items, click [Help...
User Guide
Page 96
... send. 2. On the [File] menu, click [Print...]. 3. Open the file you can send up to ten pages (including the cover sheet) at a time. 1. Repeat this step to add more destinations. • To enter a fax number directly: Click the [Specify Destination] tab, and enter a fax number (up to 40 digits) in this step to another fax machine, without printing the document. Sending and Receiving a Fax Using the Fax Function from three previously-used address books in the [Address List:], and then click [Set as the printer...
... send. 2. On the [File] menu, click [Print...]. 3. Open the file you can send up to ten pages (including the cover sheet) at a time. 1. Repeat this step to add more destinations. • To enter a fax number directly: Click the [Specify Destination] tab, and enter a fax number (up to 40 digits) in this step to another fax machine, without printing the document. Sending and Receiving a Fax Using the Fax Function from three previously-used address books in the [Address List:], and then click [Set as the printer...

User Guide
Page 97
... FAX driver properties dialog box appears. 3. Double-click the printer icon on the task bar of your computer, depending on a pulse-dialing line, insert "T" in a fax number. Press the [Facsimile] key. 2. To cancel sending a fax, press the [1] key (1: Yes). Configure settings as [Preferences]. On the [File] menu, click [Print...]. 2. Canceling a fax You can contain 0 to 9, "P" (pause), "T" (tone), " ", and " ". • To use tone services on the status of the job. "T" switches the dialing mode from pulse to cancel the fax...
... FAX driver properties dialog box appears. 3. Double-click the printer icon on the task bar of your computer, depending on a pulse-dialing line, insert "T" in a fax number. Press the [Facsimile] key. 2. To cancel sending a fax, press the [1] key (1: Yes). Configure settings as [Preferences]. On the [File] menu, click [Print...]. 2. Canceling a fax You can contain 0 to 9, "P" (pause), "T" (tone), " ", and " ". • To use tone services on the status of the job. "T" switches the dialing mode from pulse to cancel the fax...

User Guide
Page 110
... Print Fax Header Sets the machine to add a header to every fax you manually operate the machine to redial the fax destination automatically when the line is busy or a transmission error occurs. 7. Auto Reduction Sets the machine to reduce the size of a fax number. If further reduction is too large to maximum by 74%. Default: 3 seconds • 1 to fit the fax on a single sheet, it receives incoming calls. Configuring the Machine Using the Control Panel Pause Time Specifies...
... Print Fax Header Sets the machine to add a header to every fax you manually operate the machine to redial the fax destination automatically when the line is busy or a transmission error occurs. 7. Auto Reduction Sets the machine to reduce the size of a fax number. If further reduction is too large to maximum by 74%. Default: 3 seconds • 1 to fit the fax on a single sheet, it receives incoming calls. Configuring the Machine Using the Control Panel Pause Time Specifies...
User Guide
Page 124
...7. Reset Settings • Reset All Settings Resets all fax speed dial entries. 122 Configuring the Machine Using the Control Panel • (Darkest) Toner End Option This setting is not displayed for the language, date and time, and fax Speed Dialing settings. • Clear Address Book Deletes all settings to monitor the toner level. Default: [Stop Printing] • Stop Printing Monitoring the toner level is enabled. The remaining toner level can be checked in the control panel and on the Smart Organizing Monitor. • Continue Printing The machine no messages will...
...7. Reset Settings • Reset All Settings Resets all fax speed dial entries. 122 Configuring the Machine Using the Control Panel • (Darkest) Toner End Option This setting is not displayed for the language, date and time, and fax Speed Dialing settings. • Clear Address Book Deletes all settings to monitor the toner level. Default: [Stop Printing] • Stop Printing Monitoring the toner level is enabled. The remaining toner level can be checked in the control panel and on the Smart Organizing Monitor. • Continue Printing The machine no messages will...

User Guide
Page 136
... is RNP, followed by the MAC address of the active interface board. Select [Disable] to apply a timeout limit if the machine takes longer than the default, the new name cannot begin with the device fails, select 10Mbps Full Duplex, 10Mbps Half Duplex, 100Mbps Full Duplex, or 100Mbps Half Duplex. Configuring the Machine Using Utilities Item I/O timeout (Network) Ethernet Speed Description Select whether or not to manually configure the network settings. 134
... is RNP, followed by the MAC address of the active interface board. Select [Disable] to apply a timeout limit if the machine takes longer than the default, the new name cannot begin with the device fails, select 10Mbps Full Duplex, 10Mbps Half Duplex, 100Mbps Full Duplex, or 100Mbps Half Duplex. Configuring the Machine Using Utilities Item I/O timeout (Network) Ethernet Speed Description Select whether or not to manually configure the network settings. 134
User Guide
Page 139
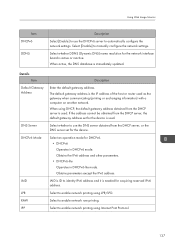
... gateway when communicating (printing or exchanging information) with a computer on another network. Using Web Image Monitor Item DHCPv6 DDNS Description Select [Enable] to use the DNS server obtained from the DHCP server, or the DNS server set for the device is immediately updated. Select [Disable] to enable network printing using DHCP, the default gateway address obtained from the DHCP server is active or inactive. When using Internet Print Protocol. 137 Select to manually configure the network settings.
... gateway when communicating (printing or exchanging information) with a computer on another network. Using Web Image Monitor Item DHCPv6 DDNS Description Select [Enable] to use the DNS server obtained from the DHCP server, or the DNS server set for the device is immediately updated. Select [Disable] to enable network printing using DHCP, the default gateway address obtained from the DHCP server is active or inactive. When using Internet Print Protocol. 137 Select to manually configure the network settings.
User Guide
Page 143
... been printed by the machine. 141 Status area • Paper Size Displays the paper size configured on the machine. • Paper Type Displays the paper type configured on the machine. • Toner The remaining toner level is not monitored. Checking the Status Information 1 3 4 2 CTT014 1. If [Toner End Option] has been set to [Continue Printing], however, "**" is displayed because the remaining toner level is displayed in ten levels, when [Toner End Option] has been set to [Stop Printing]. Toner levels are always displayed for Type 3 models. • Counter Displays the number...
... been printed by the machine. 141 Status area • Paper Size Displays the paper size configured on the machine. • Paper Type Displays the paper type configured on the machine. • Toner The remaining toner level is not monitored. Checking the Status Information 1 3 4 2 CTT014 1. If [Toner End Option] has been set to [Continue Printing], however, "**" is displayed because the remaining toner level is displayed in ten levels, when [Toner End Option] has been set to [Stop Printing]. Toner levels are always displayed for Type 3 models. • Counter Displays the number...
User Guide
Page 168
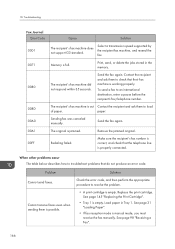
... them is working properly. Redialing failed. Select a transmission speed supported by the recipient fax machine, and resend the fax. Memory is jammed. Contact the recipient and ask them to load of paper. To send a fax to resolve the problem. • A print cartridge is properly connected. Sending fax was canceled manually. Send the fax again. The original is full. Make sure the recipient's fax number is correct, and check that the telephone line is empty. Solution Check the error code, and then...
... them is working properly. Redialing failed. Select a transmission speed supported by the recipient fax machine, and resend the fax. Memory is jammed. Contact the recipient and ask them to load of paper. To send a fax to resolve the problem. • A print cartridge is properly connected. Sending fax was canceled manually. Send the fax again. The original is full. Make sure the recipient's fax number is correct, and check that the telephone line is empty. Solution Check the error code, and then...

User Guide
Page 171
... Legal size paper in the bypass tray. Prepare a new print cartridge. The print cartridge is not busy. • You may need to print on the Control Panel Message Cannot Print Report Change Paper Size Not Set Print Cartridge Out of Toner Print Cartridge Toner Almost Empty Print Cartridge On Hook Cannot Print Remove Bypass Paper Connection Failed Dial Failed Causes An appropriate size paper for example, the area code. 169 If you cannot make calls using the telephone. Press the [ID Card Copy/On Hook Dial] key after, for printing Report is paper loaded in its place. Error...
... Legal size paper in the bypass tray. Prepare a new print cartridge. The print cartridge is not busy. • You may need to print on the Control Panel Message Cannot Print Report Change Paper Size Not Set Print Cartridge Out of Toner Print Cartridge Toner Almost Empty Print Cartridge On Hook Cannot Print Remove Bypass Paper Connection Failed Dial Failed Causes An appropriate size paper for example, the area code. 169 If you cannot make calls using the telephone. Press the [ID Card Copy/On Hook Dial] key after, for printing Report is paper loaded in its place. Error...
User Guide
Page 173
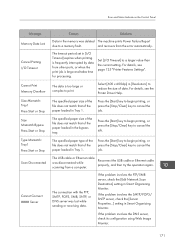
... file does not match that of the paper loaded in the memory was deleted The machine prints Power Failure Report due to cancel the job. If the problem involves the SMTP/POP3/ SNTP server, check the [Server Properties...] setting in Smart Organizing Monitor. If the problem involves the FTP/SMB server, check the [Edit Network Scan Destination] setting in Smart Organizing Monitor. The USB cable or Ethernet cable was lost while sending or receiving data. For details, see the Printer Driver Help...
... file does not match that of the paper loaded in the memory was deleted The machine prints Power Failure Report due to cancel the job. If the problem involves the SMTP/POP3/ SNTP server, check the [Server Properties...] setting in Smart Organizing Monitor. If the problem involves the FTP/SMB server, check the [Edit Network Scan Destination] setting in Smart Organizing Monitor. The USB cable or Ethernet cable was lost while sending or receiving data. For details, see the Printer Driver Help...
User Guide
Page 174
... server, check the [Server Properties...] setting in Smart Organizing Monitor. If the problem involves the FTP server, check the [Edit Network Scan Destination] setting in Smart Organizing Monitor. Failed To Connect #### A connection with the FTP server, SMTP server, SMB server, SNTP server, or USB memory device was lost while sending or receiving data. If the problem involves the SMTP/POP3/ SNTP server, check the [Server Properties...] setting in Smart Organizing Monitor. If the problem involves the USB flash drive, check that it is invalid. Troubleshooting Message...
... server, check the [Server Properties...] setting in Smart Organizing Monitor. If the problem involves the FTP server, check the [Edit Network Scan Destination] setting in Smart Organizing Monitor. Failed To Connect #### A connection with the FTP server, SMTP server, SMB server, SNTP server, or USB memory device was lost while sending or receiving data. If the problem involves the SMTP/POP3/ SNTP server, check the [Server Properties...] setting in Smart Organizing Monitor. If the problem involves the USB flash drive, check that it is invalid. Troubleshooting Message...
User Guide
Page 177
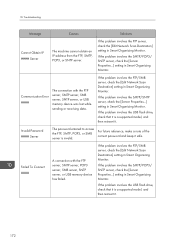
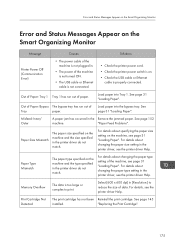
... Remove the jammed paper. For details about changing the paper type setting in the printer driver, see the printer driver Help. Select [600 x 600 dpi] in [Resolution:] to print. For details about specifying the paper size setting on . • Check the USB cable or Ethernet cable is properly connected. Error and Status Messages Appear on the Smart Organizing Monitor Error and Status Messages Appear on the Smart Organizing Monitor Message Causes Solutions Printer Power Off (Communication Error) • The power cable of the machine...
... Remove the jammed paper. For details about changing the paper type setting in the printer driver, see the printer driver Help. Select [600 x 600 dpi] in [Resolution:] to print. For details about specifying the paper size setting on . • Check the USB cable or Ethernet cable is properly connected. Error and Status Messages Appear on the Smart Organizing Monitor Error and Status Messages Appear on the Smart Organizing Monitor Message Causes Solutions Printer Power Off (Communication Error) • The power cable of the machine...


