Software Installation Guide
Page 1
... Guide This manual explains how to install the software over USB and network connections. Selecting the Type and Method of IP Address Configuration (See p.6) 3. Connecting the Computer and Machine (See p.7) 4. After Installing the Software (Checking the IP Address) (See p.12) Network Connection (IPv6 Environment) 1. Quick Install for models SP 200/200S/203S...
... Guide This manual explains how to install the software over USB and network connections. Selecting the Type and Method of IP Address Configuration (See p.6) 3. Connecting the Computer and Machine (See p.7) 4. After Installing the Software (Checking the IP Address) (See p.12) Network Connection (IPv6 Environment) 1. Quick Install for models SP 200/200S/203S...
Software Installation Guide
Page 7
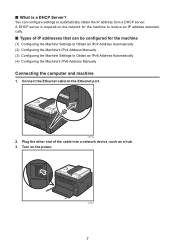
... the machine (1) Configuring the Machine Settings to Obtain an IPv4 Address Automatically (2) Configuring the Machine's IPv4 Address Manually (3) Configuring the Machine Settings to Obtain an IPv6 Address Automatically (4) Configuring the Machine's IPv6 Address Manually Connecting the computer and machine 1. Plug the other end of IP addresses that can configure settings to the...
... the machine (1) Configuring the Machine Settings to Obtain an IPv4 Address Automatically (2) Configuring the Machine's IPv4 Address Manually (3) Configuring the Machine Settings to Obtain an IPv6 Address Automatically (4) Configuring the Machine's IPv6 Address Manually Connecting the computer and machine 1. Plug the other end of IP addresses that can configure settings to the...
Software Installation Guide
Page 9
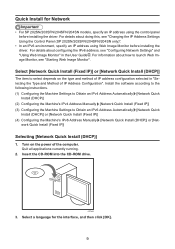
...drive. work Quick Install (Fixed IP)] Selecting [Network Quick Install (DHCP)] 1. Select a language for Network • For SP 202SN/203SFN/204SFN/204SN models, specify an IP address using Web Image Monitor before installing the driver. Install the software according to the following instructions. ...to Obtain an IPv6 Address Automatically [Network Quick Install (DHCP)] or [Network Quick Install (Fixed IP)] (4) Configuring the Machine's IPv6 Address Manually [Network Quick Install (DHCP)] or [Net- Turn on the type and method of IP address configuration selected in the User Guide . ...
...drive. work Quick Install (Fixed IP)] Selecting [Network Quick Install (DHCP)] 1. Select a language for Network • For SP 202SN/203SFN/204SFN/204SN models, specify an IP address using Web Image Monitor before installing the driver. Install the software according to the following instructions. ...to Obtain an IPv6 Address Automatically [Network Quick Install (DHCP)] or [Network Quick Install (Fixed IP)] (4) Configuring the Machine's IPv6 Address Manually [Network Quick Install (DHCP)] or [Net- Turn on the type and method of IP address configuration selected in the User Guide . ...
Software Installation Guide
Page 13
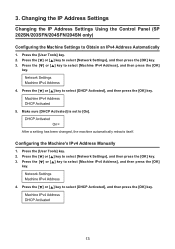
... Address Automatically 1. Changing the IP Address Settings Changing the IP Address Settings Using the Control Panel (SP 202SN/203SFN/204SFN/204SN only) Configuring the Machine Settings to select [Machine IPv4 Address], and then press the [OK] ...key. 4. Press the [ ] or [ ] key to select [Network Settings], and then press the [OK] key. 3. Press the [ ] or [ ] key to select [Machine IPv4 Address], and then press the [OK] key. 4. Configuring the Machine's IPv4 Address Manually...
... Address Automatically 1. Changing the IP Address Settings Changing the IP Address Settings Using the Control Panel (SP 202SN/203SFN/204SFN/204SN only) Configuring the Machine Settings to select [Machine IPv4 Address], and then press the [OK] ...key. 4. Press the [ ] or [ ] key to select [Network Settings], and then press the [OK] key. 3. Press the [ ] or [ ] key to select [Machine IPv4 Address], and then press the [OK] key. 4. Configuring the Machine's IPv4 Address Manually...
Software Installation Guide
Page 16
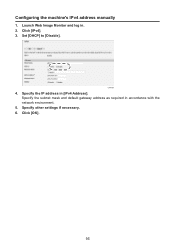
Configuring the machine's IPv4 address manually 1. Launch Web Image Monitor and log in accordance with the network environment. 5. Set [DHCP] to [Disable]. Click [OK]. 16 Specify other settings if necessary. 6. Specify the subnet mask and default gateway address as required in . 2. CTT167 4. Click [IPv4]. 3. Specify the IP address in [IPv4 Address].
Configuring the machine's IPv4 address manually 1. Launch Web Image Monitor and log in accordance with the network environment. 5. Set [DHCP] to [Disable]. Click [OK]. 16 Specify other settings if necessary. 6. Specify the subnet mask and default gateway address as required in . 2. CTT167 4. Click [IPv4]. 3. Specify the IP address in [IPv4 Address].
User Guide
Page 3
.../or Accumulator Symbol (For EU countries only 10 Notes to Users of California...12 ENERGY STAR Program...13 1. TABLE OF CONTENTS How to Read This Manual...6 Introduction...6 Legal Prohibition...6 Disclaimer...6 About IP Address...7 Differences in the State of Facsimile Unit...11 NOTICE TO USERS (NEW ZEALAND)...11 Important Safety Instructions ...12...
.../or Accumulator Symbol (For EU countries only 10 Notes to Users of California...12 ENERGY STAR Program...13 1. TABLE OF CONTENTS How to Read This Manual...6 Introduction...6 Legal Prohibition...6 Disclaimer...6 About IP Address...7 Differences in the State of Facsimile Unit...11 NOTICE TO USERS (NEW ZEALAND)...11 Important Safety Instructions ...12...
User Guide
Page 8
... is meant as a guide only and is generally prohibited by law. If you have backups of the data registered in this manual. Disclaimer Contents of this manual are employed in no event will the manufacturer be responsible for any damage or expense that you always copy or have any documents...recommends that might result from the use of parts other than genuine parts from your office products. Some illustrations or explanations in this manual in the product. 6 Keep this guide may differ from the manufacturer with your product due to improvement or change without prior notice.
... is meant as a guide only and is generally prohibited by law. If you have backups of the data registered in this manual. Disclaimer Contents of this manual are employed in no event will the manufacturer be responsible for any damage or expense that you always copy or have any documents...recommends that might result from the use of parts other than genuine parts from your office products. Some illustrations or explanations in this manual in the product. 6 Keep this guide may differ from the manufacturer with your product due to improvement or change without prior notice.
User Guide
Page 9
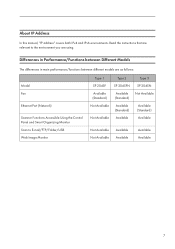
... between Different Models The differences in main performance/functions between different models are using. About IP Address In this manual, "IP address" covers both IPv4 and IPv6 environments. Read the instructions that are relevant to the environment you...Smart Organizing Monitor Scan to E-mail/FTP/Folder/USB Web Image Monitor Type 1 SP 204SF Available (Standard) Not Available Not Available Type 2 SP 204SFN Available (Standard) Available (Standard) Available Type 3 SP 204SN Not Available Available (Standard) Available Not Available Not Available Available Available Available Available...
... between Different Models The differences in main performance/functions between different models are using. About IP Address In this manual, "IP address" covers both IPv4 and IPv6 environments. Read the instructions that are relevant to the environment you...Smart Organizing Monitor Scan to E-mail/FTP/Folder/USB Web Image Monitor Type 1 SP 204SF Available (Standard) Not Available Not Available Type 2 SP 204SFN Available (Standard) Available (Standard) Available Type 3 SP 204SN Not Available Available (Standard) Available Not Available Not Available Available Available Available Available...
User Guide
Page 10
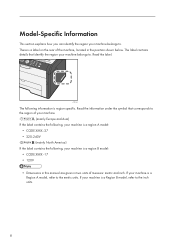
...; 220-240V (mainly North America) If the label contains the following information is a region B model: • CODE XXXX -17 • 120V • Dimensions in this manual are given in two units of the machine, located in the position shown below. The label contains details that corresponds to the region of your...
...; 220-240V (mainly North America) If the label contains the following information is a region B model: • CODE XXXX -17 • 120V • Dimensions in this manual are given in two units of the machine, located in the position shown below. The label contains details that corresponds to the region of your...
User Guide
Page 11
... symbol indicates that this product is produced in accordance with the symbol below. It must not be disposed of products helps to either the User's Manual for this section has been specified in national law on collection and treatment of the consumable. Recycling of separately via the appropriate return and collection...
... symbol indicates that this product is produced in accordance with the symbol below. It must not be disposed of products helps to either the User's Manual for this section has been specified in national law on collection and treatment of the consumable. Recycling of separately via the appropriate return and collection...
User Guide
Page 23
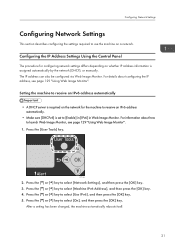
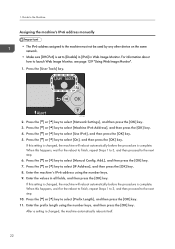
... Settings This section describes configuring the settings required to use the machine on whether IP address information is assigned automatically by the network (DHCP), or manually. Configuring the IP Address Settings Using the Control Panel The procedure for the machine to receive an IPv6 address automatically. • Make sure [DHCPv6] is...
... Settings This section describes configuring the settings required to use the machine on whether IP address information is assigned automatically by the network (DHCP), or manually. Configuring the IP Address Settings Using the Control Panel The procedure for the machine to receive an IPv6 address automatically. • Make sure [DHCPv6] is...
User Guide
Page 24
... using the number keys. 9. If this setting is changed , the machine automatically reboots itself. 22 Guide to the Machine Assigning the machine's IPv6 address manually • The IPv6 address assigned to the next step. 6. Press the [ ] or [ ] key to select [Machine IPv6 Address], and then press... the [OK] key. 4. Press the [User Tools] key. Press the [ ] or [ ] key to select [Manual Config. When this happens, wait for the reboot to finish, repeat Steps 1 to 3, and then proceed to [Disable] in [IPv6] in all fields, and then...
... using the number keys. 9. If this setting is changed , the machine automatically reboots itself. 22 Guide to the Machine Assigning the machine's IPv6 address manually • The IPv6 address assigned to the next step. 6. Press the [ ] or [ ] key to select [Machine IPv6 Address], and then press... the [OK] key. 4. Press the [User Tools] key. Press the [ ] or [ ] key to select [Manual Config. When this happens, wait for the reboot to finish, repeat Steps 1 to 3, and then proceed to [Disable] in [IPv6] in all fields, and then...
User Guide
Page 54
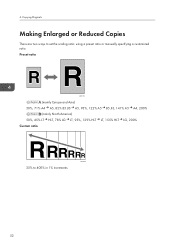
4. Copying Originals Making Enlarged or Reduced Copies There are two ways to 400% in 1% increments. 52 Preset ratio CES103 (mainly Europe and Asia) 50%, 71% A4 A5, 82% B5 JIS A5, 93%, 122% A5 B5 JIS, 141% A5 A4, 200% (mainly North America) 50%, 65% LT HLT, 78% LG LT, 93%, 129% HLT LT, 155% HLT LG, 200% Custom ratio CES106 25% to set the scaling ratio: using a preset ratio or manually specifying a customized ratio.
4. Copying Originals Making Enlarged or Reduced Copies There are two ways to 400% in 1% increments. 52 Preset ratio CES103 (mainly Europe and Asia) 50%, 71% A4 A5, 82% B5 JIS A5, 93%, 122% A5 B5 JIS, 141% A5 A4, 200% (mainly North America) 50%, 65% LT HLT, 78% LG LT, 93%, 129% HLT LT, 155% HLT LG, 200% Custom ratio CES106 25% to set the scaling ratio: using a preset ratio or manually specifying a customized ratio.
User Guide
Page 77
When [Auto] is selected, the default values will be applied to scan originals. When [Manual] is selected in [Original Scan Method], specify the orientation of the printer model you want to use, and then click [Start scan]. 4. Image Quality Adjustment ...
When [Auto] is selected, the default values will be applied to scan originals. When [Manual] is selected in [Original Scan Method], specify the orientation of the printer model you want to use, and then click [Start scan]. 4. Image Quality Adjustment ...
User Guide
Page 87
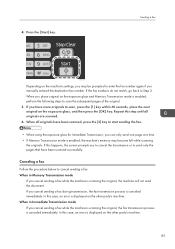
..., an error is enabled, the machine's memory may be prompted to start sending the fax. • When using the exposure glass for Immediate Transmission, you manually entered the destination fax number. In this case, an error is displayed on the exposure glass and Memory Transmission mode is canceled immediately. Repeat this...
..., an error is enabled, the machine's memory may be prompted to start sending the fax. • When using the exposure glass for Immediate Transmission, you manually entered the destination fax number. In this case, an error is displayed on the exposure glass and Memory Transmission mode is canceled immediately. Repeat this...
User Guide
Page 91
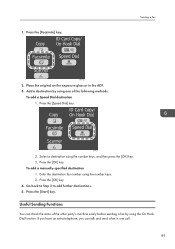
... one of the other party's machine easily before sending a fax by using the On Hook Dial function. Select a destination using the number keys. 2. To add a manually-specified destination 1. Press the [Speed Dial] key. Go back to Step 3 to add further destinations. 5. If you have an extra telephone, you can check the...
... one of the other party's machine easily before sending a fax by using the On Hook Dial function. Select a destination using the number keys. 2. To add a manually-specified destination 1. Press the [Speed Dial] key. Go back to Step 3 to add further destinations. 5. If you have an extra telephone, you can check the...
User Guide
Page 93
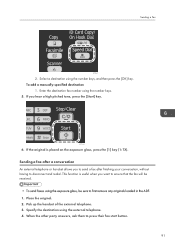
... external telephone. 3. CTT131 6. When the other party answers, ask them to disconnect and redial. Sending a Fax CTT127 2. Select a destination using the number keys. 5. To add a manually-specified destination 1. Place the original. 2. If you to send a fax after a conversation An external telephone or handset allows you hear a high pitched tone, press the...
... external telephone. 3. CTT131 6. When the other party answers, ask them to disconnect and redial. Sending a Fax CTT127 2. Select a destination using the number keys. 5. To add a manually-specified destination 1. Place the original. 2. If you to send a fax after a conversation An external telephone or handset allows you hear a high pitched tone, press the...
User Guide
Page 96
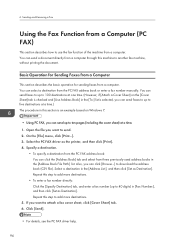
... [Address Book] tab and select from a computer. Open the file you can send a document directly from the PC FAX address book or enter a fax number manually. Specify a destination. • To specify a destination from the PC FAX address book: You can select a destination from a computer through this section is selected, you can...
... [Address Book] tab and select from a computer. Open the file you can send a document directly from the PC FAX address book or enter a fax number manually. Specify a destination. • To specify a destination from the PC FAX address book: You can select a destination from a computer through this section is selected, you can...
User Guide
Page 100
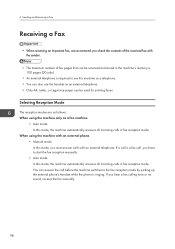
... a Fax Receiving a Fax • When receiving an important fax, we recommend you hear a fax calling tone or no sound, receive the fax manually. 98 You can answer the call , you must answer calls with an external telephone. Selecting Reception Mode The reception modes are as follows: When using... machine switches to the fax reception mode by picking up the external phone's handset while the phone is required to start the fax reception manually. • Auto mode In this mode, the machine automatically answers all incoming calls in fax reception mode. If you check the contents ...
... a Fax Receiving a Fax • When receiving an important fax, we recommend you hear a fax calling tone or no sound, receive the fax manually. 98 You can answer the call , you must answer calls with an external telephone. Selecting Reception Mode The reception modes are as follows: When using... machine switches to the fax reception mode by picking up the external phone's handset while the phone is required to start the fax reception manually. • Auto mode In this mode, the machine automatically answers all incoming calls in fax reception mode. If you check the contents ...
User Guide
Page 101
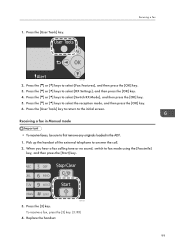
Press the [ ] or [ ] keys to first remove any originals loaded in the ADF. 1. Receiving a fax in Manual mode • To receive faxes, be sure to select [Fax Features], and then press the [OK] key. 3. CTT131 3. Press the [ ] or [ ] keys to answer the ...
Press the [ ] or [ ] keys to first remove any originals loaded in the ADF. 1. Receiving a fax in Manual mode • To receive faxes, be sure to select [Fax Features], and then press the [OK] key. 3. CTT131 3. Press the [ ] or [ ] keys to answer the ...


