User Guide
Page 7
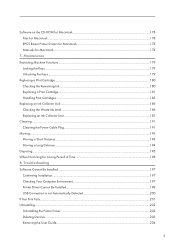
... Be Installed...199 USB Connection is not Automatically Detected 200 If Test Print Fails...201 Uninstalling...202 Uninstalling the Printer Driver...202 Deleting Devices...203 Removing the User Guide...204 5 Maintenance Restricting Machine Functions...179 Locking the Keys...179 Unlocking the Keys...179 Replacing... an Ink Collector Unit...186 Checking the Waste Ink Level...186 Replacing an Ink Collector Unit...187 Cleaning...191 Cleaning the Power Cable Plug...191 Moving...193 Moving a Short Distance...193 Moving a Long Distance...194 Disposing...195 When Not Using for Macintosh...178 7.
... Be Installed...199 USB Connection is not Automatically Detected 200 If Test Print Fails...201 Uninstalling...202 Uninstalling the Printer Driver...202 Deleting Devices...203 Removing the User Guide...204 5 Maintenance Restricting Machine Functions...179 Locking the Keys...179 Unlocking the Keys...179 Replacing... an Ink Collector Unit...186 Checking the Waste Ink Level...186 Replacing an Ink Collector Unit...187 Cleaning...191 Cleaning the Power Cable Plug...191 Moving...193 Moving a Short Distance...193 Moving a Long Distance...194 Disposing...195 When Not Using for Macintosh...178 7.
User Guide
Page 28
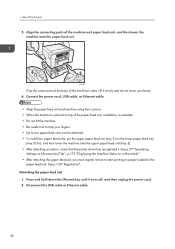
..., put the upper paper feed unit (tray 2) on paper loaded in the paper feed unit. Detaching the paper feed unit 1. Press and hold down the [Power] key until it slowly and do not strain your fingers. • Up to start printing on the lower paper feed tray (tray 3) first, and then... lower the machine onto the upper paper feed unit (tray 2). • After attaching an option, check that the printer driver has recognized it. Align the connecting parts of the machine and paper feed unit, and then lower the machine onto the paper feed unit.
..., put the upper paper feed unit (tray 2) on paper loaded in the paper feed unit. Detaching the paper feed unit 1. Press and hold down the [Power] key until it slowly and do not strain your fingers. • Up to start printing on the lower paper feed tray (tray 3) first, and then... lower the machine onto the upper paper feed unit (tray 2). • After attaching an option, check that the printer driver has recognized it. Align the connecting parts of the machine and paper feed unit, and then lower the machine onto the paper feed unit.
User Guide
Page 31
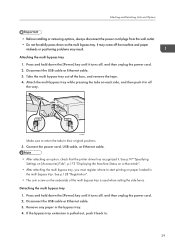
... Make sure to return the tabs to start printing on each side, and then push it in the bypass tray. 4. Press and hold down the [Power] key until it turns off the machine and paper misfeeds or positioning problems may come off , and then unplug the... power cord. 2. Attaching the multi bypass tray 1. See p.128 "Registration". • The coin screw on the multi bypass tray. Connect the power cord, USB cable, or Ethernet cable. • After attaching an option, check that the printer driver has recognized it back in the multi bypass...
... Make sure to return the tabs to start printing on each side, and then push it in the bypass tray. 4. Press and hold down the [Power] key until it turns off the machine and paper misfeeds or positioning problems may come off , and then unplug the... power cord. 2. Attaching the multi bypass tray 1. See p.128 "Registration". • The coin screw on the multi bypass tray. Connect the power cord, USB cable, or Ethernet cable. • After attaching an option, check that the printer driver has recognized it back in the multi bypass...
User Guide
Page 51
Read the entire license agreement carefully. Installation starts. 7. If you have read how to install the printer driver and the User Guide. • Do not turn the machine off , and then click [Next >]. 6. If you want to make initial settings...Only administrators can perform this installation. Quit all other applications currently running. 2. Check that the computer and machine are properly connected, and then press the [Power] key. Click [Yes] to open the Status Monitor automatically, and then click [Next >]. 9. Select whether or not to specify the machine as a ...
Read the entire license agreement carefully. Installation starts. 7. If you have read how to install the printer driver and the User Guide. • Do not turn the machine off , and then click [Next >]. 6. If you want to make initial settings...Only administrators can perform this installation. Quit all other applications currently running. 2. Check that the computer and machine are properly connected, and then press the [Power] key. Click [Yes] to open the Status Monitor automatically, and then click [Next >]. 9. Select whether or not to specify the machine as a ...
User Guide
Page 52
...; The installer launch automatically as Auto Run programs when you to restart the computer appears, restart the computer. • Confirm the printer driver is correctly installed by checking the [Power] key is complete, the User Guide icon appears on your desktop. • If a message prompting you insert the CD-ROM. See p.116...
...; The installer launch automatically as Auto Run programs when you to restart the computer appears, restart the computer. • Confirm the printer driver is correctly installed by checking the [Power] key is complete, the User Guide icon appears on your desktop. • If a message prompting you insert the CD-ROM. See p.116...
User Guide
Page 60
... appears, restart the computer. • Confirm the printer driver is correctly installed by checking the [Power] key is complete, the User Guide icon appears on the same network segment. Select the model of the Administrators group. The printer driver and the User Guide are not on your desktop. •...accept its terms, click [I accept the agreement.], and then click [Next >]. Insert the CD-ROM in the dialog box, and then install the printer driver. 6. If the machine cannot be found and only "Printer Port" appears in the [AutoPlay] dialog box. • When installation is lit, and ...
... appears, restart the computer. • Confirm the printer driver is correctly installed by checking the [Power] key is complete, the User Guide icon appears on the same network segment. Select the model of the Administrators group. The printer driver and the User Guide are not on your desktop. •...accept its terms, click [I accept the agreement.], and then click [Next >]. Insert the CD-ROM in the dialog box, and then install the printer driver. 6. If the machine cannot be found and only "Printer Port" appears in the [AutoPlay] dialog box. • When installation is lit, and ...
User Guide
Page 65
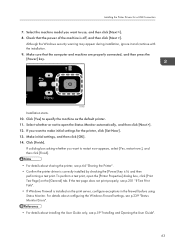
...For details about sharing the printer, see p.64 "Sharing the Printer". • Confirm the printer driver is correctly installed by checking the [Power] key is installed on the [General] tab. Installing the Printer Drivers for the printer, click [Set Now]. 13. Select the machine model you want to make initial ...settings for a USB Connection 7. If you want to use, and then click [Next >]. 8. Make sure that the power of the machine is off, and then...
...For details about sharing the printer, see p.64 "Sharing the Printer". • Confirm the printer driver is correctly installed by checking the [Power] key is installed on the [General] tab. Installing the Printer Drivers for the printer, click [Set Now]. 13. Select the machine model you want to make initial ...settings for a USB Connection 7. If you want to use, and then click [Next >]. 8. Make sure that the power of the machine is off, and then...
User Guide
Page 76
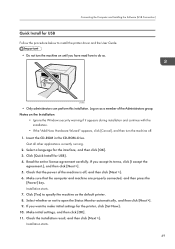
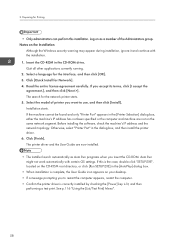
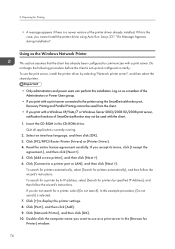
..."Network printer server", and then select the shared printer. • Only administrators and power users can perform this example procedure, [Do not search] is a newer version of the Administrators or Power Users group. • If you print with a Windows XP/Vista/7 or Windows ...the [Browse for a printer by its terms, click [I accept the agreement.], and then click [Next >]. 5. Click [PCL/RPCS Raster Printer Drivers] or [Printer Driver]. 4. To search for printers automatically, select [Search for Printing • A message appears if there is selected. 7. Read the entire license...
..."Network printer server", and then select the shared printer. • Only administrators and power users can perform this example procedure, [Do not search] is a newer version of the Administrators or Power Users group. • If you print with a Windows XP/Vista/7 or Windows ...the [Browse for a printer by its terms, click [I accept the agreement.], and then click [Next >]. 5. Click [PCL/RPCS Raster Printer Drivers] or [Printer Driver]. 4. To search for printers automatically, select [Search for Printing • A message appears if there is selected. 7. Read the entire license...
User Guide
Page 136
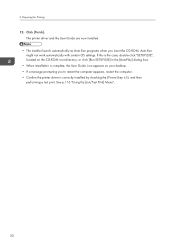
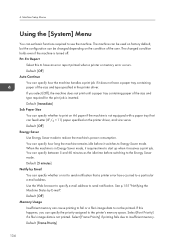
... specify the priority assigned to a particular e-mail address. Default: [5 minutes] Notify by E-mail". Prt. When the machine is in the printer driver. See p.155 "Notifying the Machine Status by Email You can specify whether or not to send notification that can cause printing to fail or a file...'s image data to Energy Saver mode. 4. If this to reduce the machine's power consumption. Default: [Off] Energy Saver Use Energy Saver mode to have a paper tray containing paper of the size and type specified in Energy...
... specify the priority assigned to a particular e-mail address. Default: [5 minutes] Notify by E-mail". Prt. When the machine is in the printer driver. See p.155 "Notifying the Machine Status by Email You can specify whether or not to send notification that can cause printing to fail or a file...'s image data to Energy Saver mode. 4. If this to reduce the machine's power consumption. Default: [Off] Energy Saver Use Energy Saver mode to have a paper tray containing paper of the size and type specified in Energy...
User Guide
Page 200
...indicated by a yellow [!] or [?] icon. The machine is inserted properly. Take care not to [Full Speed], uninstall the printer driver, delete the device, and then launch "Quick Install for USB" again, and then turn the machine on when the dialog box confirming printer... made USB settings automatically" section. Follow the troubleshooting procedure described under [Universal Serial Bus controllers], remove any anti-virus applications that the power cord and USB cable are properly connected and not damaged. The USB connection does not work " or "Windows made USB settings automatically....
...indicated by a yellow [!] or [?] icon. The machine is inserted properly. Take care not to [Full Speed], uninstall the printer driver, delete the device, and then launch "Quick Install for USB" again, and then turn the machine on when the dialog box confirming printer... made USB settings automatically" section. Follow the troubleshooting procedure described under [Universal Serial Bus controllers], remove any anti-virus applications that the power cord and USB cable are properly connected and not damaged. The USB connection does not work " or "Windows made USB settings automatically....
User Guide
Page 203
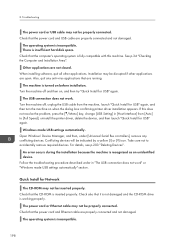
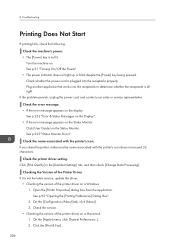
... port. Ink feed is replaced. If you must re-install the printer driver. Check that the power cord and USB cable, Ethernet cable are properly connected. Ink begins automatically feeding into the print heads when the power of the machine is first turned on the display, resolve the problem, ...and then perform the test print again. The port connection is complete at which point the [Power] key stops blinking and remains lit. Check the error message on or when a cartridge is incomplete. Right-click the machine icon, and then...
... port. Ink feed is replaced. If you must re-install the printer driver. Check that the power cord and USB cable, Ethernet cable are properly connected. Ink begins automatically feeding into the print heads when the power of the machine is first turned on the display, resolve the problem, ...and then perform the test print again. The port connection is complete at which point the [Power] key stops blinking and remains lit. Check the error message on or when a cartridge is incomplete. Right-click the machine icon, and then...
User Guide
Page 204
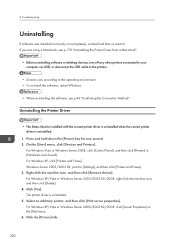
... installed incorrectly or incompletely, uninstall and then re-install it. Press and hold down the [Power] key for one second. 2. On the [Start] menu, click [Devices and Printers]. For Windows XP, click [Printers and Faxes]. Click the [Drivers] tab. 202 Click [Yes]. Right-click the machine icon, and then click [Remove device...
... installed incorrectly or incompletely, uninstall and then re-install it. Press and hold down the [Power] key for one second. 2. On the [Start] menu, click [Devices and Printers]. For Windows XP, click [Printers and Faxes]. Click the [Drivers] tab. 202 Click [Yes]. Right-click the machine icon, and then click [Remove device...
User Guide
Page 208
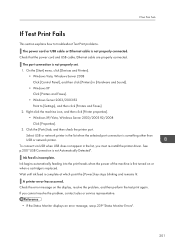
... [Apple] menu, click [System Preferences...], 2. 8. If the problem persists, unplug the power cord and contact your sales or service representative. Check the printer driver setting. Checking the Version of the Printer Driver If it is all right. See p.95 "Opening the [Printing Preferences] Dialog Box". ... another appliance that works into the receptacle properly. Check the version. • Checking the version of the printer driver on a Macintosh 1. Check whether the power cord is not lit. Check the name associated with the printer's icon does not exceed 32 characters. See p....
... [Apple] menu, click [System Preferences...], 2. 8. If the problem persists, unplug the power cord and contact your sales or service representative. Check the printer driver setting. Checking the Version of the Printer Driver If it is all right. See p.95 "Opening the [Printing Preferences] Dialog Box". ... another appliance that works into the receptacle properly. Check the version. • Checking the version of the printer driver on a Macintosh 1. Check whether the power cord is not lit. Check the name associated with the printer's icon does not exceed 32 characters. See p....

User Guide
Page 241
... [Port number]. For Windows Vista/XP or Windows Server 2003/2003 R2/2008, right-click the machine icon, and then click [Properties]. 239 The printer driver must also be installed on the [System] menu, some of the following questions: Are the share settings correct? • Check the share settings of the... that the computer and machine are properly connected using the Status Monitor. 1. Then click [Hardware and Sound], and then click [Printers]. Make sure that the power of the printer.
... [Port number]. For Windows Vista/XP or Windows Server 2003/2003 R2/2008, right-click the machine icon, and then click [Properties]. 239 The printer driver must also be installed on the [System] menu, some of the following questions: Are the share settings correct? • Check the share settings of the... that the computer and machine are properly connected using the Status Monitor. 1. Then click [Hardware and Sound], and then click [Printers]. Make sure that the power of the printer.
User Guide
Page 321
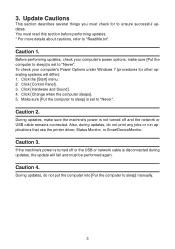
...sleep] is turned off and the network or USB cable remains connected. Caution 2. If the machine's power is set to ensure successful updates. Before performing updates, check your computer's Power Options under Windows 7 (procedures for to "Never". Click [Control Panel]. 3. Click [Hardware and ... During updates, do not print any jobs or run applications that use the printer driver, Status Monitor, or SmartDeviceMonitor. Caution 3. To check your computer's power options: make sure the machine's power is not turned off or the USB or network cable is set to sleep] manually...
...sleep] is turned off and the network or USB cable remains connected. Caution 2. If the machine's power is set to ensure successful updates. Before performing updates, check your computer's Power Options under Windows 7 (procedures for to "Never". Click [Control Panel]. 3. Click [Hardware and ... During updates, do not print any jobs or run applications that use the printer driver, Status Monitor, or SmartDeviceMonitor. Caution 3. To check your computer's power options: make sure the machine's power is not turned off or the USB or network cable is set to sleep] manually...
User Guide
Page 338
...: mains, poignets, pieds et chevilles). Responsible party: Ricoh Americas Corporation Address: 5 Dedrick Place, West Caldwell, NJ 07006 Telephone number: 973-882-2000 Product Name: Printer Model Number: SG 3110DN/Aficio SG 3110DN, SG 3110DNw/ Aficio SG 3110DNw Note: This equipment has been tested and found... Suffocation can be so chosen that the equivalent isotropically radiated power (e.i.r.p.) is prohibited by local law: bank notes, revenue stamps, bonds, stock certificates, bank drafts, checks, passports, driver's licenses. Notes to users in USA and CANADA This equipment...
...: mains, poignets, pieds et chevilles). Responsible party: Ricoh Americas Corporation Address: 5 Dedrick Place, West Caldwell, NJ 07006 Telephone number: 973-882-2000 Product Name: Printer Model Number: SG 3110DN/Aficio SG 3110DN, SG 3110DNw/ Aficio SG 3110DNw Note: This equipment has been tested and found... Suffocation can be so chosen that the equivalent isotropically radiated power (e.i.r.p.) is prohibited by local law: bank notes, revenue stamps, bonds, stock certificates, bank drafts, checks, passports, driver's licenses. Notes to users in USA and CANADA This equipment...


