
Troubleshooting Guide
Page 6
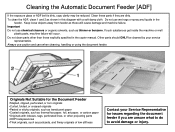
.... Always use wet rags or spray any liquids in this diagram with indexes, tags, perforated lines, or other than those explicitly specified in the copier manual. Important Do not use chemical cleaners or organic solvents, such as these parts if they are unsure what to do to avoid damage or injury...
.... Always use wet rags or spray any liquids in this diagram with indexes, tags, perforated lines, or other than those explicitly specified in the copier manual. Important Do not use chemical cleaners or organic solvents, such as these parts if they are unsure what to do to avoid damage or injury...
Troubleshooting Guide
Page 7
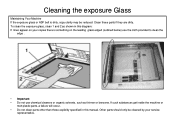
... such substances get inside the machine or melt plastic parts, a failure will occur. • Do not clean parts other than those explicitly specified in this manual.
... such substances get inside the machine or melt plastic parts, a failure will occur. • Do not clean parts other than those explicitly specified in this manual.
Quick Use Guide
Page 8
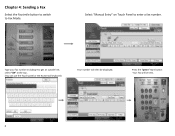
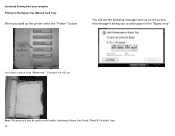
Chapter 4: Sending a Fax Select the Facsimile button to switch to enter a fax number. Press the "green" Start button Your Fax will then be Sent. 8 Type your fax number including 9 to get an outside line, select "OK" at the top . (You can use the Touch panel or the Numerical keyboard) Your number will be displayed. Select "Manual Entry" on Touch Panel to Fax Mode.
Chapter 4: Sending a Fax Select the Facsimile button to switch to enter a fax number. Press the "green" Start button Your Fax will then be Sent. 8 Type your fax number including 9 to get an outside line, select "OK" at the top . (You can use the Touch panel or the Numerical keyboard) Your number will be displayed. Select "Manual Entry" on Touch Panel to Fax Mode.
Quick Use Guide
Page 14
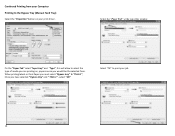
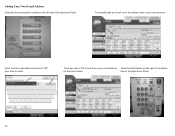
Continued Printing from . When printing labels or thick Paper you must select "Bypass tray" & "Thick 1", Once you have selected " Bypass tray" and " Thick 1" , select "OK" Select "OK" to the Bypass Tray (Manual Feed Tray) Select the "Properties" button on , paper source you are printing on your job 14 Select the "Paper Tab" at the top of the window On the "Paper Tab" select "Input tray" and "Type", this will allow to select the type of media you would like the selected from your Computer Printing to print your print driver.
Continued Printing from . When printing labels or thick Paper you must select "Bypass tray" & "Thick 1", Once you have selected " Bypass tray" and " Thick 1" , select "OK" Select "OK" to the Bypass Tray (Manual Feed Tray) Select the "Properties" button on , paper source you are printing on your job 14 Select the "Paper Tab" at the top of the window On the "Paper Tab" select "Input tray" and "Type", this will allow to select the type of media you would like the selected from your Computer Printing to print your print driver.
Quick Use Guide
Page 15
Note: This process is also be used to place paper in the "Bypass tray" Once paper is placed in the "Bypass tray" Your print job will see the following message come up on the screen, this message is asking you to print Lables, letterhead, Heavy Card Stock (Think) & Printable Tabs 15 Continued Printing from your computer Printing to the Bypass Tray (Manual Feed Tray) When you walk up the printer select the "Printer" button You will start.
Note: This process is also be used to place paper in the "Bypass tray" Once paper is placed in the "Bypass tray" Your print job will see the following message come up on the screen, this message is asking you to print Lables, letterhead, Heavy Card Stock (Think) & Printable Tabs 15 Continued Printing from your computer Printing to the Bypass Tray (Manual Feed Tray) When you walk up the printer select the "Printer" button You will start.
Quick Use Guide
Page 19
To manually add an e‐mail not in the address book, select manual entry Enter the full e‐mail address and press "OK" your e‐mail address Press the Start Button on the right To complete on the left sideof the Operation Panel. Adding Your Own E-mail Address Select the Scanner button located on the main screen. side of the Operations Panel 19 Once you select "OK' you will see your scan to email.
To manually add an e‐mail not in the address book, select manual entry Enter the full e‐mail address and press "OK" your e‐mail address Press the Start Button on the right To complete on the left sideof the Operation Panel. Adding Your Own E-mail Address Select the Scanner button located on the main screen. side of the Operations Panel 19 Once you select "OK' you will see your scan to email.


