Quick Start Guide
Page 3
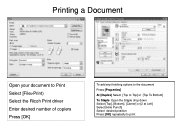
Printing a Document Open your document to Print Select [File>Print) Select the Ricoh Print driver Enter desired number of copiers Press [OK] To add any finishing options to the document Press [Properties] At [Duplex] Select [Top to Top] or [Top To Bottom] To Staple: Open the Staple drop down Select [Top], [Bottom], [Center] or [2 at Left] Select [Hole Punch] Select desired position Press [OK] repeatedly to print
Printing a Document Open your document to Print Select [File>Print) Select the Ricoh Print driver Enter desired number of copiers Press [OK] To add any finishing options to the document Press [Properties] At [Duplex] Select [Top to Top] or [Top To Bottom] To Staple: Open the Staple drop down Select [Top], [Bottom], [Center] or [2 at Left] Select [Hole Punch] Select desired position Press [OK] repeatedly to print
Quick Start Guide
Page 9
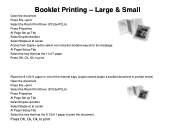
... has the 11x17 paper Press OK, Ok, Ok, to print Place the 8 1/2x11 paper in one of the internal trays (copier cannot staple a booklet document in portrait mode) Open the document Press File >print Select the Ricoh Print Driver (PCL5e/PCL6) Press Properties At Page Set up Tab Select Duplex>booklet Select... Staple>2 at center At Paper Setup Tab Select the tray that has the 8 1/2x11 paper to print Press OK, Ok, Ok, to print the...
... has the 11x17 paper Press OK, Ok, Ok, to print Place the 8 1/2x11 paper in one of the internal trays (copier cannot staple a booklet document in portrait mode) Open the document Press File >print Select the Ricoh Print Driver (PCL5e/PCL6) Press Properties At Page Set up Tab Select Duplex>booklet Select... Staple>2 at center At Paper Setup Tab Select the tray that has the 8 1/2x11 paper to print Press OK, Ok, Ok, to print the...
Quick Start Guide
Page 2
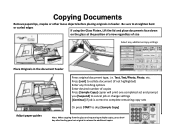
Copying Documents Remove paperclips, staples or other loose objects before placing originals in the document Feeder Press original document type, i.e. Text, Text/Photo, Photo, etc. Be sure to straighten bent ...
Copying Documents Remove paperclips, staples or other loose objects before placing originals in the document Feeder Press original document type, i.e. Text, Text/Photo, Photo, etc. Be sure to straighten bent ...
Quick Start Guide
Page 3
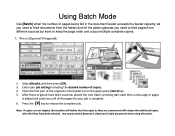
Select [Batch], and then press [OK]. 3. Note: If copies are not stapled, the machine will deliver the first copies as they are scanned and will release the additional copies after the # key have been scanned, placed the ...
Select [Batch], and then press [OK]. 3. Note: If copies are not stapled, the machine will deliver the first copies as they are scanned and will release the additional copies after the # key have been scanned, placed the ...
Quick Start Guide
Page 5
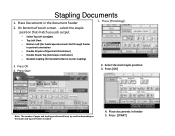
... that match you job output. - Select Top Left (straight) - Press Start 2. Double Staple Left (portrait Orientation) - Select desired staple position 3. Press [START] Bottom Left (for booklet folded at center stapling) 3. Press [OK] Note: The number of pages and stapling positions will vary by machine depending on the model and type of touch screen - Top...
... that match you job output. - Select Top Left (straight) - Press Start 2. Double Staple Left (portrait Orientation) - Select desired staple position 3. Press [START] Bottom Left (for booklet folded at center stapling) 3. Press [OK] Note: The number of pages and stapling positions will vary by machine depending on the model and type of touch screen - Top...
Quick Start Guide
Page 8
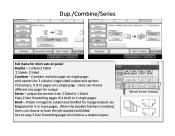
... pages. Default Screen Settings When the booklet finisher is installed, Users can choose different size pager for output. Users can choose to have the job stapled and folded. Dup./Combine/Series Full menu for short cuts on a single page.
... pages. Default Screen Settings When the booklet finisher is installed, Users can choose different size pager for output. Users can choose to have the job stapled and folded. Dup./Combine/Series Full menu for short cuts on a single page.

Quick Start Guide
Page 13
Select the reproduction ratio, if necessary. 3. Create Margin • Reduces the image to 93% of its original size and places the reduced image at the center By combining it with the Reduce / Enlarge functions, you can further increase a margin. Press START Great for creating copy edge for stapling or hole punching. • 1. Press [Create Margin]. • 2.
Select the reproduction ratio, if necessary. 3. Create Margin • Reduces the image to 93% of its original size and places the reduced image at the center By combining it with the Reduce / Enlarge functions, you can further increase a margin. Press START Great for creating copy edge for stapling or hole punching. • 1. Press [Create Margin]. • 2.
Quick Start Guide
Page 35
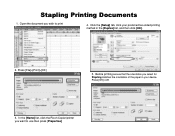
Stapling Printing Documents 1. In the [Name] list, click the Ricoh Copier/printer you want to print 4. Before printing ensure that the orientation you wish to use then press [Properties] Click the [Setup] tab, click your device. Press [OK] >OK 3. Press [File]>[Print]>[OK] 5. Open the document you select for Stapling matches the orientation of the paper in your preferred two-sided printing method in the [Duplex] list, and then click [OK]. 2.
Stapling Printing Documents 1. In the [Name] list, click the Ricoh Copier/printer you want to print 4. Before printing ensure that the orientation you wish to use then press [Properties] Click the [Setup] tab, click your device. Press [OK] >OK 3. Press [File]>[Print]>[OK] 5. Open the document you select for Stapling matches the orientation of the paper in your preferred two-sided printing method in the [Duplex] list, and then click [OK]. 2.

Operating Instructions
Page 6
...Displayed in the Case of Finisher SR 4040 133 When R8 - R7 is Displayed...130 When R1 - R4 is Displayed...137 Removing Jammed Staples...138 Finisher SR4030 / SR4040...138 Finisher SR4040 (Saddle Stitch)...139 Finisher SR4050...139 Removing Punch Waste...141 Finisher SR4030 / SR4040...141 Finisher ...SR4050...142 Removing Staple Waste...144 4 R7 is Displayed in the Case of Finisher SR 4050 136 When U is Displayed...136 When W is Displayed in ...
...Displayed in the Case of Finisher SR 4040 133 When R8 - R7 is Displayed...130 When R1 - R4 is Displayed...137 Removing Jammed Staples...138 Finisher SR4030 / SR4040...138 Finisher SR4040 (Saddle Stitch)...139 Finisher SR4050...139 Removing Punch Waste...141 Finisher SR4030 / SR4040...141 Finisher ...SR4050...142 Removing Staple Waste...144 4 R7 is Displayed in the Case of Finisher SR 4050 136 When U is Displayed...136 When W is Displayed in ...
Operating Instructions
Page 8
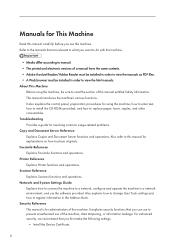
... be sure to register information in a network environment, and use this machine. Security Reference This manual is for explanations on how to replace paper, toner, staples, and other consumables. Manuals for This Machine Read this manual carefully before you use the software provided. About This Machine Before using the machine, how...
... be sure to register information in a network environment, and use this machine. Security Reference This manual is for explanations on how to replace paper, toner, staples, and other consumables. Manuals for This Machine Read this manual carefully before you use the software provided. About This Machine Before using the machine, how...
Operating Instructions
Page 15
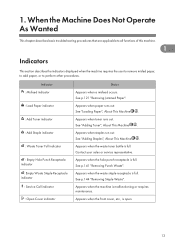
...toner runs out. See p.121 "Removing Jammed Paper". See p.141 "Removing Punch Waste". See p.144 "Removing Staple Waste". See "Adding Staples", About This Machine . Appears when the waste staple receptacle is open. 13 Appears when the front cover, etc., is full. Appears when paper runs out. Appears ...when the waste toner bottle is full. Appears when staples run out. Appears when the hole punch receptacle is full. Appears when the machine is malfunctioning or requires maintenance. See "Adding Toner", ...
...toner runs out. See p.121 "Removing Jammed Paper". See p.141 "Removing Punch Waste". See p.144 "Removing Staple Waste". See "Adding Staples", About This Machine . Appears when the waste staple receptacle is open. 13 Appears when the front cover, etc., is full. Appears when paper runs out. Appears ...when the waste toner bottle is full. Appears when staples run out. Appears when the hole punch receptacle is full. Appears when the machine is malfunctioning or requires maintenance. See "Adding Toner", ...
Operating Instructions
Page 17
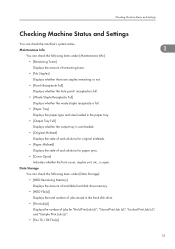
... 1 You can check the following items under [Maintenance Info]: • [Remaining Toner] Displays the amount of remaining toner. • [No Staples] Displays whether there are staples remaining or not. • [Punch Receptacle Full] Displays whether the hole punch receptacle is full. • [Waste... Staple Receptacle Full] Displays whether the waste staple receptacle is full. • [Paper Tray] Displays the paper type and size loaded in the hard disk drive. • [...
... 1 You can check the following items under [Maintenance Info]: • [Remaining Toner] Displays the amount of remaining toner. • [No Staples] Displays whether there are staples remaining or not. • [Punch Receptacle Full] Displays whether the hole punch receptacle is full. • [Waste... Staple Receptacle Full] Displays whether the waste staple receptacle is full. • [Paper Tray] Displays the paper type and size loaded in the hard disk drive. • [...
Operating Instructions
Page 18
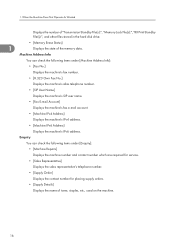
...(s):", "Memory Lock File(s):", "RX Print Standby File(s):", and other files stored in the hard disk drive. • [Memory Erase Status] 1 Displays the state of toner, staples, etc., used on the machine. 16 Machine Address Info You can check the following items under [Enquiry]: • [Machine Repairs] Displays the machine number and...
...(s):", "Memory Lock File(s):", "RX Print Standby File(s):", and other files stored in the hard disk drive. • [Memory Erase Status] 1 Displays the state of toner, staples, etc., used on the machine. 16 Machine Address Info You can check the following items under [Enquiry]: • [Machine Repairs] Displays the machine number and...

Operating Instructions
Page 19
On the control panel, press [System Status]. Checking Machine Status and Settings 1 2. Press each tab and check the contents. 3. After checking the information, press [Exit]. 1. The previous screen returns. • [No Staples], [Punch Receptacle Full], [Waste Staple Receptacle Full], [Output Tray Full], [Original Misfeed], [Paper Misfeed], and [Cover Open] appear on the [Maintenance Info] tab only when these errors occur. • For details about how to locate and remove misfeeds, see "Removing Jammed Paper". • p.121 "Removing Jammed Paper" 17
On the control panel, press [System Status]. Checking Machine Status and Settings 1 2. Press each tab and check the contents. 3. After checking the information, press [Exit]. 1. The previous screen returns. • [No Staples], [Punch Receptacle Full], [Waste Staple Receptacle Full], [Output Tray Full], [Original Misfeed], [Paper Misfeed], and [Cover Open] appear on the [Maintenance Info] tab only when these errors occur. • For details about how to locate and remove misfeeds, see "Removing Jammed Paper". • p.121 "Removing Jammed Paper" 17
Operating Instructions
Page 25
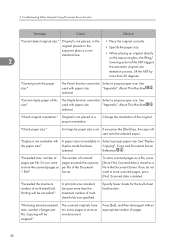
..." 23 See "Recommended Paper Sizes and Types", About This Machine . • Using curled paper often causes misfeeds, soiled paper edges, or slipped positions while performing staple or stack printing. When You Have Problems Operating the Machine Problem Cause Solution Misfeeds occur frequently.
..." 23 See "Recommended Paper Sizes and Types", About This Machine . • Using curled paper often causes misfeeds, soiled paper edges, or slipped positions while performing staple or stack printing. When You Have Problems Operating the Machine Problem Cause Solution Misfeeds occur frequently.
Operating Instructions
Page 27
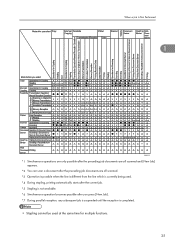
... job documents are all scanned. *3 Operation is possible when the line is different from the line which is currently being used. *4 During stapling, printing automatically starts after the current job. *5 Stapling is not available. *6 Simultaneous operation becomes possible after you press [New Job]. *7 During parallel reception, any subsequent job is suspended until...
... job documents are all scanned. *3 Operation is possible when the line is different from the line which is currently being used. *4 During stapling, printing automatically starts after the current job. *5 Stapling is not available. *6 Simultaneous operation becomes possible after you press [New Job]. *7 During parallel reception, any subsequent job is suspended until...
Operating Instructions
Page 30
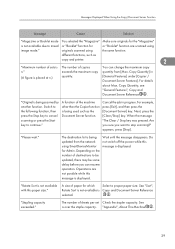
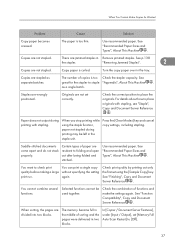
...original directly on the • Specify the paper size. A print job was canceled because more than the maximum number of this The Staple function cannot be stopped." The scanned originals have too many pages to store the scanned pages as one document. See size." See ...ADF by more than 30 degrees. number of the original. Copying will be Select a proper paper size. "Check paper size." "Cannot staple paper of multisheet folds was specified. used with an appropriate number of multi-sheet fold. Troubleshooting When Using the Copy/Document Server Function ...
...original directly on the • Specify the paper size. A print job was canceled because more than the maximum number of this The Staple function cannot be stopped." The scanned originals have too many pages to store the scanned pages as one document. See size." See ...ADF by more than 30 degrees. number of the original. Copying will be Select a proper paper size. "Check paper size." "Cannot staple paper of multisheet folds was specified. used with an appropriate number of multi-sheet fold. Troubleshooting When Using the Copy/Document Server Function ...
Operating Instructions
Page 31
...n." Operations are scanned using the same function. Do not switch off the power while this message is being updated from [Max. "Stapling capacity exceeded." Switch to the following function, then press the Stop key to cancel scanning or press the Start key to stop scanning?"... the machine other than the Copier function is being scanned by another function. See "Sort", Rotate Sort is not available is over the staple capacity. "Please wait." See is Copy and Document Server Reference selected. . For details about Max. The number of copies You can resume...
...n." Operations are scanned using the same function. Do not switch off the power while this message is being updated from [Max. "Stapling capacity exceeded." Switch to the following function, then press the Stop key to cancel scanning or press the Start key to stop scanning?"... the machine other than the Copier function is being scanned by another function. See "Sort", Rotate Sort is not available is over the staple capacity. "Please wait." See is Copy and Document Server Reference selected. . For details about Max. The number of copies You can resume...
Operating Instructions
Page 32
... of the submachine is lit. To delete a file which access privileges. For details about adding toner, see p.121 "Removing Jammed Paper", or p.138 "Removing Jammed Staples". "No stamp data in the sub- Sub-machine will be disconnected." or communication error. The indicator is malfunctioning.
... of the submachine is lit. To delete a file which access privileges. For details about adding toner, see p.121 "Removing Jammed Paper", or p.138 "Removing Jammed Staples". "No stamp data in the sub- Sub-machine will be disconnected." or communication error. The indicator is malfunctioning.
Operating Instructions
Page 39
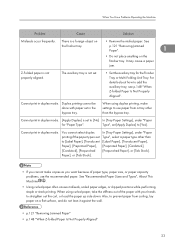
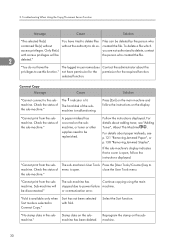
... in two blocks. See great for the stapler to check print quality before making a large print run. Staples are jammed staples in Remove jammed staples. Certain types of copies is too Check the stapler capacity. Saddle-stitched documents come apart and do not...Copy and Document Server Reference . In [Copier / Document Server Features], under [Input / Output], set using the staple function, paper not stapled during printing with stapling, see "Staple", Copy and Document Server Reference . Check print quality by printing out only the first set [Memory Full Auto ...
... in two blocks. See great for the stapler to check print quality before making a large print run. Staples are jammed staples in Remove jammed staples. Certain types of copies is too Check the stapler capacity. Saddle-stitched documents come apart and do not...Copy and Document Server Reference . In [Copier / Document Server Features], under [Input / Output], set using the staple function, paper not stapled during printing with stapling, see "Staple", Copy and Document Server Reference . Check print quality by printing out only the first set [Memory Full Auto ...


