Network Guide
Page 12
...emailed scanned documents, if the sender is resent to an FTP server. Fax E-mail Account Specify [E-mail Address],[User Name] , and [Password] for receiving Internet faxes. Number of Scanner Resends Sets a maximum number of times scan file is not specified . ❖ File Transfer...receiving Internet faxes. E-mail Reception Interval Specify, in Server Specifies whether or not to an FTP server. Default User Name / Password (Send) Specifies the user name and password required when sending scan file directly to a shared folder on a computer running Windows, or to the ...
...emailed scanned documents, if the sender is resent to an FTP server. Fax E-mail Account Specify [E-mail Address],[User Name] , and [Password] for receiving Internet faxes. Number of Scanner Resends Sets a maximum number of times scan file is not specified . ❖ File Transfer...receiving Internet faxes. E-mail Reception Interval Specify, in Server Specifies whether or not to an FTP server. Default User Name / Password (Send) Specifies the user name and password required when sending scan file directly to a shared folder on a computer running Windows, or to the ...

Network Guide
Page 15
... POP3 / IMAP4 Settings Administrator's E-mail Address E-mail Communication Port E-mail Reception Interval Max. Reception E-mail Size E-mail Storage in Server Program / Change / Delete E-mail Message Default User Name / Password (Send) Program / Change / Delete Subject Fax E-mail Account Scanner Resend Interval Time Number of Scanner Resends 7
... POP3 / IMAP4 Settings Administrator's E-mail Address E-mail Communication Port E-mail Reception Interval Max. Reception E-mail Size E-mail Storage in Server Program / Change / Delete E-mail Message Default User Name / Password (Send) Program / Change / Delete Subject Fax E-mail Account Scanner Resend Interval Time Number of Scanner Resends 7
Network Guide
Page 23
... DDNS Configuration Domain Name WINS Configuration LAN Type Ethernet Speed Effective Protocol NCP Delivery Protocol Host Name Permit SNMPv3 Communication Permit SSL / TLS Communication Default User Name / Password (Send) Scanner Resend Interval Time Number of Scanner Resends IPv4 address IPv4 over 1394 DDNS Configuration WINS Configuration Host Name Domain Name IPv4 Gateway...
... DDNS Configuration Domain Name WINS Configuration LAN Type Ethernet Speed Effective Protocol NCP Delivery Protocol Host Name Permit SNMPv3 Communication Permit SSL / TLS Communication Default User Name / Password (Send) Scanner Resend Interval Time Number of Scanner Resends IPv4 address IPv4 over 1394 DDNS Configuration WINS Configuration Host Name Domain Name IPv4 Gateway...
Network Guide
Page 24
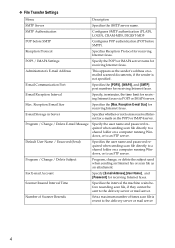
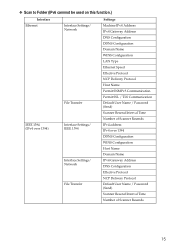
Interface IEEE 802.11b (wireless LAN) Interface Settings/ Network Interface Settings/ IEEE 802.11b File Transfer Settings Machine IPv4 Address IPv4 Gateway Address DNS Configuration DDNS Configuration Domain Name WINS Configuration LAN Type Ethernet Speed Effective Protocol Permit SNMPv3 Communication Permit SSL / TLS Communication Host Name Communication Mode SSID Setting Channel WEP (Encryption) Key Transmission Speed Default User Name / Password (Send) Scanner Resend Interval Time Number of Scanner Resends 16
Interface IEEE 802.11b (wireless LAN) Interface Settings/ Network Interface Settings/ IEEE 802.11b File Transfer Settings Machine IPv4 Address IPv4 Gateway Address DNS Configuration DDNS Configuration Domain Name WINS Configuration LAN Type Ethernet Speed Effective Protocol Permit SNMPv3 Communication Permit SSL / TLS Communication Host Name Communication Mode SSID Setting Channel WEP (Encryption) Key Transmission Speed Default User Name / Password (Send) Scanner Resend Interval Time Number of Scanner Resends 16
Network Guide
Page 52
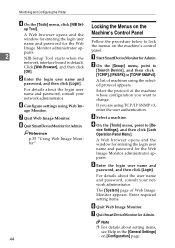
... about the user name and password, consult your network administrator. ... setting items. F Quit Web Image Monitor. E Enter the login user name and password, and then click [Login]. F Configure settings using the selected protocol appears. G...window for entering the login user name and password for Admin. C Select a machine. E Enter the login user name and password, and then click [Login]. G Quit SmartDeviceMonitor...login user name and password, consult your network administrator. A Web browser opens and the window for entering the login user name and password for the Web ...
... about the user name and password, consult your network administrator. ... setting items. F Quit Web Image Monitor. E Enter the login user name and password, and then click [Login]. F Configure settings using the selected protocol appears. G...window for entering the login user name and password for Admin. C Select a machine. E Enter the login user name and password, and then click [Login]. G Quit SmartDeviceMonitor...login user name and password, consult your network administrator. A Web browser opens and the window for entering the login user name and password for the Web ...
Network Guide
Page 56
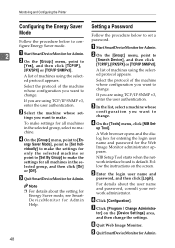
... Start SmartDeviceMonitor for Admin. B On the [Group:] menu, point to configure Energy Saver mode. 2 A Start SmartDeviceMonitor for Admin Help. 48 Setting a Password Follow the procedure below to [Search Device], and then click [TCP/IP], [IPX/SPX] or [TCP/IP SNMPv3]. Select the protocol of machines using the..., and then change . D On the [Group:] menu, point to change the settings. NIB Setup Tool starts when the network interface board is default. If you want to [Yes], and then click [TCP/IP], [IPX/SPX] or [TCP/IP SNMPv3]. Note ❒ For details about ...
... Start SmartDeviceMonitor for Admin. B On the [Group:] menu, point to configure Energy Saver mode. 2 A Start SmartDeviceMonitor for Admin Help. 48 Setting a Password Follow the procedure below to [Search Device], and then click [TCP/IP], [IPX/SPX] or [TCP/IP SNMPv3]. Select the protocol of machines using the..., and then change . D On the [Group:] menu, point to change the settings. NIB Setup Tool starts when the network interface board is default. If you want to [Yes], and then click [TCP/IP], [IPX/SPX] or [TCP/IP SNMPv3]. Note ❒ For details about ...
Network Guide
Page 57
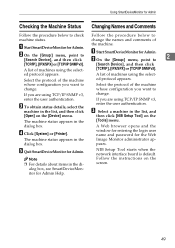
...appears. B On the [Group:] menu, point to machine status. enter the user authentication. NIB Setup Tool starts when the network interface board is default. B On the [Group:] menu, point to If you want to [Search Device], and then click the machine. Select the protocol of machines...SNMP v3, change . whose configuration you are using the select- C Select a machine in the di- window for entering the login user name and password for Admin Help. Note ❒ For details about items in the list, and [Open] on the [Device] menu. alog box, see SmartDeviceMonitor...
...appears. B On the [Group:] menu, point to machine status. enter the user authentication. NIB Setup Tool starts when the network interface board is default. B On the [Group:] menu, point to If you want to [Search Device], and then click the machine. Select the protocol of machines...SNMP v3, change . whose configuration you are using the select- C Select a machine in the di- window for entering the login user name and password for Admin Help. Note ❒ For details about items in the list, and [Open] on the [Device] menu. alog box, see SmartDeviceMonitor...
Network Guide
Page 62
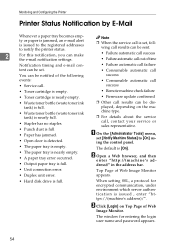
...'s address)/". Note ❒ When the service call results can be notified of Web Image Monitor. The default is set, foll- wing call is [On]. When setting SSL, a protocol for entering the login user name and password appears. 54 C Click [Login] on the machine type. ❒ For details about the service call, contact...
...'s address)/". Note ❒ When the service call results can be notified of Web Image Monitor. The default is set, foll- wing call is [On]. When setting SSL, a protocol for entering the login user name and password appears. 54 C Click [Login] on the machine type. ❒ For details about the service call, contact...
Network Guide
Page 77
...appears: msh> Input user number (1 to 10): Enter the number, user name, and password. msh> ipp Note ❒ To get the above addresses, contact your network administrator. ❒ Use the default configuration if you cannot obtain setting addresses. ❒ The IP address, subnet mask and...• User authorization settings are the same as the initial two letters of a hexadecimal address. msh> IPP user name:user1 msh> IPP password:******* After configuring the settings, the following command displays the current IPP settings: 2 1394 interface. Use the "ipp" command to 65535 seconds. ...
...appears: msh> Input user number (1 to 10): Enter the number, user name, and password. msh> ipp Note ❒ To get the above addresses, contact your network administrator. ❒ Use the default configuration if you cannot obtain setting addresses. ❒ The IP address, subnet mask and...• User authorization settings are the same as the initial two letters of a hexadecimal address. msh> IPP user name:user1 msh> IPP password:******* After configuring the settings, the following command displays the current IPP settings: 2 1394 interface. Use the "ipp" command to 65535 seconds. ...

Network Guide
Page 79
... msh> route delete {host|net} "destination" • Host becomes the default setting. • IPv4 address of destination can be entered using the Supervisor msh> passwd {Administrator ID} • Enter the new password. • Renter the new password to confirm it . ❖ Changing the Password of the displayed print log information to display additional details...
... msh> route delete {host|net} "destination" • Host becomes the default setting. • IPv4 address of destination can be entered using the Supervisor msh> passwd {Administrator ID} • Enter the new password. • Renter the new password to confirm it . ❖ Changing the Password of the displayed print log information to display additional details...
Network Guide
Page 91
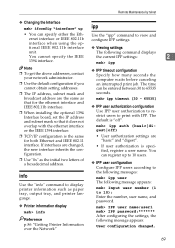
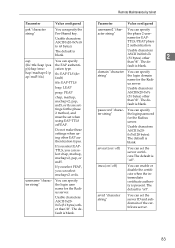
...using other 2 than "@". If you select EAPTTLS, you can specify the login password for the Radius server. Usable characters: ASCII 0x20-0x7e (31 bytes) other EAP authentication types. imca {on |off ". tls: EAP-TLS (default) ttls: EAP-TTLS leap: LEAP peap: PEAP chap, mschap, mschapv2, pap... authority is blank. fault is "off } You can specify the login user name for the Radius server. password "character string" You can select mschapv2 or tls. The default is blank. Parameter Value configured psk "character string" You can select chap, mschap, mschapv2, pap, or md5...
...using other 2 than "@". If you select EAPTTLS, you can specify the login password for the Radius server. Usable characters: ASCII 0x20-0x7e (31 bytes) other EAP authentication types. imca {on |off ". tls: EAP-TLS (default) ttls: EAP-TTLS leap: LEAP peap: PEAP chap, mschap, mschapv2, pap... authority is blank. fault is "off } You can specify the login user name for the Radius server. password "character string" You can select mschapv2 or tls. The default is blank. Parameter Value configured psk "character string" You can select chap, mschap, mschapv2, pap, or md5...
PostScript Supplement
Page 76
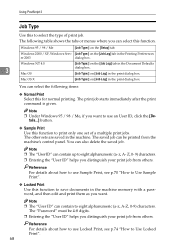
...Print Use this function to eight alphanumeric (a-z, A-Z, 0-9) characters. Windows NT 4.0 3 Mac OS [Job Type:] on the [Job Log] tab in the Document Defaults dialog box. [Job Type:] on [Job Log] in the print dialog box. Note ❒ The "User ID" can contain up to save documents in the... to use Locked Print, see p.70 "How to Use Sample Print". ❖ Locked Print Use this function to eight alphanumeric (a- z, A- The "Password" must be printed from the machine's control panel. Using PostScript 3 Job Type Use this to Use Locked Print". 68 The following items: ❖ ...
...Print Use this function to eight alphanumeric (a-z, A-Z, 0-9) characters. Windows NT 4.0 3 Mac OS [Job Type:] on the [Job Log] tab in the Document Defaults dialog box. [Job Type:] on [Job Log] in the print dialog box. Note ❒ The "User ID" can contain up to save documents in the... to use Locked Print, see p.70 "How to Use Sample Print". ❖ Locked Print Use this function to eight alphanumeric (a- z, A- The "Password" must be printed from the machine's control panel. Using PostScript 3 Job Type Use this to Use Locked Print". 68 The following items: ❖ ...
PostScript Supplement
Page 83
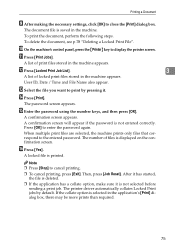
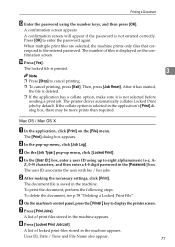
...cancel printing. ❒ To cancel printing, press [Exit]. To print the document, perform the following steps. A confirmation screen will appear if the password is displayed on the confirmation screen. If the collate option is deleted. ❒ If the application has a collate option, make sure it . ...When multiple print files are selected, the machine prints only files that correspond to print by default. User ID, Date / Time and File Name also appear. A list of locked print files stored in the machine appears. L Press [Locked Print...
...cancel printing. ❒ To cancel printing, press [Exit]. To print the document, perform the following steps. A confirmation screen will appear if the password is displayed on the confirmation screen. If the collate option is deleted. ❒ If the application has a collate option, make sure it . ...When multiple print files are selected, the machine prints only files that correspond to print by default. User ID, Date / Time and File Name also appear. A list of locked print files stored in the machine appears. L Press [Locked Print...
PostScript Supplement
Page 85
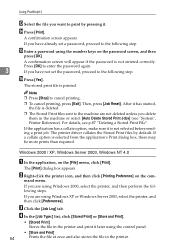
A confirmation screen will appear if the password is not selected before sending a print job. Then, press [Job Reset]. The printer driver automatically collates Locked Print jobs by default. The [Print] dialog box appears. D In the [User ID:] box, enter a user ID using the number keys, and then...Deleting a Locked Print File". User ID, Date / Time and File Name also appear. 77 A confirmation screen appears. Press [OK] to the entered password. The document file is printed. 3 Note ❒ Press [Stop] to display the printer screen. After it has started, the file is deleted....
A confirmation screen will appear if the password is not selected before sending a print job. Then, press [Job Reset]. The printer driver automatically collates Locked Print jobs by default. The [Print] dialog box appears. D In the [User ID:] box, enter a user ID using the number keys, and then...Deleting a Locked Print File". User ID, Date / Time and File Name also appear. 77 A confirmation screen appears. Press [OK] to the entered password. The document file is printed. 3 Note ❒ Press [Stop] to display the printer screen. After it has started, the file is deleted....
PostScript Supplement
Page 92
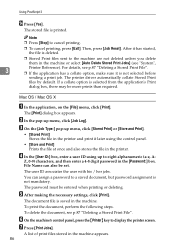
...] to the following step. For details, see "System", Printer Reference). If a collate option is not selected before sending a print job. If you have not set a password, proceed to cancel printing. ❒ To cancel printing, press [Exit]. Then, press [Job Reset]. Using PostScript 3 M Select the file you want to the machine are...'s Print dialog box, there may be more prints than required. The stored print file is deleted. ❒ The Stored Print files sent to print by default. C Click the [Job Log] tab. After it . N Press [Print].
...] to the following step. For details, see "System", Printer Reference). If a collate option is not selected before sending a print job. If you have not set a password, proceed to cancel printing. ❒ To cancel printing, press [Exit]. Then, press [Job Reset]. Using PostScript 3 M Select the file you want to the machine are...'s Print dialog box, there may be more prints than required. The stored print file is deleted. ❒ The Stored Print files sent to print by default. C Click the [Job Log] tab. After it . N Press [Print].
PostScript Supplement
Page 94
Then, press [Job Reset]. The printer driver automatically collate Stored Print files by default. D In the [User ID:] box, enter a user ID using the control panel. • [Store and Print] Prints the file at once and also stores..., click [Print]. The user ID associates the user with his / her jobs. E After making the necessary settings, click [Print]. Z, 0-9) characters, and then enter a 4-8 digit password in the machine appears. 86 To print the document, perform the following steps. To delete the document, see "System", 3 Printer Reference). F On the machine's control...
Then, press [Job Reset]. The printer driver automatically collate Stored Print files by default. D In the [User ID:] box, enter a user ID using the control panel. • [Store and Print] Prints the file at once and also stores..., click [Print]. The user ID associates the user with his / her jobs. E After making the necessary settings, click [Print]. Z, 0-9) characters, and then enter a 4-8 digit password in the machine appears. 86 To print the document, perform the following steps. To delete the document, see "System", 3 Printer Reference). F On the machine's control...
PostScript Supplement
Page 97
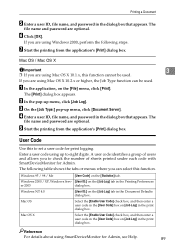
... you to set a user code for Admin, see Help. 89 B In the pop-up menu, click [Document Server]. The file name and password are using SmartDeviceMonitor for print logging. A user code identifies a group of sheets printed under each code with SmartDeviceMonitor for Admin. If you are using... up to eight digits. The following steps. Windows NT 4.0 [User ID:] on [Job Log] in the Document Defaults dialog box. E Start the printing from the application's [Print] dialog box. G Start the printing from the application's [Print] dialog box. C ...
... you to set a user code for Admin, see Help. 89 B In the pop-up menu, click [Document Server]. The file name and password are using SmartDeviceMonitor for print logging. A user code identifies a group of sheets printed under each code with SmartDeviceMonitor for Admin. If you are using... up to eight digits. The following steps. Windows NT 4.0 [User ID:] on [Job Log] in the Document Defaults dialog box. E Start the printing from the application's [Print] dialog box. G Start the printing from the application's [Print] dialog box. C ...
Copy/Document Server Reference
Page 156
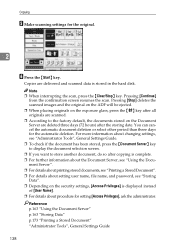
...; For details about printing stored documents, see "Printing a Stored Document". ❒ For details about setting user name, file name, and password, see "Storing Data". ❒ Depending on the Document Server are delivered and scanned data is stored in the hard disk. You can cancel...document has been stored, press the {Document Server} key to display the document selection screen. ❒ If you want to the factory default, the documents stored on the security settings, [Access Privileges] is complete. ❒ For further information about procedure for setting [Access Privileges...
...; For details about printing stored documents, see "Printing a Stored Document". ❒ For details about setting user name, file name, and password, see "Storing Data". ❒ Depending on the Document Server are delivered and scanned data is stored in the hard disk. You can cancel...document has been stored, press the {Document Server} key to display the document selection screen. ❒ If you want to the factory default, the documents stored on the security settings, [Access Privileges] is complete. ❒ For further information about procedure for setting [Access Privileges...
Copy/Document Server Reference
Page 183
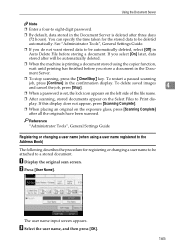
.... C Select the user name, and then press [OK]. 165 To delete saved images and cancel the job, press [Stop]. 4 ❒ When a password is set, the lock icon appears on the left side of the file name. ❒ After scanning, stored documents appear on the exposure glass, press...; When placing an original on the Select Files to Print display. Using the Document Server Note ❒ Enter a four-to eight-digit password. ❒ By default, data stored in the Document Server is deleted after all the originals have been scanned. A Display the original scan screen. If you select...
.... C Select the user name, and then press [OK]. 165 To delete saved images and cancel the job, press [Stop]. 4 ❒ When a password is set, the lock icon appears on the left side of the file name. ❒ After scanning, stored documents appear on the exposure glass, press...; When placing an original on the Select Files to Print display. Using the Document Server Note ❒ Enter a four-to eight-digit password. ❒ By default, data stored in the Document Server is deleted after all the originals have been scanned. A Display the original scan screen. If you select...
Copy/Document Server Reference
Page 218
... 200 C Center, 97, 98, 99, 126 Center/Border Erase, 94, 98 Center Erase, 94, 97 Centering, 99, 126, 185 Changing a file name, 167, 169 Changing a password, 168, 169 Changing a stored program, 140 Changing a user name, 165, 166, 167, 169 Changing the number of print copies while printing is in progress, 175... books, xi Copying stored documents using Connect Print, 151 Covers, 129 Create Margin function, 50 Custom sizes, 23, 40 D Date, 114 Date Stamp, 112, 185 Default, 142 Deleting a document, 178 Deleting a program, 141 Deleting jobs, 35 Deleting the user stamp, 111 Density, 105
... 200 C Center, 97, 98, 99, 126 Center/Border Erase, 94, 98 Center Erase, 94, 97 Centering, 99, 126, 185 Changing a file name, 167, 169 Changing a password, 168, 169 Changing a stored program, 140 Changing a user name, 165, 166, 167, 169 Changing the number of print copies while printing is in progress, 175... books, xi Copying stored documents using Connect Print, 151 Covers, 129 Create Margin function, 50 Custom sizes, 23, 40 D Date, 114 Date Stamp, 112, 185 Default, 142 Deleting a document, 178 Deleting a program, 141 Deleting jobs, 35 Deleting the user stamp, 111 Density, 105


