Quick Start Guide
Page 1
www.ricoh-usa.com Ricoh Product Line Segment 2 thru 6 MP/5000/5001, MP C5000/C6000/C6501, MP7000/8000, MP6001/7001, MP8001/9001, MP907EX This guide is not intended to replace your users manual, features and options will vary by machine type, model and finisher type installed.
www.ricoh-usa.com Ricoh Product Line Segment 2 thru 6 MP/5000/5001, MP C5000/C6000/C6501, MP7000/8000, MP6001/7001, MP8001/9001, MP907EX This guide is not intended to replace your users manual, features and options will vary by machine type, model and finisher type installed.
Troubleshooting Guide
Page 16
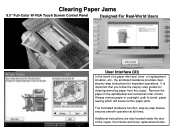
... copier. Always remove paper in the alphabetical and numerical order shown. Clearing Paper Jams 8.5" Full-Color W-VGA Touch Screen Control Panel Designed For Real-World Users User Interface (UI) In the event of the copier, the finisher and toner replacement bottle. It is important that you follow the step by step...
... copier. Always remove paper in the alphabetical and numerical order shown. Clearing Paper Jams 8.5" Full-Color W-VGA Touch Screen Control Panel Designed For Real-World Users User Interface (UI) In the event of the copier, the finisher and toner replacement bottle. It is important that you follow the step by step...
User Guide
Page 10
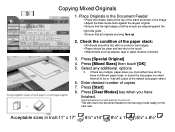
... feel dry to the touch, Attachments such as shown in the image Adjust the Side Guide flush against the right side guide . Ensure that all to normal copy mode ready for the next user. Press [Special Original] 4. Acceptable sizes in different paper trays, or select the size paper you have...
... feel dry to the touch, Attachments such as shown in the image Adjust the Side Guide flush against the right side guide . Ensure that all to normal copy mode ready for the next user. Press [Special Original] 4. Acceptable sizes in different paper trays, or select the size paper you have...

General Settings Guide
Page 1
Operating Instructions General Settings Guide 1 Connecting the Machine 2 System Settings 3 Copier/Document Server Features 4 Facsimile Features 5 Printer Features 6 Scanner Features 7 Registering Addresses and Users for future reference. For safe and correct use, be sure to read the Safety Information in "About This Machine" before you use this machine and keep it handy for Facsimile/Scanner Functions 8 Other User Tools 9 Appendix Read this manual carefully before using the machine.
Operating Instructions General Settings Guide 1 Connecting the Machine 2 System Settings 3 Copier/Document Server Features 4 Facsimile Features 5 Printer Features 6 Scanner Features 7 Registering Addresses and Users for future reference. For safe and correct use, be sure to read the Safety Information in "About This Machine" before you use this machine and keep it handy for Facsimile/Scanner Functions 8 Other User Tools 9 Appendix Read this manual carefully before using the machine.
General Settings Guide
Page 3
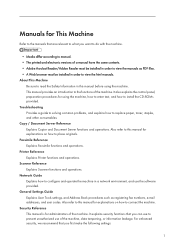
...this manual for explanations on how to connect the machine. Scanner Reference Explains Scanner functions and operations. Network Guide Explains how to place originals. General Settings Guide Explains User Tools settings, and Address Book procedures such as PDF files. • A Web browser must be installed... to view the manuals as registering fax numbers, e-mail addresses, and user codes. This manual provides an introduction to replace paper, toner, staples, and other consumables. Troubleshooting Provides a guide to solving common problems, and explains how to the functions of the machine...
...this manual for explanations on how to connect the machine. Scanner Reference Explains Scanner functions and operations. Network Guide Explains how to place originals. General Settings Guide Explains User Tools settings, and Address Book procedures such as PDF files. • A Web browser must be installed... to view the manuals as registering fax numbers, e-mail addresses, and user codes. This manual provides an introduction to replace paper, toner, staples, and other consumables. Troubleshooting Provides a guide to solving common problems, and explains how to the functions of the machine...

General Settings Guide
Page 4
...Other manuals • Manuals for DeskTopBinder Lite • DeskTopBinder Lite Setup Guide • DeskTopBinder Introduction Guide • Auto Document Link Guide • Manuals provided are specific to machine types. • The following... software products are referred to set up and use PostScript 3. PostScript 3 Supplement Explains how to using Web Image Monitor. Information Contains general notes on this manual when setting the enhanced security functions, or user...
...Other manuals • Manuals for DeskTopBinder Lite • DeskTopBinder Lite Setup Guide • DeskTopBinder Introduction Guide • Auto Document Link Guide • Manuals provided are specific to machine types. • The following... software products are referred to set up and use PostScript 3. PostScript 3 Supplement Explains how to using Web Image Monitor. Information Contains general notes on this manual when setting the enhanced security functions, or user...

General Settings Guide
Page 24
.... When using the control panel. 1. Press [System Settings]. 2. The machine's radio wave status appears. 5. 1. For details about setting methods, see "Configuring WPA/WPA2", Network Guide. • For details about how to specify wireless LAN settings from the control panel on the machine, see "Wireless LAN". • For details about setting...type of the following: [WPA-PSK], [WPA], [WPA2-PSK], or [WPA2]. For details about how to check the machine's radio wave status. Press the [User Tools/Counter] key. • p.12 "Accessing User Tools" 22 Press [Wireless LAN Signal].
.... When using the control panel. 1. Press [System Settings]. 2. The machine's radio wave status appears. 5. 1. For details about setting methods, see "Configuring WPA/WPA2", Network Guide. • For details about how to specify wireless LAN settings from the control panel on the machine, see "Wireless LAN". • For details about setting...type of the following: [WPA-PSK], [WPA], [WPA2-PSK], or [WPA2]. For details about how to check the machine's radio wave status. Press the [User Tools/Counter] key. • p.12 "Accessing User Tools" 22 Press [Wireless LAN Signal].


