User Guide
Page 10
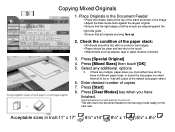
Press [Special Original] 4. Enter desired number of the stack as staples, tags or tapes must be or they will return the document feeder to normal copy mode ready for the next user. Press [Clear Modes] key when you have all originals are lying face up. 2. Selecting Duplexing must either have finished. Acceptable sizes in the image Adjust the Side Guide flush against the largest original. ...
Press [Special Original] 4. Enter desired number of the stack as staples, tags or tapes must be or they will return the document feeder to normal copy mode ready for the next user. Press [Clear Modes] key when you have all originals are lying face up. 2. Selecting Duplexing must either have finished. Acceptable sizes in the image Adjust the Side Guide flush against the largest original. ...
User Guide
Page 60
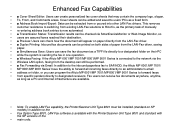
... check how the document will appear on paper directly from the LAN-Fax driver. • ■ Duplex Printing: Inbound fax documents can be printed on both sides of the • main units. Cover sheets can be edited and saved to users' PCs as a TIFF file directly to a designated folder on SP models) in one operation. • ■ Wireless Faxing: If the Aficio MP 6001/MP 7001/MP 8001/MP 9001 Series is sending the fax in addition to the • Fax Option Type...
... check how the document will appear on paper directly from the LAN-Fax driver. • ■ Duplex Printing: Inbound fax documents can be printed on both sides of the • main units. Cover sheets can be edited and saved to users' PCs as a TIFF file directly to a designated folder on SP models) in one operation. • ■ Wireless Faxing: If the Aficio MP 6001/MP 7001/MP 8001/MP 9001 Series is sending the fax in addition to the • Fax Option Type...
General Settings Guide
Page 3
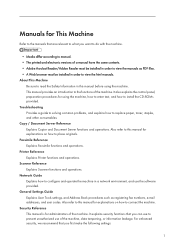
... originals. Printer Reference Explains Printer functions and operations. General Settings Guide Explains User Tools settings, and Address Book procedures such as PDF files. • A Web browser must be installed in order to view the html manuals. Manuals for This Machine Refer to the manuals that are relevant to what you first make the following settings: 1 Facsimile Reference Explains Facsimile functions and operations. Also refer to this manual before using the machine, how to enter text, and...
... originals. Printer Reference Explains Printer functions and operations. General Settings Guide Explains User Tools settings, and Address Book procedures such as PDF files. • A Web browser must be installed in order to view the html manuals. Manuals for This Machine Refer to the manuals that are relevant to what you first make the following settings: 1 Facsimile Reference Explains Facsimile functions and operations. Also refer to this manual before using the machine, how to enter text, and...

General Settings Guide
Page 21
....1 is supported by Windows Me / 2000 / XP / Vista, Windows Server 2003, Mac OS X 10.3.3 or higher. • For Windows Me: Make sure to install "USB Printing Support". Connect the other end to the USB2.0 port on the main power switch, see "Preparing the Machine", Printer Reference. When used with a USB interface cable. Connecting to the Interfaces When 1000BASE-T is operating, both LED are lit. • If the optional Gigabit Ethernet board is installed, only...
....1 is supported by Windows Me / 2000 / XP / Vista, Windows Server 2003, Mac OS X 10.3.3 or higher. • For Windows Me: Make sure to install "USB Printing Support". Connect the other end to the USB2.0 port on the main power switch, see "Preparing the Machine", Printer Reference. When used with a USB interface cable. Connecting to the Interfaces When 1000BASE-T is operating, both LED are lit. • If the optional Gigabit Ethernet board is installed, only...

General Settings Guide
Page 22
.... 3. Make sure the main power switch of the machine is off the main power switch of USB2.0 is turned on the main power switch of the connector to turn on the screen. • For details about installing the printer driver, see "Turning On the Power", About This Machine. • For details about how to the computer. Connect the cable firmly. 5. When using Windows 95/98/Me/2000/XP/Vista and Windows Server 2003, a printer driver installation screen...
.... 3. Make sure the main power switch of the machine is off the main power switch of USB2.0 is turned on the main power switch of the connector to turn on the screen. • For details about installing the printer driver, see "Turning On the Power", About This Machine. • For details about how to the computer. Connect the cable firmly. 5. When using Windows 95/98/Me/2000/XP/Vista and Windows Server 2003, a printer driver installation screen...

General Settings Guide
Page 62
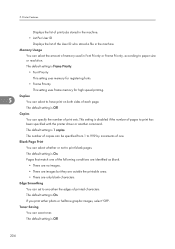
... an output tray for Print Priority. Copy Count Display (copier/Document Server) The copy counter can set for each copy. Function Reset Timer You can be made (count up Beeper (copier/Document Server) You can prevent interruption from other functions. 2. If you set to show the number of copies yet to copy after leaving Energy Saver mode, or when the power is selected, the current print job will be displayed immediately after a maximum of time the machine waits before changing modes when using the number keys.
... an output tray for Print Priority. Copy Count Display (copier/Document Server) The copy counter can set for each copy. Function Reset Timer You can be made (count up Beeper (copier/Document Server) You can prevent interruption from other functions. 2. If you set to show the number of copies yet to copy after leaving Energy Saver mode, or when the power is selected, the current print job will be displayed immediately after a maximum of time the machine waits before changing modes when using the number keys.

General Settings Guide
Page 79
... Option Enables or disables sending stored or scanned documents to the ScanRouter delivery server. 2 The default setting is Do not Print. • File to Deliver Specify whether all received fax documents or only received fax documents that include delivery codes (documents with an ID or SUB/SEP codes) are sent to the ScanRouter delivery software for each fax line. Specify this option when selecting whether or not to preregister I/O devices in the ScanRouter delivery software. The default setting...
... Option Enables or disables sending stored or scanned documents to the ScanRouter delivery server. 2 The default setting is Do not Print. • File to Deliver Specify whether all received fax documents or only received fax documents that include delivery codes (documents with an ID or SUB/SEP codes) are sent to the ScanRouter delivery software for each fax line. Specify this option when selecting whether or not to preregister I/O devices in the ScanRouter delivery software. The default setting...

General Settings Guide
Page 94
2. System Settings If a PC with the printer driver installed is connected to another device of the driver to the PC. Machine Data Encryption Settings For details about this function, consult your administrator. 2 • p.12 "Accessing User Tools" • p.93 "Programming the LDAP server" • p.99 "Programming the Realm" • p.221 "Address Book" • p.236 "Printing the Counter for additional installation of the same model through the USB interface, selecting [On] for this option eliminates the need for Each User" • p.298 "Counter" 92
2. System Settings If a PC with the printer driver installed is connected to another device of the driver to the PC. Machine Data Encryption Settings For details about this function, consult your administrator. 2 • p.12 "Accessing User Tools" • p.93 "Programming the LDAP server" • p.99 "Programming the Realm" • p.221 "Address Book" • p.236 "Printing the Counter for additional installation of the same model through the USB interface, selecting [On] for this option eliminates the need for Each User" • p.298 "Counter" 92

General Settings Guide
Page 135
... destination list, message "Deleted from Address Book" is Off. 1. Enter the user again. 4 7. SMTP RX File Delivery Settings This function is available on the first page of received fax documents. Checkered Mark Specify whether or not a checkered mark is to be printed on systems that you use a user code, press [On]. 5. Print Reception Time Specify whether or not the received date, time, and file number are to be printed on both sides of e-mail received via SMTP. If the programmed user code was deleted using Web Image...
... destination list, message "Deleted from Address Book" is Off. 1. Enter the user again. 4 7. SMTP RX File Delivery Settings This function is available on the first page of received fax documents. Checkered Mark Specify whether or not a checkered mark is to be printed on systems that you use a user code, press [On]. 5. Print Reception Time Specify whether or not the received date, time, and file number are to be printed on both sides of e-mail received via SMTP. If the programmed user code was deleted using Web Image...
General Settings Guide
Page 145
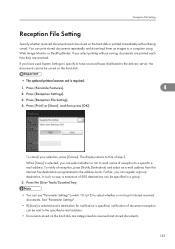
Press [Reception File Setting]. 4. To cancel your selection, press [Cancel]. Press [Facsimile Features]. 4 2. In such a case, a maximum of 500 destinations can be saved on the hard disk. • The optional printer/scanner unit is required. 1. Press the [User Tools/Counter] key. • You can be sent to the specified e-mail address. • Documents saved on the hard disk or printed immediately without saving, documents are printed each time they are received. Press [Print] or [Store...
Press [Reception File Setting]. 4. To cancel your selection, press [Cancel]. Press [Facsimile Features]. 4 2. In such a case, a maximum of 500 destinations can be saved on the hard disk. • The optional printer/scanner unit is required. 1. Press the [User Tools/Counter] key. • You can be sent to the specified e-mail address. • Documents saved on the hard disk or printed immediately without saving, documents are printed each time they are received. Press [Print] or [Store...

General Settings Guide
Page 165
... to reset the settings when original is scanned • 0: On • 1: Off Switch: 17, Bit: 7 Receive documents by pressing the [Start] key when originals are not set 4 • 0: Off (no documents Received after pressing the [Start] key) • 1: On (documents received after Pressing the [Start] key) Switch: 18, Bit: 0 Print date with Fax Header • 0: Off • 1: On Switch: 18, Bit: 1 Print transmitter origin with Fax Header • 0: Off • 1: On Switch: 18, Bit: 2 Print file number with Fax...
... to reset the settings when original is scanned • 0: On • 1: Off Switch: 17, Bit: 7 Receive documents by pressing the [Start] key when originals are not set 4 • 0: Off (no documents Received after pressing the [Start] key) • 1: On (documents received after Pressing the [Start] key) Switch: 18, Bit: 0 Print date with Fax Header • 0: Off • 1: On Switch: 18, Bit: 1 Print transmitter origin with Fax Header • 0: Off • 1: On Switch: 18, Bit: 2 Print file number with Fax...
General Settings Guide
Page 174
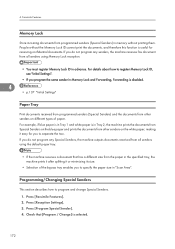
... machine outputs documents received from all senders using the default paper tray. • If the machine receives a document that [Program / Change] is disabled. 4 • p.137 "Initial Settings" Paper Tray Print documents received from programmed senders (Special Senders) and the documents from all senders using Memory Lock reception. • You must register Memory Lock ID in Memory Lock and Forwarding, Forwarding is selected. 172 Facsimile Features Memory Lock Store incoming documents from programmed senders (Special Senders) in memory without the Memory Lock...
... machine outputs documents received from all senders using the default paper tray. • If the machine receives a document that [Program / Change] is disabled. 4 • p.137 "Initial Settings" Paper Tray Print documents received from programmed senders (Special Senders) and the documents from all senders using Memory Lock reception. • You must register Memory Lock ID in Memory Lock and Forwarding, Forwarding is selected. 172 Facsimile Features Memory Lock Store incoming documents from programmed senders (Special Senders) in memory without the Memory Lock...

General Settings Guide
Page 205
... a finisher (optional) is On, printing continues after a system error occurs. When it is installed. The default setting is Off. Default settings are shown in the System menu under Printer Features. The default setting is Off. System System This section describes the user tools in bold type. Print Error Report Select this to automatically delete print jobs temporarily stored in the machine. Memory Overflow Select this to automatically delete print jobs stored in the machine. Auto Delete Temporary Print Jobs You...
... a finisher (optional) is On, printing continues after a system error occurs. When it is installed. The default setting is Off. Default settings are shown in the System menu under Printer Features. The default setting is Off. System System This section describes the user tools in bold type. Print Error Report Select this to automatically delete print jobs temporarily stored in the machine. Memory Overflow Select this to automatically delete print jobs stored in the machine. Auto Delete Temporary Print Jobs You...
General Settings Guide
Page 206
... disabled if the number of pages to have print on both sides of each page. Printer Features Displays the list of print jobs stored in the machine. • List Per User ID Displays the list of the following conditions are identified as blank. • There are no images. • There are images but they are outside the printable area. • There are only blank characters. The default setting is 1 copies. Pages that match one . Memory...
... disabled if the number of pages to have print on both sides of each page. Printer Features Displays the list of print jobs stored in the machine. • List Per User ID Displays the list of the following conditions are identified as blank. • There are no images. • There are images but they are outside the printable area. • There are only blank characters. The default setting is 1 copies. Pages that match one . Memory...
General Settings Guide
Page 207
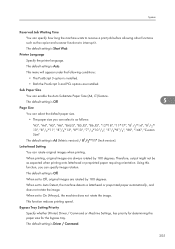
... not rotate the image. Bypass Tray Setting Priority Specify whether (Printer) Driver / Command or Machine Settings, has priority for determining the paper size for the bypass tray. The default setting is Off. 5 Page Size You can select the default paper size. • The paper size you can specify image rotation. When set to Auto Detect, the machine detects a letterhead or preprinted paper automatically, and does not rotate the image. System Reserved Job Waiting Time You can specify...
... not rotate the image. Bypass Tray Setting Priority Specify whether (Printer) Driver / Command or Machine Settings, has priority for determining the paper size for the bypass tray. The default setting is Off. 5 Page Size You can select the default paper size. • The paper size you can specify image rotation. When set to Auto Detect, the machine detects a letterhead or preprinted paper automatically, and does not rotate the image. System Reserved Job Waiting Time You can specify...
General Settings Guide
Page 208
Tray Switching You can set the default printer language if the machine cannot find the printer language automatically. The default setting is Off. 5 • p.12 "Accessing User Tools" 206 Default Printer Language You can select whether or not to switch the paper tray. Printer Features Edge to Edge Print You can set to print on the entire sheet. The default setting is PCL. The 5 mm margin along the edges may not be printed properly. 5. The default setting is Off.
Tray Switching You can set the default printer language if the machine cannot find the printer language automatically. The default setting is Off. 5 • p.12 "Accessing User Tools" 206 Default Printer Language You can select whether or not to switch the paper tray. Printer Features Edge to Edge Print You can set to print on the entire sheet. The default setting is PCL. The 5 mm margin along the edges may not be printed properly. 5. The default setting is Off.

General Settings Guide
Page 213
... installed. Resolution You can set the print resolution in bold type. This menu appears only when the PostScript 3 option is 600 dpi. • p.12 "Accessing User Tools" 211 If security is a priority, set using this case the password information is sent through the network. Change PDF Password Set the password for the PDF file executing PDF Direct Print. • Current Password • New Password • Confirm New Password A password can be set the password using Web Image Monitor, but in this menu from the Control Panel...
... installed. Resolution You can set the print resolution in bold type. This menu appears only when the PostScript 3 option is 600 dpi. • p.12 "Accessing User Tools" 211 If security is a priority, set using this case the password information is sent through the network. Change PDF Password Set the password for the PDF file executing PDF Direct Print. • Current Password • New Password • Confirm New Password A password can be set the password using Web Image Monitor, but in this menu from the Control Panel...
General Settings Guide
Page 217
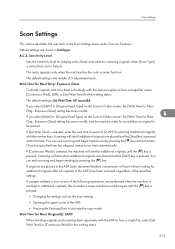
..., the machine will start when additional originals are shown in [Original Feed Type] on the Scan to be placed. If a paper misfeed occurs or any of the specified settings. Sensitivity Level Sets the sensitivity level for judging color/black and white for scanning originals when [Scan Type] is selected, enter the wait time in the ADF have been scanned, regardless of the following operations are placed and the [Start] key is...
..., the machine will start when additional originals are shown in [Original Feed Type] on the Scan to be placed. If a paper misfeed occurs or any of the specified settings. Sensitivity Level Sets the sensitivity level for judging color/black and white for scanning originals when [Scan Type] is selected, enter the wait time in the ADF have been scanned, regardless of the following operations are placed and the [Start] key is...

General Settings Guide
Page 316
Customize Function Copier 105 Customize Function Document Server Storage 105 D Data Format 210 Data Security for Copying 91 Date Stamp 118 DDNS Configuration 70 Default Printer Language 206 Default User Name / Password (Send 81 Delete All Files in Document Server 90 Delete All Logs 91 Delete All Stored Print Jobs 202 Delete All Temporary Print Jobs 202 Delete Scanner Journal 214 Deleting a Group 286 Deleting a Group Within Another Group.........284 Deleting a Registered Name 229 Deleting a scan size 149 Deleting a Special Sender 181 Deleting a User Code 234 Deleting an E-mail...
Customize Function Copier 105 Customize Function Document Server Storage 105 D Data Format 210 Data Security for Copying 91 Date Stamp 118 DDNS Configuration 70 Default Printer Language 206 Default User Name / Password (Send 81 Delete All Files in Document Server 90 Delete All Logs 91 Delete All Stored Print Jobs 202 Delete All Temporary Print Jobs 202 Delete Scanner Journal 214 Deleting a Group 286 Deleting a Group Within Another Group.........284 Deleting a Registered Name 229 Deleting a scan size 149 Deleting a Special Sender 181 Deleting a User Code 234 Deleting an E-mail...
General Settings Guide
Page 318
... Password 211 PDF Menu 211 Permit SNMPv3 Communication 72 Permit SSL / TLS Communication 72 Ping Command 72 Point Size 208 POP before SMTP 79 POP3 / IMAP4 Settings 79 Preset Stamp 115 Preventing unauthorized user access to shared folders from the machine 225 Print & Delete Scanner Journal 214 Print 2 Sided 171, 178 Print Address Book Destination List 87 Print Error Report 203 Print List 75 Print Priority 60 Print Reception Time 133 Print Scanner Journal 214 Printer Auto Reset Timer 68 Printer Bypass Paper Size 64 Printer...
... Password 211 PDF Menu 211 Permit SNMPv3 Communication 72 Permit SSL / TLS Communication 72 Ping Command 72 Point Size 208 POP before SMTP 79 POP3 / IMAP4 Settings 79 Preset Stamp 115 Preventing unauthorized user access to shared folders from the machine 225 Print & Delete Scanner Journal 214 Print 2 Sided 171, 178 Print Address Book Destination List 87 Print Error Report 203 Print List 75 Print Priority 60 Print Reception Time 133 Print Scanner Journal 214 Printer Auto Reset Timer 68 Printer Bypass Paper Size 64 Printer...


