User Guide
Page 7
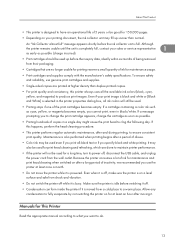
Selecting the Control Panel Language...191 Restricting Printer Functions...193 Locking the Keys...193 Unlocking the Keys...193 Replacing a Print Cartridge...195 Checking the Remaining Ink...195 Replacing a Print Cartridge...197 Handling Print Cartridges...199 Replacing an Ink Collector Unit...201 Cleaning...204 Cleaning the Power Cable Plug...204 Moving...205 Moving a Short Distance...205 Moving...
Selecting the Control Panel Language...191 Restricting Printer Functions...193 Locking the Keys...193 Unlocking the Keys...193 Replacing a Print Cartridge...195 Checking the Remaining Ink...195 Replacing a Print Cartridge...197 Handling Print Cartridges...199 Replacing an Ink Collector Unit...201 Cleaning...204 Cleaning the Power Cable Plug...204 Moving...205 Moving a Short Distance...205 Moving...
User Guide
Page 8
... Mismatch (Bypass Tray 260 Paper Size Mismatch/Paper Type Mismatch (Auto Tray Select 262 Cover Open...264 Cover Open / Print Cartridge(s) Not Detected 266 Duplex Unit Not Detected...268 Cartridge Almost Empty...269 Cartridge Empty...270 Used Cartridge...271 Ink Collector Unit Not Detected...272 Ink Collector Unit Almost Full...274 Ink Collector Unit Full...274 Used...
... Mismatch (Bypass Tray 260 Paper Size Mismatch/Paper Type Mismatch (Auto Tray Select 262 Cover Open...264 Cover Open / Print Cartridge(s) Not Detected 266 Duplex Unit Not Detected...268 Cartridge Almost Empty...269 Cartridge Empty...270 Used Cartridge...271 Ink Collector Unit Not Detected...272 Ink Collector Unit Almost Full...274 Ink Collector Unit Full...274 Used...
User Guide
Page 14
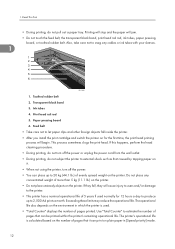
...printer. Transparent black band 3. This process sometimes clogs the print head. If they fall inside the printer. • After you install the print cartridge and switch the printer on for 12 hours a day to produce up to snag any concentrated weight of pages printed. Also, take care not...5 kg (11.1 lb.) on the printer. • Do not place unsteady objects on the printer. Printing will stop and the paper will begin. Ink tubes 4. Paper pressing board 6. The printer's operational life is used normally for the first time, the print head priming process will jam. • ...
...printer. Transparent black band 3. This process sometimes clogs the print head. If they fall inside the printer. • After you install the print cartridge and switch the printer on for 12 hours a day to produce up to snag any concentrated weight of pages printed. Also, take care not...5 kg (11.1 lb.) on the printer. • Do not place unsteady objects on the printer. Printing will stop and the paper will begin. Ink tubes 4. Paper pressing board 6. The printer's operational life is used normally for the first time, the print head priming process will jam. • ...
User Guide
Page 15
...or be used . • Printing stops if one of inactivity, we recommended you to change the print cartridge appears, change the cartridge as soon as possible. • Printing hundreds of ink for printing reserve a small quantity of copies in a single day might cause the print head to produce ...used for at least once a month. • Do not move the printer while it is busy. If a cartridge containing a color ink such as possible (charge incurred). • Print cartridges should be good for 150,000 pages. • Depending on after and during printing, to do. 13 If ...
...or be used . • Printing stops if one of inactivity, we recommended you to change the print cartridge appears, change the cartridge as soon as possible. • Printing hundreds of ink for printing reserve a small quantity of copies in a single day might cause the print head to produce ...used for at least once a month. • Do not move the printer while it is busy. If a cartridge containing a color ink such as possible (charge incurred). • Print cartridges should be good for 150,000 pages. • Depending on after and during printing, to do. 13 If ...
User Guide
Page 23
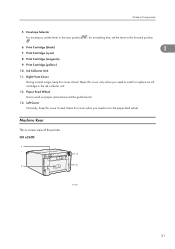
Envelope Selector For envelopes, set the lever to wind out paper jammed around the guide board. 13. Print Cartridge (black) 1 7. Print Cartridge (cyan) 8. Ink Collector Unit 11. GX e2600 1 4 7 5 BYJ260S 21 Print Cartridge (magenta) 9. Print Cartridge (yellow) 10. Right Front Cover During normal usage, keep this cover only when you need to turn the paper feed wheel...
Envelope Selector For envelopes, set the lever to wind out paper jammed around the guide board. 13. Print Cartridge (black) 1 7. Print Cartridge (cyan) 8. Ink Collector Unit 11. GX e2600 1 4 7 5 BYJ260S 21 Print Cartridge (magenta) 9. Print Cartridge (yellow) 10. Right Front Cover During normal usage, keep this cover only when you need to turn the paper feed wheel...
User Guide
Page 44
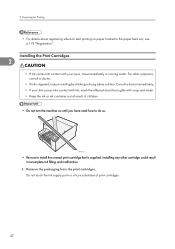
...; If your eyes, rinse immediately in running water. Installing any other symptoms, consult a doctor. • If ink is supplied. Remove the packaging from the print cartridges. Preparing for Printing • For details about registering where to do so. BPR111S • Be sure to install...the machine on until you have read how to start printing on paper loaded in incomplete ink filling and malfunction. 1. Installing the Print Cartridges 2 • If ink comes into contact with ink, wash the affected area thoroughly with your skin comes into contact with soap and water...
...; If your eyes, rinse immediately in running water. Installing any other symptoms, consult a doctor. • If ink is supplied. Remove the packaging from the print cartridges. Preparing for Printing • For details about registering where to do so. BPR111S • Be sure to install...the machine on until you have read how to start printing on paper loaded in incomplete ink filling and malfunction. 1. Installing the Print Cartridges 2 • If ink comes into contact with ink, wash the affected area thoroughly with your skin comes into contact with soap and water...
User Guide
Page 46
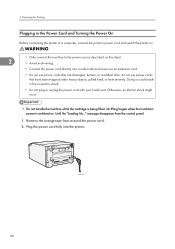
... the printer's power cord and switch the printer on. • Only connect the machine to the power source described on . Until the "Loading Ink..." message disappears from around the power cord. 2. Plug the power cord fully into a wall outlet and never use an extension cord. • Do... use power cords that are damaged, broken, or modified. Otherwise, an electric shock might occur. • Do not handle the machine while the cartridge is switched on this sheet. 2 • Avoid multi-wiring. • Connect the power cord directly into the printer. Remove the orange tape ...
... the printer's power cord and switch the printer on. • Only connect the machine to the power source described on . Until the "Loading Ink..." message disappears from around the power cord. 2. Plug the power cord fully into a wall outlet and never use an extension cord. • Do... use power cords that are damaged, broken, or modified. Otherwise, an electric shock might occur. • Do not handle the machine while the cartridge is switched on this sheet. 2 • Avoid multi-wiring. • Connect the power cord directly into the printer. Remove the orange tape ...
User Guide
Page 109
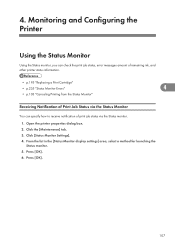
... Printer Using the Status Monitor Using the Status monitor, you can check the print job status, error messages amount of remaining ink, and other printer status information. • p.195 "Replacing a Print Cartridge" • p.255 "Status Monitor Errors" 4 • p.103 "Canceling Printing from the Status Monitor" Receiving Notification of Print Job Status via...
... Printer Using the Status Monitor Using the Status monitor, you can check the print job status, error messages amount of remaining ink, and other printer status information. • p.195 "Replacing a Print Cartridge" • p.255 "Status Monitor Errors" 4 • p.103 "Canceling Printing from the Status Monitor" Receiving Notification of Print Job Status via...

User Guide
Page 122
Functions Selectable value Printer Error ON 4 OFF Cartridge Empty ON OFF Cartridge Almost Empty ON OFF Replace Ink Collector Unit ON OFF Ink Collector Unit Near Full ON OFF No Paper ON OFF Paper Misfeed ON OFF Paper Size Mismatch ON OFF Paper Type Mismatch ON OFF Paper ...
Functions Selectable value Printer Error ON 4 OFF Cartridge Empty ON OFF Cartridge Almost Empty ON OFF Replace Ink Collector Unit ON OFF Ink Collector Unit Near Full ON OFF No Paper ON OFF Paper Misfeed ON OFF Paper Size Mismatch ON OFF Paper Type Mismatch ON OFF Paper ...

User Guide
Page 125
Functions Notify within Cartridge Almost Empty Functions Notify when error Notify within Replace Ink Collector Unit Functions Notify when error Notify within Using Web Browser Selectable value 0 5 10 15 5 20 25 30 (minutes) Default 4 Selectable value Default Occurs Occurs & Fixed Occurs 10 20 10 30 (%) Selectable value Occurs 0 5 10 15 20 25 30 (minutes) Occurs Default 5 123
Functions Notify within Cartridge Almost Empty Functions Notify when error Notify within Replace Ink Collector Unit Functions Notify when error Notify within Using Web Browser Selectable value 0 5 10 15 5 20 25 30 (minutes) Default 4 Selectable value Default Occurs Occurs & Fixed Occurs 10 20 10 30 (%) Selectable value Occurs 0 5 10 15 20 25 30 (minutes) Occurs Default 5 123
User Guide
Page 156
... panel language See p.191 "Selecting the Control Panel Language" 5 Restricting printer functions See p.193 "Restricting Printer Functions" Replacing a print cartridge See p.195 "Replacing a Print Cartridge" Replacing an ink collector unit See p.201 "Replacing an Ink Collector Unit" Cleaning See p.204 "Cleaning" Moving See p.205 "Moving" Disposing See p.207 "Disposing" When not using for a long...
... panel language See p.191 "Selecting the Control Panel Language" 5 Restricting printer functions See p.193 "Restricting Printer Functions" Replacing a print cartridge See p.195 "Replacing a Print Cartridge" Replacing an ink collector unit See p.201 "Replacing an Ink Collector Unit" Cleaning See p.204 "Cleaning" Moving See p.205 "Moving" Disposing See p.207 "Disposing" When not using for a long...

User Guide
Page 168
Head cleaning consumes ink. Perform a head cleaning when a particular color cannot be automatically performed. 6 1. After a Print cartridge is empty, replace it instead of performing a print head cleaning. BPR137S 166 BYJ127S 6. Slide the envelope selector to perform a normal print head cleaning. Press the [Menu] key. When the Print cartridge is replaced, a print head cleaning will be printed or print images are blurred. Maintaining BPR212S Head-cleaning Follow the procedure below to the forward position. 2.
Head cleaning consumes ink. Perform a head cleaning when a particular color cannot be automatically performed. 6 1. After a Print cartridge is empty, replace it instead of performing a print head cleaning. BPR137S 166 BYJ127S 6. Slide the envelope selector to perform a normal print head cleaning. Press the [Menu] key. When the Print cartridge is replaced, a print head cleaning will be printed or print images are blurred. Maintaining BPR212S Head-cleaning Follow the procedure below to the forward position. 2.

User Guide
Page 171
...below to display [Head-flushing], and then press the [#Enter] key. After a Print cartridge is empty, replace it instead of performing a print head cleaning. Since this consumes more ink than a normal head cleaning does, perform this when the problem persists after performing a ...normal head cleaning. When the Print cartridge is replaced, a print head cleaning will be automatically performed. 1. Press the [Menu...
...below to display [Head-flushing], and then press the [#Enter] key. After a Print cartridge is empty, replace it instead of performing a print head cleaning. Since this consumes more ink than a normal head cleaning does, perform this when the problem persists after performing a ...normal head cleaning. When the Print cartridge is replaced, a print head cleaning will be automatically performed. 1. Press the [Menu...

User Guide
Page 197
... dialog box appears. 195 Checking the cartridge replacement indicators of the printer control panel 6 BPR201S The illustration above indicates the control panel is indicating that the cyan print cartridge is empty. Checking the Remaining Ink Follow the procedure below to replace Print cartridges using the Status monitor or the cartridge replacement indicators. Checking Using the...
... dialog box appears. 195 Checking the cartridge replacement indicators of the printer control panel 6 BPR201S The illustration above indicates the control panel is indicating that the cyan print cartridge is empty. Checking the Remaining Ink Follow the procedure below to replace Print cartridges using the Status monitor or the cartridge replacement indicators. Checking Using the...

User Guide
Page 198
...ink has completely run out. Check which color of cartridge change. From left to be also checked on the control panel. 196 A red background in the image indicates that printing is not possible. BYJ138S • A message indicating to replace a print cartridge can be used for determination of cartridge 6 needs to right, the cartridge... replacement indicators display the status of the black (K), cyan (C), magenta (M), and yellow (Y) Print cartridges. • The cartridge status can...
...ink has completely run out. Check which color of cartridge change. From left to be also checked on the control panel. 196 A red background in the image indicates that printing is not possible. BYJ138S • A message indicating to replace a print cartridge can be used for determination of cartridge 6 needs to right, the cartridge... replacement indicators display the status of the black (K), cyan (C), magenta (M), and yellow (Y) Print cartridges. • The cartridge status can...

User Guide
Page 199
... ingested, induce vomiting by drinking a strong saline solution. For other symptoms, consult a doctor. • If ink is remaining in running water. If multiple cartridges are empty, replace all the empty cartridges. Replacing a Print Cartridge Follow the procedure below to insert the print cartridges correctly. Consult a doctor immediately. • If your eyes, rinse immediately in the...
... ingested, induce vomiting by drinking a strong saline solution. For other symptoms, consult a doctor. • If ink is remaining in running water. If multiple cartridges are empty, replace all the empty cartridges. Replacing a Print Cartridge Follow the procedure below to insert the print cartridges correctly. Consult a doctor immediately. • If your eyes, rinse immediately in the...

User Guide
Page 201
... soap and water. • Keep the ink or ink container out of reach of a Print cartridge until the cartridge will be installed in running water. Replacing a Print Cartridge BPR115S • p.315 "Recommended Consumables" Handling Print Cartridges Important points about handling Print cartridges are explained. 6 • If ink comes into contact with ink, wash the affected area thoroughly with your...
... soap and water. • Keep the ink or ink container out of reach of a Print cartridge until the cartridge will be installed in running water. Replacing a Print Cartridge BPR115S • p.315 "Recommended Consumables" Handling Print Cartridges Important points about handling Print cartridges are explained. 6 • If ink comes into contact with ink, wash the affected area thoroughly with your...

User Guide
Page 351
... Unit 11. Paper Feed Wheel Use to install or replace an ink cartridge or the ink collector unit. 12. Machine Rear This is a rear view of the printer. 1 4 2 3 5 BUG104S 56 BUG105S 21 Print Cartridge (black) 1 7. Guide to the forward position 6. for everything else, set the lever to turn the paper feed wheel. Right ...paper jammed around the guide board. 13. Open this cover closed . Left Cover Normally, keep this cover when you need to the rear position . ; Print Cartridge (cyan) 8. Envelope Selector For envelopes, set the lever to Components 5. Print...
... Unit 11. Paper Feed Wheel Use to install or replace an ink cartridge or the ink collector unit. 12. Machine Rear This is a rear view of the printer. 1 4 2 3 5 BUG104S 56 BUG105S 21 Print Cartridge (black) 1 7. Guide to the forward position 6. for everything else, set the lever to turn the paper feed wheel. Right ...paper jammed around the guide board. 13. Open this cover closed . Left Cover Normally, keep this cover when you need to the rear position . ; Print Cartridge (cyan) 8. Envelope Selector For envelopes, set the lever to Components 5. Print...
User Guide
Page 704
...printer main power before beginning the replacement. 2. Set new print head ranks ųųųųų3. Remove the FFC. 3. Remove the ink cartridges. 2. Before Ჽ unlocking Disconnect the right side and left corner of the tool to the front guide rod. Remove the spring....the spring by disconnecting the top end (shown by the date printed on the front left side next. Remove the screw (x1䋩. Unit GX hole. Carriage Left side C Attach the fastening -2 and removal tools Holes C -3 Unlock guide rod 1. Remove the screws (x3). Boss Pull...
...printer main power before beginning the replacement. 2. Set new print head ranks ųųųųų3. Remove the FFC. 3. Remove the ink cartridges. 2. Before Ჽ unlocking Disconnect the right side and left corner of the tool to the front guide rod. Remove the spring....the spring by disconnecting the top end (shown by the date printed on the front left side next. Remove the screw (x1䋩. Unit GX hole. Carriage Left side C Attach the fastening -2 and removal tools Holes C -3 Unlock guide rod 1. Remove the screws (x3). Boss Pull...

User Guide
Page 705
...). 4. Remove the humidity retention cap. Make sure to print head will perform auto maintenance and consume a large amount of ink. Procedure 3. Ink cartridges Left Hole Marking Right CAUTION: If you turn off the power. Clean from right to fold them. 䊶One FFC ...ĭ Į Ĭ 4. Adjust the paper feed. [Menu]ą[Maintenance]ą[Adj. Attach the right cover.See Step A-4. 12. Attach the ink cartridge cover. See Step A-1 and 2. 6 *1: 䇸Standard䇹-䇸High Speed䇹-䇸High Quality 2: Only "Tray 1-Plain Paper" 5. right side...
...). 4. Remove the humidity retention cap. Make sure to print head will perform auto maintenance and consume a large amount of ink. Procedure 3. Ink cartridges Left Hole Marking Right CAUTION: If you turn off the power. Clean from right to fold them. 䊶One FFC ...ĭ Į Ĭ 4. Adjust the paper feed. [Menu]ą[Maintenance]ą[Adj. Attach the right cover.See Step A-4. 12. Attach the ink cartridge cover. See Step A-1 and 2. 6 *1: 䇸Standard䇹-䇸High Speed䇹-䇸High Quality 2: Only "Tray 1-Plain Paper" 5. right side...


