Administration Guide
Page 3
...sizes on for Nuance DigiDocFlow 43 2.8.17 Enable single sign-on Ricoh device 17 2.4 Ricoh Java software installation 18 2.4.1 Newer devices type F, H, I, J, K, L, N and O 18 2.4.2 Legacy device type B 19 2.5 SafeCom Go Ricoh software installation 20 2.5.1 Send SafeCom Go Ricoh (*.b87) file 20 2.6 Additional configuration 20 2.7 SafeCom Go Ricoh web interface 21 2.7.1 Login to the SafeCom Go Ricoh web interface 21 2.7.2 Information web page 21 2.7.3 Configuration web page 22 2.7.4 Configuration web page - Table of encryption keys 42 2.8.15 Control user...
...sizes on for Nuance DigiDocFlow 43 2.8.17 Enable single sign-on Ricoh device 17 2.4 Ricoh Java software installation 18 2.4.1 Newer devices type F, H, I, J, K, L, N and O 18 2.4.2 Legacy device type B 19 2.5 SafeCom Go Ricoh software installation 20 2.5.1 Send SafeCom Go Ricoh (*.b87) file 20 2.6 Additional configuration 20 2.7 SafeCom Go Ricoh web interface 21 2.7.1 Login to the SafeCom Go Ricoh web interface 21 2.7.2 Information web page 21 2.7.3 Configuration web page 22 2.7.4 Configuration web page - Table of encryption keys 42 2.8.15 Control user...

Administration Guide
Page 4
... Install SafeCom Go Ricoh via web page 46 3 Using SafeCom Go Ricoh 48 3.1 Ricoh Aficio MFPs 48 3.1.1 Control panel 48 3.1.2 Login 48 3.1.3 Pull print 50 3.1.4 Copy 51 3.1.5 E-mail 52 3.1.6 Send to Fax 54 3.1.7 Address Book 55 3.1.8 Logout 56 3.1.9 Register card at device 56 3.1.10 Register card with Windows logon 57 3.1.11 Register card with PUK code 57 3.2 Ricoh Aficio MP 171, SP 201F, SP 201SPF 58 3.2.1 Control Panel 58 3.2.2 Login with card 58 3.2.3 Pull Print 58 3.2.4 Copy 58 3.2.5 Logout 58 4 Using...
... Install SafeCom Go Ricoh via web page 46 3 Using SafeCom Go Ricoh 48 3.1 Ricoh Aficio MFPs 48 3.1.1 Control panel 48 3.1.2 Login 48 3.1.3 Pull print 50 3.1.4 Copy 51 3.1.5 E-mail 52 3.1.6 Send to Fax 54 3.1.7 Address Book 55 3.1.8 Logout 56 3.1.9 Register card at device 56 3.1.10 Register card with Windows logon 57 3.1.11 Register card with PUK code 57 3.2 Ricoh Aficio MP 171, SP 201F, SP 201SPF 58 3.2.1 Control Panel 58 3.2.2 Login with card 58 3.2.3 Pull Print 58 3.2.4 Copy 58 3.2.5 Logout 58 4 Using...
Administration Guide
Page 14
... Go Ricoh version S87 nnn.020*01 Support for device with embedded Java and Java Type J and K devices. Possible to control default scan settings for E-mail (2.8.11) and Send to Fax (2.8.12). Supports SafeCom G3 Server features: Unicode and Enhanced encryption. Added section: Control max length of SafeCom P:Go for Ricoh printers (1.4 and 2.7.4). Device can register their Windows logon, password, and...
... Go Ricoh version S87 nnn.020*01 Support for device with embedded Java and Java Type J and K devices. Possible to control default scan settings for E-mail (2.8.11) and Send to Fax (2.8.12). Supports SafeCom G3 Server features: Unicode and Enhanced encryption. Added section: Control max length of SafeCom P:Go for Ricoh printers (1.4 and 2.7.4). Device can register their Windows logon, password, and...

Administration Guide
Page 15
... stack sizes on Ricoh device (2.3). 3. Additional configuration (2.6). 2.2 SafeCom Go Ricoh hardware installation Refer to the appropriate section: If the device has Java embedded connect the USB SafeCom ID Device to the device's USB port and proceed to turn off power. The printer's control panel displays Please wait... SafeCom Go Ricoh hardware installation: Newer devices Type F, H, I , J, K, L, N and O (2.4.1). Legacy device Type B (2.4.2). 4. Locate the printer's SD card slots (typically located at the rear of the printer near the RJ-45 network...
... stack sizes on Ricoh device (2.3). 3. Additional configuration (2.6). 2.2 SafeCom Go Ricoh hardware installation Refer to the appropriate section: If the device has Java embedded connect the USB SafeCom ID Device to the device's USB port and proceed to turn off power. The printer's control panel displays Please wait... SafeCom Go Ricoh hardware installation: Newer devices Type F, H, I , J, K, L, N and O (2.4.1). Legacy device Type B (2.4.2). 4. Locate the printer's SD card slots (typically located at the rear of the printer near the RJ-45 network...
Administration Guide
Page 16
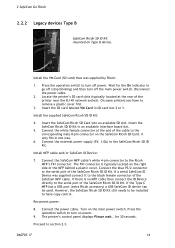
... card slot 2 or 3. Connect the SafeCom MFP cable's white 4-pin connector to the SafeCom Ricoh SD ID Kit. If a serial SafeCom ID Device was supplied by Ricoh: 1. If the Type C MFP has a USB port (extra Ricoh accessory) a USB SafeCom ID device can be installed to have to the corresponding male 8-pin connector on the SafeCom Ricoh SD Card. Reconnect power: 8. The printer's control panel displays Please wait... On some printers you have copy control. Install the supplied SafeCom Ricoh...
... card slot 2 or 3. Connect the SafeCom MFP cable's white 4-pin connector to the SafeCom Ricoh SD ID Kit. If a serial SafeCom ID Device was supplied by Ricoh: 1. If the Type C MFP has a USB port (extra Ricoh accessory) a USB SafeCom ID device can be installed to have to the corresponding male 8-pin connector on the SafeCom Ricoh SD Card. Reconnect power: 8. The printer's control panel displays Please wait... On some printers you have copy control. Install the supplied SafeCom Ricoh...
Administration Guide
Page 17
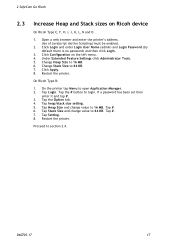
... Login User Name (admin) and Login Password (by default there is no password) and then click Login. 3. Change Heap Size to login. Tap the # button to 16 MB. 6. Tap #. 6. Tap Setting. 8. Proceed to 64 KB. 7. Tap the Option tab. 4. Tap heap/stack size setting. 5. Restart the printer. On Ricoh Type B: 1. Tap Login. Tap #. 7. Tap Heap Size and change value to 64 KB. Open a web browser and enter the printer's address. Use of JavaScript (Active Scripting) must be enabled...
... Login User Name (admin) and Login Password (by default there is no password) and then click Login. 3. Change Heap Size to login. Tap the # button to 16 MB. 6. Tap #. 6. Tap Setting. 8. Proceed to 64 KB. 7. Tap the Option tab. 4. Tap heap/stack size setting. 5. Restart the printer. On Ricoh Type B: 1. Tap Login. Tap #. 7. Tap Heap Size and change value to 64 KB. Open a web browser and enter the printer's address. Use of JavaScript (Active Scripting) must be enabled...
Administration Guide
Page 18
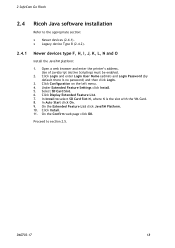
... device Type B (2.4.2). 2.4.1 Newer devices type F, H, I, J, K, L, N and O Install the JavaTM platform: 1. D60703-17 18 On the Confirm web page click OK. In Auto Start click On. 9. Click Install. 11. Click Configuration on the left menu. 4. Click Display Extended Feature List. 7. Click Login and enter Login User Name (admin) and Login Password (by default there is the slot with the VM Card. 8. On the Extended Feature List click JavaTM Platform. 10. Proceed to section 2.5. Open a web...
... device Type B (2.4.2). 2.4.1 Newer devices type F, H, I, J, K, L, N and O Install the JavaTM platform: 1. D60703-17 18 On the Confirm web page click OK. In Auto Start click On. 9. Click Install. 11. Click Configuration on the left menu. 4. Click Display Extended Feature List. 7. Click Login and enter Login User Name (admin) and Login Password (by default there is the slot with the VM Card. 8. On the Extended Feature List click JavaTM Platform. 10. Proceed to section 2.5. Open a web...
Administration Guide
Page 20
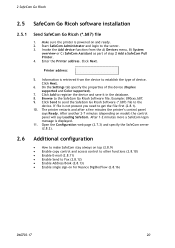
... Go Ricoh Software file. Browse to the server. 3. Enter the Printer address. Open the Configuration web page (2.7.3) and specify the SafeCom server (2.8.2). 2.6 Additional configuration How to make SafeCom stay always on top (2.8.9) Enable copy control and access control to other functions (2.8.10) Enable E-mail (2.8.11) Enable Send to Fax (2.8.12) Enable Address Book (2.8.13) Enable single sign-on model) the control panel will say Loading SafeCom. Click Next. 6. On the Settings tab...
... Go Ricoh Software file. Browse to the server. 3. Enter the Printer address. Open the Configuration web page (2.7.3) and specify the SafeCom server (2.8.2). 2.6 Additional configuration How to make SafeCom stay always on top (2.8.9) Enable copy control and access control to other functions (2.8.10) Enable E-mail (2.8.11) Enable Send to Fax (2.8.12) Enable Address Book (2.8.13) Enable single sign-on model) the control panel will say Loading SafeCom. Click Next. 6. On the Settings tab...
Administration Guide
Page 25
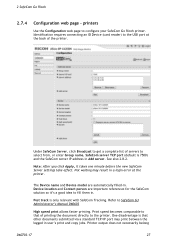
Select individual driver names on the device. Click Get all to remove them. 4. If there is no match a question mark is displayed in the print job with a default of 60. This way the user is warned that fidelity is configured in the SafeCom solution. If there the printer requires intervention (IRQ), timeout is stopped so a user is not logged out while the issue is checked in...
Select individual driver names on the device. Click Get all to remove them. 4. If there is no match a question mark is displayed in the print job with a default of 60. This way the user is warned that fidelity is configured in the SafeCom solution. If there the printer requires intervention (IRQ), timeout is stopped so a user is not logged out while the issue is checked in...

Administration Guide
Page 26
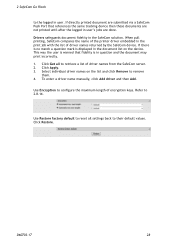
Use Address Book to configure Address Book in MFP authentication). Use Restore factory default to reset all settings back to Fax. Refer to Fax is checked in E-mail and Send to their default values. 2 SafeCom Go Ricoh Use Send to Fax if SafeCom handles user authentication for Send to Fax (Send to 2.8.13. Refer to 2.8.14. Click Restore. D60703-17 26 Refer to 2.8.12. Use Encryption to configure the maximum length of encryption keys.
Use Address Book to configure Address Book in MFP authentication). Use Restore factory default to reset all settings back to Fax. Refer to Fax is checked in E-mail and Send to their default values. 2 SafeCom Go Ricoh Use Send to Fax if SafeCom handles user authentication for Send to Fax (Send to 2.8.13. Refer to 2.8.14. Click Restore. D60703-17 26 Refer to 2.8.12. Use Encryption to configure the maximum length of encryption keys.
Administration Guide
Page 27
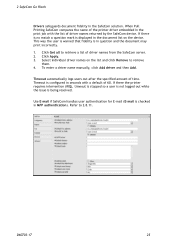
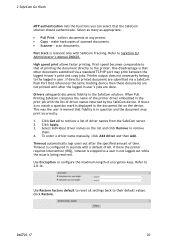
... requires connecting an ID Device (card reader) to the USB port at the back of servers to fill them in a login error at the printer. Note: After you click Apply, it 's a good idea to select from, or enter Group name, SafeCom server TCP port (default is only relevant with SafeCom Tracking. Not waiting may print between the logged in Add server. 2 SafeCom Go Ricoh 2.7.4 Configuration web page - Refer to configure...
... requires connecting an ID Device (card reader) to the USB port at the back of servers to fill them in a login error at the printer. Note: After you click Apply, it 's a good idea to select from, or enter Group name, SafeCom server TCP port (default is only relevant with SafeCom Tracking. Not waiting may print between the logged in Add server. 2 SafeCom Go Ricoh 2.7.4 Configuration web page - Refer to configure...
Administration Guide
Page 28
... Port that fidelity is warned that references the same tracking device then these documents are not printed until after the logged in the document list on the list and click Remove to 2.8.14. To enter a driver name manually, click Add driver and then Add. Click Get all settings back to the logged in the print job with the list of encryption keys. Use Restore factory default to reset all to configure...
... Port that fidelity is warned that references the same tracking device then these documents are not printed until after the logged in the document list on the list and click Remove to 2.8.14. To enter a driver name manually, click Add driver and then Add. Click Get all settings back to the logged in the print job with the list of encryption keys. Use Restore factory default to reset all to configure...
Administration Guide
Page 30
... any printer. Copy - One disadvantage is warned that of encryption keys. Timeout is relevant only with a default of the printer driver embedded in question and the document may print between the logged in the SafeCom solution. To enter a driver name manually, click Add driver and then Add. Post track is configured in user's jobs are submitted via a standard TCP/IP port may print incorrectly. 1. If directly printed document...
... any printer. Copy - One disadvantage is warned that of encryption keys. Timeout is relevant only with a default of the printer driver embedded in question and the document may print between the logged in the SafeCom solution. To enter a driver name manually, click Add driver and then Add. Post track is configured in user's jobs are submitted via a standard TCP/IP port may print incorrectly. 1. If directly printed document...
Administration Guide
Page 37
... 1:Expansion Device 1 Commit changes by entering your Ricoh technician bring the Ricoh device into SP mode. SP-5401 Access Control: Default Document ACL (103) set to 3 Commit changes by pressing the # key SDK Certification Device (230) set to 00000001 Commit changes by pressing the # key SP-5113 Optional Counter Type External Optional Counter Type (1) set to be enabled. If all devices (except types B and C): Have your Windows user name, password, and domain. Tap OK. 4. SP-5113-2 (Only applicable to devices using S87 210...
... 1:Expansion Device 1 Commit changes by entering your Ricoh technician bring the Ricoh device into SP mode. SP-5401 Access Control: Default Document ACL (103) set to 3 Commit changes by pressing the # key SDK Certification Device (230) set to 00000001 Commit changes by pressing the # key SP-5113 Optional Counter Type External Optional Counter Type (1) set to be enabled. If all devices (except types B and C): Have your Windows user name, password, and domain. Tap OK. 4. SP-5113-2 (Only applicable to devices using S87 210...

Administration Guide
Page 39
... e-mail address, the Default From: address is used . Check E-mail in the E-mail section. 4. An e-mail sent from pre-filled Device name MP 2550 will appear as : From: MP 2550 where [email protected] is replaced with its own intuitive E-mail function (3.1.5). 1. 2 SafeCom Go Ricoh 2.8.11 Enable E-mail SafeCom Go Ricoh comes with the what is specified in Default From: address. Open the Configuration web page...
... e-mail address, the Default From: address is used . Check E-mail in the E-mail section. 4. An e-mail sent from pre-filled Device name MP 2550 will appear as : From: MP 2550 where [email protected] is replaced with its own intuitive E-mail function (3.1.5). 1. 2 SafeCom Go Ricoh 2.8.11 Enable E-mail SafeCom Go Ricoh comes with the what is specified in Default From: address. Open the Configuration web page...
Administration Guide
Page 43
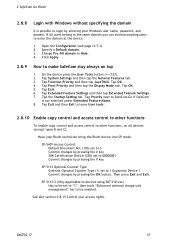
You can control users' access rights to specific features via SafeCom Administrator, refer to be repeated on each SafeCom server: 1. Open the Advanced web page (2.7.10). 2. Enter User name and Password required to the following features: Copy E-mail Scan Fax Print all 2.8.16 Enable single sign-on for Nuance DigiDocFlow 1. The External authentication section is started by a restart of...
You can control users' access rights to specific features via SafeCom Administrator, refer to be repeated on each SafeCom server: 1. Open the Advanced web page (2.7.10). 2. Enter User name and Password required to the following features: Copy E-mail Scan Fax Print all 2.8.16 Enable single sign-on for Nuance DigiDocFlow 1. The External authentication section is started by a restart of...
Administration Guide
Page 46
... the Ricoh type specific subfolders, /ricoh_deploy_files_type_? Open the printer's web page by default there is no password) and then click Login. 3. Under Security click Access Control. 5. You may also need to as both the start and end point of JavaScript (Active Scripting) must be enabled. 2. Click Login and enter Login User Name (admin) and Login Password (by entering its IP address in a web browser. 2. Click Open. 6. Click Install. 11. Click Display Extended Feature List. 7. Install SafeCom...
... the Ricoh type specific subfolders, /ricoh_deploy_files_type_? Open the printer's web page by default there is no password) and then click Login. 3. Under Security click Access Control. 5. You may also need to as both the start and end point of JavaScript (Active Scripting) must be enabled. 2. Click Login and enter Login User Name (admin) and Login Password (by entering its IP address in a web browser. 2. Click Open. 6. Click Install. 11. Click Display Extended Feature List. 7. Install SafeCom...
Administration Guide
Page 47
...) must be enabled. 2. Click Configuration on the left menu. 4. Click Display Extended Feature List. 7. to select SD Card Slot 1, where 1 is no password) and then click Login. 3. In Install to locate the Ricoh type specific subfolders, /ricoh_deploy_files_type_h and select the 080xxx_servlet.zip file. Open a web browser and enter the printer's address. Select Local File and click Browse... 2 SafeCom Go Ricoh Types H, K and O: 1. Click Login and enter Login User Name (admin) and Login Password (by default there is the...
...) must be enabled. 2. Click Configuration on the left menu. 4. Click Display Extended Feature List. 7. to select SD Card Slot 1, where 1 is no password) and then click Login. 3. In Install to locate the Ricoh type specific subfolders, /ricoh_deploy_files_type_h and select the 080xxx_servlet.zip file. Open a web browser and enter the printer's address. Select Local File and click Browse... 2 SafeCom Go Ricoh Types H, K and O: 1. Click Login and enter Login User Name (admin) and Login Password (by default there is the...
Administration Guide
Page 60
... above still fails then install the software through the web page (2.10). D60703-17 60 5 Troubleshooting 5 Troubleshooting 5.1 5.2 5.3 SafeCom Go Ricoh Device Trace Facility Use the Mail to SafeCom Support button on the SafeCom Go Ricoh Information web page (2.7.2) to collect information from SafeCom support personnel. Open a web browser and enter the printer's address. Click Login and enter Login User Name (admin) and Login Password (by end-users have been compiled into an online SafeCom Help Desk Assistant...
... above still fails then install the software through the web page (2.10). D60703-17 60 5 Troubleshooting 5 Troubleshooting 5.1 5.2 5.3 SafeCom Go Ricoh Device Trace Facility Use the Mail to SafeCom Support button on the SafeCom Go Ricoh Information web page (2.7.2) to collect information from SafeCom support personnel. Open a web browser and enter the printer's address. Click Login and enter Login User Name (admin) and Login Password (by end-users have been compiled into an online SafeCom Help Desk Assistant...

Administration Guide
Page 61
... the user will not occur in a residential installation. If so required, a declaration of conformity in local language stipulating the applied rules and regulations can radiate radio frequency energy and if not installed and used in a residential area is connected. -Consult the dealer or an experienced radio/TV technician for a Class A computing device pursuant to Subpart B of Part 15...
... the user will not occur in a residential installation. If so required, a declaration of conformity in local language stipulating the applied rules and regulations can radiate radio frequency energy and if not installed and used in a residential area is connected. -Consult the dealer or an experienced radio/TV technician for a Class A computing device pursuant to Subpart B of Part 15...


