Copy Reference
Page 2
... following pages. Notes: The model names of the machines do not appear in some countries. For good copy quality, Ricoh recommends that might not be available in the following label is considered a class 1 laser device, safe for quick reference. Notes Some illustrations in this machine refer to change without prior notice. For details about power source, see P.6 "Machine Types".) • Type 1: Aficio 2016 • Type 2: Aficio 2020 • Type 3: Aficio...
... following pages. Notes: The model names of the machines do not appear in some countries. For good copy quality, Ricoh recommends that might not be available in the following label is considered a class 1 laser device, safe for quick reference. Notes Some illustrations in this machine refer to change without prior notice. For details about power source, see P.6 "Machine Types".) • Type 1: Aficio 2016 • Type 2: Aficio 2020 • Type 3: Aficio...
Copy Reference
Page 3
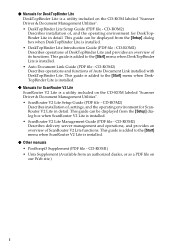
... specific to machine type. ❒ Adobe Acrobat Reader is necessary to this manual for Address Book procedures such as a PDF file. ❒ Three CD-ROMs are provided: • CD-ROM 1 "Operating Instructions for Printer/Scanner" • CD-ROM 2 "Scanner Driver & Document Management Utilities" • CD-ROM 3 "Operating Instructions for General Settings and Facsimile" ❖ General Settings Guide (PDF file - Refer to view the manuals as registering fax numbers, e-mail addresses, and user codes. ❖ Network Guide (PDF file - CD-ROM3) Describes advanced functions...
... specific to machine type. ❒ Adobe Acrobat Reader is necessary to this manual for Address Book procedures such as a PDF file. ❒ Three CD-ROMs are provided: • CD-ROM 1 "Operating Instructions for Printer/Scanner" • CD-ROM 2 "Scanner Driver & Document Management Utilities" • CD-ROM 3 "Operating Instructions for General Settings and Facsimile" ❖ General Settings Guide (PDF file - Refer to view the manuals as registering fax numbers, e-mail addresses, and user codes. ❖ Network Guide (PDF file - CD-ROM3) Describes advanced functions...
Copy Reference
Page 4
... is installed. • Auto Document Link Guide (PDF file - CD-ROM2) Describes delivery server management and operations, and provides an overview of its functions. This guide is added to the [Start] menu when DeskTopBinder Lite is installed. ❖ Manuals for ScanRouter V2 Lite ScanRouter V2 Lite is a utility included on the CD-ROM labeled "Scanner Driver & Document Management Utilities". • DeskTopBinder Lite Setup Guide (PDF file - CD-ROM2) Describes installation of Auto Document Link installed...
... is installed. • Auto Document Link Guide (PDF file - CD-ROM2) Describes delivery server management and operations, and provides an overview of its functions. This guide is added to the [Start] menu when DeskTopBinder Lite is installed. ❖ Manuals for ScanRouter V2 Lite ScanRouter V2 Lite is a utility included on the CD-ROM labeled "Scanner Driver & Document Management Utilities". • DeskTopBinder Lite Setup Guide (PDF file - CD-ROM2) Describes installation of Auto Document Link installed...

Copy Reference
Page 5
... Originals on the Exposure Glass 18 Placing Originals in the ADF or ARDF 19 2. Copying Basic Procedure 21 Copying from the Bypass Tray 22 Copier Functions 26 Adjusting Image Density 26 Selecting Original Type Setting 26 Selecting Copy Paper 26 Preset Reduce/Enlarge 27 Zoom ...28 Auto Reduce/Enlarge 29 Sort...30 Duplex (Type 3 only 31 One-Sided Combine 33 Two-Sided Combine (Type 3 only 35 Series Copies...37 iii
... Originals on the Exposure Glass 18 Placing Originals in the ADF or ARDF 19 2. Copying Basic Procedure 21 Copying from the Bypass Tray 22 Copier Functions 26 Adjusting Image Density 26 Selecting Original Type Setting 26 Selecting Copy Paper 26 Preset Reduce/Enlarge 27 Zoom ...28 Auto Reduce/Enlarge 29 Sort...30 Duplex (Type 3 only 31 One-Sided Combine 33 Two-Sided Combine (Type 3 only 35 Series Copies...37 iii
Copy Reference
Page 6
... Setting...55 5. 3. Troubleshooting If Your Machine Does Not Operate As You Want 39 When a Message Is Displayed 39 If You Cannot Make Clear Copies 40 If You Cannot Make Copies As You Want 41 When Memory Is Full 42 B Loading Paper 43 Loading Paper...43 Orientation-Fixed Paper or Two-Sided Paper 44 D Adding Toner 47 Handling Toner...47 Toner Storage ...47 Used Toner ...47 Removing Toner 48 Inserting Toner...49 4. User Tools (Copier Features) Accessing User Tools (Copier Features 51 Changing Default Settings 51 Quitting User...
... Setting...55 5. 3. Troubleshooting If Your Machine Does Not Operate As You Want 39 When a Message Is Displayed 39 If You Cannot Make Clear Copies 40 If You Cannot Make Copies As You Want 41 When Memory Is Full 42 B Loading Paper 43 Loading Paper...43 Orientation-Fixed Paper or Two-Sided Paper 44 D Adding Toner 47 Handling Toner...47 Toner Storage ...47 Used Toner ...47 Removing Toner 48 Inserting Toner...49 4. User Tools (Copier Features) Accessing User Tools (Copier Features 51 Changing Default Settings 51 Quitting User...
Copy Reference
Page 10
... used together, or conditions in which a particular function cannot be lost. Preparation This symbol indicates information or preparations required prior to take after abnormal operation. Limitation This symbol indicates numerical limits, functions that does not involve personal injury when you misuse the machine without following the instructions under this manual: • Auto Document Feeder → ADF • Auto Document Feeder capable of scanning both sides of a sheet...
... used together, or conditions in which a particular function cannot be lost. Preparation This symbol indicates information or preparations required prior to take after abnormal operation. Limitation This symbol indicates numerical limits, functions that does not involve personal injury when you misuse the machine without following the instructions under this manual: • Auto Document Feeder → ADF • Auto Document Feeder capable of scanning both sides of a sheet...
Copy Reference
Page 15
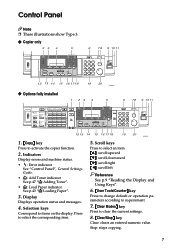
Memory Trans. Display Displays operation status and messages. 4. Press to clear the current settings. 8. {Clear/Stop} key Clear: clears an entered numeric value. Scroll keys Press to select an item. {U}: scroll upward {T}: scroll downward {V}: scroll right {W}: scroll left Reference See p.9 "Reading the Display and Using Keys". 6. {User Tools/Counter} key Press to change default or operation parameters according to requirement. 7. {Clear Modes} key Press to select the corresponding item. 5. Switch RX Mode Transmission Stamp Standard Detail Fine Search Check Job Destination Destination...
Memory Trans. Display Displays operation status and messages. 4. Press to clear the current settings. 8. {Clear/Stop} key Clear: clears an entered numeric value. Scroll keys Press to select an item. {U}: scroll upward {T}: scroll downward {V}: scroll right {W}: scroll left Reference See p.9 "Reading the Display and Using Keys". 6. {User Tools/Counter} key Press to change default or operation parameters according to requirement. 7. {Clear Modes} key Press to select the corresponding item. 5. Switch RX Mode Transmission Stamp Standard Detail Fine Search Check Job Destination Destination...

Copy Reference
Page 16
... make combine or series copies. On indicator Lights when the operation switch is selected, the corresponding indicator lights. 17. {Cancel} key Press to cancel an operation or return to the previous display. 18. {OK} key Press to select the original type registered with [Original Type 1 (Text)] or [Original Type 2 (Photo)]. Operation switch Press to start scanning or sending. 8 Reference See p.31 "Duplex (Type 3 only)". 13. {Combine/Series} key Press to change the image density setting. Note ❒ This key is turned...
... make combine or series copies. On indicator Lights when the operation switch is selected, the corresponding indicator lights. 17. {Cancel} key Press to cancel an operation or return to the previous display. 18. {OK} key Press to select the original type registered with [Original Type 1 (Text)] or [Original Type 2 (Photo)]. Operation switch Press to start scanning or sending. 8 Reference See p.31 "Duplex (Type 3 only)". 13. {Combine/Series} key Press to change the image density setting. Note ❒ This key is turned...

Copy Reference
Page 19
... control panel) Press to malfunctions. Use this is done, machine power is installed, fax files in memory may result in damage to the memory, leading to activate the machine. ly plugged into the wall outlet. The main power indicator goes on . When the fax unit (optional) is completely off this switch off if you can operate the machine. ❖ Main power switch (left side of the machine) Turning off . Note ❒ This machine automatically enters...
... control panel) Press to malfunctions. Use this is done, machine power is installed, fax files in memory may result in damage to the memory, leading to activate the machine. ly plugged into the wall outlet. The main power indicator goes on . When the fax unit (optional) is completely off this switch off if you can operate the machine. ❖ Main power switch (left side of the machine) Turning off . Note ❒ This machine automatically enters...

Copy Reference
Page 20
... the fax unit (optional) is installed When the main power switch is shown as available memory on the display before turning off while using the fax function, waiting fax and print jobs may result in mind: Important ❒ Make sure 100% is turned off the main power switch or unplugging the power cord. Fax files in mode even if you turn off the main power switch. • the computer is not controlling the machine. • the machine is lit...
... the fax unit (optional) is installed When the main power switch is shown as available memory on the display before turning off while using the fax function, waiting fax and print jobs may result in mind: Important ❒ Make sure 100% is turned off the main power switch or unplugging the power cord. Fax files in mode even if you turn off the main power switch. • the computer is not controlling the machine. • the machine is lit...
Copy Reference
Page 21
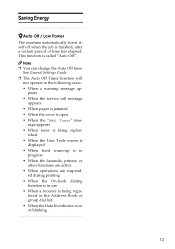
... / Low Power The machine automatically turns itself off when the job is on or blinking 13 This function is in the following cases: • When a warning message ap- ished • When the User Tools screen is displayed • When fixed warm-up is called "Auto Off". pears • When the service call message appears • When paper is jammed • When the cover is open • When the "Add Toner...
... / Low Power The machine automatically turns itself off when the job is on or blinking 13 This function is in the following cases: • When a warning message ap- ished • When the User Tools screen is displayed • When fixed warm-up is called "Auto Off". pears • When the service call message appears • When paper is jammed • When the cover is open • When the "Add Toner...
Copy Reference
Page 25
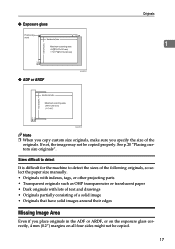
...; Originals that have solid images around their edges Missing Image Area Even if you specify the size of the originals. See p.20 "Placing custom size originals". ❖ Exposure glass Positioning mark Maximum scanning area mm) mm) ❖ ADF or ARDF GCSIZE1E Originals 1 Maximum scanning area mm) GCSIZE2E Note ❒ When you copy custom size originals, make sure you place originals...
...; Originals that have solid images around their edges Missing Image Area Even if you specify the size of the originals. See p.20 "Placing custom size originals". ❖ Exposure glass Positioning mark Maximum scanning area mm) mm) ❖ ADF or ARDF GCSIZE1E Originals 1 Maximum scanning area mm) GCSIZE2E Note ❒ When you copy custom size originals, make sure you place originals...

Copy Reference
Page 50
Troubleshooting ❖ Duplex (Type 3 only) Problem Causes Solutions Order of originals in correct order. You set an original on the bottom. When setting a stack of copies is full. Reset * orig., then press The machine checks To continue copying, [Resume] to cancel/clear memory. [Clear][Print] Note ❒ Copying will stop original has been copying, press [Stop]. if the remaining orig- remove all copies, maining originals. When Memory Is Full Messages Causes Solutions Memory is selected. Press...
Troubleshooting ❖ Duplex (Type 3 only) Problem Causes Solutions Order of originals in correct order. You set an original on the bottom. When setting a stack of copies is full. Reset * orig., then press The machine checks To continue copying, [Resume] to cancel/clear memory. [Clear][Print] Note ❒ Copying will stop original has been copying, press [Stop]. if the remaining orig- remove all copies, maining originals. When Memory Is Full Messages Causes Solutions Memory is selected. Press...

Copy Reference
Page 52
... using the duplex function, and loaded paper orientation is L, place originals as shown below . When printing with the printer function, placing orientation is only available when the printer/scanner and fax units are placed. Troubleshooting Orientation-Fixed Paper or Two-Sided Paper Orientation-fixed (top to [Letterhead] in [Tray Paper Settings] under [System Settings](User Tools). This setting is the same. ❒ Set the paper type to bottom) or two-sided paper (for example, letterhead paper, prepunched paper, or copied paper) might not print...
... using the duplex function, and loaded paper orientation is L, place originals as shown below . When printing with the printer function, placing orientation is only available when the printer/scanner and fax units are placed. Troubleshooting Orientation-Fixed Paper or Two-Sided Paper Orientation-fixed (top to [Letterhead] in [Tray Paper Settings] under [System Settings](User Tools). This setting is the same. ❒ Set the paper type to bottom) or two-sided paper (for example, letterhead paper, prepunched paper, or copied paper) might not print...
Copy Reference
Page 55
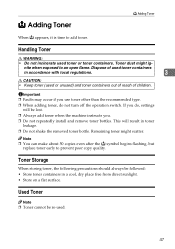
.... ❒ Do not shake the removed toner bottle. Toner dust might scatter. This will be re-used toner or toner containers. Handling Toner R WARNING: • Do not incinerate used . 47 Used Toner Note ❒ Toner cannot be lost. ❒ Always add toner when the machine instructs you use toner other than the recommended type. ❒ When adding toner, do , settings will result in a cool, dry place free from direct sunlight. •...
.... ❒ Do not shake the removed toner bottle. Toner dust might scatter. This will be re-used toner or toner containers. Handling Toner R WARNING: • Do not incinerate used . 47 Used Toner Note ❒ Toner cannot be lost. ❒ Always add toner when the machine instructs you use toner other than the recommended type. ❒ When adding toner, do , settings will result in a cool, dry place free from direct sunlight. •...

Copy Reference
Page 59
...] using {U} or {T}, and then press the {OK} key. D Change settings by following in effect even if the main power switch or operation switch is turned off, or the {Clear Modes} key is set, the key operator code input display appears before you can change the default settings. Key operators can change or make default settings. Note ❒ If a key operator code is pressed. Reference For details, see "Key Operator Tools", General Settings Guide. For details about access codes, see "User Tools (System Settings)", General Settings Guide. The "Programmed" message appears...
...] using {U} or {T}, and then press the {OK} key. D Change settings by following in effect even if the main power switch or operation switch is turned off, or the {Clear Modes} key is set, the key operator code input display appears before you can change the default settings. Key operators can change or make default settings. Note ❒ If a key operator code is pressed. Reference For details, see "Key Operator Tools", General Settings Guide. For details about access codes, see "User Tools (System Settings)", General Settings Guide. The "Programmed" message appears...

Copy Reference
Page 61
... adjust copy finish quality level according to use Auto Tray Switching or not. Settings You Can Change with User Tools Settings You Can Change with colored text and lines • Special Mode 3 photo images created by dithering (visible dots), such as newspaper photos - coarse resolution • Special Mode 5 normal text originals (reproducing the background) Note ❒ Default: • Original Type 1 (Text): Text Mode 1 • Original Type 2 (Photo): Photo Mode 1 53 verse side clearly visible), or light 4 text on a colored...
... adjust copy finish quality level according to use Auto Tray Switching or not. Settings You Can Change with User Tools Settings You Can Change with colored text and lines • Special Mode 3 photo images created by dithering (visible dots), such as newspaper photos - coarse resolution • Special Mode 5 normal text originals (reproducing the background) Note ❒ Default: • Original Type 1 (Text): Text Mode 1 • Original Type 2 (Photo): Photo Mode 1 53 verse side clearly visible), or light 4 text on a colored...

Copy Reference
Page 65
... the machine while copying or printing. Make sure all copying or printing has finished first. • The machine might occur. • Do not move the machine. 5. Be sure to make sure remaining memory space is at 100%, as a result of rapid temperature change. • Do not open the covers of settings, or use this is not a malfunction. • Do not turn the power off the main power switch, make a note...
... the machine while copying or printing. Make sure all copying or printing has finished first. • The machine might occur. • Do not move the machine. 5. Be sure to make sure remaining memory space is at 100%, as a result of rapid temperature change. • Do not open the covers of settings, or use this is not a malfunction. • Do not turn the power off the main power switch, make a note...
Copy Reference
Page 75
...special paper, 24 Copy key, 7 Counter key, 7 D Display, 9 Do's and Don'ts, 57 Duplex 1 sided → 2 sided, 31 2 sided → 2 sided, 32 Duplex key, 8 E Environment, 58 H Handling toner, 47 I Indicators, 7 Inserting toner, 49 67 INDEX 1 Sided → 2 Sided, 31 2 Sided → 1 Sided, 37 2 Sided → 2 Sided, 32 A Accessing user tools copier features, 51 Adding toner, 47 Adjusting image density, 26 Auto paper select, 26 reduce/enlarge, 29 tray switching, 53 Auto Off / Low Power, 13 Auto paper select, 27 B Basic procedure, 21 C Cancel key, 8 Changing default settings, 51 Cleaning ADF...
...special paper, 24 Copy key, 7 Counter key, 7 D Display, 9 Do's and Don'ts, 57 Duplex 1 sided → 2 sided, 31 2 sided → 2 sided, 32 Duplex key, 8 E Environment, 58 H Handling toner, 47 I Indicators, 7 Inserting toner, 49 67 INDEX 1 Sided → 2 Sided, 31 2 Sided → 1 Sided, 37 2 Sided → 2 Sided, 32 A Accessing user tools copier features, 51 Adding toner, 47 Adjusting image density, 26 Auto paper select, 26 reduce/enlarge, 29 tray switching, 53 Auto Off / Low Power, 13 Auto paper select, 27 B Basic procedure, 21 C Cancel key, 8 Changing default settings, 51 Cleaning ADF...
Copy Reference
Page 76
... Placing Originals, 15 Power connection, 59 68 Q Quitting user tools, 52 R Reading display, 9 using keys, 9 Remarks, 57 Removing toner, 48 Rotated copy, 27 S Safety information, 3 Saving energy, 13 Scroll keys, 7 Selecting copy paper, 26 original type setting, 26 Selection keys, 7 Series copies 2 sided → 1 sided, 37 book → 1 sided, 37 Series key, 8 Sizes detectable by auto paper select, 16 difficult to detect, 17 of recommended originals, 15 Sort, 30 rotate sort, 30 Sort key, 8 Specifications, 63 Start key, 8 Stop key, 7 Supplementary information, 64...
... Placing Originals, 15 Power connection, 59 68 Q Quitting user tools, 52 R Reading display, 9 using keys, 9 Remarks, 57 Removing toner, 48 Rotated copy, 27 S Safety information, 3 Saving energy, 13 Scroll keys, 7 Selecting copy paper, 26 original type setting, 26 Selection keys, 7 Series copies 2 sided → 1 sided, 37 book → 1 sided, 37 Series key, 8 Sizes detectable by auto paper select, 16 difficult to detect, 17 of recommended originals, 15 Sort, 30 rotate sort, 30 Sort key, 8 Specifications, 63 Start key, 8 Stop key, 7 Supplementary information, 64...


