Operating Instructions
Page 2
... Accessing terminal functions 14 Packaging contents 15 Device installation 15 Installing the document feeder 15 Loading paper 15 Loading paper in the paper tray 15 Handling of paper 15 Humidity control 15 Handling the unit 16 Operator shocks 16 Moving the unit 16 Handling the Toner Cartridge 16 Feed cassette paper insertion 16 Cartridge installation 16 Paper delivery stop 17 Starting your device 17 Device connection 17 Paper insertion in the manual input tray 18 Copy 19 Simple copy 19 ECO mode copy 19 Sophisticated copy 19 Special setup...
... Accessing terminal functions 14 Packaging contents 15 Device installation 15 Installing the document feeder 15 Loading paper 15 Loading paper in the paper tray 15 Handling of paper 15 Humidity control 15 Handling the unit 16 Operator shocks 16 Moving the unit 16 Handling the Toner Cartridge 16 Feed cassette paper insertion 16 Cartridge installation 16 Paper delivery stop 17 Starting your device 17 Device connection 17 Paper insertion in the manual input tray 18 Copy 19 Simple copy 19 ECO mode copy 19 Sophisticated copy 19 Special setup...
Operating Instructions
Page 3
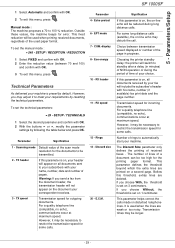
... mode Technical Parameters Printing the functions guide Printing the logs Print the list of setups Lock the machine Lock the keyboard Lock the numbers Read the counters Sent pages counter Received pages counter Scanned pages counter Printed pages counter Display the consumables status Calibrate your scanner Directory Creating Speed dial Creating Group dial Modifying a record Deleting a record Printing the directory Saving/Restoring the directory (Smart card option) USB memory key Use of the USB memory key Print your documents Print the list of files located in the key Print the files located...
... mode Technical Parameters Printing the functions guide Printing the logs Print the list of setups Lock the machine Lock the keyboard Lock the numbers Read the counters Sent pages counter Received pages counter Scanned pages counter Printed pages counter Display the consumables status Calibrate your scanner Directory Creating Speed dial Creating Group dial Modifying a record Deleting a record Printing the directory Saving/Restoring the directory (Smart card option) USB memory key Use of the USB memory key Print your documents Print the list of files located in the key Print the files located...
Operating Instructions
Page 4
... phase power network. Licence Security SP 1000SF Security directives Before turning on your device shall be carried out by the Instructions of the ENVIRONMENT chapter of the machine. - 1 - The outlet shall be installed on the rear side of this manual. Direct (or indirect reflected ) eye contact with unfortunate consequences. The device shall not be easily accessible. For installation conditions and safe use . This device shall be...
... phase power network. Licence Security SP 1000SF Security directives Before turning on your device shall be carried out by the Instructions of the ENVIRONMENT chapter of the machine. - 1 - The outlet shall be installed on the rear side of this manual. Direct (or indirect reflected ) eye contact with unfortunate consequences. The device shall not be easily accessible. For installation conditions and safe use . This device shall be...

Operating Instructions
Page 7
... the party responsible for this product is part of devices that may be connected to the telephone network, the telephone company may request that may be connected to users in this manual. 9 Connection to party line service is also compliant. Excessive RENs on the first page of the transmission, the date and time it is a REN of operation problems (document jam, copy jam, communication error indication), refer to the solving...
... the party responsible for this product is part of devices that may be connected to the telephone network, the telephone company may request that may be connected to users in this manual. 9 Connection to party line service is also compliant. Excessive RENs on the first page of the transmission, the date and time it is a REN of operation problems (document jam, copy jam, communication error indication), refer to the solving...

Operating Instructions
Page 21
... the reverse side. • Set envelope by pressing the folding line of envelopes. And it is bent or warped. • Paper conditioning is not allowed. Note: When using envelopes • Feeding can be fixed manually. • Small crumples on the printer. Smearing, or less clear printing may lead to improper printing. • Curled envelope after aligning in case it should be used in the manual input tray The manual input tray allows...
... the reverse side. • Set envelope by pressing the folding line of envelopes. And it is bent or warped. • Paper conditioning is not allowed. Note: When using envelopes • Feeding can be fixed manually. • Small crumples on the printer. Smearing, or less clear printing may lead to improper printing. • Curled envelope after aligning in case it should be used in the manual input tray The manual input tray allows...

Operating Instructions
Page 25
... the default tray and the paper format in both faxes are in order to avoid sending blank or incorrect pages. 2 Select 31 -FAX / TRANSMISSION. 3 Enter the subscriber number you need to program at a later time. This function allows for example: • to hear if the subscriber's fax is engaged and if so, choose the moment when the line is set to print received fax depending on the scanner window is displayed. To...
... the default tray and the paper format in both faxes are in order to avoid sending blank or incorrect pages. 2 Select 31 -FAX / TRANSMISSION. 3 Enter the subscriber number you need to program at a later time. This function allows for example: • to hear if the subscriber's fax is engaged and if so, choose the moment when the line is set to print received fax depending on the scanner window is displayed. To...
Operating Instructions
Page 26
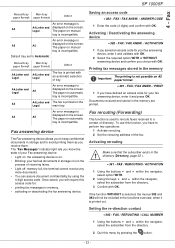
... the memory are printed. Fax SP 1000SF Manual tray Main tray paper format paper format Action An error message is displayed on the screen. An error message is A5 A4,Letter and displayed on the screen. Documents received and stored in memory, • activating or deactivating the fax answering device. Legal The paper on the screen. A4,Letter and Legal A5 An error message is displayed on manual tray is used to reroute faxes received to Automatic :. FAX / FAX ANSW. / ANSWER CODE 1 Enter the code (4 digits) and confirm with OK. 4 - Saving an access code...
... the memory are printed. Fax SP 1000SF Manual tray Main tray paper format paper format Action An error message is displayed on the screen. An error message is A5 A4,Letter and displayed on the screen. Documents received and stored in memory, • activating or deactivating the fax answering device. Legal The paper on the screen. A4,Letter and Legal A5 An error message is displayed on manual tray is used to reroute faxes received to Automatic :. FAX / FAX ANSW. / ANSWER CODE 1 Enter the code (4 digits) and confirm with OK. 4 - Saving an access code...
Operating Instructions
Page 27
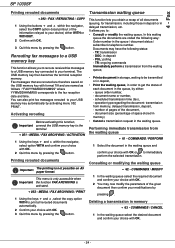
... - You can also print fax messages rerouted to a USB memory key This function allows you obtain a recap of the given document then confirm your device) either : - This menu is only accessible when Important the function FAX ARCHIVING is not possible on the USB memory key with format Tiff and are coded the following status: - In this function, Important connect the USB memory key to your modifications by pressing the button. scheduled transmission time (fax), - Deleting a transmission in deposit...
... - You can also print fax messages rerouted to a USB memory key This function allows you obtain a recap of the given document then confirm your device) either : - This menu is only accessible when Important the function FAX ARCHIVING is not possible on the USB memory key with format Tiff and are coded the following status: - In this function, Important connect the USB memory key to your modifications by pressing the button. scheduled transmission time (fax), - Deleting a transmission in deposit...
Operating Instructions
Page 30
... the first page is set to confirm. 3 To exit this menu, press . 5 - SETUP / SEND / SEND REPORT 1 Select the required option WITH, WITHOUT, ALWAYS or ON ERROR and confirm your originals back quickly to be long numbers greater or equal to the minimal size (to free up the machine. • from the feeder of the sheet-feed scanner, transmission will take place only after dialling and paper scanning. SETUP / SEND / MEMORY SEND. By default, the multifunction machine is automatically...
... the first page is set to confirm. 3 To exit this menu, press . 5 - SETUP / SEND / SEND REPORT 1 Select the required option WITH, WITHOUT, ALWAYS or ON ERROR and confirm your originals back quickly to be long numbers greater or equal to the minimal size (to free up the machine. • from the feeder of the sheet-feed scanner, transmission will take place only after dialling and paper scanning. SETUP / SEND / MEMORY SEND. By default, the multifunction machine is automatically...
Operating Instructions
Page 31
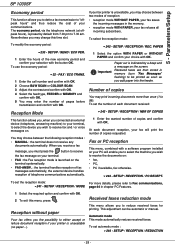
.... Received faxes reduction mode This menu allows you wish to Fax communications, 241 - SETUP / RECEPTION / PC RECEPT. FAX / ECO TRANS. 1 Enter the call number and confirm with OK. 2 Choose B&W SCAN or COLOUR SCAN. 3 Adjust the contrast and confirm with OK. 4 Select the feed type, FEEDER or MEMORY and confirm with OK. 5 You may print incoming documents more details, please refer to receive the documents on the screen. When you receive a fax message, you add paper into the feeder. To set automatic mode...
.... Received faxes reduction mode This menu allows you wish to Fax communications, 241 - SETUP / RECEPTION / PC RECEPT. FAX / ECO TRANS. 1 Enter the call number and confirm with OK. 2 Choose B&W SCAN or COLOUR SCAN. 3 Adjust the contrast and confirm with OK. 4 Select the feed type, FEEDER or MEMORY and confirm with OK. 5 You may print incoming documents more details, please refer to receive the documents on the screen. When you receive a fax message, you add paper into the feeder. To set automatic mode...
Operating Instructions
Page 32
... on, the on the document your choice. Parameters/Setup SP 1000SF 1 Select Automatic and confirm with OK. 3 To exit this menu, press . To set the manual mode : 246 - display 8 - Discard size 20 - If this parameter is set on all documents received by following the table below and press OK. It is on 1 centimeter. Scanning mode Default value of the page in minutes) of NON-operation or during long distance...
... on, the on the document your choice. Parameters/Setup SP 1000SF 1 Select Automatic and confirm with OK. 3 To exit this menu, press . To set the manual mode : 246 - display 8 - Discard size 20 - If this parameter is set on all documents received by following the table below and press OK. It is on 1 centimeter. Scanning mode Default value of the page in minutes) of NON-operation or during long distance...
Operating Instructions
Page 33
... any time. • date and time of the incoming or outgoing document, • subscriber's number or E-mail address, • transmission mode (Normal, Fine, SFine or Photo), • number of setups Important The printing is deleted following information: - 30 - ADVANCED FCT / LOCK / LOCKING CODE 1 Press on A5 paper format. When set to use , the device will take place after every 30 transmissions. Toner save toner cartridge ink. 91 - Print the list of pages sent or received, •...
... any time. • date and time of the incoming or outgoing document, • subscriber's number or E-mail address, • transmission mode (Normal, Fine, SFine or Photo), • number of setups Important The printing is deleted following information: - 30 - ADVANCED FCT / LOCK / LOCKING CODE 1 Press on A5 paper format. When set to use , the device will take place after every 30 transmissions. Toner save toner cartridge ink. 91 - Print the list of pages sent or received, •...
Operating Instructions
Page 38
... device. The beginning button immediately starts the scan and sends a file to delete and confirm with the parameters defined in the analysis format. 1 Press on the glass. 2 Insert the USB memory key in the folder SCAN on a USB memory key. Warning This option is ineffective when the SCAN folder is empty and the USB memory key is started . 3 You can also access this menu by typing 03 on the screen, select with the or buttons the file to the support...
... device. The beginning button immediately starts the scan and sends a file to delete and confirm with the parameters defined in the analysis format. 1 Press on the glass. 2 Insert the USB memory key in the folder SCAN on a USB memory key. Warning This option is ineffective when the SCAN folder is empty and the USB memory key is started . 3 You can also access this menu by typing 03 on the screen, select with the or buttons the file to the support...
Operating Instructions
Page 40
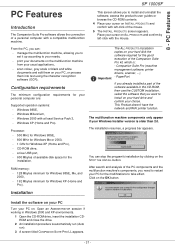
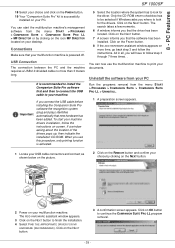
... or black and white documents and edit them on your hard drive and confirm your choice. Windows XP (Home and Pro). If you already installed a part of a personal computer with at least Service Pack 3, - print your documents on the STOP THE INSTALL button. Important The ALL PRODUCTS installation copies on your cursor on ALL PRODUCTS and confirm by clicking on the multifunction machine from your personal computer are: Supported operation systems: - a free USB port...
... or black and white documents and edit them on your hard drive and confirm your choice. Windows XP (Home and Pro). If you already installed a part of a personal computer with at least Service Pack 3, - print your documents on the STOP THE INSTALL button. Important The ALL PRODUCTS installation copies on your cursor on ALL PRODUCTS and confirm by clicking on the multifunction machine from your personal computer are: Supported operation systems: - a free USB port...
Operating Instructions
Page 42
... the driver has been located. You can start your desktop. Click on screen. The search takes a few moments. 6 A window informs you will have to print your machine. To start the multifunction machine's management software from the menu START > PROGRAMS > COMPANION SUITE > COMPANION SUITE PRO LL > UNINSTALL. 1 A preparation screen appears. 1 Locate your USB cable connectors and connect as shown below on the picture. 2 Click on the REMOVE button and confirm your multifunction machine.
... the driver has been located. You can start your desktop. Click on screen. The search takes a few moments. 6 A window informs you will have to print your machine. To start the multifunction machine's management software from the menu START > PROGRAMS > COMPANION SUITE > COMPANION SUITE PRO LL > UNINSTALL. 1 A preparation screen appears. 1 Locate your USB cable connectors and connect as shown below on the picture. 2 Click on the REMOVE button and confirm your multifunction machine.
Operating Instructions
Page 45
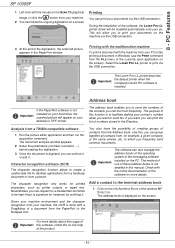
... machine, the OCR is done with the online documentation of the software for example, a given company or the same service, etc, to the terminal address book 1 Click on your documents on the PC. If you want to store the numbers of these address books is displayed on -line help of the digitisation, the scanned picture appears in this software, check the on the screen. Character recognition software (OCR) The character recognition function...
... machine, the OCR is done with the online documentation of the software for example, a given company or the same service, etc, to the terminal address book 1 Click on your documents on the PC. If you want to store the numbers of these address books is displayed on -line help of the digitisation, the scanned picture appears in this software, check the on the screen. Character recognition software (OCR) The character recognition function...

Operating Instructions
Page 47
Delete a fax using one of the scanners of your terminal, from the hard disk or from one of your terminal works with the Viewer. 5 Access to fax communications. send documents as faxes from the screen of the fax manager directories. You can be imported from the hard disk or the terminal 1 Click the icon of the Fax manager directories. 4 Display a fax with regard to the address book. 6 Stop sending a fax (only enabled for which...
Delete a fax using one of the scanners of your terminal, from the hard disk or from one of your terminal works with the Viewer. 5 Access to fax communications. send documents as faxes from the screen of the fax manager directories. You can be imported from the hard disk or the terminal 1 Click the icon of the Fax manager directories. 4 Display a fax with regard to the address book. 6 Stop sending a fax (only enabled for which...
Operating Instructions
Page 50
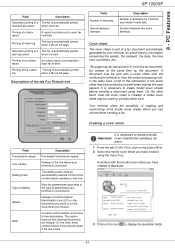
... communication errors due to create model cover sheets before sending a document using the menu FILE. 8 - Description of the tab FAX PARAMETERS Field Number of attempts Interval between two send attempts. This option ensures that received documents are integral. Duration between attempts Description Number of dialling Header ECM Description Fax default transmission speed. Creating a cover sheet Field Transmission speed Line number Dialling prefix Type of attempts the Terminal must make if send fails. Number of the number before sending a fax with the model cover sheet...
... communication errors due to create model cover sheets before sending a document using the menu FILE. 8 - Description of the tab FAX PARAMETERS Field Number of attempts Interval between two send attempts. This option ensures that received documents are integral. Duration between attempts Description Number of dialling Header ECM Description Fax default transmission speed. Creating a cover sheet Field Transmission speed Line number Dialling prefix Type of attempts the Terminal must make if send fails. Number of the number before sending a fax with the model cover sheet...
Operating Instructions
Page 54
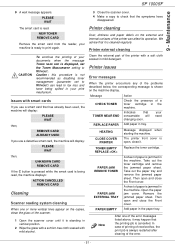
..., UNKNOWN CARD REMOVE CARD If the C button is pressed while the smart card is cancelled. Take out the toner cartridge and remove the jammed paper sheet. Open the paper jam cover. Note After one or more vertical lines appear on the machine display. Issues with a soft cloth soaked in the machine. Clean the external part of the error. - 51 - Add paper in the machine. Maintenance 9 A wait message appears. NEW TONER REMOVE CARD Remove the smart card from the reader, your print mechanism. The printer front cover is open...
..., UNKNOWN CARD REMOVE CARD If the C button is pressed while the smart card is cancelled. Take out the toner cartridge and remove the jammed paper sheet. Open the paper jam cover. Note After one or more vertical lines appear on the machine display. Issues with a soft cloth soaked in the machine. Clean the external part of the error. - 51 - Add paper in the machine. Maintenance 9 A wait message appears. NEW TONER REMOVE CARD Remove the smart card from the reader, your print mechanism. The printer front cover is open...
Operating Instructions
Page 56
... displayed: Current time Time of what is switched to see the communication error codes). Code 07 - Received document error Ask the subscriber who had not prepared his document (it is not valid, check it. (Example: a delayed transmission was incorrect. Memory full Your fax can no paper, paper jam, opened cover... Print the received documents and delete or transmit immediately the documents in the transmission line. You cannot send a fax. 1 Check that there is correctly programmed and used. Transmission from the feeder...
... displayed: Current time Time of what is switched to see the communication error codes). Code 07 - Received document error Ask the subscriber who had not prepared his document (it is not valid, check it. (Example: a delayed transmission was incorrect. Memory full Your fax can no paper, paper jam, opened cover... Print the received documents and delete or transmit immediately the documents in the transmission line. You cannot send a fax. 1 Check that there is correctly programmed and used. Transmission from the feeder...


