Brochure
Page 2
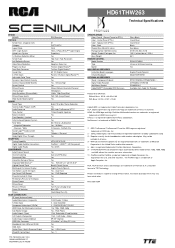
... Mirror Screen Type Anti-Reflective Screen Video Noise Reduction Progressive Scan Scan Rate Converter Comb Filter 3:2 Pull Down Adjustable Color Temp Dynamic Color Stretch Circuitry Contrast Expand (B&W Stretch) Format Control Picture Presets Viewing Angle Horiz Resolution (Picture Width) Picture Power (watts) Wide Band Video Amplifier SOUND Sound Type Second Audio Program (SAP) Audio Processor Tone Control Balance Control Front Speakers (number) Fully Enclosed Speaker System Total Watts Integrated Subwoofer Channels / Watts Sound Logic™ Audio Leveler Sound Presets Dolby Digital²...
... Mirror Screen Type Anti-Reflective Screen Video Noise Reduction Progressive Scan Scan Rate Converter Comb Filter 3:2 Pull Down Adjustable Color Temp Dynamic Color Stretch Circuitry Contrast Expand (B&W Stretch) Format Control Picture Presets Viewing Angle Horiz Resolution (Picture Width) Picture Power (watts) Wide Band Video Amplifier SOUND Sound Type Second Audio Program (SAP) Audio Processor Tone Control Balance Control Front Speakers (number) Fully Enclosed Speaker System Total Watts Integrated Subwoofer Channels / Watts Sound Logic™ Audio Leveler Sound Presets Dolby Digital²...
User Manual
Page 8
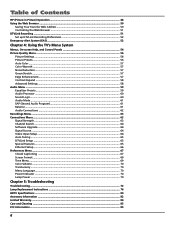
... Sound Logic ...60 Audio Mode ...61 SAP (Second Audio Program 61 Balance ...61 Audio Connections ...62 Recordings Menu ...63 Connections Menu ...63 Signal Strength ...63 Channel Search ...64 Software Upgrade ...64 Signal Source ...64 Video Input Setup ...64 Auto Tuning ...65 DTVLink Setup ...65 Special Features ...65 Ethernet Setup ...66 Preferences Menu ...67 Closed Captioning ...67 Screen Format ...69 Time Menu ...69 Color Scheme ...70 Translucency ...70 Menu Language ...70 Power Indicator ...70 Lamp Power ...70 Chapter 5: Troubleshooting Troubleshooting ...72 Lamp Replacement Instructions...
... Sound Logic ...60 Audio Mode ...61 SAP (Second Audio Program 61 Balance ...61 Audio Connections ...62 Recordings Menu ...63 Connections Menu ...63 Signal Strength ...63 Channel Search ...64 Software Upgrade ...64 Signal Source ...64 Video Input Setup ...64 Auto Tuning ...65 DTVLink Setup ...65 Special Features ...65 Ethernet Setup ...66 Preferences Menu ...67 Closed Captioning ...67 Screen Format ...69 Time Menu ...69 Color Scheme ...70 Translucency ...70 Menu Language ...70 Power Indicator ...70 Lamp Power ...70 Chapter 5: Troubleshooting Troubleshooting ...72 Lamp Replacement Instructions...

User Manual
Page 13
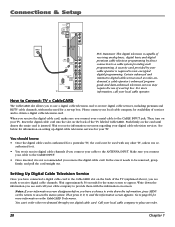
... and inputs (video input into video out, right audio input into right audio out, etc.). Different jacks and cables provide a different level of picture quality for comparison. Note: Go to Fixed/Variable Output in the Audio Connections menu to set option to remember the different degrees of performance. CABLE INPUT INPUT 1 INPUT 3 R R L L COMPOSITE INPUTS V V S-VIDEO S-VIDEO TV R R For Factory Use Only L L COMPONENT/ COMPOSITE INPUTS Use menu for DVI audio. When connecting cables, be ordered separately by calling the number on the remote control and choose Audio...
... and inputs (video input into video out, right audio input into right audio out, etc.). Different jacks and cables provide a different level of picture quality for comparison. Note: Go to Fixed/Variable Output in the Audio Connections menu to set option to remember the different degrees of performance. CABLE INPUT INPUT 1 INPUT 3 R R L L COMPOSITE INPUTS V V S-VIDEO S-VIDEO TV R R For Factory Use Only L L COMPONENT/ COMPOSITE INPUTS Use menu for DVI audio. When connecting cables, be ordered separately by calling the number on the remote control and choose Audio...
User Manual
Page 17
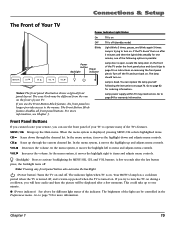
... button press, the backlight turns off (standby mode) Blinks Power button Power Backlight indicator MMENU/OOKK CH CH VOL VOL Notes: The front panel illustration shows a typical front panel layout. VOL Increases the volume. The indicator lights when TV is on Off TV is off . Chapter 1 15 VOL Decreases the volume. Lamp is displayed, pressing MENU/OK selects highlighted items. CH Scans down and adjusts menu controls. Connections & Setup The Front of Your TV Power Indicator Light...
... button press, the backlight turns off (standby mode) Blinks Power button Power Backlight indicator MMENU/OOKK CH CH VOL VOL Notes: The front panel illustration shows a typical front panel layout. VOL Increases the volume. The indicator lights when TV is on Off TV is off . Chapter 1 15 VOL Decreases the volume. Lamp is displayed, pressing MENU/OK selects highlighted items. CH Scans down and adjusts menu controls. Connections & Setup The Front of Your TV Power Indicator Light...

User Manual
Page 18
...Channel. Press the TV button on the TV using an S-Video cable or component video cables, you use the INPUT 3 S-VIDEO jack instead of digital and analog programs (except copy protected or component video formats). Connections & Setup ETHERNET TV CABLE DIGITAL AUDIO OUTPUT CableCARD™ SUBWOOFER R FIXED/ VARIABLE AUDIO OUTPUTS L WIRED IR R CTR R REAR L REAR MATRIX SURROUND OUTPUTS DVD L AUDIO/ VIDEO OUTPUT V VCR DVD R AUDIO L IN VIDEO 1 HDMI/DVI INPUT Use menu for composite PR PR video. 2BTV POWER (AC 120V~60Hz) ANTENNA INPUT PB Y/VIDEO PB Y/VIDEO INPUT 2 INPUT...
...Channel. Press the TV button on the TV using an S-Video cable or component video cables, you use the INPUT 3 S-VIDEO jack instead of digital and analog programs (except copy protected or component video formats). Connections & Setup ETHERNET TV CABLE DIGITAL AUDIO OUTPUT CableCARD™ SUBWOOFER R FIXED/ VARIABLE AUDIO OUTPUTS L WIRED IR R CTR R REAR L REAR MATRIX SURROUND OUTPUTS DVD L AUDIO/ VIDEO OUTPUT V VCR DVD R AUDIO L IN VIDEO 1 HDMI/DVI INPUT Use menu for composite PR PR video. 2BTV POWER (AC 120V~60Hz) ANTENNA INPUT PB Y/VIDEO PB Y/VIDEO INPUT 2 INPUT...

User Manual
Page 19
... R REAR L REAR MATRIX SURROUND OUTPUTS L AUDIO/ VIDEO OUTPUT V 1 2B 2A TV HDMI/DVI INPUT Use menu for more information.) Go to page 24 Chapter 1 17 Connect the VCR's audio/video outputs to the correct Video Input Channel. Connect the VCR's audio/video inputs to AUDIO/VIDEO OUTPUT jacks on the TV and the component(s) you can set up the TV to automatically tune to INPUT 2 (R and L-Audio, and V-Video) on the TV using composite audio/ video cables. If your satellite receiver doesn't have cable and an off-air antenna, connect the cable signal...
... R REAR L REAR MATRIX SURROUND OUTPUTS L AUDIO/ VIDEO OUTPUT V 1 2B 2A TV HDMI/DVI INPUT Use menu for more information.) Go to page 24 Chapter 1 17 Connect the VCR's audio/video outputs to the correct Video Input Channel. Connect the VCR's audio/video inputs to AUDIO/VIDEO OUTPUT jacks on the TV and the component(s) you can set up the TV to automatically tune to INPUT 2 (R and L-Audio, and V-Video) on the TV using composite audio/ video cables. If your satellite receiver doesn't have cable and an off-air antenna, connect the cable signal...
User Manual
Page 22
...CABLE ETHERNET DIGITAL AUDIO OUTPUT CableCARD™ SUBWOOFER R FIXED/ VARIABLE AUDIO OUTPUTS L WIRED IR Digital CablRe Card L AUDIO/ VIDEO OUTPUT V CTR R REAR L REAR MATRIX SURROUND OUTPUTS HDMI/DVI INPUT Use menu for composite PR PR video. Please contact your TV. How to Connect: TV + CableCARD The CableCARD slot allows you are ready to receive digital cable services, including premium and HDTV cable channels, without the need for your local cable company for availability of the TV (explained above), you to use of a set -top box. Insert the digital cable card...
...CABLE ETHERNET DIGITAL AUDIO OUTPUT CableCARD™ SUBWOOFER R FIXED/ VARIABLE AUDIO OUTPUTS L WIRED IR Digital CablRe Card L AUDIO/ VIDEO OUTPUT V CTR R REAR L REAR MATRIX SURROUND OUTPUTS HDMI/DVI INPUT Use menu for composite PR PR video. Please contact your TV. How to Connect: TV + CableCARD The CableCARD slot allows you are ready to receive digital cable services, including premium and HDTV cable channels, without the need for your local cable company for availability of the TV (explained above), you to use of a set -top box. Insert the digital cable card...
User Manual
Page 30
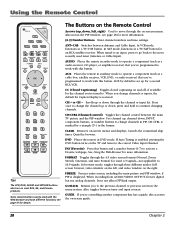
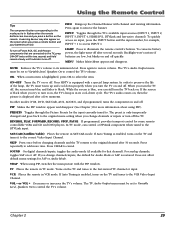
... work with this button and a number button (0-7) to continue changing channels. see page 48 for Caption Display is set up for an RCA satellite receiver. AUX by a triangle ( ) in DVD mode. Use channel up or down; CLEAR Removes on -screen guide. 28 Chapter 2 Quits the browser. Also, toggles between tuner and input sources. AUDIO Places the remote in audio mode to operate a component (such as a cable box, satellite receiver, VCR, DVD, or audio receiver) that has a guide, this button. CC (Closed Captioning) Toggles closed captioning on the TV...
... work with this button and a number button (0-7) to continue changing channels. see page 48 for Caption Display is set up for an RCA satellite receiver. AUX by a triangle ( ) in DVD mode. Use channel up or down; CLEAR Removes on -screen guide. 28 Chapter 2 Quits the browser. Also, toggles between tuner and input sources. AUDIO Places the remote in audio mode to operate a component (such as a cable box, satellite receiver, VCR, DVD, or audio receiver) that has a guide, this button. CC (Closed Captioning) Toggles closed captioning on the TV...
User Manual
Page 31
... mode. SAT/CAB (Satellite/Cable) Places the remote in flashes when the remote batteries are low. Does not affect default menu settings for more time. A warning banner may also appear on the TV and tunes to . To quickly access an input, press the INPUT button and the input number, for the input currently tuned to the last-viewed TV channel or input. SWAP When using PIP.) PRESETS Toggles through the TV's available input sources (INPUT 1, INPUT 2, INPUT 3, INPUT 4, HDMI/DVI...
... mode. SAT/CAB (Satellite/Cable) Places the remote in flashes when the remote batteries are low. Does not affect default menu settings for more time. A warning banner may also appear on the TV and tunes to . To quickly access an input, press the INPUT button and the input number, for the input currently tuned to the last-viewed TV channel or input. SWAP When using PIP.) PRESETS Toggles through the TV's available input sources (INPUT 1, INPUT 2, INPUT 3, INPUT 4, HDMI/DVI...
User Manual
Page 53
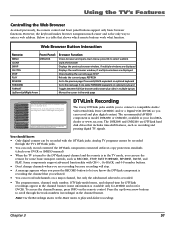
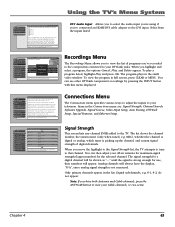
... user on the remote control. The recommended AVHDD component is model DVR2080 or DVR2160, available at your DVCR or AVHDD manual). • When the TV is tuned to let you know : • Only digital content can be recorded through the track numbers (recordings) in the web page 0 Go Back 1 Signal Strength 2 Channel Search 3 Software Upgrade 4 Signal Source 5 Video Input Setup 6 Auto Tuning 7 DTVLink Setup 8 Special Features 9 Ethernet Setup Main Menu Connections...
... user on the remote control. The recommended AVHDD component is model DVR2080 or DVR2160, available at your DVCR or AVHDD manual). • When the TV is tuned to let you know : • Only digital content can be recorded through the track numbers (recordings) in the web page 0 Go Back 1 Signal Strength 2 Channel Search 3 Software Upgrade 4 Signal Source 5 Video Input Setup 6 Auto Tuning 7 DTVLink Setup 8 Special Features 9 Ethernet Setup Main Menu Connections...
User Manual
Page 56
...) Not Connected AUDIO (Audio Receiver/Amp) Not Connected RCA SAT2 Not Connected DVD Input 2 SAT-CABLE (Satellite or Cable Box) Input 3 Press OK to select the channel or input that is tuned when the VCR key is discussed in the Features chapter while Assisted Setup is pressed on -screen menu system. Press the MENU button (the Main Menu appears). 2. You can choose a setting, enter a number, or adjust a level such as tint or brightness. The menu system...
...) Not Connected AUDIO (Audio Receiver/Amp) Not Connected RCA SAT2 Not Connected DVD Input 2 SAT-CABLE (Satellite or Cable Box) Input 3 Press OK to select the channel or input that is tuned when the VCR key is discussed in the Features chapter while Assisted Setup is pressed on -screen menu system. Press the MENU button (the Main Menu appears). 2. You can choose a setting, enter a number, or adjust a level such as tint or brightness. The menu system...
User Manual
Page 61
... Presets or create your sound system. Tune to the input you switch from the main menu. For example, if the left corner is set to Fixed Output, you turn the left screw counterclockwise. Press MENU to reset. 2. Using the TV's Menu System Mirror Adjustment Over time the small mirror inside the TV may shift slightly. Left and Right adjustments you adjust audio output. Use a 4 mm. Try adjusting the edges by using Trapezoid- To exit...
... Presets or create your sound system. Tune to the input you switch from the main menu. For example, if the left corner is set to Fixed Output, you turn the left screw counterclockwise. Press MENU to reset. 2. Using the TV's Menu System Mirror Adjustment Over time the small mirror inside the TV may shift slightly. Left and Right adjustments you adjust audio output. Use a 4 mm. Try adjusting the edges by using Trapezoid- To exit...

User Manual
Page 64
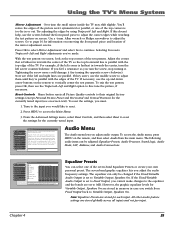
... 1 Fixed/Variable Out 2 Digital Audio Out 3 DVI Audio Input Main Menu Audio Audio Connections Auto Select PCM Choosing Auto Select will not. Using the TV's Menu System 0 Go Back 1 Equalizer Presets 2 Audio Processor 3 Sound Logic 4 Audio Mode 5 SAP 6 Balance 7 FAiuxdeido/VCaornianbelcetiOonust Main Menu Audio The Audio Connections menu has screens for setting up input or outputs associated with Dolby Digital and PCM that was manufactured in the last several years. • PCM (Pulse Code Modulation) The TV sends all signals through the Digital Audio Output...
... 1 Fixed/Variable Out 2 Digital Audio Out 3 DVI Audio Input Main Menu Audio Audio Connections Auto Select PCM Choosing Auto Select will not. Using the TV's Menu System 0 Go Back 1 Equalizer Presets 2 Audio Processor 3 Sound Logic 4 Audio Mode 5 SAP 6 Balance 7 FAiuxdeido/VCaornianbelcetiOonust Main Menu Audio The Audio Connections menu has screens for setting up input or outputs associated with Dolby Digital and PCM that was manufactured in the last several years. • PCM (Pulse Code Modulation) The TV sends all signals through the Digital Audio Output...
User Manual
Page 65
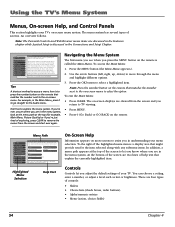
... access the Audio menu. To view the program in your off-air antenna for maximum signal strength (largest number) for available channels in full screen, press CLEAR or MENU. You can then adjust your area. •Software Upgrade: Check software version and upgrades. •Signal Source: Lost remote? Press OK or to the menu. Digital subchannels, e.g. 8-1, 8-2, do not appear. Chapter 4 63 Using the TV's Menu System 0 Go Back 1 Fixed/Variable Out 2 Digital Audio Out 3 DVI Audio Input Main Menu Audio Audio Connections Select the TV audio input...
... access the Audio menu. To view the program in your off-air antenna for maximum signal strength (largest number) for available channels in full screen, press CLEAR or MENU. You can then adjust your area. •Software Upgrade: Check software version and upgrades. •Signal Source: Lost remote? Press OK or to the menu. Digital subchannels, e.g. 8-1, 8-2, do not appear. Chapter 4 63 Using the TV's Menu System 0 Go Back 1 Fixed/Variable Out 2 Digital Audio Out 3 DVI Audio Input Main Menu Audio Audio Connections Select the TV audio input...

User Manual
Page 67
... remote control. Initial Channel is not enabled from being turned up DTVLink devices to hear. Program the second receiver with the TV. •DTVLink Connect: Set an analog input for setting up too loudly. Choose a video input or select Antenna or Cable Input and select a channel. Set the volume at the loudest level you 're using the 5001 code. VCR Input 1 VCR2 (AUX default) Not Connected AUDIO (Audio Receiver/Amp) Not Connected RCA SAT2 Not Connected DVD Input 2 SAT-CABLE (Satellite or Cable Box) Input...
... remote control. Initial Channel is not enabled from being turned up DTVLink devices to hear. Program the second receiver with the TV. •DTVLink Connect: Set an analog input for setting up too loudly. Choose a video input or select Antenna or Cable Input and select a channel. Set the volume at the loudest level you 're using the 5001 code. VCR Input 1 VCR2 (AUX default) Not Connected AUDIO (Audio Receiver/Amp) Not Connected RCA SAT2 Not Connected DVD Input 2 SAT-CABLE (Satellite or Cable Box) Input...
User Manual
Page 71
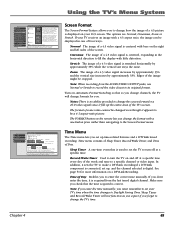
... the time, it is centered with a 4:3 aspect ratio, the image can have a different setting for Screen Format and Automatic Format Switching (AFS). Sleep Timer A one of four ways: Normal The image of the TV's screen. Note: If you enter the time manually, you forget to record a digital-TV program via DTVLink, or use as a wake-up the entire area of a 4:3 video signal is acquired from the AUDIO/VIDEO OUTPUT jacks, use Normal...
... the time, it is centered with a 4:3 aspect ratio, the image can have a different setting for Screen Format and Automatic Format Switching (AFS). Sleep Timer A one of four ways: Normal The image of the TV's screen. Note: If you enter the time manually, you forget to record a digital-TV program via DTVLink, or use as a wake-up the entire area of a 4:3 video signal is acquired from the AUDIO/VIDEO OUTPUT jacks, use Normal...
User Manual
Page 74
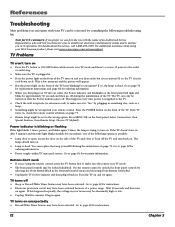
... in TV mode. • The front panel controls may have been activated. Turn the TV on after 5 minutes and then the light blinks steadily for one of the TV. If so, the lamp is "live" by consulting the following troubleshooting list. The TV can only be abnormally high or low. • Unplug. Choose TV (default). Buttons don't work • If you're using your TV into an outlet, the Power...
... in TV mode. • The front panel controls may have been activated. Turn the TV on after 5 minutes and then the light blinks steadily for one of the TV. If so, the lamp is "live" by consulting the following troubleshooting list. The TV can only be abnormally high or low. • Unplug. Choose TV (default). Buttons don't work • If you're using your TV into an outlet, the Power...
User Manual
Page 78
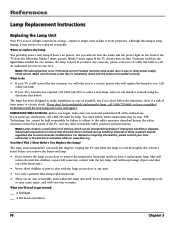
... at any clarification, call an authorized servicer in film or front projectors. References Lamp Replacement Instructions Replacing the Lamp Unit Your TV's source of the TV, and any other reasonable safety practices and precautions. If the TV doesn't turn on the back panel of light comes from a lamp - If you 'll need any time. • Use only a genuine RCA lamp replacement unit. • There are no picture, but if you don't follow...
... at any clarification, call an authorized servicer in film or front projectors. References Lamp Replacement Instructions Replacing the Lamp Unit Your TV's source of the TV, and any other reasonable safety practices and precautions. If the TV doesn't turn on the back panel of light comes from a lamp - If you 'll need any time. • Use only a genuine RCA lamp replacement unit. • There are no picture, but if you don't follow...

User Manual
Page 89
... light 8 INFO button 29 Initial channel 65 volume 65 INPUT autotuning 48 INPUT button 29 Internet connection 23 Internet service provider 23 J Jack panel access 10 door 10 Jacks ANTENNA INPUT 14 AUDIO/VIDEO OUTPUT 12 CABLE INPUT 14 CableCARD 14 CENTER 11 COMPONENT/COMPOSITE INPUT 13 COMPOSITE INPUT 12 DIGITAL AUDIO OUTPUT 13 DTVLink 14 ETHERNET 13 FIXED/VARIABLE OUTPUTS 11 HDMI/DVI 14 S-VIDEO 12 SUBWOOFER 11 WIRED IR 13 L Lamp Power 70 Lamp replacement 76 Language Menu 25, 70 Language display...
... light 8 INFO button 29 Initial channel 65 volume 65 INPUT autotuning 48 INPUT button 29 Internet connection 23 Internet service provider 23 J Jack panel access 10 door 10 Jacks ANTENNA INPUT 14 AUDIO/VIDEO OUTPUT 12 CABLE INPUT 14 CableCARD 14 CENTER 11 COMPONENT/COMPOSITE INPUT 13 COMPOSITE INPUT 12 DIGITAL AUDIO OUTPUT 13 DTVLink 14 ETHERNET 13 FIXED/VARIABLE OUTPUTS 11 HDMI/DVI 14 S-VIDEO 12 SUBWOOFER 11 WIRED IR 13 L Lamp Power 70 Lamp replacement 76 Language Menu 25, 70 Language display...
User Manual
Page 90
... Remote Control Buttons 28 Code list 35 Installing the Batteries 24 Programming 30 Remote control Learning feature 32 Reset controls 59 REVERSE button 29 S S-Video jack 12 SAP 61 SAP display 38 SAT/CAB Button 29 Satellite Receiver remote codes 36 Saving Web address 50 Screen Format 69 Search Automatic code 30 Channels 64 Second audio program 61 Service, authorized 9 Setup Ethernet 66 Remote 66 Setup, assisted 24 Signal source 64 SKIP button 29 Sleep timer 69 Sliders 55 Software Upgrade 64 SOUND button...
... Remote Control Buttons 28 Code list 35 Installing the Batteries 24 Programming 30 Remote control Learning feature 32 Reset controls 59 REVERSE button 29 S S-Video jack 12 SAP 61 SAP display 38 SAT/CAB Button 29 Satellite Receiver remote codes 36 Saving Web address 50 Screen Format 69 Search Automatic code 30 Channels 64 Second audio program 61 Service, authorized 9 Setup Ethernet 66 Remote 66 Setup, assisted 24 Signal source 64 SKIP button 29 Sleep timer 69 Sliders 55 Software Upgrade 64 SOUND button...


