
User Manual
Page 2
... can cause them . When servicing use the Freeze feature for proper grounding and, in case you if needed. For US customers: Your RCA Consumer Electronics product may cause similar damage. These numbers are located on the back panel of your product for proof of purchase. Important Information...or splashing and that the cable ground shall be permanently imprinted on the apparatus. may also be placed on the picture tube. Cable TV Installer: This reminder is provided to call your sales receipt to qualified service personnel. Press any time. Product Information Keep ...
... can cause them . When servicing use the Freeze feature for proper grounding and, in case you if needed. For US customers: Your RCA Consumer Electronics product may cause similar damage. These numbers are located on the back panel of your product for proof of purchase. Important Information...or splashing and that the cable ground shall be permanently imprinted on the apparatus. may also be placed on the picture tube. Cable TV Installer: This reminder is provided to call your sales receipt to qualified service personnel. Press any time. Product Information Keep ...

User Manual
Page 3
...the antenna system. Unplug this product, maintain a spacing of 4 inches from the top and sides of the TV receiver and 2 inches from the rear of the wall outlet or power strip. Even if the power indicator... to avoid injury from the power source, take its power plug out of the TV receiver and other apparatus (including amplifiers) that produce heat. 9. A polarized plug has two blades... with respect to the TV receiver, be easily accessible. 14. If an outside antenna is connected to proper grounding of the ...
...the antenna system. Unplug this product, maintain a spacing of 4 inches from the top and sides of the TV receiver and 2 inches from the rear of the wall outlet or power strip. Even if the power indicator... to avoid injury from the power source, take its power plug out of the TV receiver and other apparatus (including amplifiers) that produce heat. 9. A polarized plug has two blades... with respect to the TV receiver, be easily accessible. 14. If an outside antenna is connected to proper grounding of the ...
User Manual
Page 4
...purchase decision represents an investment in different parts of technology-HDTV. There are many off-air antennas you for choosing RCA Congratulations on your TV is the most user-friendly of both worlds Your HDTV has two tuners: one for regular, analog television and one...lifelike picture that people rave about HDTV that bring you through all of pixels. Introduction Connect the off-air antenna for digital television to this RCA High Definition Television (HDTV). ANTENNA DIGITAL INPUT HDTV COMPOSITE INPUTS S-VIDEO V L /MONO R VID1 ANTENNA/ CABLE ANALOG INPUT AUDIO/...
...purchase decision represents an investment in different parts of technology-HDTV. There are many off-air antennas you for choosing RCA Congratulations on your TV is the most user-friendly of both worlds Your HDTV has two tuners: one for regular, analog television and one...lifelike picture that people rave about HDTV that bring you through all of pixels. Introduction Connect the off-air antenna for digital television to this RCA High Definition Television (HDTV). ANTENNA DIGITAL INPUT HDTV COMPOSITE INPUTS S-VIDEO V L /MONO R VID1 ANTENNA/ CABLE ANALOG INPUT AUDIO/...

User Manual
Page 5
... by the ATSC (Advanced Television Standards Committee), the 16:9 aspect ratio was using the computer language of the picture on a regular, analog TV! When the standards were being developed by the NTSC (the National Television Standards Committee), it 's much wider than tall because of about 15... 16:9 (Widescreen) 1920 x 1080 5.1 ch Surround Aspect Ratio Aspect ratio is a little wider than 2 million pixels (1,920 x 1,080 = 2,073,600). Regular TVs use a 4:3 aspect ratio, which means the picture is simply the width and height of their living rooms and back to get people out of the...
... by the ATSC (Advanced Television Standards Committee), the 16:9 aspect ratio was using the computer language of the picture on a regular, analog TV! When the standards were being developed by the NTSC (the National Television Standards Committee), it 's much wider than tall because of about 15... 16:9 (Widescreen) 1920 x 1080 5.1 ch Surround Aspect Ratio Aspect ratio is a little wider than 2 million pixels (1,920 x 1,080 = 2,073,600). Regular TVs use a 4:3 aspect ratio, which means the picture is simply the width and height of their living rooms and back to get people out of the...

User Manual
Page 6
The DVI-HDTV connection is taking place. A summary of your TV viewing experience, and features that provide flexibility to build on these and additional features. DVI-HDTV Input Lets you connect a component with HDCP (High ... uncompressed, digital video interface developed for more details on the digital revolution that will enhance your TV's most unique features follows. Introduction Other Key Features of owning an RCA HDTV There are other interactive services. But your RCA HDTV has been designed with features that is designed to display either progressive scan (480p...
The DVI-HDTV connection is taking place. A summary of your TV viewing experience, and features that provide flexibility to build on these and additional features. DVI-HDTV Input Lets you connect a component with HDCP (High ... uncompressed, digital video interface developed for more details on the digital revolution that will enhance your TV's most unique features follows. Introduction Other Key Features of owning an RCA HDTV There are other interactive services. But your RCA HDTV has been designed with features that is designed to display either progressive scan (480p...
User Manual
Page 7
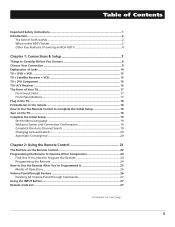
...Key Features of owning an RCA HDTV 4 Chapter 1: Connections & Setup 7 Things to Consider Before You Connect 8 Choose Your Connection 9 Explanation of Jacks ...10 TV + DVD + VCR ...13 TV + Satellite Receiver + VCR 15 TV + DVI Component ...16 TV+ A/V Receiver ...16 The Front of Your TV...17 Front Input Jacks...17... Front Panel Buttons 17 Plug in the TV ...18 Put batteries in the remote 18 ...
...Key Features of owning an RCA HDTV 4 Chapter 1: Connections & Setup 7 Things to Consider Before You Connect 8 Choose Your Connection 9 Explanation of Jacks ...10 TV + DVD + VCR ...13 TV + Satellite Receiver + VCR 15 TV + DVI Component ...16 TV+ A/V Receiver ...16 The Front of Your TV...17 Front Input Jacks...17... Front Panel Buttons 17 Plug in the TV ...18 Put batteries in the remote 18 ...
User Manual
Page 8
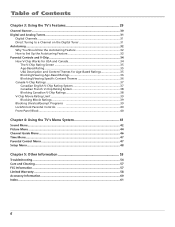
Table of Contents Chapter 3: Using the TV's Features 29 Channel Banner...30 Digital and Analog Tuners 31 Digital Channels...31 Direct Tuning to a Channel on the Digital Tuner 31 Autotuning ...32 Why ... Movie Rating Limit 39 Blocking Movie Ratings 39 Blocking Unrated/Exempt Programs 39 Lock/Unlock Parental Controls 40 Front Panel Block...40 Chapter 4: Using the TV's Menu System 41 Sound Menu ...42 Picture Menu ...44 Channel Guide Menu ...46 Time Menu...47 Parental Control Menu 47 Setup Menu ...48 Chapter 5: Other...
Table of Contents Chapter 3: Using the TV's Features 29 Channel Banner...30 Digital and Analog Tuners 31 Digital Channels...31 Direct Tuning to a Channel on the Digital Tuner 31 Autotuning ...32 Why ... Movie Rating Limit 39 Blocking Movie Ratings 39 Blocking Unrated/Exempt Programs 39 Lock/Unlock Parental Controls 40 Front Panel Block...40 Chapter 4: Using the TV's Menu System 41 Sound Menu ...42 Picture Menu ...44 Channel Guide Menu ...46 Time Menu...47 Parental Control Menu 47 Setup Menu ...48 Chapter 5: Other...

User Manual
Page 9
Again. Chapter 1 Connections & Setup Chapter Overview: • Things to Consider Before You Connect • Choose Your Connection • Explanation of Jacks • Connection Instructions • Front Panel Buttons and Jacks • Plug in the TV • Put Batteries in the Remote • How to Use the Remote Control to Complete the Initial Setup • Turn on the TV • Complete the Initial Setup Changing Entertainment. Graphics contained within this publication are for representation only. 7
Again. Chapter 1 Connections & Setup Chapter Overview: • Things to Consider Before You Connect • Choose Your Connection • Explanation of Jacks • Connection Instructions • Front Panel Buttons and Jacks • Plug in the TV • Put Batteries in the Remote • How to Use the Remote Control to Complete the Initial Setup • Turn on the TV • Complete the Initial Setup Changing Entertainment. Graphics contained within this publication are for representation only. 7
User Manual
Page 10
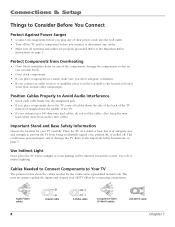
...that air can circulate freely. • Don't stack components. • If you place components in this book. Use Indirect Light Don't place the TV where sunlight or room lighting will be directed toward the screen. Audio/Video cables 8 Coaxial cable S-Video cable Component Video (Y•Pb•Pr) ... components before you connect or disconnect any of the components. Arrange the components so that is of adequate size and strength to prevent the TV from Overheating • Don't block ventilation holes on the top shelf so the heated air from audio/video cables. Also, keep the ...
...that air can circulate freely. • Don't stack components. • If you place components in this book. Use Indirect Light Don't place the TV where sunlight or room lighting will be directed toward the screen. Audio/Video cables 8 Coaxial cable S-Video cable Component Video (Y•Pb•Pr) ... components before you connect or disconnect any of the components. Arrange the components so that is of adequate size and strength to prevent the TV from Overheating • Don't block ventilation holes on the top shelf so the heated air from audio/video cables. Also, keep the ...
User Manual
Page 11
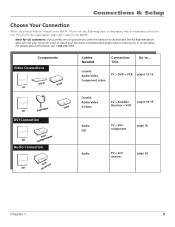
... your HDTV. For details about this service, call 1-888-206-3359. Components Video Connections DVD VCR TV TV Satellite VCR DVI Connection TV comDpVoInent Audio Connection TV reAc/eViver Cables Needed Connection Title Go to determine which connection is best for a fee to install ...your home for you in its operation. Coaxial Audio/video Component video TV + DVD + VCR pages 12-13 Coaxial Audio/video S-Video TV + Satellite Receiver + VCR pages 14-15 Audio DVI TV + DVI component page 16 Audio TV + A/V receiver page 16 Chapter 1 9 Please use the following ...
... your HDTV. For details about this service, call 1-888-206-3359. Components Video Connections DVD VCR TV TV Satellite VCR DVI Connection TV comDpVoInent Audio Connection TV reAc/eViver Cables Needed Connection Title Go to determine which connection is best for a fee to install ...your home for you in its operation. Coaxial Audio/video Component video TV + DVD + VCR pages 12-13 Coaxial Audio/video S-Video TV + Satellite Receiver + VCR pages 14-15 Audio DVI TV + DVI component page 16 Audio TV + A/V receiver page 16 Chapter 1 9 Please use the following ...
User Manual
Page 12
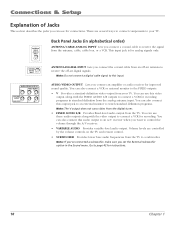
...connect this video output along with the FIXED AUDIO L/R outputs to connect a VCR for recording programs in standard definition from the TV to a subwoofer. ANTENNA/ CABLE ANALOG INPUT Back Panel Jacks (in alphabetical order) ANTENNA/CABLE ANALOG INPUT Lets you connect a coaxial ...cable to receive the signal from the TV. Connections & Setup Explanation of Jacks This section describes the jacks you can use these audio outputs along with the video output to connect...
...connect this video output along with the FIXED AUDIO L/R outputs to connect a VCR for recording programs in standard definition from the TV to a subwoofer. ANTENNA/ CABLE ANALOG INPUT Back Panel Jacks (in alphabetical order) ANTENNA/CABLE ANALOG INPUT Lets you connect a coaxial ...cable to receive the signal from the TV. Connections & Setup Explanation of Jacks This section describes the jacks you can use these audio outputs along with the video output to connect...
User Manual
Page 14
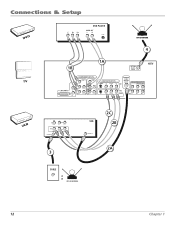
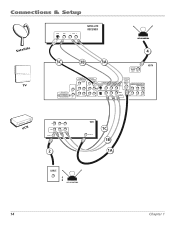
Connections & Setup POWER VOL + VOL - CH MENU CH DVD TV Y PB PR DVD PLAYER AUDIO OUT L R S-VIDEO OFF-AIR ANTENNA 4 1B 1A ANTENNA DIGITAL INPUT HDTV DVI-HDTV L R COMPONENT INPUTS CMP1 CMP2 Y Y COMPOSITE INPUTS S-VIDEO V L /MONO R VID1 ANTENNA/ CABLE ANALOG INPUT AUDIO/VIDEO OUTPUT FIXED AUDIO V L R PB L PB L PR R PR R VID2 VARIABLE AUDIO FOR FACTORY V L /MONO R USE ONLY SUBWOOFER L R VCR VIDEO IN L R AUDIO OUT VIDEO ANTENNA IN AUDIO L R 3 VCR ANTENNA OUT 2C 2B 2A CABLE O R OFF-AIR ANTENNA 12 Chapter 1
Connections & Setup POWER VOL + VOL - CH MENU CH DVD TV Y PB PR DVD PLAYER AUDIO OUT L R S-VIDEO OFF-AIR ANTENNA 4 1B 1A ANTENNA DIGITAL INPUT HDTV DVI-HDTV L R COMPONENT INPUTS CMP1 CMP2 Y Y COMPOSITE INPUTS S-VIDEO V L /MONO R VID1 ANTENNA/ CABLE ANALOG INPUT AUDIO/VIDEO OUTPUT FIXED AUDIO V L R PB L PB L PR R PR R VID2 VARIABLE AUDIO FOR FACTORY V L /MONO R USE ONLY SUBWOOFER L R VCR VIDEO IN L R AUDIO OUT VIDEO ANTENNA IN AUDIO L R 3 VCR ANTENNA OUT 2C 2B 2A CABLE O R OFF-AIR ANTENNA 12 Chapter 1
User Manual
Page 15
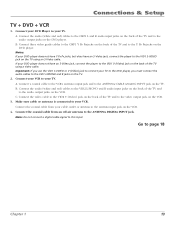
... cable or antenna is connected to your DVD player does not have an S-Video jack, connect the player to the antenna input jack on the TV using a video cable. Go to the ANTENNA/CABLE ANALOG INPUT jack on the VCR. Connect your DVD Player to your DVD player does not have... the audio (white and red) cables to the VID2 L/MONO and R audio input jacks on the back of the TV and to the video output jack on the back of the TV using an S-Video cable. Connect three video grade cables to the CMP1 Y PB PR jacks on the back of the...
... cable or antenna is connected to your DVD player does not have an S-Video jack, connect the player to the antenna input jack on the TV using a video cable. Go to the ANTENNA/CABLE ANALOG INPUT jack on the VCR. Connect your DVD Player to your DVD player does not have... the audio (white and red) cables to the VID2 L/MONO and R audio input jacks on the back of the TV and to the video output jack on the back of the TV using an S-Video cable. Connect three video grade cables to the CMP1 Y PB PR jacks on the back of the...
User Manual
Page 16
Connections & Setup Satellite TV S-VIDEO VIDEO L AUDIO R SATELLITE RECEIVER OFF-AIR ANTENNA 4 3C 3B 3A ANTENNA DIGITAL INPUT HDTV DVI-HDTV L R COMPONENT INPUTS CMP1 CMP2 Y Y COMPOSITE INPUTS S-VIDEO V L /MONO R VID1 ANTENNA/ CABLE ANALOG INPUT AUDIO/VIDEO OUTPUT FIXED AUDIO V L R PB L PB L PR R PR R VID2 VARIABLE AUDIO FOR FACTORY V L /MONO R USE ONLY SUBWOOFER L R VCR VIDEO IN L R AUDIO OUT VIDEO ANTENNA IN AUDIO L R 2 VCR ANTENNA OUT 1C 1B 1A CABLE O R OFF-AIR ANTENNA 14 Chapter 1
Connections & Setup Satellite TV S-VIDEO VIDEO L AUDIO R SATELLITE RECEIVER OFF-AIR ANTENNA 4 3C 3B 3A ANTENNA DIGITAL INPUT HDTV DVI-HDTV L R COMPONENT INPUTS CMP1 CMP2 Y Y COMPOSITE INPUTS S-VIDEO V L /MONO R VID1 ANTENNA/ CABLE ANALOG INPUT AUDIO/VIDEO OUTPUT FIXED AUDIO V L R PB L PB L PR R PR R VID2 VARIABLE AUDIO FOR FACTORY V L /MONO R USE ONLY SUBWOOFER L R VCR VIDEO IN L R AUDIO OUT VIDEO ANTENNA IN AUDIO L R 2 VCR ANTENNA OUT 1C 1B 1A CABLE O R OFF-AIR ANTENNA 14 Chapter 1
User Manual
Page 17
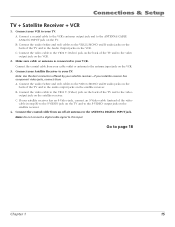
... the coaxial cable from your VCR. B. Connect the video cable to the VID2 V (Video) jack on the back of the TV and to the ANTENNA DIGITAL INPUT jack. C. Connections & Setup TV + Satellite Receiver + VCR 1. Connect your VCR to your cable outlet or antenna to the antenna input jack on the VCR.... Connect your satellite receiver has component video jacks, connect those A. Connect the video cable to the VID1 V (Video) jack on the back of the TV and to the ANTENNA/CABLE ANALOG INPUT jack on the VCR. Note: Do not connect a digital cable signal to the video output jack on the...
... the coaxial cable from your VCR. B. Connect the video cable to the VID2 V (Video) jack on the back of the TV and to the ANTENNA DIGITAL INPUT jack. C. Connections & Setup TV + Satellite Receiver + VCR 1. Connect your VCR to your cable outlet or antenna to the antenna input jack on the VCR.... Connect your satellite receiver has component video jacks, connect those A. Connect the video cable to the VID1 V (Video) jack on the back of the TV and to the ANTENNA/CABLE ANALOG INPUT jack on the VCR. Note: Do not connect a digital cable signal to the video output jack on the...
User Manual
Page 18
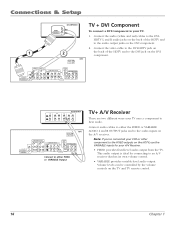
... ANALOG INPUT AUDIO/VIDEO OUTPUT FIXED AUDIO V L R PB L PB L PR R PR R VID2 VARIABLE AUDIO FOR FACTORY V L /MONO R USE ONLY SUBWOOFER L R TV + DVI Component To connect a DVI Component to the audio output jacks on the DVI component. 2. Connect the video cable to the DVI-HDTV jack on...component to the FIXED outputs on the HDTV, use the VARIABLE inputs for connecting to the audio inputs on the TV and TV remote control. 16 Chapter 1 CD IN R L TAPE TV IN OUT IN A/V RECEIVER VCR IN OUT ANTENNA DIGITAL INPUT HDTV DVI-HDTV L R COMPONENT INPUTS CMP1 CMP1 Y...
... ANALOG INPUT AUDIO/VIDEO OUTPUT FIXED AUDIO V L R PB L PB L PR R PR R VID2 VARIABLE AUDIO FOR FACTORY V L /MONO R USE ONLY SUBWOOFER L R TV + DVI Component To connect a DVI Component to the audio output jacks on the DVI component. 2. Connect the video cable to the DVI-HDTV jack on...component to the FIXED outputs on the HDTV, use the VARIABLE inputs for connecting to the audio inputs on the TV and TV remote control. 16 Chapter 1 CD IN R L TAPE TV IN OUT IN A/V RECEIVER VCR IN OUT ANTENNA DIGITAL INPUT HDTV DVI-HDTV L R COMPONENT INPUTS CMP1 CMP1 Y...

User Manual
Page 19
...information, see Chapter 3. Press the arrow up the Main menu. Notes: When you plug in ) Allows you also connect audio cables from the TV. When connecting a component that uses a monaural cable, such as some camcorders, use the Front Button Block feature, the front panel no longer ... component, such as a camcorder, video game console, or VCR. L/MONO and R AUDIO Receives audio from both speakers. S-VIDEO (in headphones, the TV's internal speakers are muted. Use the VOL up through the current channel list. CH Scans up or down button (the headphone volume display appears...
...information, see Chapter 3. Press the arrow up the Main menu. Notes: When you plug in ) Allows you also connect audio cables from the TV. When connecting a component that uses a monaural cable, such as some camcorders, use the Front Button Block feature, the front panel no longer ... component, such as a camcorder, video game console, or VCR. L/MONO and R AUDIO Receives audio from both speakers. S-VIDEO (in headphones, the TV's internal speakers are muted. Use the VOL up through the current channel list. CH Scans up or down button (the headphone volume display appears...

User Manual
Page 20
...item that the buttons on -screen menus. Use the up or down arrow button to move through the on the remote control operate the TV's functions. 18 Chapter 1 "TV mode" means that you move up or down . Note: Highlighted means that the menu item stands out from the back of the ... VOL VOL CH - The theory is "Navigation" - Use the right or left arrow button to insert the plug completely. Do not plug the TV into an outlet controlled by pushing the tab and lifting off the cover. • Insert 2 fresh batteries. Make sure the polarities (+ and -) are aligned correctly....
...item that the buttons on -screen menus. Use the up or down arrow button to move through the on the remote control operate the TV's functions. 18 Chapter 1 "TV mode" means that you move up or down . Note: Highlighted means that the menu item stands out from the back of the ... VOL VOL CH - The theory is "Navigation" - Use the right or left arrow button to insert the plug completely. Do not plug the TV into an outlet controlled by pushing the tab and lifting off the cover. • Insert 2 fresh batteries. Make sure the polarities (+ and -) are aligned correctly....

User Manual
Page 21
... the setup allows you turn on your preferred language for channels on both tuners. This is connected, press OK. If it 's set to your new RCA TV. Note: The Auto Channel Search looks for channels for an off-air antenna or Cable. 4. Tip To access the setup menus manually, press MENU and.... Press OK to continue with the setup. After the welcome screen, the initial setup asks you 've connected the HDTV to search on your new RCA TV. When the channel search is set your tuners-for just one tuner, choose that source. Make sure the Signal Source is complete, press OK to...
... the setup allows you turn on your preferred language for channels on both tuners. This is connected, press OK. If it 's set to your new RCA TV. Note: The Auto Channel Search looks for channels for an off-air antenna or Cable. 4. Tip To access the setup menus manually, press MENU and.... Press OK to continue with the setup. After the welcome screen, the initial setup asks you 've connected the HDTV to search on your new RCA TV. When the channel search is set your tuners-for just one tuner, choose that source. Make sure the Signal Source is complete, press OK to...

User Manual
Page 22
... channel from the signal sent by starting auto convergence. Pressing OK before the end will stop the process and keep old settings. Press OK (the TV tunes to the last selected/ available channel in the middle of the label. 5. See page 51 for at a later time by accessing the Setup menu...
... channel from the signal sent by starting auto convergence. Pressing OK before the end will stop the process and keep old settings. Press OK (the TV tunes to the last selected/ available channel in the middle of the label. 5. See page 51 for at a later time by accessing the Setup menu...


