
Warranty Card
Page 1
...Consumer will be repaired or replaced with factory default settings, and without charge for installation, removal or reinstallation of product, to corruptions caused by removal or defacement of the factory serial number/bar code label(s). THE ...installation, mishandling, misuse, neglect, accident, or by computer viruses, spyware or other malware, to loss of media, files, data or content, or to damage to tapes, discs, removable memory devices or cards, speakers, accessories, computers, computer peripherals, other express warranties or liabilities. dated bill of sale), specification...
...Consumer will be repaired or replaced with factory default settings, and without charge for installation, removal or reinstallation of product, to corruptions caused by removal or defacement of the factory serial number/bar code label(s). THE ...installation, mishandling, misuse, neglect, accident, or by computer viruses, spyware or other malware, to loss of media, files, data or content, or to damage to tapes, discs, removable memory devices or cards, speakers, accessories, computers, computer peripherals, other express warranties or liabilities. dated bill of sale), specification...
Owner/User Manual
Page 4
... not installed and used in a residential installation. This device complies with the instructions, may not cause harmful interference, and (2) this equipment does cause harmful interference to radio or television reception, which the receiver is connected. • Consult the dealer or an experienced radio/TV technician for technical support RCA EZ2120 RCA EZ2120BL RCA EZ2120BK RCA EZ2120PL RCA EZ2120RD RCA EZ2120SL This Class B digital apparatus complies...
... not installed and used in a residential installation. This device complies with the instructions, may not cause harmful interference, and (2) this equipment does cause harmful interference to radio or television reception, which the receiver is connected. • Consult the dealer or an experienced radio/TV technician for technical support RCA EZ2120 RCA EZ2120BL RCA EZ2120BK RCA EZ2120PL RCA EZ2120RD RCA EZ2120SL This Class B digital apparatus complies...
Owner/User Manual
Page 5
... 4 End user license agreement End user license agreement...6 Getting started 1. Content of the box...12 2. Resetting the camcorder ...14 6. Charging the battery...12 3. Inserting (or removing) SD memory card 13 4. Setting date and time ...14 General controls General controls ...15 Operation modes ...16 Recording videos Recording quality...17 Quality settings...17 Recording videos...18 Taking photos To take photos...19 Playback mode Playing back recordings...20 Deleting To delete one recording ...22 Menu settings Using the camcorder menu...23 Menu options and settings ...23...
... 4 End user license agreement End user license agreement...6 Getting started 1. Content of the box...12 2. Resetting the camcorder ...14 6. Charging the battery...12 3. Inserting (or removing) SD memory card 13 4. Setting date and time ...14 General controls General controls ...15 Operation modes ...16 Recording videos Recording quality...17 Quality settings...17 Recording videos...18 Taking photos To take photos...19 Playback mode Playing back recordings...20 Deleting To delete one recording ...22 Menu settings Using the camcorder menu...23 Menu options and settings ...23...
Owner/User Manual
Page 7
... (ii) to make one (1) copy of the Program into any software upgrades or updates provided by AUDIOVOX that replace and/or supplement the original Program, unless such upgrade or update is a copy of the EULA that you are granted a non-exclusive, non-sublicenseable, non-assignable and nontransferable (except as a part of the RCA branded Portable Digital Audio/Video Device ("A/V Device"), and only if the other...
... (ii) to make one (1) copy of the Program into any software upgrades or updates provided by AUDIOVOX that replace and/or supplement the original Program, unless such upgrade or update is a copy of the EULA that you are granted a non-exclusive, non-sublicenseable, non-assignable and nontransferable (except as a part of the RCA branded Portable Digital Audio/Video Device ("A/V Device"), and only if the other...
Owner/User Manual
Page 8
...a final code release. All rights not expressly granted are owned by multiple computers at the level of warranty may be downloaded from AUDIOVOX. (d) Upon termination of the Program is provided with any copies thereof are reserved by destroying or permanently erasing the Program...Updated versions of the Program may not be used by AUDIOVOX, its Licensors or its Licensors. 7 Government is not obligated to provide support services for the licenses expressly granted to use of this EULA and your license will automatically terminate without any copyright notices on the date...
...a final code release. All rights not expressly granted are owned by multiple computers at the level of warranty may be downloaded from AUDIOVOX. (d) Upon termination of the Program is provided with any copies thereof are reserved by destroying or permanently erasing the Program...Updated versions of the Program may not be used by AUDIOVOX, its Licensors or its Licensors. 7 Government is not obligated to provide support services for the licenses expressly granted to use of this EULA and your license will automatically terminate without any copyright notices on the date...
Owner/User Manual
Page 11
... CORPORATION END USER LICENSE AGREEMENT IMPORTANT: READ CAREFULLY BEFORE DOWNLOADING OR INSTALLING THIS SOFTWARE! This license permits you have read this package or device is either loaded into RAM or installed into the hard disk or other permanent memory of License. The Software must be prohibited under applicable law). 2. Warranty Disclaimer. You agree to abide by United States copyright laws, international treaty...
... CORPORATION END USER LICENSE AGREEMENT IMPORTANT: READ CAREFULLY BEFORE DOWNLOADING OR INSTALLING THIS SOFTWARE! This license permits you have read this package or device is either loaded into RAM or installed into the hard disk or other permanent memory of License. The Software must be prohibited under applicable law). 2. Warranty Disclaimer. You agree to abide by United States copyright laws, international treaty...
Owner/User Manual
Page 13
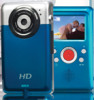
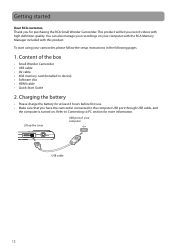
... camcorder, please follow the setup instructions in device) • Software disc • HDMI cable • Quick Start Guide 2. You can also manage your recordings on . Charging the battery • Please charge the battery for more information. To start using your computer with the RCA Memory Manager included with high definition quality. Lift up the cover USB port of the box • Small Wonder Camcorder • USB cable • AV cable • 4GB memory card (Installed...
... camcorder, please follow the setup instructions in device) • Software disc • HDMI cable • Quick Start Guide 2. You can also manage your recordings on . Charging the battery • Please charge the battery for more information. To start using your computer with the RCA Memory Manager included with high definition quality. Lift up the cover USB port of the box • Small Wonder Camcorder • USB cable • AV cable • 4GB memory card (Installed...

Owner/User Manual
Page 14
... card in memory slot, please use care when removing. Internal memory is under minimal tension when locked in until a click is ready for recording (memory card supplied). Turning on the LCD screen when the camcorder is heard • The card icon appears on the screen with memory card inserted. • To remove card, push card in the micro-SD card adapter before inserting it into the camcorder's card slot. Inserting (or removing) SD memory card An SD memory card...
... card in memory slot, please use care when removing. Internal memory is under minimal tension when locked in until a click is ready for recording (memory card supplied). Turning on the LCD screen when the camcorder is heard • The card icon appears on the screen with memory card inserted. • To remove card, push card in the micro-SD card adapter before inserting it into the camcorder's card slot. Inserting (or removing) SD memory card An SD memory card...

Owner/User Manual
Page 16
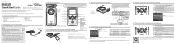
Adjust volume during record and preview / - Skip to show the card slot) Tripod screw hole Camcorder strap hole LCD screen Play/pause Setup menu Record Audio speaker Delete recordings Switch between Photo preview and Video preview modes +/- fast rewind or forward 15 zoom during playback; General controls General controls On/off switch Microphone Recording indicator Lens AV output USB and HDMI video output (Lift up the cover to access the connector) SD card slot (Lift up the cover to previous or next recording;
Adjust volume during record and preview / - Skip to show the card slot) Tripod screw hole Camcorder strap hole LCD screen Play/pause Setup menu Record Audio speaker Delete recordings Switch between Photo preview and Video preview modes +/- fast rewind or forward 15 zoom during playback; General controls General controls On/off switch Microphone Recording indicator Lens AV output USB and HDMI video output (Lift up the cover to access the connector) SD card slot (Lift up the cover to previous or next recording;

Owner/User Manual
Page 17
... Video preview mode Playback mode (read Playback mode section) 1 In Video preview mode, press RECORD to record a video 2 In Photo preview mode, press RECORD to the diagram below for switching between modes and read Taking photos section) Press To end Playback mode, simply press RECORD which will always launch in video preview mode after being switched on Video preview mode1 (read Recording videos section) Press MODE Press MODE Photo preview mode2 (read relevant sections in the user manual for operating the camcorder: Video preview mode, Photo...
... Video preview mode Playback mode (read Playback mode section) 1 In Video preview mode, press RECORD to record a video 2 In Photo preview mode, press RECORD to the diagram below for switching between modes and read Taking photos section) Press To end Playback mode, simply press RECORD which will always launch in video preview mode after being switched on Video preview mode1 (read Recording videos section) Press MODE Press MODE Photo preview mode2 (read relevant sections in the user manual for operating the camcorder: Video preview mode, Photo...
Owner/User Manual
Page 18
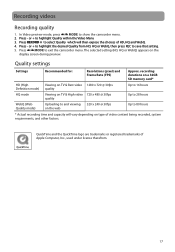
... press REC to show the camcorder menu. 2. Press - The selected setting (HD, HQ or WebQ) appears on type of Apple Computer, Inc., used under license therefrom. 17 Press MODE to highlight Quality within the Video Menu 3. Recording videos Recording quality 1. or + to exit the camcorder menu. Press - Quality settings Settings Recommended for: Resolutions (pixel) and Frame Rate (FPS) Approx. recording durations on a 32GB SD memory card* HD (High Viewing on...
... press REC to show the camcorder menu. 2. Press - The selected setting (HD, HQ or WebQ) appears on type of Apple Computer, Inc., used under license therefrom. 17 Press MODE to highlight Quality within the Video Menu 3. Recording videos Recording quality 1. or + to exit the camcorder menu. Press - Quality settings Settings Recommended for: Resolutions (pixel) and Frame Rate (FPS) Approx. recording durations on a 32GB SD memory card* HD (High Viewing on...
Owner/User Manual
Page 24
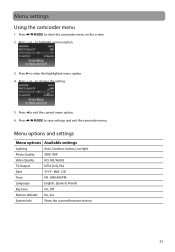
.../PM Language English, Spanish, French Key tone On, Off Restore defaults No, Yes System Info Show the current firmware version 23 MM - Press + or - Menu options and settings Menu options Available settings Lighting Auto, Outdoor, Indoor, Low light Photo Quality 3MP, 1MP Video Quality HD, HQ, WebQ TV Output NTSC (US), PAL Date YYYY - to show the camcorder menu on the screen. 2. Press + or - Menu settings Using the camcorder menu 1. Press MODE to change the setting. 5.
.../PM Language English, Spanish, French Key tone On, Off Restore defaults No, Yes System Info Show the current firmware version 23 MM - Press + or - Menu options and settings Menu options Available settings Lighting Auto, Outdoor, Indoor, Low light Photo Quality 3MP, 1MP Video Quality HD, HQ, WebQ TV Output NTSC (US), PAL Date YYYY - to show the camcorder menu on the screen. 2. Press + or - Menu settings Using the camcorder menu 1. Press MODE to change the setting. 5.
Owner/User Manual
Page 25
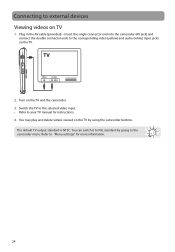
... corresponding video (yellow) and audio (white) input jacks on TV 1. Refer to the camcorder menu. Connecting to external devices Viewing videos on the TV. 2. You may play and delete videos viewed on the TV and the camcorder. 3. You can switch it to PAL standard by using the camcorder buttons. Plug in the AV cable (provided) - Turn on the TV by going to "Menu settings" for instructions. 4. The default TV output standard is NTSC. Switch the TV to the selected video input...
... corresponding video (yellow) and audio (white) input jacks on TV 1. Refer to the camcorder menu. Connecting to external devices Viewing videos on the TV. 2. You may play and delete videos viewed on the TV and the camcorder. 3. You can switch it to PAL standard by using the camcorder buttons. Plug in the AV cable (provided) - Turn on the TV by going to "Menu settings" for instructions. 4. The default TV output standard is NTSC. Switch the TV to the selected video input...

Owner/User Manual
Page 26
... VHS tape or DVD 1. Turn on the camcorder for instructions. 4. Recording videos to your recording device. Press to playback the file you wish to record. • To record all videos on the camcorder. • For best viewing or recording quality, use the HDMI connector on the right panel of the recording device (VHS or DVD recorder). 2. Start recording of your user manual of the recording device for 3 seconds to corresponding video (yellow) and audio (white) inputs of the camcorder with an HDMI cable...
... VHS tape or DVD 1. Turn on the camcorder for instructions. 4. Recording videos to your recording device. Press to playback the file you wish to record. • To record all videos on the camcorder. • For best viewing or recording quality, use the HDMI connector on the right panel of the recording device (VHS or DVD recorder). 2. Start recording of your user manual of the recording device for 3 seconds to corresponding video (yellow) and audio (white) inputs of the camcorder with an HDMI cable...
Owner/User Manual
Page 27
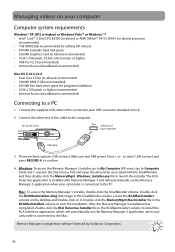
...) • 300 MB free hard drive space for program installation • 1024 x 768 pixels or higher recommended • Internet Access (broadband recommended) Connecting to launch the installer. Memory Manager is connected to the connection jack. Connect the supplied USB cable to the Mac. Managing videos on it. After the Memory Manager 3 installation has completed, double-click the RCA Detective Installer file in the Start menu, find and open the drive letter associated with...
...) • 300 MB free hard drive space for program installation • 1024 x 768 pixels or higher recommended • Internet Access (broadband recommended) Connecting to launch the installer. Memory Manager is connected to the connection jack. Connect the supplied USB cable to the Mac. Managing videos on it. After the Memory Manager 3 installation has completed, double-click the RCA Detective Installer file in the Start menu, find and open the drive letter associated with...
Owner/User Manual
Page 29
... playing back recordings. • Adjust the volume by camcorder. • Make sure the SD memory card is powered off ? • Yes. My friends cannot view the videos I retrieve deleted videos and photos? • Unfortunately, deleted videos cannot be retrieved. Cannot record videos. • Make sure the memory space is annoying. Can I have correctly selected the TV output system (PAL or NTSC) from the camcorder may be very low. The recording time and date are played...
... playing back recordings. • Adjust the volume by camcorder. • Make sure the SD memory card is powered off ? • Yes. My friends cannot view the videos I retrieve deleted videos and photos? • Unfortunately, deleted videos cannot be retrieved. Cannot record videos. • Make sure the memory space is annoying. Can I have correctly selected the TV output system (PAL or NTSC) from the camcorder may be very low. The recording time and date are played...

Owner/User Manual
Page 31
... still images: • 2304 X 1296 pixels (JPG) Recording media: • SD memory card (Installed in device) Maximum recording time (approximate figures): Video Recording Modes HD (High Definition mode) HQ (High Quality mode) WebQ (Web Quality mode) Maximum no. LCD screen: • 2 inches Microphone: • Mono microphone Charging Time: • 4 hours 30 Technical specifications Battery: • Built-in 3.7V Lithium battery Size and frame rate of video recordings: • HD mode: 1280 x 720 pixels @ 30 fps (H.264 video compression, MOV file format...
... still images: • 2304 X 1296 pixels (JPG) Recording media: • SD memory card (Installed in device) Maximum recording time (approximate figures): Video Recording Modes HD (High Definition mode) HQ (High Quality mode) WebQ (Web Quality mode) Maximum no. LCD screen: • 2 inches Microphone: • Mono microphone Charging Time: • 4 hours 30 Technical specifications Battery: • Built-in 3.7V Lithium battery Size and frame rate of video recordings: • HD mode: 1280 x 720 pixels @ 30 fps (H.264 video compression, MOV file format...
Owner/User Manual
Page 32
... to tapes, discs, removable memory devices or cards, speakers, accessories, computers, computer peripherals, other rights which vary from the date of original purchase, such defect(s) will be responsible for a warranty claim: • If your product for reloading data and content. If applicable, before returning your product is capable of storing content (such as an mp3 player, voice recorder, camcorder, digital photo frame...
... to tapes, discs, removable memory devices or cards, speakers, accessories, computers, computer peripherals, other rights which vary from the date of original purchase, such defect(s) will be responsible for a warranty claim: • If your product for reloading data and content. If applicable, before returning your product is capable of storing content (such as an mp3 player, voice recorder, camcorder, digital photo frame...
Quick Start Guide
Page 1
...can also be found in the memory card installed in until the camcorder turns on the camcorder display. Playing back or deleting recordings 32 1 Enter Playback mode to initiate charging. www.rcaaudiovideo.com The User Manual PDF file can also set video quality settings from Playback mode QuickTime and the QuickTime logo are three basic modes for more than 10 seconds. Charging your computer USB cable 3. Microphone Recording indicator Lens AV output USB and HDMI video output Playback/pause Setup menu Record Audio speaker LCD screen Camcorder strap hole Tripod screw hole...
...can also be found in the memory card installed in until the camcorder turns on the camcorder display. Playing back or deleting recordings 32 1 Enter Playback mode to initiate charging. www.rcaaudiovideo.com The User Manual PDF file can also set video quality settings from Playback mode QuickTime and the QuickTime logo are three basic modes for more than 10 seconds. Charging your computer USB cable 3. Microphone Recording indicator Lens AV output USB and HDMI video output Playback/pause Setup menu Record Audio speaker LCD screen Camcorder strap hole Tripod screw hole...

Quick Start Guide
Page 2
..., to loss of media, files, data or content, or to damage to tapes, discs, removable memory devices or cards, speakers, accessories, computers, computer peripherals, other media players, home networks or vehicle electrical systems. This Warranty does not apply to your Small Wonder camcorder's videos/photos. dated bill of sale), specification of these software titles is not necessary to use these applications to install the included Memory Manager application. 10...
..., to loss of media, files, data or content, or to damage to tapes, discs, removable memory devices or cards, speakers, accessories, computers, computer peripherals, other media players, home networks or vehicle electrical systems. This Warranty does not apply to your Small Wonder camcorder's videos/photos. dated bill of sale), specification of these software titles is not necessary to use these applications to install the included Memory Manager application. 10...


