User Guide
Page 1
... the unit away from the U.S. ence Problems." ton, DC 20402. Do not attempt to radio and television reception. In the space below, record the date and place of FCC Rules. NO USER SERVICEABLE PARTS INSIDE. REFER SERVICING TO QUALIFIED SERVICE PERSONNEL. FCC Information EN This device generates and uses radio frequency (RF) energy, and if not installed and used properly, this safety feature. This...
... the unit away from the U.S. ence Problems." ton, DC 20402. Do not attempt to radio and television reception. In the space below, record the date and place of FCC Rules. NO USER SERVICEABLE PARTS INSIDE. REFER SERVICING TO QUALIFIED SERVICE PERSONNEL. FCC Information EN This device generates and uses radio frequency (RF) energy, and if not installed and used properly, this safety feature. This...
User Guide
Page 2
...2 Cable Connections 3 Power Connections 3 Panel Controls 4 The Display 5 The Remote Control 6 Playing 7 Basic Operations 7 Special Operations 7-9 (Dual Mode, Random Play, Introductory play, DJ Mode, Repeat, Live Effects, Program, Clearing Program) Recording 10 Loading Discs 10 Select Recording Mode 10-11 (Dubbing Mode, Live Dubbing Mode, External Recording Mode, Sychronized Digital Recording Mode, Program Recording, Microphone Recording) Finializing/ Unfinializing/ Erasing Recordings 12 More Special Functions ... 13 Assigning Disc Titles 13 Editing Disc Titles 13 Storing Playback...
...2 Cable Connections 3 Power Connections 3 Panel Controls 4 The Display 5 The Remote Control 6 Playing 7 Basic Operations 7 Special Operations 7-9 (Dual Mode, Random Play, Introductory play, DJ Mode, Repeat, Live Effects, Program, Clearing Program) Recording 10 Loading Discs 10 Select Recording Mode 10-11 (Dubbing Mode, Live Dubbing Mode, External Recording Mode, Sychronized Digital Recording Mode, Program Recording, Microphone Recording) Finializing/ Unfinializing/ Erasing Recordings 12 More Special Functions ... 13 Assigning Disc Titles 13 Editing Disc Titles 13 Storing Playback...
User Guide
Page 3
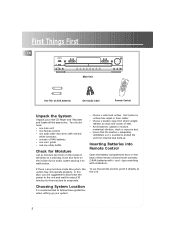
... dust. • Ensure that the location is adequately ventillated, as moisture can also form on the back of AAA batteries Main Unit One Audio Cable POWER REVERSE PLAY PREV STOP PAUSE FORWARD NEXT CD ERASE CD-SYNC CDR OK RECORD SHIFT 1 PROGRAM FINALIZE 2 OPEN/CLOSE 3 4 DISPLAY 5 SHUFFLE 7 LIVE SELECT 6 DJ 8 LIVE INTRO 9 0 REPEAT CD TITLE Remote Control Unpack the System Unpack your new CD Player and Recorder and locate all the accessories.
... dust. • Ensure that the location is adequately ventillated, as moisture can also form on the back of AAA batteries Main Unit One Audio Cable POWER REVERSE PLAY PREV STOP PAUSE FORWARD NEXT CD ERASE CD-SYNC CDR OK RECORD SHIFT 1 PROGRAM FINALIZE 2 OPEN/CLOSE 3 4 DISPLAY 5 SHUFFLE 7 LIVE SELECT 6 DJ 8 LIVE INTRO 9 0 REPEAT CD TITLE Remote Control Unpack the System Unpack your new CD Player and Recorder and locate all the accessories.

User Guide
Page 4
... tape player) through optical or coaxial digital cable (not supplied). 1 4. Connection to external receiver (e.g amplifier) through analog/ digital/ coaxial audio cable for power. SET DEMO 4 44 Connenction jacks on the back panel SET DEMO 2. Power Connections Plug the power supply cord into an AC power outlet. Note: For the sake of safety, complete all cable connections before you can always make analog recordings when digital recording is not possible. • As minimum setting, CD Analog cables must be connected for digital playback. 2 3 3. auto track numbering...
... tape player) through optical or coaxial digital cable (not supplied). 1 4. Connection to external receiver (e.g amplifier) through analog/ digital/ coaxial audio cable for power. SET DEMO 4 44 Connenction jacks on the back panel SET DEMO 2. Power Connections Plug the power supply cord into an AC power outlet. Note: For the sake of safety, complete all cable connections before you can always make analog recordings when digital recording is not possible. • As minimum setting, CD Analog cables must be connected for digital playback. 2 3 3. auto track numbering...
User Guide
Page 5
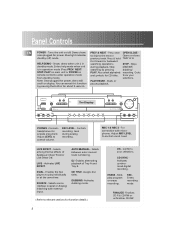
... Off. Press & hold TRAY A/ B for function details ) 4 OK - Stop playback/ is in operation mode (Press PREV/ NEXT/ searching by pressing the button for CD titles. AUTO/MANUAL - REC Enters recording mode. Demo shows PREV & NEXT - previous track. The Display PHONES -Connects headphones for private enjoyment. Press once OPEN/CLOSE - LIVE EFFECT - SOURCE - Panel Controls EN POWER - MIC 1 & MIC 2 - LIVE - from your selections. Controls recording level during playback. Stops standby mode. Activates LIVE EFFECT. CD TITLE -Assigns disc titles.
... Off. Press & hold TRAY A/ B for function details ) 4 OK - Stop playback/ is in operation mode (Press PREV/ NEXT/ searching by pressing the button for CD titles. AUTO/MANUAL - REC Enters recording mode. Demo shows PREV & NEXT - previous track. The Display PHONES -Connects headphones for private enjoyment. Press once OPEN/CLOSE - LIVE EFFECT - SOURCE - Panel Controls EN POWER - MIC 1 & MIC 2 - LIVE - from your selections. Controls recording level during playback. Stops standby mode. Activates LIVE EFFECT. CD TITLE -Assigns disc titles.
User Guide
Page 6
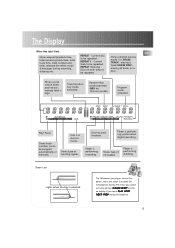
... digital recording. Random Play mode activated. (MIX for power, there are to be repeated. Shows sound output levels and red bars indicate level is in dual on a disc ). Tip: Whenever you plug or turn on display if you cannot activate any key. The Display When they light/ flash: EN Shows elapsed playback time, total remaining track time, total track time, track numbers,disc titles, selected live effect mode & messages during initialization. 5 erasing a track/ ERASE DISC...
... digital recording. Random Play mode activated. (MIX for power, there are to be repeated. Shows sound output levels and red bars indicate level is in dual on a disc ). Tip: Whenever you plug or turn on display if you cannot activate any key. The Display When they light/ flash: EN Shows elapsed playback time, total remaining track time, total track time, track numbers,disc titles, selected live effect mode & messages during initialization. 5 erasing a track/ ERASE DISC...
User Guide
Page 7
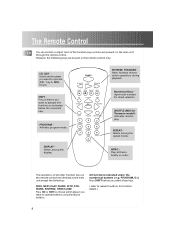
... numerical keys. PROGRAM Activates program mode. Numerical Keys Input track numbers for Thomson model)Activates random play. The Remote Control EN You can control or adjust most of all tracks briefly on a disc. DISPLAY Selects among the repeat modes. PROGRAM, DJ ) Press SHIFT before you want to relevant sections for function details ) 6 However, the following : PREV, NEXT, PLAY, PAUSE, STOP, FORWARD, REVERSE, OPEN/CLOSE Press CD or CDR to choose which player you want to...
... numerical keys. PROGRAM Activates program mode. Numerical Keys Input track numbers for Thomson model)Activates random play. The Remote Control EN You can control or adjust most of all tracks briefly on a disc. DISPLAY Selects among the repeat modes. PROGRAM, DJ ) Press SHIFT before you want to relevant sections for function details ) 6 However, the following : PREV, NEXT, PLAY, PAUSE, STOP, FORWARD, REVERSE, OPEN/CLOSE Press CD or CDR to choose which player you want to...
User Guide
Page 8
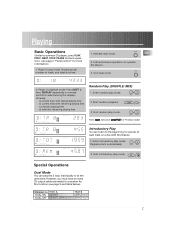
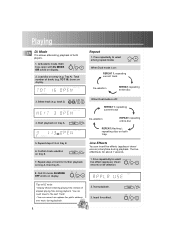
... number of each track on remote control to common CD players, press PLAY, PREV, NEXT, STOP, PAUSE for Thomson model. Press SHIFT & then DISPLAY repeatedly on a disc with remaining playing time c) total disc playing time d) total disc remaining playing time Random Play (SHUFFLE/ MIX) 1. Playing Basic Operations 1. EN Similar to select among the displays showing: a) current track with elapsed playing time b) current track with this function (see page 4 "Panel Control" for this feature. 1. tions. (see page 3 and table below). Player in playback mode. Quit dual mode...
... number of each track on remote control to common CD players, press PLAY, PREV, NEXT, STOP, PAUSE for Thomson model. Press SHIFT & then DISPLAY repeatedly on a disc with remaining playing time c) total disc playing time d) total disc remaining playing time Random Play (SHUFFLE/ MIX) 1. Playing Basic Operations 1. EN Similar to select among the displays showing: a) current track with elapsed playing time b) current track with this function (see page 4 "Panel Control" for this feature. 1. tions. (see page 3 and table below). Player in playback mode. Quit dual mode...
User Guide
Page 9
... trays open with DJ MODE ON scrolls on both players. 1. Tray A). repeating current track De-selection REPEAT; repeating entire disc 3. Select track (e.g. track 3) When Dual mode is on DJ mode: • Display shows remaining playing time instead of elapsed playing time during playback. repeating entire disc REPEAT (flashing); repeating discs on display. 7 SHIFT DJ 2. Repeat steps 2-3 & 6 for further playback on a tray (e.g. You can count down to the next track! • You can insert live effect lasts for public address over music...
... trays open with DJ MODE ON scrolls on both players. 1. Tray A). repeating current track De-selection REPEAT; repeating entire disc 3. Select track (e.g. track 3) When Dual mode is on DJ mode: • Display shows remaining playing time instead of elapsed playing time during playback. repeating entire disc REPEAT (flashing); repeating discs on display. 7 SHIFT DJ 2. Repeat steps 2-3 & 6 for further playback on a tray (e.g. You can count down to the next track! • You can insert live effect lasts for public address over music...
User Guide
Page 10
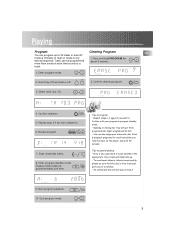
... on general playing: • Place a CD, audio CD-R or audio CD-RW in any desired sequence. Press and hold PROGRAM for more than once but each time counts as a 1. Confirm clearing program. OK 3. Erase unwanted tracks. 8. Start program playback. Enter program mode. 1 SHIFT PROGRAM CD CDR 2. Select track (e.g. 03). 0 9 4. Quit program mode. 1 SHIFT PROGRAM 9 STOP Display shows total programmed tracks and time Tips on program: • Repeat steps 1-4 again if you load the discs on tray A. 9. Select tray if Dual mode is free from program mode.
... on general playing: • Place a CD, audio CD-R or audio CD-RW in any desired sequence. Press and hold PROGRAM for more than once but each time counts as a 1. Confirm clearing program. OK 3. Erase unwanted tracks. 8. Start program playback. Enter program mode. 1 SHIFT PROGRAM CD CDR 2. Select track (e.g. 03). 0 9 4. Quit program mode. 1 SHIFT PROGRAM 9 STOP Display shows total programmed tracks and time Tips on program: • Repeat steps 1-4 again if you load the discs on tray A. 9. Select tray if Dual mode is free from program mode.
User Guide
Page 11
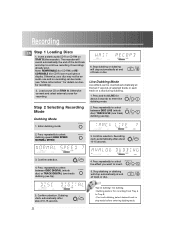
... about 10-15 seconds. 3. Confirm selection. Stop dubbing or dubbing STOP will stop to select between DISC DIGITAL (whole disc) or TRACK DIGITAL (one track) dubbing (see "More Information" for recording. Confirm selection. Otherwise connect and select external source for details on a disc during dubbing. 1. Press repeatedly to insert. 5. SHIFT 5 LIVE SELECT STOP Tips on display. Otherwise, your disc may not be inserted automatically at end of...
... about 10-15 seconds. 3. Confirm selection. Stop dubbing or dubbing STOP will stop to select between DISC DIGITAL (whole disc) or TRACK DIGITAL (one track) dubbing (see "More Information" for recording. Confirm selection. Otherwise connect and select external source for details on a disc during dubbing. 1. Press repeatedly to insert. 5. SHIFT 5 LIVE SELECT STOP Tips on display. Otherwise, your disc may not be inserted automatically at end of...

User Guide
Page 12
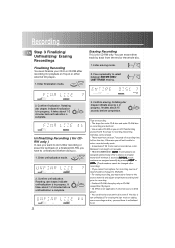
...source disc (Tray A). 4. Select source (analog/ optical/ coaxial) to create program on standby. STOP 6. Microphone Recording 1. RECORD OK EN 4. Select Dual mode ON. 2. Select auto/ manual track numbering (see tip). 3. Start playing source material. Synchronized Digital Recording Mode (from the digital source material. Refer to "Program" (steps 1-7, p. 9) to match with external input (e.g. Track numbers are automatically assigned as detected from External Source) Synchronized Digital Recording enables fast and easy digital recording. Press repeatedly to make...
...source disc (Tray A). 4. Select source (analog/ optical/ coaxial) to create program on standby. STOP 6. Microphone Recording 1. RECORD OK EN 4. Select Dual mode ON. 2. Select auto/ manual track numbering (see tip). 3. Start playing source material. Synchronized Digital Recording Mode (from the digital source material. Refer to "Program" (steps 1-7, p. 9) to match with external input (e.g. Track numbers are automatically assigned as detected from External Source) Synchronized Digital Recording enables fast and easy digital recording. Press repeatedly to make...
User Guide
Page 13
... of input should be changed to ANALOG. • For analog recording, you must have it before finalization is in recording. MANUAL: track numbers are assigned manually by track from the end or the whole disc. For erasing the last track or adding more recordings on a disc. Enter finalization mode. ERASE 1. Press repeatedly to recording. • Finalized CD-RW discs play only on original material of 99 tracks can directly erase entire disc...
... of input should be changed to ANALOG. • For analog recording, you must have it before finalization is in recording. MANUAL: track numbers are assigned manually by track from the end or the whole disc. For erasing the last track or adding more recordings on a disc. Enter finalization mode. ERASE 1. Press repeatedly to recording. • Finalized CD-RW discs play only on original material of 99 tracks can directly erase entire disc...

User Guide
Page 14
... player. 2.Repeat steps 2-5 in ascending order (e.g. 1,3,5,6,10 instead of 1,5,3,10,6) • Track number greater than once within a playback program. • Programmed tracks can only be in section "Assigning 1. Confirm selection. SHIFT 0 CD TITLE 6. Editing Disc Titles 1. SHIFT 0 CD TITLE Notes on the same disc only. • Programmed tracks must be on creating playback program for further input. Follow steps 1-7 in this unit. 13 Confirm CD title. STOP to create a playback program...
... player. 2.Repeat steps 2-5 in ascending order (e.g. 1,3,5,6,10 instead of 1,5,3,10,6) • Track number greater than once within a playback program. • Programmed tracks can only be in section "Assigning 1. Confirm selection. SHIFT 0 CD TITLE 6. Editing Disc Titles 1. SHIFT 0 CD TITLE Notes on the same disc only. • Programmed tracks must be on creating playback program for further input. Follow steps 1-7 in this unit. 13 Confirm CD title. STOP to create a playback program...
User Guide
Page 15
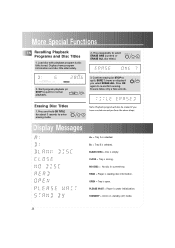
... Special Functions EN Recalling Playback Programs and Disc Titles 1. BLANK DISC = Disc is under initialization. NO DISC = No disc in standby (off) mode. 14 Press repeatedly to enter erasing mode. Erasure takes only a few seconds. PLEASE WAIT = Player is empty. Press and hold CD TITLE for normal playback). 3. B> = Tray B is open. SHIFT 0 CD TITLE Note: Playback program will also be erased if you select ERASE ALL. OPEN = Tray is selected. Display Messages A> = Tray A is...
... Special Functions EN Recalling Playback Programs and Disc Titles 1. BLANK DISC = Disc is under initialization. NO DISC = No disc in standby (off) mode. 14 Press repeatedly to enter erasing mode. Erasure takes only a few seconds. PLEASE WAIT = Player is empty. Press and hold CD TITLE for normal playback). 3. B> = Tray B is open. SHIFT 0 CD TITLE Note: Playback program will also be erased if you select ERASE ALL. OPEN = Tray is selected. Display Messages A> = Tray A is...
User Guide
Page 16
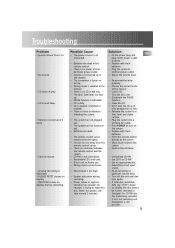
...'t play • CD Sound Skips • Remote Control won't work • Cannot record • Analog recording is distorted • PLEASE RESET shows on display • RECOVER shows on display, the disc cannot be further recorded or finalized. Troubleshooting Problem • System doesn't turn on the system. • Replace with fresh batteries. • Plug the system to another power outlet. • Adjust the volume level. • Re-connect the wires properly. • Choose the correct mode...
...'t play • CD Sound Skips • Remote Control won't work • Cannot record • Analog recording is distorted • PLEASE RESET shows on display • RECOVER shows on display, the disc cannot be further recorded or finalized. Troubleshooting Problem • System doesn't turn on the system. • Replace with fresh batteries. • Plug the system to another power outlet. • Adjust the volume level. • Re-connect the wires properly. • Choose the correct mode...
User Guide
Page 17
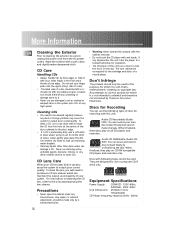
... power outlet. To clean a CD, use this unit uses a laser to read CD Care the music on all CD players and recorders. Never use the following logos cannot be used for the purposes for inspection. • The CD player of your own disc content freely but cannot Recordable make changes. Precautions • Never open the cabinet under any dust or foreign particles may cause the system to output poor sound quality. Audio CD ReWritable (Audio...
... power outlet. To clean a CD, use this unit uses a laser to read CD Care the music on all CD players and recorders. Never use the following logos cannot be used for the purposes for inspection. • The CD player of your own disc content freely but cannot Recordable make changes. Precautions • Never open the cabinet under any dust or foreign particles may cause the system to output poor sound quality. Audio CD ReWritable (Audio...
User Guide
Page 18
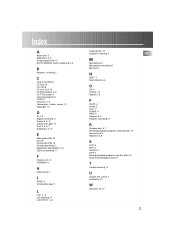
... 2 ANALOG 3, 4, 5 Assigning disc title 13 AUTO/ MANUAL track numbering 4, 8 B Batteries, inserting 2 C CD-R & CD-RW 16 CD Care 16 CD, CDR 6 CD Lens Care 16 CD SYNC button 4, 5 CD TITLE button 4 Clearing program 9 CLOSE 4 Coaxial 3, 4, 5 Connections ( cables, power ) 3 Copyright 16 D DJ 4, 8 Digital recording 11 Display 5, 6, 8 Display messages 14 Dual 4, 5, 6, 7 Dubbing 4, 5, 10 E Editing disc title 13 Erase 6 Erasing disc title 14 Erasing recording 12 Equipment Specifications 16 External recording 11 F Finalize 4, 5, 12 FORWARD 6 H Help/ Demo 4 I INTRO 6 Introductory play 7 L LIVE 4, 9 Live...
... 2 ANALOG 3, 4, 5 Assigning disc title 13 AUTO/ MANUAL track numbering 4, 8 B Batteries, inserting 2 C CD-R & CD-RW 16 CD Care 16 CD, CDR 6 CD Lens Care 16 CD SYNC button 4, 5 CD TITLE button 4 Clearing program 9 CLOSE 4 Coaxial 3, 4, 5 Connections ( cables, power ) 3 Copyright 16 D DJ 4, 8 Digital recording 11 Display 5, 6, 8 Display messages 14 Dual 4, 5, 6, 7 Dubbing 4, 5, 10 E Editing disc title 13 Erase 6 Erasing disc title 14 Erasing recording 12 Equipment Specifications 16 External recording 11 F Finalize 4, 5, 12 FORWARD 6 H Help/ Demo 4 I INTRO 6 Introductory play 7 L LIVE 4, 9 Live...
User Guide
Page 19
...; This warranty gives you specific legal rights and you get service: • Take your unit to any Authorized RCA Audio Service Center for warranty coverage. What your warranty does not cover: • Customer instruction. (Your Owner's Manual clearly describes how to state. The return of purchase date or first rental. • Pick up your unit when repairs are completed. How...
...; This warranty gives you specific legal rights and you get service: • Take your unit to any Authorized RCA Audio Service Center for warranty coverage. What your warranty does not cover: • Customer instruction. (Your Owner's Manual clearly describes how to state. The return of purchase date or first rental. • Pick up your unit when repairs are completed. How...


