User Guide
Page 3
... 83) Accessories 800-338-0376 (pages 70-75) Safety Information i First Time Operation • Assistance 3 • Unpack the Camcorder and Accessories 3 • Attach the Adapter/Charger 4 • Adjust the Handstrap to Fit Your Hand 4 • Slide LENS...CAMERA .......... 5 • Adjust the Viewfinder and Eyepiece Focus Control ........ 6 • Select a Recording Speed 6 • Select a Tape Length 7 • Set the AE Dial to AUTO 8 • Start and Stop Recording 8 • Play Back What you Have Recorded 9 • Set the POWER Switch to OFF to Turn Off the Camcorder...
... 83) Accessories 800-338-0376 (pages 70-75) Safety Information i First Time Operation • Assistance 3 • Unpack the Camcorder and Accessories 3 • Attach the Adapter/Charger 4 • Adjust the Handstrap to Fit Your Hand 4 • Slide LENS...CAMERA .......... 5 • Adjust the Viewfinder and Eyepiece Focus Control ........ 6 • Select a Recording Speed 6 • Select a Tape Length 7 • Set the AE Dial to AUTO 8 • Start and Stop Recording 8 • Play Back What you Have Recorded 9 • Set the POWER Switch to OFF to Turn Off the Camcorder...
User Guide
Page 4
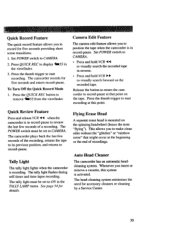
• Quick Record Feature 33 • Quick Review Feature 33 • Tally Light 33 • Camera Edit Feature 33 • Flying Erase Head 33 • Auto Head Cleaner 33 • Zooming • Use the Zoom Buttons ......... 34-35 • ...Optional Accessories 70-75 • Accessory Order Form 73-75 Trouble Checks 76-79 Care and Maintenance • Clean the Camcorder 80 • Clean the Camcorder's Lens ......... 80 • Clean the Camcorder's Viewfinder 80 • Proper Care and Storage 81 • Things to Avoid 81 Specifications 82 Information to User 82 Customer...
• Quick Record Feature 33 • Quick Review Feature 33 • Tally Light 33 • Camera Edit Feature 33 • Flying Erase Head 33 • Auto Head Cleaner 33 • Zooming • Use the Zoom Buttons ......... 34-35 • ...Optional Accessories 70-75 • Accessory Order Form 73-75 Trouble Checks 76-79 Care and Maintenance • Clean the Camcorder 80 • Clean the Camcorder's Lens ......... 80 • Clean the Camcorder's Viewfinder 80 • Proper Care and Storage 81 • Things to Avoid 81 Specifications 82 Information to User 82 Customer...
User Guide
Page 5
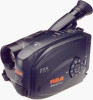
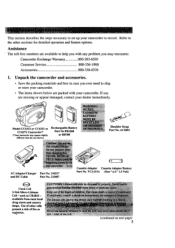
... or BB700 Shoulder Strap Part No. If any are packed with any problem you with your camcorder. Model CC6151 or CC6251 or CC6271 Camcorder* (*Your camcorder may encounter. such as CR2025 available from most local drug stores and camera shops. Use of other sectionsfor detailedoperationandfeatureoptions. ACS091 4+ "{1 AC Adapter/Charger and DC Cable C...a..s..s.e..t.t..e...A...d..a..p...t.e..r........C...a..s.s..e..t.t.e... VCAll5A (Size "AA...
... or BB700 Shoulder Strap Part No. If any are packed with any problem you with your camcorder. Model CC6151 or CC6251 or CC6271 Camcorder* (*Your camcorder may encounter. such as CR2025 available from most local drug stores and camera shops. Use of other sectionsfor detailedoperationandfeatureoptions. ACS091 4+ "{1 AC Adapter/Charger and DC Cable C...a..s..s.e..t.t..e...A...d..a..p...t.e..r........C...a..s.s..e..t.t.e... VCAll5A (Size "AA...
User Guide
Page 7
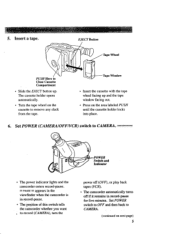
...• Insert the cassette with the tape wheel facing up . Set POWER switch to OFF and then back to CAMERA. _ _ ___ • Switch and Indicator • The power indicator lights and the camcorder enters record-pause. =- Insert a tape. EJECT Button j Tape Wheel PUSH Here to Close Cassette Compartment •... up and the tape window facing out. • Press on the cassette to record (CAMERA), turn the power off if it remains in record-pause. • The position of this switch tells the camcorder whether you want , to remove any slack from the tape. PAUSE--: appears in the...
...• Insert the cassette with the tape wheel facing up . Set POWER switch to OFF and then back to CAMERA. _ _ ___ • Switch and Indicator • The power indicator lights and the camcorder enters record-pause. =- Insert a tape. EJECT Button j Tape Wheel PUSH Here to Close Cassette Compartment •... up and the tape window facing out. • Press on the cassette to record (CAMERA), turn the power off if it remains in record-pause. • The position of this switch tells the camcorder whether you want , to remove any slack from the tape. PAUSE--: appears in the...
User Guide
Page 13
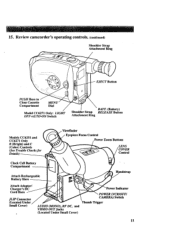
Review camcorder's operating controls. (continued) Shoulder Strap Attachment Ring EJECT Button PUSH Here to Close Cassette Compartment MENU Dial Model CC6271 Only: LIGHT OFF.A UTO.ON Switch ... Clock Cell Battery Compartment Attach Rechargeable Battery Here Handstrap Attach Adapter/ Charger's DC Cord Here JLIP Connector (Located Under Small Cover) Indicator POWER (VCR/OFF/ CAMERA) Switch AUDIO (MONO), RF DC, and VIDEO OUT Jacks (Located Under Small Cover) Thumb Trigger 11 , -,4: _ .......... ..... 15.
Review camcorder's operating controls. (continued) Shoulder Strap Attachment Ring EJECT Button PUSH Here to Close Cassette Compartment MENU Dial Model CC6271 Only: LIGHT OFF.A UTO.ON Switch ... Clock Cell Battery Compartment Attach Rechargeable Battery Here Handstrap Attach Adapter/ Charger's DC Cord Here JLIP Connector (Located Under Small Cover) Indicator POWER (VCR/OFF/ CAMERA) Switch AUDIO (MONO), RF DC, and VIDEO OUT Jacks (Located Under Small Cover) Thumb Trigger 11 , -,4: _ .......... ..... 15.
User Guide
Page 15
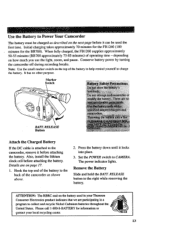
... during recording breaks. It has no other purpose. Set the POWER switch to the camcorder, remove it before attaching the battery. RELEASE Button Attach the Charged Battery If the DC cable is attached to CAMERA. The power indicator lights. RELEASE button to charge the battery. Please call 1-800-8-... of the battery to help remind yourself to the right while removing the battery. Hook the top end of the battery to Power Your Camcorder The battery must be used in a program to collect and recycle Nickel Cadmium batteries throughout the, United States. Also, install the lithium ...
... during recording breaks. It has no other purpose. Set the POWER switch to the camcorder, remove it before attaching the battery. RELEASE Button Attach the Charged Battery If the DC cable is attached to CAMERA. The power indicator lights. RELEASE button to charge the battery. Please call 1-800-8-... of the battery to help remind yourself to the right while removing the battery. Hook the top end of the battery to Power Your Camcorder The battery must be used in a program to collect and recycle Nickel Cadmium batteries throughout the, United States. Also, install the lithium ...
User Guide
Page 18
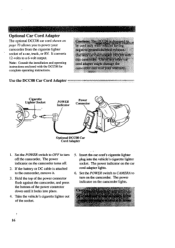
...top of the power connector flush against the camcorder, and press •the bottom of the socket. 5. Cigarette Lighter Socket POWER Indicator Power Connector Optional DCC08 Car Cord Adapter 1. Set the POWER switch to CAMERA to the camcorder, remove it locks into the, vehicle's ...cigarette lighter socket. The power indicator on the camcorder. The power indicator on the car cord adapte r lights. 6. Use the DCC08...
...top of the power connector flush against the camcorder, and press •the bottom of the socket. 5. Cigarette Lighter Socket POWER Indicator Power Connector Optional DCC08 Car Cord Adapter 1. Set the POWER switch to CAMERA to the camcorder, remove it locks into the, vehicle's ...cigarette lighter socket. The power indicator on the camcorder. The power indicator on the car cord adapte r lights. 6. Use the DCC08...
User Guide
Page 20
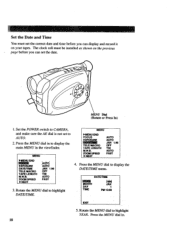
... it on the previous page before "you can set to display the DATE/TIME menu. MENU Dial (Rotate or Press In) 1. Set thePOWER switch to CAMERA, and make sure the AE dial is not set the date. Press the MENU dial in to display the main MENU in . 18 Press the...
... it on the previous page before "you can set to display the DATE/TIME menu. MENU Dial (Rotate or Press In) 1. Set thePOWER switch to CAMERA, and make sure the AE dial is not set the date. Press the MENU dial in to display the main MENU in . 18 Press the...
User Guide
Page 22
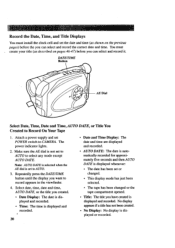
... title you want to select any mode except AUTO DATE. AE Dial Select Date, Time, Date and Time, AUTO DATE, or Title You Created to CAMERA. Repeatedly press the DATE/TIME button until the display you have created is not set POWER switch to Record On Your Tape 1. Make sure the...
... title you want to select any mode except AUTO DATE. AE Dial Select Date, Time, Date and Time, AUTO DATE, or Title You Created to CAMERA. Repeatedly press the DATE/TIME button until the display you have created is not set POWER switch to Record On Your Tape 1. Make sure the...
User Guide
Page 26
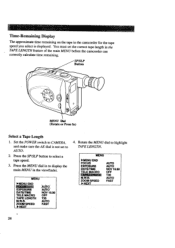
... TAPE LENGTH M.W.B. Rotate the MENU dial to AUTO. 2. Set the POWER switch to CAMERA, and make sure the AE dial is displayed. Press the MENU dial in the viewfinder. You must set the correct tape length in the camcorder for the tape speed you select is not set to highlight TAPE LENGTH... EXPOSURE DATEfTIME TELE MACRO M.W.B. Time-Remaining Display The approximate time remaining on the tape in the TAPE LENGTH feature of the main MENU before the camcorder can correctly calculate time remaining. / SPISLP Button .,S / MENU Dial (Rotate or Press In) Select a Tape Length 1.
... TAPE LENGTH M.W.B. Rotate the MENU dial to AUTO. 2. Set the POWER switch to CAMERA, and make sure the AE dial is displayed. Press the MENU dial in the viewfinder. You must set the correct tape length in the camcorder for the tape speed you select is not set to highlight TAPE LENGTH... EXPOSURE DATEfTIME TELE MACRO M.W.B. Time-Remaining Display The approximate time remaining on the tape in the TAPE LENGTH feature of the main MENU before the camcorder can correctly calculate time remaining. / SPISLP Button .,S / MENU Dial (Rotate or Press In) Select a Tape Length 1.

User Guide
Page 31
...back a tape. • | | appears during play-pause appears during fast forward appears during rewind. (AT) Tracking Indicator AT appears when the camcorder is almost empty. Viewfinder Displays (continued) Battery Level Indicator ( _il ) • This indicator shows the amount of power left in the rechargeable battery... Cassette Warning • The _ indicator flashes when the POWER switch is set to CAMERA and there is no cassette in the camcorder. • The _ indicator flashes when the POWER switch is set to CAMERA and the safety tab is set to record one of them, press DATE/TIME until...
...back a tape. • | | appears during play-pause appears during fast forward appears during rewind. (AT) Tracking Indicator AT appears when the camcorder is almost empty. Viewfinder Displays (continued) Battery Level Indicator ( _il ) • This indicator shows the amount of power left in the rechargeable battery... Cassette Warning • The _ indicator flashes when the POWER switch is set to CAMERA and there is no cassette in the camcorder. • The _ indicator flashes when the POWER switch is set to CAMERA and the safety tab is set to record one of them, press DATE/TIME until...
User Guide
Page 34
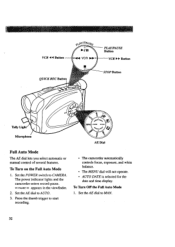
... Full Auto Mode lo Set the POWER switch to start recording. Press the thumb trigger to CAMERA. To Turn Off the Full Auto Mode 1. Set the AE dial to AUTO. 3. appears in the viewf'mder. . The camcorder automatically controls focus, exposure, and white balance. : The MENU dial will not operate. The power... indicator lights and the camcorder enters record-pause. ----PAUSE---- Set the AE dial to MAN. 32 AUTO DATE is selected for the date and time display. VCR • • QUICK ...
... Full Auto Mode lo Set the POWER switch to start recording. Press the thumb trigger to CAMERA. To Turn Off the Full Auto Mode 1. Set the AE dial to AUTO. 3. appears in the viewf'mder. . The camcorder automatically controls focus, exposure, and white balance. : The MENU dial will not operate. The power... indicator lights and the camcorder enters record-pause. ----PAUSE---- Set the AE dial to MAN. 32 AUTO DATE is selected for the date and time display. VCR • • QUICK ...
User Guide
Page 35
... the spinning headwheel (hence the term "flying"). Release the button to return the camcorder to record-pause at that might occur at this system is recording. The tally light must be set to CAMERA. Flying Erase Head A separate erase head is in reverse. • Press and...to record for accessory cleaners or cleaning by a Service Center. 33 Camera Edit Feature The camera edit feature allows you insert or remove a cassette, this point. Cleaner The camcorder has an automatic headcleaning system. The camcorder plays back the last few seconds of the recording, returns the ...
... the spinning headwheel (hence the term "flying"). Release the button to return the camcorder to record-pause at that might occur at this system is recording. The tally light must be set to CAMERA. Flying Erase Head A separate erase head is in reverse. • Press and...to record for accessory cleaners or cleaning by a Service Center. 33 Camera Edit Feature The camera edit feature allows you insert or remove a cassette, this point. Cleaner The camcorder has an automatic headcleaning system. The camcorder plays back the last few seconds of the recording, returns the ...
User Guide
Page 36
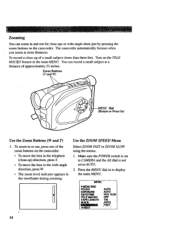
Make sure the POWER switch is set to CAMERA and the AE dial is not set to display the main MENU. Press the MENU ... small subject at most distances. Use the ZOOM SPEED Menu Select ZOOM FAST or ZOOM SLOW using the menus. 1. Turn on the camcorder. Zoom Buttons (T and W) Dial (Rotate or Press In) Use the Zoom Buttons (W and T) lo To zoom in or out...the lens in the wide angle direction,press W. • The zoom level indicator appears in to AUTO. 2. The camcorder automatically focuses when you zoom at a distance of a small subject closer than three feet. To record a close ...
Make sure the POWER switch is set to CAMERA and the AE dial is not set to display the main MENU. Press the MENU ... small subject at most distances. Use the ZOOM SPEED Menu Select ZOOM FAST or ZOOM SLOW using the menus. 1. Turn on the camcorder. Zoom Buttons (T and W) Dial (Rotate or Press In) Use the Zoom Buttons (W and T) lo To zoom in or out...the lens in the wide angle direction,press W. • The zoom level indicator appears in to AUTO. 2. The camcorder automatically focuses when you zoom at a distance of a small subject closer than three feet. To record a close ...
User Guide
Page 37
... MACRO. ° Press the MENU dial in the ZOOM SPEED menu and press the zoom button lightly. Make sure the POWER switch is set to CAMERA and the AE dial is not set to highlight ZOOM SPEED. 4. EXIT 5. ZOOM SPEED FAST 5. Rotate the MENU dial to display the TELE MACRO menu...
... MACRO. ° Press the MENU dial in the ZOOM SPEED menu and press the zoom button lightly. Make sure the POWER switch is set to CAMERA and the AE dial is not set to highlight ZOOM SPEED. 4. EXIT 5. ZOOM SPEED FAST 5. Rotate the MENU dial to display the TELE MACRO menu...
User Guide
Page 38
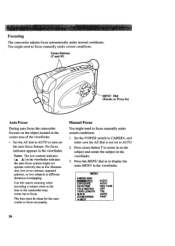
... kNEXT "A6TO AI_i"c) NOV 18.98 OFF T30 AUTO FAST 36 Zoom Buttons (T and W) Dial (Rotate or Press In) Auto Focus During auto focus the camcorder focuses on the subject and center the subject in the center area of the viewfinder. You might need to focus manually under certain conditions. . No... MACRO TAPE LENGTH M.W.B. . Set the AE dial to AUTO to zoom in on the object located in the viewf'mder. . Set the POWER switch to CAMERA, and make sure the AE dial is not set to display the main MENU in the viewfinder indicates the auto-focus system might need to...
... kNEXT "A6TO AI_i"c) NOV 18.98 OFF T30 AUTO FAST 36 Zoom Buttons (T and W) Dial (Rotate or Press In) Auto Focus During auto focus the camcorder focuses on the subject and center the subject in the center area of the viewfinder. You might need to focus manually under certain conditions. . No... MACRO TAPE LENGTH M.W.B. . Set the AE dial to AUTO to zoom in on the object located in the viewf'mder. . Set the POWER switch to CAMERA, and make sure the AE dial is not set to display the main MENU in the viewfinder indicates the auto-focus system might need to...

User Guide
Page 40
... TAPE LENGTH AUTO AUTO NOV 18.98 OFF ,T_ . This is not set to CAMERA, and make sure the AE dial is achieved by adjusting the way the camcorder "sees" and records the light source in the viewfinder. Your camcorder is all about. Zoom Buttons (T and W) MENU Dial (Rotate or Press In) Auto... White Balance During auto white balance, the camcorder adjusts the white balance. • Set the AE dial to AUTO to display the main MENU in the scene you record. Manual .White Balance 1. Press ...
... TAPE LENGTH AUTO AUTO NOV 18.98 OFF ,T_ . This is not set to CAMERA, and make sure the AE dial is achieved by adjusting the way the camcorder "sees" and records the light source in the viewfinder. Your camcorder is all about. Zoom Buttons (T and W) MENU Dial (Rotate or Press In) Auto... White Balance During auto white balance, the camcorder adjusts the white balance. • Set the AE dial to AUTO to display the main MENU in the scene you record. Manual .White Balance 1. Press ...
User Guide
Page 42
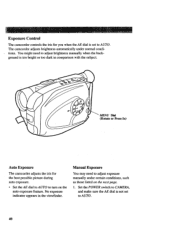
...iris for the best possible picture during auto exposure. • Set the AE dial to AUTO to turn on the next page. 1. The camcorder adjusts brighmess automatically under certain conditions, such as those listed on the auto exposure feature. Manual Exposure You may need to adjust exposure manually under ...normal conditions. MENU Dial (Rotate or Press In) Auto Exposure The camcorder adjusts the iris for you when the AE dial is not set to A UTO. 40 Set the POWER switch to CAMERA, and make sure the AE dial is set to AUTO. You might need to adjust...
...iris for the best possible picture during auto exposure. • Set the AE dial to AUTO to turn on the next page. 1. The camcorder adjusts brighmess automatically under certain conditions, such as those listed on the auto exposure feature. Manual Exposure You may need to adjust exposure manually under ...normal conditions. MENU Dial (Rotate or Press In) Auto Exposure The camcorder adjusts the iris for you when the AE dial is not set to A UTO. 40 Set the POWER switch to CAMERA, and make sure the AE dial is set to AUTO. You might need to adjust...
User Guide
Page 44
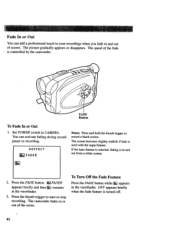
The speed of the fade is used with the sepia feature. PEFFECT [j_]FADER Notes: Press and hold the thumb trigger to CAMERA. Fade In or Out You can activate fading during recordpause or recording. Set POWER switch to record a black screen. The screen becomes ...slightly reddish if fade is controlled by the camcorder. You can add a professional touch to start or stop recording. OFF appears briefly when the fade feature is in and out from a white screen....
The speed of the fade is used with the sepia feature. PEFFECT [j_]FADER Notes: Press and hold the thumb trigger to CAMERA. Fade In or Out You can activate fading during recordpause or recording. Set POWER switch to record a black screen. The screen becomes ...slightly reddish if fade is controlled by the camcorder. You can add a professional touch to start or stop recording. OFF appears briefly when the fade feature is in and out from a white screen....
User Guide
Page 60
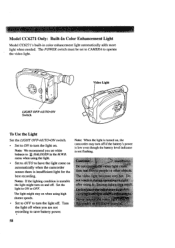
Set to ON to save battery power. The light might turn the light on automatically when the camcorder senses there is not flashing. 58• Note: When the light is turned on when using the light. Note: We recommend you are not recording ...;ON switch. menu when using high shutter speeds. Notes: If the lighting condition is unstable the light might stay on , the camcorder may turn the light off when you set to CAMERA to have the light come on . Turn the light off . Set to AUTO to operate the video light. The POWER...
Set to ON to save battery power. The light might turn the light on automatically when the camcorder senses there is not flashing. 58• Note: When the light is turned on when using the light. Note: We recommend you are not recording ...;ON switch. menu when using high shutter speeds. Notes: If the lighting condition is unstable the light might stay on , the camcorder may turn the light off when you set to CAMERA to have the light come on . Turn the light off . Set to AUTO to operate the video light. The POWER...


