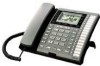
User's Guide
Page 4
... 8 LANGUAGE...8 RINGER TONE ...8 PRIORITY LINE...9 DELAY RING ...9 PHONE ID...9 PHONE NAME...9 INTERCOM AUTO ANSWER 10 FLASH TIME ...10 CALL ALERT TONE 10 NO UNKNOWN/BLOCKED 10 DISPLAY CONTRAST 11 LOCAL AREA CODE 11 REGIONAL AREA CODES 11 MANUALLY SETTING THE TIME AND DATE 11 HOUR FORMAT ...12 RESTORING THE...CALLER ID 20 SUMMARY SCREEN 20 RECEIVING AND STORING CID RECORDS 20 Reviewing CID Records 20 Saving CID Record to Intercom/Memory Log or Phone Book Memory20 Deleting a CID Record 20 Deleting All Call Records 20 Dialing Back...21 IF YOU PROGRAMMED YOUR LOCAL AREA CODE 21 ...
... 8 LANGUAGE...8 RINGER TONE ...8 PRIORITY LINE...9 DELAY RING ...9 PHONE ID...9 PHONE NAME...9 INTERCOM AUTO ANSWER 10 FLASH TIME ...10 CALL ALERT TONE 10 NO UNKNOWN/BLOCKED 10 DISPLAY CONTRAST 11 LOCAL AREA CODE 11 REGIONAL AREA CODES 11 MANUALLY SETTING THE TIME AND DATE 11 HOUR FORMAT ...12 RESTORING THE...CALLER ID 20 SUMMARY SCREEN 20 RECEIVING AND STORING CID RECORDS 20 Reviewing CID Records 20 Saving CID Record to Intercom/Memory Log or Phone Book Memory20 Deleting a CID Record 20 Deleting All Call Records 20 Dialing Back...21 IF YOU PROGRAMMED YOUR LOCAL AREA CODE 21 ...

User's Guide
Page 9
...or 4. Press the SELECT/SAVE button. 4. Press the SELECT/SAVE button. 6. Use the < REVIEW > button to scroll to SET PHONE ID. 5. Press the SELECT/SAVE button. 4. If you manually select a phone ID that you pick up the incoming call before it rings in each of the number keys. Press the MENU button...press the 5 key three times for the I. Press the 7 key three times for the letter E. 7. Press the 6 key two times for the letter A. Phone ID 1. Press the MENU button while in standby mode. 2. Press the SELECT/SAVE button. 4. Press the 2 key once for the letter N. Press the ...
...or 4. Press the SELECT/SAVE button. 4. Press the SELECT/SAVE button. 6. Use the < REVIEW > button to scroll to SET PHONE ID. 5. Press the SELECT/SAVE button. 4. If you manually select a phone ID that you pick up the incoming call before it rings in each of the number keys. Press the MENU button...press the 5 key three times for the I. Press the 7 key three times for the letter E. 7. Press the 6 key two times for the letter A. Phone ID 1. Press the MENU button while in standby mode. 2. Press the SELECT/SAVE button. 4. Press the 2 key once for the letter N. Press the ...

User's Guide
Page 11
...64257;elds and Enter Number show in standby mode. 2. Use the < REVIEW > button to adjust the contrast. Press the SELECT/SAVE button. To manually reset the time and date, follow the steps below. 1. Use the < REVIEW > button to select the hour. The display instantly adjusts with selected... hour 11 Setting Regional Area Codes helps the phone determine the number format to erase all digits. Press the MENU button while in standby mode. 2. Press the SELECT/SAVE button. Press the ...
...64257;elds and Enter Number show in standby mode. 2. Use the < REVIEW > button to adjust the contrast. Press the SELECT/SAVE button. To manually reset the time and date, follow the steps below. 1. Use the < REVIEW > button to select the hour. The display instantly adjusts with selected... hour 11 Setting Regional Area Codes helps the phone determine the number format to erase all digits. Press the MENU button while in standby mode. 2. Press the SELECT/SAVE button. Press the ...
User's Guide
Page 16
... with the Speakerphone 1. Hang up the handset and press the corresponding line button (handset mode), OR 2. Making Calls with the Handset 1. The phone will automatically switch between transmitting and receiving depending on the priority line, 1. NOTE: If a line goes off-hook, the call on the level...speakerphone mic. When you are listening, you receive a call on the cradle, manually enter the telephone number. Connect the headset plug to all the lines go on top of the base. 2. With the phone idle and the handset on hold first. 16 The telephone number shows ...
... with the Speakerphone 1. Hang up the handset and press the corresponding line button (handset mode), OR 2. Making Calls with the Handset 1. The phone will automatically switch between transmitting and receiving depending on the priority line, 1. NOTE: If a line goes off-hook, the call on the level...speakerphone mic. When you are listening, you receive a call on the cradle, manually enter the telephone number. Connect the headset plug to all the lines go on top of the base. 2. With the phone idle and the handset on hold first. 16 The telephone number shows ...
User's Guide
Page 27
... Caller ID memory log. START/END You are connected to the same jack. The H5400 is packaged with the handset. Make sure the line cords are not damaged. • Make sure the hook switch pops up when the handset is properly inserted into No Power Operation mode. Try unplugging... user guide of the H5400 accessory handset and module. If UNKNOWN CALLER appears along with cordless handset) is preferable to set one or more additional phones to manually make a call on line 1 with an RF module, when the module is lifted. • Check the SPEAKER button. when a message is possible ...
... Caller ID memory log. START/END You are connected to the same jack. The H5400 is packaged with the handset. Make sure the line cords are not damaged. • Make sure the hook switch pops up when the handset is properly inserted into No Power Operation mode. Try unplugging... user guide of the H5400 accessory handset and module. If UNKNOWN CALLER appears along with cordless handset) is preferable to set one or more additional phones to manually make a call on line 1 with an RF module, when the module is lifted. • Check the SPEAKER button. when a message is possible ...
User's Guide
Page 30
...Not Program Your Local Area Code21 If You Programmed Your Local Area Code 21 Important Installation Guidelines 6 Important Installation Information 6 Installing the Phone 6 Intercom Auto Answer 10 Intercom Calls 19 Intercom Conference Calls 19 Intercom Hold 19 Interference Information 2 L Language 8 Licensing 3 ...16 Making Calls with the Optional Headset 16 Making Calls with the Speakerphone 16 Manually Setting the Time and Date11 Memo Recording 24 Memory Delete/Clear 22 Memory Log and Phone Book (Directory) Memory 21 Message Interrupt 13 Message Length 13 E Message ...
...Not Program Your Local Area Code21 If You Programmed Your Local Area Code 21 Important Installation Guidelines 6 Important Installation Information 6 Installing the Phone 6 Intercom Auto Answer 10 Intercom Calls 19 Intercom Conference Calls 19 Intercom Hold 19 Interference Information 2 L Language 8 Licensing 3 ...16 Making Calls with the Optional Headset 16 Making Calls with the Speakerphone 16 Manually Setting the Time and Date11 Memo Recording 24 Memory Delete/Clear 22 Memory Log and Phone Book (Directory) Memory 21 Message Interrupt 13 Message Length 13 E Message ...


