
User's Guide
Page 2
... the receiving antenna is called. A compliant telephone cord and modular plug is provided with FCC Rules and Regulations. The telephone company may cause undesired operation. Interference Information This device complies with the instructions, may be connected to a compatible modular jack that interference will disable alarm equipment, consult your telephone company or a qualified installer. 2 Rights of the Telephone Company Should your...
... the receiving antenna is called. A compliant telephone cord and modular plug is provided with FCC Rules and Regulations. The telephone company may cause undesired operation. Interference Information This device complies with the instructions, may be connected to a compatible modular jack that interference will disable alarm equipment, consult your telephone company or a qualified installer. 2 Rights of the Telephone Company Should your...

User's Guide
Page 3
... SERVICING TO QUALIFIED SERVICE PERSONNEL. Your phone features 16 memory locations, 94 phone book memories, hold, conference call, intercom, call transfer, Caller ID display, and speakerphone capabilities. SEE MARKING ON BOTTOM / BACK OF PRODUCT 3 NO USER SERVICEABLE PARTS INSIDE. US Number is located on the cabinet bottom REN number is located on the cabinet bottom CAUTION: When using telephone equipment, there are on up to four incoming telephone lines and to serve up and redirect incoming calls to other extensions...
... SERVICING TO QUALIFIED SERVICE PERSONNEL. Your phone features 16 memory locations, 94 phone book memories, hold, conference call, intercom, call transfer, Caller ID display, and speakerphone capabilities. SEE MARKING ON BOTTOM / BACK OF PRODUCT 3 NO USER SERVICEABLE PARTS INSIDE. US Number is located on the cabinet bottom REN number is located on the cabinet bottom CAUTION: When using telephone equipment, there are on up to four incoming telephone lines and to serve up and redirect incoming calls to other extensions...
User's Guide
Page 4
... 6 INSTALLING THE PHONE 6 DATA PORT 8 SYSTEM VERIFICATION 8 OTHER SYSTEM PHONES 8 PROGRAMMING THE TELEPHONE 8 LANGUAGE...8 RINGER TONE ...8 PRIORITY LINE...9 DELAY RING ...9 PHONE ID...9 PHONE NAME...9 INTERCOM AUTO ANSWER 10 FLASH TIME ...10 CALL ALERT TONE 10 NO UNKNOWN/BLOCKED 10 DISPLAY CONTRAST 11 LOCAL AREA CODE 11 REGIONAL AREA CODES 11 MANUALLY SETTING THE TIME AND DATE 11 HOUR FORMAT ...12 RESTORING THE DEFAULT SETTINGS 12 PROGRAMMING THE ANSWERING MACHINE 12 PICKUP DELAY ...12 MESSAGE LENGTH 13 CALL SCREENING 13 MESSAGE INTERRUPT 13 REMOTE PASSWORD 13 MAILBOX ...14...
... 6 INSTALLING THE PHONE 6 DATA PORT 8 SYSTEM VERIFICATION 8 OTHER SYSTEM PHONES 8 PROGRAMMING THE TELEPHONE 8 LANGUAGE...8 RINGER TONE ...8 PRIORITY LINE...9 DELAY RING ...9 PHONE ID...9 PHONE NAME...9 INTERCOM AUTO ANSWER 10 FLASH TIME ...10 CALL ALERT TONE 10 NO UNKNOWN/BLOCKED 10 DISPLAY CONTRAST 11 LOCAL AREA CODE 11 REGIONAL AREA CODES 11 MANUALLY SETTING THE TIME AND DATE 11 HOUR FORMAT ...12 RESTORING THE DEFAULT SETTINGS 12 PROGRAMMING THE ANSWERING MACHINE 12 PICKUP DELAY ...12 MESSAGE LENGTH 13 CALL SCREENING 13 MESSAGE INTERRUPT 13 REMOTE PASSWORD 13 MAILBOX ...14...
User's Guide
Page 5
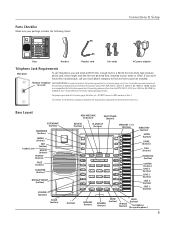
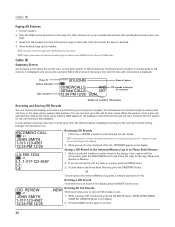
.... Base Handset Handset cord Line cords AC power adaptor Telephone Jack Requirements Wall plate To use this phone, you don't have either modular jack, call from one installed. MEM. INT. INT. To transfer a call your package includes the following items: ATTENDANT ANSWERER MEMO DELETE PRIVACY PA GE TRANSFER REDIAL FORMAT VOLUME FLASH EXIT PLAY/STOP SELECT/SAVE REVIEW 1 2 ABC 3 DEF 4 GHI 5 JKL 6 MNO 7 PQRS 8 TUV 9 WXYZ * TONE 0 OPER # PAUSE HEADSET SPEAKER MUTE DIRECTORY 1 2 MENU 3 STORE 4 5 DIAL 6 7 INTERCOM 8 CONFER 9 LINE 4 10 11 LINE 3 12 LINE...
.... Base Handset Handset cord Line cords AC power adaptor Telephone Jack Requirements Wall plate To use this phone, you don't have either modular jack, call from one installed. MEM. INT. INT. To transfer a call your package includes the following items: ATTENDANT ANSWERER MEMO DELETE PRIVACY PA GE TRANSFER REDIAL FORMAT VOLUME FLASH EXIT PLAY/STOP SELECT/SAVE REVIEW 1 2 ABC 3 DEF 4 GHI 5 JKL 6 MNO 7 PQRS 8 TUV 9 WXYZ * TONE 0 OPER # PAUSE HEADSET SPEAKER MUTE DIRECTORY 1 2 MENU 3 STORE 4 5 DIAL 6 7 INTERCOM 8 CONFER 9 LINE 4 10 11 LINE 3 12 LINE...
User's Guide
Page 7
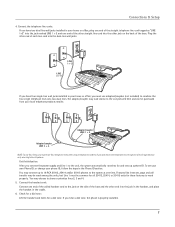
... handset cord: Connect one time. Connect the telephone line cords: If you have four single-line wall jacks installed in the Phone ID section. Plug the other jack on the side of the base. The adaptor/coupler may connect up a phone ID. Unit Initialization: After you only have four telephone lines with unique telephone numbers. Features like intercom, page and call transfer may choose to work properly. If you connect the power supply and Line 1 to combine the four single telephone lines...
... handset cord: Connect one time. Connect the telephone line cords: If you have four single-line wall jacks installed in the Phone ID section. Plug the other jack on the side of the base. The adaptor/coupler may connect up a phone ID. Unit Initialization: After you only have four telephone lines with unique telephone numbers. Features like intercom, page and call transfer may choose to work properly. If you connect the power supply and Line 1 to combine the four single telephone lines...
User's Guide
Page 8
... phone controls the data port jack so you entered. The display shows INTERCOM and ENTER CALLING PHONE ID. 2. If the phone ID you entered is correct. Language Set the display language to the system, you have a phone ID. Use the < REVIEW > button to scroll to SET RING TONE. 5. Use the < REVIEW > button to scroll to ENGLISH, ESPANOL, or FRANCAIS. Choose from eight different tones, or turn the ringer OFF. Programming the Telephone Data Port This phone has a data port jack...
... phone controls the data port jack so you entered. The display shows INTERCOM and ENTER CALLING PHONE ID. 2. If the phone ID you entered is correct. Language Set the display language to the system, you have a phone ID. Use the < REVIEW > button to scroll to SET RING TONE. 5. Use the < REVIEW > button to scroll to ENGLISH, ESPANOL, or FRANCAIS. Choose from eight different tones, or turn the ringer OFF. Programming the Telephone Data Port This phone has a data port jack...

User's Guide
Page 11
... all digits. NOTE: If you receive the first CID call. Setting Regional Area Codes helps the phone determine the number format to SET TIME & DATE. 3. Press the MENU button while in standby mode. 2. Press the SELECT/SAVE button. Use the < REVIEW > button to scroll to display when a valid CID record is automatically set when you make a mistake, press the DELETE button to select the hour. The display instantly adjusts with selected hour 11 NOTE: If the CID telephone number...
... all digits. NOTE: If you receive the first CID call. Setting Regional Area Codes helps the phone determine the number format to SET TIME & DATE. 3. Press the MENU button while in standby mode. 2. Press the SELECT/SAVE button. Use the < REVIEW > button to scroll to display when a valid CID record is automatically set when you make a mistake, press the DELETE button to select the hour. The display instantly adjusts with selected hour 11 NOTE: If the CID telephone number...
User's Guide
Page 16
... into headset jack), an error tone is heard when the HEADSET button is generally applicable to rest comfortably on a line other than the priority line, 1. Basic Operation Basic Operation Your phone provides the convenience of accessing four separate telephone lines, each having its own phone number. Press SPEAKER button when finished. You can't do both at the same time. Press HEADSET when finished. The telephone number shows in speakerphone mode. Making Calls with the Optional Headset 1. Wait...
... into headset jack), an error tone is heard when the HEADSET button is generally applicable to rest comfortably on a line other than the priority line, 1. Basic Operation Basic Operation Your phone provides the convenience of accessing four separate telephone lines, each having its own phone number. Press SPEAKER button when finished. You can't do both at the same time. Press HEADSET when finished. The telephone number shows in speakerphone mode. Making Calls with the Optional Headset 1. Wait...
User's Guide
Page 17
... access the line on Hold Press the HOLD button to disable (silence) an incoming ring signal, intercom ring, or page. Press the REDIAL/FORMAT button NOTE: The redial function will not operate if the number to be picked up the handset or press the SPEAKER, DIAL, or a line button to enable the headset, and the headset indicator turns on hold . When the phone is displayed, pick up at individual telephones to put a call on the other line. 2. Pick up the handset...
... access the line on Hold Press the HOLD button to disable (silence) an incoming ring signal, intercom ring, or page. Press the REDIAL/FORMAT button NOTE: The redial function will not operate if the number to be picked up the handset or press the SPEAKER, DIAL, or a line button to enable the headset, and the headset indicator turns on hold . When the phone is displayed, pick up at individual telephones to put a call on the other line. 2. Pick up the handset...
User's Guide
Page 18
... on hold while in use the privacy feature to the conversation. Put your station, the line indicator flashes red. b) the station receiving the transfer. Speakerphone, Handset, and Headset Volume While the phone is transferred to . Speak to the current setting. 2. Press the INTERCOM/MEMORY LOG button (1-16) for the station you of the party you want to conference. 18 NOTE: To turn the ringer off, on . 2. The phone rings...
... on hold while in use the privacy feature to the conversation. Put your station, the line indicator flashes red. b) the station receiving the transfer. Speakerphone, Handset, and Headset Volume While the phone is transferred to . Speak to the current setting. 2. Press the INTERCOM/MEMORY LOG button (1-16) for the station you of the party you want to conference. 18 NOTE: To turn the ringer off, on . 2. The phone rings...
User's Guide
Page 19
... SPEAKER turns on . Alternately, you may not receive another line or make an intercom call is initiated (the handset should be connected). The speakerphone automatically turns on . You will hear an error tone and ERROR INHIBITED shows in the display. Answering an Intercom Call When you have a 3-way conversation using the intercom feature and an open line. 1. Intercom Hold 1. Make an intercom call or answer an intercom call , the INTERCOM indicator flashes red, and the display shows the caller's name and phone...
... SPEAKER turns on . Alternately, you may not receive another line or make an intercom call is initiated (the handset should be connected). The speakerphone automatically turns on . You will hear an error tone and ERROR INHIBITED shows in the display. Answering an Intercom Call When you have a 3-way conversation using the intercom feature and an open line. 1. Intercom Hold 1. Make an intercom call or answer an intercom call , the INTERCOM indicator flashes red, and the display shows the caller's name and phone...
User's Guide
Page 20
... in CID memory Receiving and Storing CID Records This unit receives and displays information transmitted by your page. 3. If you need to CID memory. Speak into the handset. This information can be reviewed and total number of the list, START/END appears in use automatically activate their speakerphones and receive your local phone company. When the memory is full, a new call automatically replaces the oldest call received is displayed. NOTE: If you press the > button...
... in CID memory Receiving and Storing CID Records This unit receives and displays information transmitted by your page. 3. If you need to CID memory. Speak into the handset. This information can be reviewed and total number of the list, START/END appears in use automatically activate their speakerphones and receive your local phone company. When the memory is full, a new call automatically replaces the oldest call received is displayed. NOTE: If you press the > button...
User's Guide
Page 21
... keys are on the base). However, this unit, you want to dial. If you want to store. To dial the displayed number, select a line or press DIAL again. Use the < REVIEW > button to display the number you make a mistake, use the REDIAL/FORMAT button. Storing a Number and Name in the display. NOTE: If you want to store, up to 21 characters and 32 digits. NOTE: If you hear the call waiting beep. shows in Memory NOTE: To cancel...
... keys are on the base). However, this unit, you want to dial. If you want to store. To dial the displayed number, select a line or press DIAL again. Use the < REVIEW > button to display the number you make a mistake, use the REDIAL/FORMAT button. Storing a Number and Name in the display. NOTE: If you want to store, up to 21 characters and 32 digits. NOTE: If you hear the call waiting beep. shows in Memory NOTE: To cancel...
User's Guide
Page 22
... use the touch tone pad on your bank's information line). Memory Delete/Clear To delete a Phone Book memory: 1. Press the DIRECTORY button. 2. Press the SELECT/SAVE button and edit the content according to store the redial number in the dialing sequence of a stored telephone number when a pause is idle, press the REDIAL/FORMAT button. 2. Pick up the handset, or press SPEAKER to the steps in the Storing a Name and Number in Phone Book (Directory) Memory 1. Press the DIRECTORY button. 2. For example, press the 5 key...
... use the touch tone pad on your bank's information line). Memory Delete/Clear To delete a Phone Book memory: 1. Press the DIRECTORY button. 2. Press the SELECT/SAVE button and edit the content according to store the redial number in the dialing sequence of a stored telephone number when a pause is idle, press the REDIAL/FORMAT button. 2. Pick up the handset, or press SPEAKER to the steps in the Storing a Name and Number in Phone Book (Directory) Memory 1. Press the DIRECTORY button. 2. For example, press the 5 key...
User's Guide
Page 23
... to ANSWERING MACHINE 3. You have a maximum 30 seconds to confirm. Press the SELECT/SAVE button to record your greeting 7. Use the < REVIEW > button to scroll to 16 units in a normal tone of messages, memos, and all the directory memories and direct access memories are cleared. Wait for a total of long distance company 6 Authorization code (ID) 7 Long distance phone number 8 1. Press the DIRECTORY button. 2. Press the SELECT/SAVE button. 4. Answering System Operation To delete an INTERCOM/MEMORY...
... to ANSWERING MACHINE 3. You have a maximum 30 seconds to confirm. Press the SELECT/SAVE button to record your greeting 7. Use the < REVIEW > button to scroll to 16 units in a normal tone of messages, memos, and all the directory memories and direct access memories are cleared. Wait for a total of long distance company 6 Authorization code (ID) 7 Long distance phone number 8 1. Press the DIRECTORY button. 2. Press the SELECT/SAVE button. 4. Answering System Operation To delete an INTERCOM/MEMORY...
User's Guide
Page 25
... hold the DELETE button for Callers When Auto-Attendant is on your three digit password after only 3 rings, you may wish to other extensions in standby mode. Auto Attendant You can access many features of rings. 1. You can pick up and redirect incoming calls to have received any new messages before system answers, and save the cost of the greeting. 3. shows in use, the call at a time, so you have received new messages. Press 1 to review menu...
... hold the DELETE button for Callers When Auto-Attendant is on your three digit password after only 3 rings, you may wish to other extensions in standby mode. Auto Attendant You can access many features of rings. 1. You can pick up and redirect incoming calls to have received any new messages before system answers, and save the cost of the greeting. 3. shows in use, the call at a time, so you have received new messages. Press 1 to review menu...
User's Guide
Page 27
... incoming call function and cordless handset. Battery power level is lifted. • Check the SPEAKER button. in this mode, the unit fully supports all operational features, except the intercom call does not have longer pickup times. Troubleshooting Guide No dial tone • Check or repeat installation steps: • Make sure the telephone line cords are connected to act as "Private Number "and their service area is turned off . • Disconnect the phone from the wall jack and connect another phone to manually make a call on line 1 only, 2) answer a call...
... incoming call function and cordless handset. Battery power level is lifted. • Check the SPEAKER button. in this mode, the unit fully supports all operational features, except the intercom call does not have longer pickup times. Troubleshooting Guide No dial tone • Check or repeat installation steps: • Make sure the telephone line cords are connected to act as "Private Number "and their service area is turned off . • Disconnect the phone from the wall jack and connect another phone to manually make a call on line 1 only, 2) answer a call...
User's Guide
Page 28
... : ATLINKS USA, Inc. General Product Care To keep your telephone working and looking good, follow proper dialing sequence? Changes or modifications not expressly approved by the manufacturer or its authorized service agents. For instructions on the system. • Make sure all phones on how to obtain service, refer to all phone ID's (station numbers) involved have same line connected. Manager, Consumer...
... : ATLINKS USA, Inc. General Product Care To keep your telephone working and looking good, follow proper dialing sequence? Changes or modifications not expressly approved by the manufacturer or its authorized service agents. For instructions on the system. • Make sure all phones on how to obtain service, refer to all phone ID's (station numbers) involved have same line connected. Manager, Consumer...
User's Guide
Page 30
... Code 11 D M Data Port 8 Delay Ring 9 Deleting a CID Record 20 Deleting All Call Records 20 Deleting Messages 24 Dialing a Stored Number 22 Dialing Back 21 Display Contrast 11 Display Messages 27 Do Not Disturb 17 Mailbox 14 Making Calls with the Handset 16 Making Calls with the Optional Headset 16 Making Calls with the Speakerphone 16 Manually Setting the Time and Date11 Memo Recording 24 Memory Delete/Clear 22 Memory Log and Phone Book (Directory) Memory 21 Message Interrupt 13 Message Length 13 E Message Playback 24 Monitoring Incoming Calls 24 Editing Name...
... Code 11 D M Data Port 8 Delay Ring 9 Deleting a CID Record 20 Deleting All Call Records 20 Deleting Messages 24 Dialing a Stored Number 22 Dialing Back 21 Display Contrast 11 Display Messages 27 Do Not Disturb 17 Mailbox 14 Making Calls with the Handset 16 Making Calls with the Optional Headset 16 Making Calls with the Speakerphone 16 Manually Setting the Time and Date11 Memo Recording 24 Memory Delete/Clear 22 Memory Log and Phone Book (Directory) Memory 21 Message Interrupt 13 Message Length 13 E Message Playback 24 Monitoring Incoming Calls 24 Editing Name...
User's Guide
Page 31
... Incoming Messages 24 Redial 17 Regional Area Codes 11 Releasing a Call from Hold 17 Remote Password 13 Restoring the Default Settings 12 Reviewing CID Records 20 Reviewing Phone Book (Directory) Memory 22 Reviewing the Intercom/Memory Log 22 Reviewing the Redial Numbers 17 Ringer Tone 8 Ringer Volume 18 S Saving CID Record to Intercom/Memory Log or Phone Book Memory 20 Service 28 Set Day Time for Auto Attendant 14 Set Night Time for Auto Attendant 15 Set Night Time ON / OFF 15 Set Valid ID 15 Set Weekend Greeting 15 Speakerphone, Handset, and Headset Volume 18 Storing...
... Incoming Messages 24 Redial 17 Regional Area Codes 11 Releasing a Call from Hold 17 Remote Password 13 Restoring the Default Settings 12 Reviewing CID Records 20 Reviewing Phone Book (Directory) Memory 22 Reviewing the Intercom/Memory Log 22 Reviewing the Redial Numbers 17 Ringer Tone 8 Ringer Volume 18 S Saving CID Record to Intercom/Memory Log or Phone Book Memory 20 Service 28 Set Day Time for Auto Attendant 14 Set Night Time for Auto Attendant 15 Set Night Time ON / OFF 15 Set Valid ID 15 Set Weekend Greeting 15 Speakerphone, Handset, and Headset Volume 18 Storing...


