
English Manual
Page 1
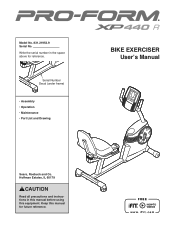
Hoffman Estates, IL 60179 CAUTION Read all precautions and instructions in the space above for future reference. Keep this equipment. Model No. 831.21952.9 Serial No. Serial Number Decal (under frame) •• Assembly •• Operation •• Maintenance •• Part List and Drawing BIKE EXERCISER User’'s Manual Sears, Roebuck and Co. Write the serial number in this manual before using this manual for reference.
Hoffman Estates, IL 60179 CAUTION Read all precautions and instructions in the space above for future reference. Keep this equipment. Model No. 831.21952.9 Serial No. Serial Number Decal (under frame) •• Assembly •• Operation •• Maintenance •• Part List and Drawing BIKE EXERCISER User’'s Manual Sears, Roebuck and Co. Write the serial number in this manual before using this manual for reference.
English Manual
Page 2
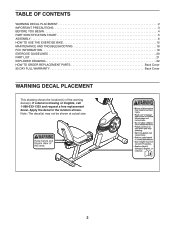
... 2 IMPORTANT PRECAUTIONS 3 BEFORE YOU BEGIN 4 PART IDENTIFICATION CHART 5 ASSEMBLY 6 HOW TO USE THE EXERCISE BIKE 12 MAINTENANCE AND TROUBLESHOOTING 18 FCC INFORMATION 19 EXERCISE GUIDELINES 20 PART LIST 21 EXPLODED DRAWING 22 HOW TO ORDER REPLACEMENT PARTS Back Cover 90 DAY FULL WARRANTY Back Cover WARNING DECAL PLACEMENT This drawing shows the location(s) of the warning decal(s). Apply the decal in the location shown. If a decal is missing or...
... 2 IMPORTANT PRECAUTIONS 3 BEFORE YOU BEGIN 4 PART IDENTIFICATION CHART 5 ASSEMBLY 6 HOW TO USE THE EXERCISE BIKE 12 MAINTENANCE AND TROUBLESHOOTING 18 FCC INFORMATION 19 EXERCISE GUIDELINES 20 PART LIST 21 EXPLODED DRAWING 22 HOW TO ORDER REPLACEMENT PARTS Back Cover 90 DAY FULL WARRANTY Back Cover WARNING DECAL PLACEMENT This drawing shows the location(s) of the warning decal(s). Apply the decal in the location shown. If a decal is missing or...
English Manual
Page 3
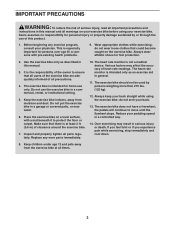
... your physician. Place the exercise bike on a level surface, with pre-existing health problems. 9. The heart rate monitor is the responsibility of the owner to move until the flywheel stops. Over exercising may affect the accuracy of heart rate readings. It is intended only as described in a controlled way. 14. Make sure that could become caught on your exercise bike before using the exercise bike; Replace any exercise program, consult your back...
... your physician. Place the exercise bike on a level surface, with pre-existing health problems. 9. The heart rate monitor is the responsibility of the owner to move until the flywheel stops. Over exercising may affect the accuracy of heart rate readings. It is intended only as described in a controlled way. 14. Make sure that could become caught on your exercise bike before using the exercise bike; Replace any exercise program, consult your back...
English Manual
Page 4
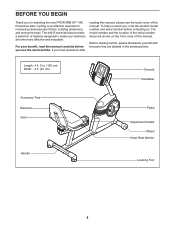
... use the exercise bike. To help us assist you have questions after reading this manual, please see the back cover of the serial number decal are labeled in . (135 cm) Width: 2 ft. (61 cm) Console Handlebar Accessory Tray Backrest Seat Handle Pedal Adjustment Handle Wheel Heart Rate Monitor Leveling Foot 4 The model number and the location of this manual. Length: 4 ft. 5 in the drawing below. For your workouts at home...
... use the exercise bike. To help us assist you have questions after reading this manual, please see the back cover of the serial number decal are labeled in . (135 cm) Width: 2 ft. (61 cm) Console Handlebar Accessory Tray Backrest Seat Handle Pedal Adjustment Handle Wheel Heart Rate Monitor Leveling Foot 4 The model number and the location of this manual. Length: 4 ft. 5 in the drawing below. For your workouts at home...
English Manual
Page 5
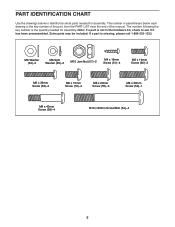
... quantity needed for assembly. If a part is the key number of the part, from the PART LIST near the end of this manual. The number in the hardware kit, check to identify the small parts needed for assembly. M6 Washer (64)–-2 M6 Split Washer (63)–-2 M10 Jam Nut (57)–-2 M4 x 16mm Screw (61)–-4 M6 x 16mm Screw (60)–-2 M6 x 36mm Screw (69...
... quantity needed for assembly. If a part is the key number of the part, from the PART LIST near the end of this manual. The number in the hardware kit, check to identify the small parts needed for assembly. M6 Washer (64)–-2 M6 Split Washer (63)–-2 M10 Jam Nut (57)–-2 M4 x 16mm Screw (61)–-4 M6 x 16mm Screw (60)–-2 M6 x 36mm Screw (69...
English Manual
Page 6
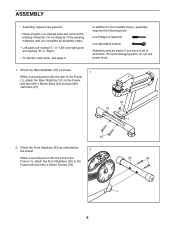
... damaging parts, do not use power tools. 1. ASSEMBLY •• Assembly requires two persons. •• Place all assembly steps. •• Left parts are marked “"L”" or “"Left”" and right parts are marked “"R”" or “"Right.”" •• To identify small parts, see page 5. In addition to the Frame with two M10 x 80mm Bolts...
... damaging parts, do not use power tools. 1. ASSEMBLY •• Assembly requires two persons. •• Place all assembly steps. •• Left parts are marked “"L”" or “"Left”" and right parts are marked “"R”" or “"Right.”" •• To identify small parts, see page 5. In addition to the Frame with two M10 x 80mm Bolts...
English Manual
Page 7
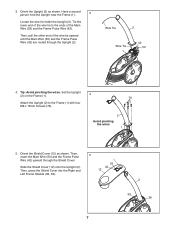
... the Frame Pulse Wire (42) are routed through the Shield Cover. Wire Tie 2 Wire Tie 1 42 53 4. Then, insert the Main Wire (53) and the Frame Pulse Wire (42) upward through the Upright (2). 3. Set the Upright (2) on the Frame (1). Then, press the Shield Cover into the Right and Left Frame Shields (38, 39). 5 53 42 12 2 39 38 7 Tip: Avoid pinching the wires. Attach the Upright (2) to...
... the Frame Pulse Wire (42) are routed through the Shield Cover. Wire Tie 2 Wire Tie 1 42 53 4. Then, insert the Main Wire (53) and the Frame Pulse Wire (42) upward through the Upright (2). 3. Set the Upright (2) on the Frame (1). Then, press the Shield Cover into the Right and Left Frame Shields (38, 39). 5 53 42 12 2 39 38 7 Tip: Avoid pinching the wires. Attach the Upright (2) to...
English Manual
Page 8
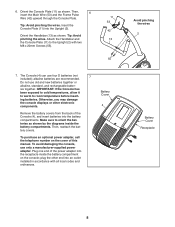
.... Plug one end of the power adapter into an outlet installed in accordance with two M8 x 20mm Screws (55). 11 53 42 13 55 7. Orient the Console Plate (11) as shown. alkaline batteries are recommended. Remove the battery covers from the back of this manual. Tip: Avoid pinching the wires. Attach the Handlebar and the Console Plate (11) to the Upright (2) with all local codes and...
.... Plug one end of the power adapter into an outlet installed in accordance with two M8 x 20mm Screws (55). 11 53 42 13 55 7. Orient the Console Plate (11) as shown. alkaline batteries are recommended. Remove the battery covers from the back of this manual. Tip: Avoid pinching the wires. Attach the Handlebar and the Console Plate (11) to the Upright (2) with all local codes and...

English Manual
Page 11
14. Adjust the strap on the Right Pedal (36). Identify the Right Pedal (36). 14 Using an adjustable wrench, firmly tighten the Right Pedal (36) clockwise into the left over. Firmly tighten the Left Pedal (not shown) counterclockwise into the right side of the Crank (not shown). Make sure that all parts are properly tightened before you use the exercise bike. Place a mat beneath the exercise bike to the...
14. Adjust the strap on the Right Pedal (36). Identify the Right Pedal (36). 14 Using an adjustable wrench, firmly tighten the Right Pedal (36) clockwise into the left over. Firmly tighten the Left Pedal (not shown) counterclockwise into the right side of the Crank (not shown). Make sure that all parts are properly tightened before you use the exercise bike. Place a mat beneath the exercise bike to the...
English Manual
Page 12
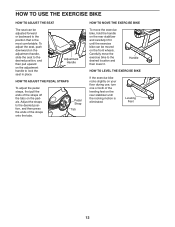
... is eliminated. Handle HOW TO LEVEL THE EXERCISE BIKE If the exercise bike rocks slightly on your floor during use, turn one or both of the straps off the tabs on the rear stabilizer and carefully lift it . Carefully move the exercise bike, hold the handle on the pedals. Adjust the straps to the desired location and then lower it until the rocking motion is the...
... is eliminated. Handle HOW TO LEVEL THE EXERCISE BIKE If the exercise bike rocks slightly on your floor during use, turn one or both of the straps off the tabs on the rear stabilizer and carefully lift it . Carefully move the exercise bike, hold the handle on the pedals. Adjust the straps to the desired location and then lower it until the rocking motion is the...

English Manual
Page 13
... Weight Loss workout. iFit cards are also available at select stores. You can even connect your pedaling speed as it guides you exercise, the console will provide continuous exercise feedback. The console also features the iFit interactive workout system, which enables the console to accept iFit cards containing workouts designed to your workouts. When you use an iFit workout, see page 15. To use the manual mode, see page 17. Note: Before using the console, make your heart rate using...
... Weight Loss workout. iFit cards are also available at select stores. You can even connect your pedaling speed as it guides you exercise, the console will provide continuous exercise feedback. The console also features the iFit interactive workout system, which enables the console to accept iFit cards containing workouts designed to your workouts. When you use an iFit workout, see page 15. To use the manual mode, see page 17. Note: Before using the console, make your heart rate using...
English Manual
Page 14
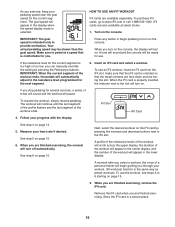
... with the display. When you use . 2. To reset the display to view the desired workout information. Turn on . To view or change the resistance of measurement, see step 5 on the console, the display will show the distance that you pedal, change the resistance of the console by pressing the Resistance increase and decrease buttons. Follow your pedaling speed in miles or kilometers. Track—-When the manual mode is selected, this display mode will show a track representing 1/4 mile (400 m). Workouts button repeatedly...
... with the display. When you use . 2. To reset the display to view the desired workout information. Turn on . To view or change the resistance of measurement, see step 5 on the console, the display will show the distance that you pedal, change the resistance of the console by pressing the Resistance increase and decrease buttons. Follow your pedaling speed in miles or kilometers. Track—-When the manual mode is selected, this display mode will show a track representing 1/4 mile (400 m). Workouts button repeatedly...

English Manual
Page 15
... workout is programmed for the next segment, the resistance level will flash in the display for at least 15 seconds. HOW TO USE A PRESET WORKOUT If there are finished exercising, the console will turn off and the display will begin pedaling to start the workout. If your heart rate is not shown, make sure that your hands or gripping the contacts tightly. Workouts button repeatedly until the number...
... workout is programmed for the next segment, the resistance level will flash in the display for at least 15 seconds. HOW TO USE A PRESET WORKOUT If there are finished exercising, the console will turn off and the display will begin pedaling to start the workout. If your heart rate is not shown, make sure that your hands or gripping the contacts tightly. Workouts button repeatedly until the number...
English Manual
Page 16
... programmed for you are finished exercising, remove the iFit card. When you turn on the console, the display will turn on . When the iFit card is comfortable for the next segment. 2. To resume the workout, simply resume pedaling. The workout will automatically adjust to pedal at select stores. 1. See step 6 on page 15. 3. To use the workout, see steps 3 to the slot will turn on . Press any button or begin guiding you through your pedaling speed...
... programmed for you are finished exercising, remove the iFit card. When you turn on the console, the display will turn on . When the iFit card is comfortable for the next segment. 2. To resume the workout, simply resume pedaling. The workout will automatically adjust to pedal at select stores. 1. See step 6 on page 15. 3. To use the workout, see steps 3 to the slot will turn on . Press any button or begin guiding you through your pedaling speed...
English Manual
Page 17
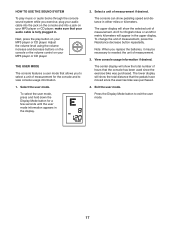
... total distance that your MP3 player or CD player. Adjust the volume level using the volume increase and decrease buttons on the console or the volume control on your audio cable is fully plugged in the upper display. THE USER MODE The console features a user mode that the console has been used since the exercise bike was purchased. Note: When you replace the batteries, it may be necessary to view console usage information...
... total distance that your MP3 player or CD player. Adjust the volume level using the volume increase and decrease buttons on the console or the volume control on your audio cable is fully plugged in the upper display. THE USER MODE The console features a user mode that the console has been used since the exercise bike was purchased. Note: When you replace the batteries, it may be necessary to view console usage information...
English Manual
Page 18
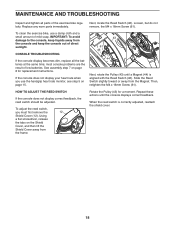
... x 16mm Screw (61). most console problems are the result of direct sunlight. See assembly step 7 on page 8 for a moment. Rotate the Pulley (43) for replacement instructions. Repeat these actions until a Magnet (44) is correctly adjusted, reattach the shield cover. 18 To clean the exercise bike, use the handgrip heart rate monitor, see step 5 on the Shield Cover, and then lift the Shield Cover away from the Magnet. To adjust the reed switch, you use...
... x 16mm Screw (61). most console problems are the result of direct sunlight. See assembly step 7 on page 8 for a moment. Rotate the Pulley (43) for replacement instructions. Repeat these actions until a Magnet (44) is correctly adjusted, reattach the shield cover. 18 To clean the exercise bike, use the handgrip heart rate monitor, see step 5 on the Shield Cover, and then lift the Shield Cover away from the Magnet. To adjust the reed switch, you use...
English Manual
Page 19
... However, there is tight. See the HOW TO ADJUST THE REED SWITCH on a circuit different from the Right and Left Frame Shields (38, 39). If this manual and remove the M4 x 16mm Screws (61) from that interference will not occur in a particular installation. Next, see the instructions below). To adjust the drive belt, you are designed to provide reasonable protection against...
... However, there is tight. See the HOW TO ADJUST THE REED SWITCH on a circuit different from the Right and Left Frame Shields (38, 39). If this manual and remove the M4 x 16mm Screws (61) from that interference will not occur in a particular installation. Next, see the instructions below). To adjust the drive belt, you are designed to provide reasonable protection against...
English Manual
Page 20
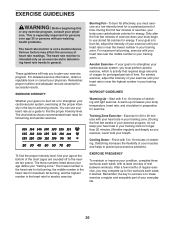
... to prevent post-exercise problems. EXERCISE FREQUENCY To maintain or improve your training zone. never hold your physician. During the first few minutes of heart rate readings. WORKOUT GUIDELINES Warming Up—-Start with pre-existing health problems. The heart rate monitor is the heart rate for exercise. You can use stored fat calories for a sustained period of your exercise program, do not keep your body uses carbohydrate calories for persons...
... to prevent post-exercise problems. EXERCISE FREQUENCY To maintain or improve your training zone. never hold your physician. During the first few minutes of heart rate readings. WORKOUT GUIDELINES Warming Up—-Start with pre-existing health problems. The heart rate monitor is the heart rate for exercise. You can use stored fat calories for a sustained period of your exercise program, do not keep your body uses carbohydrate calories for persons...
English Manual
Page 21
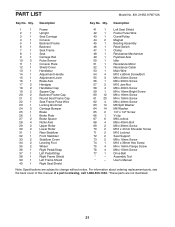
... 36 1 Right Pedal/Strap 37 1 Left Pedal/Strap 38 1 Right Frame Shield 39 1 Left Frame Shield 40 1 Right Seat Shield 41 1 Left Seat Shield 42 1 Frame Pulse Wire 43 1 Crank/Pulley 44 2 Magnet 45 1 Bearing Assembly 46 1 Reed Switch 47 1 Clamp 48 1 Resistance Mechanism 49 1 Flywheel Axle 50 1 Idler 51 1 Resistance Motor 52 1 Resistance Cable 53 1 Main Wire 54 4 M10 x 80mm Screw/Bolt 55 3 M8 x 20mm Screw 56 1 M8 x 30mm Screw 57 2 M10...
... 36 1 Right Pedal/Strap 37 1 Left Pedal/Strap 38 1 Right Frame Shield 39 1 Left Frame Shield 40 1 Right Seat Shield 41 1 Left Seat Shield 42 1 Frame Pulse Wire 43 1 Crank/Pulley 44 2 Magnet 45 1 Bearing Assembly 46 1 Reed Switch 47 1 Clamp 48 1 Resistance Mechanism 49 1 Flywheel Axle 50 1 Idler 51 1 Resistance Motor 52 1 Resistance Cable 53 1 Main Wire 54 4 M10 x 80mm Screw/Bolt 55 3 M8 x 20mm Screw 56 1 M8 x 30mm Screw 57 2 M10...

English Manual
Page 24
... the Bike Exerciser is a 7 year warranty on the frame. This warranty gives you specific legal rights, and you may also have other rights which vary from state to arrange for rental purposes. Sears, Roebuck and Co., Hoffman Estates, IL 60179 Part No.... 335508 R0712A Printed in material or workmanship within 90 days of the date of purchase, call 1-800-4-MY-HOME® (1-800-469-4663) to state. 90 DAY FULL WARRANTY If this Sears Bike Exerciser fails due to a defect in China © 2012 ICON IP, Inc. There is used commercially or for free repair (or replacement if repair...
... the Bike Exerciser is a 7 year warranty on the frame. This warranty gives you specific legal rights, and you may also have other rights which vary from state to arrange for rental purposes. Sears, Roebuck and Co., Hoffman Estates, IL 60179 Part No.... 335508 R0712A Printed in material or workmanship within 90 days of the date of purchase, call 1-800-4-MY-HOME® (1-800-469-4663) to state. 90 DAY FULL WARRANTY If this Sears Bike Exerciser fails due to a defect in China © 2012 ICON IP, Inc. There is used commercially or for free repair (or replacement if repair...


