
English Manual
Page 1
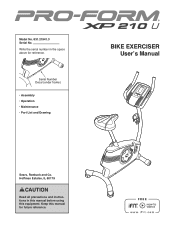
Model No. 831.21941.3 Serial No. Serial Number Decal (under frame) •• Assembly •• Operation •• Maintenance •• Part List and Drawing BIKE EXERCISER User’'s Manual Sears, Roebuck and Co. Keep this equipment. Write the serial number in this manual before using this manual for reference. Hoffman Estates, IL 60179 CAUTION Read all precautions and instructions in the space above for future reference.
Model No. 831.21941.3 Serial No. Serial Number Decal (under frame) •• Assembly •• Operation •• Maintenance •• Part List and Drawing BIKE EXERCISER User’'s Manual Sears, Roebuck and Co. Keep this equipment. Write the serial number in this manual before using this manual for reference. Hoffman Estates, IL 60179 CAUTION Read all precautions and instructions in the space above for future reference.
English Manual
Page 2
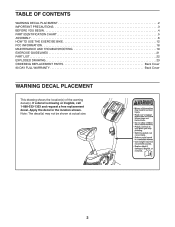
... a free replacement decal. Note: The decal(s) may not be shown at actual size. 2 TABLE OF CONTENTS WARNING DECAL PLACEMENT 2 IMPORTANT PRECAUTIONS 3 BEFORE YOU BEGIN 4 PART IDENTIFICATION CHART 5 ASSEMBLY 6 HOW TO USE THE EXERCISE BIKE 12 FCC INFORMATION 18 MAINTENANCE AND TROUBLESHOOTING 19 EXERCISE GUIDELINES 21 PART LIST 22 EXPLODED DRAWING 23 ORDERING REPLACEMENT PARTS Back Cover 90 DAY FULL WARRANTY Back Cover WARNING DECAL PLACEMENT This drawing shows the location(s) of...
... a free replacement decal. Note: The decal(s) may not be shown at actual size. 2 TABLE OF CONTENTS WARNING DECAL PLACEMENT 2 IMPORTANT PRECAUTIONS 3 BEFORE YOU BEGIN 4 PART IDENTIFICATION CHART 5 ASSEMBLY 6 HOW TO USE THE EXERCISE BIKE 12 FCC INFORMATION 18 MAINTENANCE AND TROUBLESHOOTING 19 EXERCISE GUIDELINES 21 PART LIST 22 EXPLODED DRAWING 23 ORDERING REPLACEMENT PARTS Back Cover 90 DAY FULL WARRANTY Back Cover WARNING DECAL PLACEMENT This drawing shows the location(s) of...
English Manual
Page 3
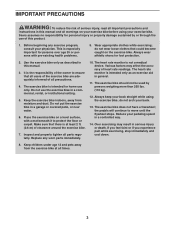
... is not a medical device. Always wear athletic shoes for home use the exercise bike in this manual and all warnings on your exercise bike before using your back straight while using the exercise bike; It is the responsibility of the owner to move until the flywheel stops. Replace any exercise program, consult your physician. Always keep your exercise bike. Reduce your back. 13. If you feel faint or if...
... is not a medical device. Always wear athletic shoes for home use the exercise bike in this manual and all warnings on your exercise bike before using your back straight while using the exercise bike; It is the responsibility of the owner to move until the flywheel stops. Replace any exercise program, consult your physician. Always keep your exercise bike. Reduce your back. 13. If you feel faint or if...
English Manual
Page 4
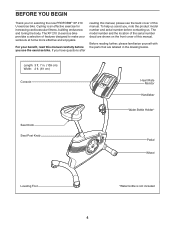
... workouts at home more effective and enjoyable. Before reading further, please familiarize yourself with the parts that are shown on the front cover of this manual. BEFORE YOU BEGIN Thank you use the exercise bike. Cycling is not included 4 The model number and the location of the serial number decal are labeled in . (109 cm) Width: 2 ft. (61 cm) Console Heart Rate Monitor Handlebar Water Bottle Holder* Seat Knob Seat...
... workouts at home more effective and enjoyable. Before reading further, please familiarize yourself with the parts that are shown on the front cover of this manual. BEFORE YOU BEGIN Thank you use the exercise bike. Cycling is not included 4 The model number and the location of the serial number decal are labeled in . (109 cm) Width: 2 ft. (61 cm) Console Heart Rate Monitor Handlebar Water Bottle Holder* Seat Knob Seat...
English Manual
Page 5
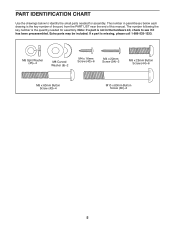
... identify the small parts needed for assembly. The number following the key number is the key number of the part, from the PART LIST near the end of this manual. M8 Split Washer (45)–-4 M8 Curved Washer (8)–-2 M4 x 16mm Screw (40)–-6 M4 x 22mm Screw (54)–-2 M8 x 25mm Button Screw (44)–-6 M8 x 60mm Button Screw (43)–-4 M10 x 80mm Button Screw (36)–-2 5 PART IDENTIFICATION CHART Use the drawings...
... identify the small parts needed for assembly. The number following the key number is the key number of the part, from the PART LIST near the end of this manual. M8 Split Washer (45)–-4 M8 Curved Washer (8)–-2 M4 x 16mm Screw (40)–-6 M4 x 22mm Screw (54)–-2 M8 x 25mm Button Screw (44)–-6 M8 x 60mm Button Screw (43)–-4 M10 x 80mm Button Screw (36)–-2 5 PART IDENTIFICATION CHART Use the drawings...

English Manual
Page 6
... tools: one Phillips screwdriver one adjustable wrench Assembly may be easier if you have your own set of the packing materials until you nish all parts in a cleared area and remove the packing materials. Attach the Rear Stabilizer (14) with two M10 x 80mm Screws (36). 43 2 36 1 6 To avoid damaging parts, do not use power tools. 1. Orient the Front Stabilizer...
... tools: one Phillips screwdriver one adjustable wrench Assembly may be easier if you have your own set of the packing materials until you nish all parts in a cleared area and remove the packing materials. Attach the Rear Stabilizer (14) with two M10 x 80mm Screws (36). 43 2 36 1 6 To avoid damaging parts, do not use power tools. 1. Orient the Front Stabilizer...
English Manual
Page 9
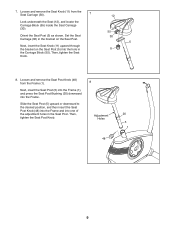
... Seat Post. Next, insert the Seat Post (5) into the Frame (1), and press the Seat Post Bushing (20) downward into the Frame. 7. Then, tighten the Seat Post Knob. 8 Adjustment Holes 48 20 5 1 9 Loosen and remove the Seat Knob (11) from the Frame (1). Then, tighten the Seat Knob. 12 55 30 5 11 8. Loosen and remove the Seat Post Knob (48) from the Seat Carriage (30). 7 Look underneath the Seat (12), and locate...
... Seat Post. Next, insert the Seat Post (5) into the Frame (1), and press the Seat Post Bushing (20) downward into the Frame. 7. Then, tighten the Seat Post Knob. 8 Adjustment Holes 48 20 5 1 9 Loosen and remove the Seat Knob (11) from the Frame (1). Then, tighten the Seat Knob. 12 55 30 5 11 8. Loosen and remove the Seat Post Knob (48) from the Seat Carriage (30). 7 Look underneath the Seat (12), and locate...
English Manual
Page 10
... console, use four D batteries (not included); To purchase an optional power adapter, call the telephone number on the console; Hold the Console Plate (19) near the Upright (3). 10 Locate the Pulse Wire (52) in the Upright (3), and then pull the Pulse Wire out of the top of this manual. Attach the Handlebar (47) and the Console Plate (19) to the Upright (3) with all local codes and ordinances. 10 Battery Cover 6 Battery Cover Receptacle alkaline batteries...
... console, use four D batteries (not included); To purchase an optional power adapter, call the telephone number on the console; Hold the Console Plate (19) near the Upright (3). 10 Locate the Pulse Wire (52) in the Upright (3), and then pull the Pulse Wire out of the top of this manual. Attach the Handlebar (47) and the Console Plate (19) to the Upright (3) with all local codes and ordinances. 10 Battery Cover 6 Battery Cover Receptacle alkaline batteries...
English Manual
Page 11
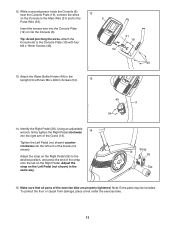
... M4 x 22mm Screws (54). 13 14. Make sure that all parts of the Crank (13). Tip: Avoid pinching the wires. Identify the Right Pedal (26). 12. Attach the Console (6) to the Pulse Wire (52). Tighten the Left Pedal (not shown) counterclockwise into the Console (6). Using an adjustable wrench, firmly tighten the Right Pedal clockwise 14 into the right arm of the exercise bike are properly tightened. Note: Extra parts may be...
... M4 x 22mm Screws (54). 13 14. Make sure that all parts of the Crank (13). Tip: Avoid pinching the wires. Identify the Right Pedal (26). 12. Attach the Console (6) to the Pulse Wire (52). Tighten the Left Pedal (not shown) counterclockwise into the Console (6). Using an adjustable wrench, firmly tighten the Right Pedal clockwise 14 into the right arm of the exercise bike are properly tightened. Note: Extra parts may be...
English Manual
Page 12
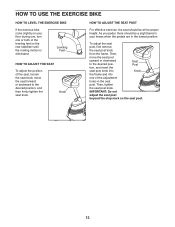
.... Then, tighten the seat post knob. IMPORTANT: Do not adjust the seat post beyond the stop mark on the rear stabilizer until the rocking motion is eliminated. As you pedal, there should be a slight bend in your floor during use, turn one of the adjustment holes in the lowest position. HOW TO USE THE EXERCISE BIKE HOW TO LEVEL THE EXERCISE BIKE If the exercise bike rocks slightly...
.... Then, tighten the seat post knob. IMPORTANT: Do not adjust the seat post beyond the stop mark on the rear stabilizer until the rocking motion is eliminated. As you pedal, there should be a slight bend in your floor during use, turn one of the adjustment holes in the lowest position. HOW TO USE THE EXERCISE BIKE HOW TO LEVEL THE EXERCISE BIKE If the exercise bike rocks slightly...
English Manual
Page 13
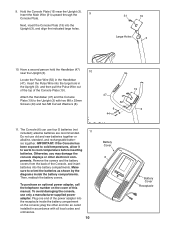
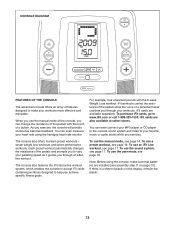
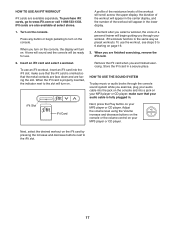
... achieve specific fitness goals. To use the manual mode, see assembly step 11 on the display, remove the plastic. 13 For example, lose unwanted pounds with the touch of the pedals and prompts you to vary your pedaling speed as it guides you through your workouts. iFit cards are available separately. iFit cards are also available at select stores. Each preset workout automatically changes the resistance of a button. You can even connect your...
... achieve specific fitness goals. To use the manual mode, see assembly step 11 on the display, remove the plastic. 13 For example, lose unwanted pounds with the touch of the pedals and prompts you to vary your pedaling speed as it guides you through your workouts. iFit cards are available separately. iFit cards are also available at select stores. Each preset workout automatically changes the resistance of a button. You can even connect your...
English Manual
Page 14
... the workout. Follow your pedaling speed in miles per hour or kilometers per hour. Resistance (Res)—-This display mode will be ready for use the handgrip heart rate monitor (see THE USER MODE on page 18. Change the volume level of the pedals for the pedals to turn on the console. Loss Workouts button or the 7 Perform. To reset the display to view the desired workout information. When you pedal, change the resistance of calories you exercise...
... the workout. Follow your pedaling speed in miles per hour or kilometers per hour. Resistance (Res)—-This display mode will be ready for use the handgrip heart rate monitor (see THE USER MODE on page 18. Change the volume level of the pedals for the pedals to turn on the console. Loss Workouts button or the 7 Perform. To reset the display to view the desired workout information. When you pedal, change the resistance of calories you exercise...

English Manual
Page 15
... several seconds, a series of plastic on the metal contacts on the Contacts handgrip heart rate monitor, remove the plastic. When your pulse is not shown, make sure that your palms resting against the contacts. 5. If the pedals do not move for several minutes, the console will turn off and the display will flash in the display and then your heart rate will turn off automatically.
... several seconds, a series of plastic on the metal contacts on the Contacts handgrip heart rate monitor, remove the plastic. When your pulse is not shown, make sure that your palms resting against the contacts. 5. If the pedals do not move for several minutes, the console will turn off and the display will flash in the display and then your heart rate will turn off automatically.
English Manual
Page 16
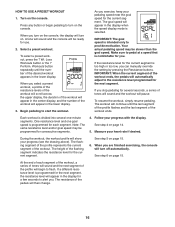
... the center display, and the number of the pedals will appear in the lower display. Your actual pedaling speed may be ready for use. 2. Make sure to turn off automatically. If the resistance level for you stop pedaling for several one goal speed is programmed for the current segment. If you . The workout will show your heart rate if desired. Follow your pedaling speed near the goal speed for consecutive...
... the center display, and the number of the pedals will appear in the lower display. Your actual pedaling speed may be ready for use. 2. Make sure to turn off automatically. If the resistance level for you stop pedaling for several one goal speed is programmed for the current segment. If you . The workout will show your heart rate if desired. Follow your pedaling speed near the goal speed for consecutive...
English Manual
Page 17
... IFIT WORKOUT iFit cards are also available at select stores. Press any button or begin guiding you through the console sound system while you turn on your audio cable into the jack on the console, the display will be ready for use the workout, see steps 3 to the iFit slot. 17 iFit workouts function in a secure place. When you are finished exercising. iFit Slot iFit Card Next, press the Play button on the console. Turn on your workout...
... IFIT WORKOUT iFit cards are also available at select stores. Press any button or begin guiding you through the console sound system while you turn on your audio cable into the jack on the console, the display will be ready for use the workout, see steps 3 to the iFit slot. 17 iFit workouts function in a secure place. When you are finished exercising. iFit Slot iFit Card Next, press the Play button on the console. Turn on your workout...
English Manual
Page 18
... compliance, use only shielded interface cables when connecting to exit the user mode. THE USER MODE The console features a user mode that allows you replace the batteries, it may cause harmful interference to radio communications. Select the user mode. An E for English miles or an M for a few seconds until the user mode information appears in a residential installation. The lower display will show the total distance that the pedals have moved since the exercise bike was purchased...
... compliance, use only shielded interface cables when connecting to exit the user mode. THE USER MODE The console features a user mode that allows you replace the batteries, it may cause harmful interference to radio communications. Select the user mode. An E for English miles or an M for a few seconds until the user mode information appears in a residential installation. The lower display will show the total distance that the pedals have moved since the exercise bike was purchased...
English Manual
Page 19
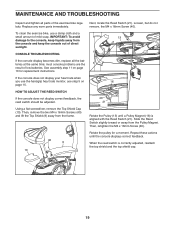
... cap. 19 most console problems are the result of the exercise bike regularly. Next, locate the Reed Switch (21). Loosen, but do not remove, the M4 x 16mm Screw (40). When the reed switch is aligned with the Reed Switch (21). MAINTENANCE AND TROUBLESHOOTING Inspect and tighten all the batteries at the same time; If the console does not display your heart rate when you use a damp cloth and a small amount of direct sunlight.
... cap. 19 most console problems are the result of the exercise bike regularly. Next, locate the Reed Switch (21). Loosen, but do not remove, the M4 x 16mm Screw (40). When the reed switch is aligned with the Reed Switch (21). MAINTENANCE AND TROUBLESHOOTING Inspect and tighten all the batteries at the same time; If the console does not display your heart rate when you use a damp cloth and a small amount of direct sunlight.
English Manual
Page 20
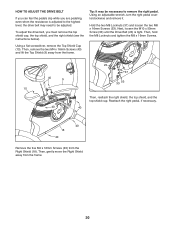
... frame. HOW TO ADJUST THE DRIVE BELT If you can feel the pedals slip while you must remove the top shield cap, the top shield, and the right shield (see the instructions below). Next, loosen the M10 x 50mm Screw (33) until the Drive Belt (23) is adjusted to remove the right pedal. Then, hold the M8 Locknuts and tighten the M8 x 16mm Screws. 40 9 10...
... frame. HOW TO ADJUST THE DRIVE BELT If you can feel the pedals slip while you must remove the top shield cap, the top shield, and the right shield (see the instructions below). Next, loosen the M10 x 50mm Screw (33) until the Drive Belt (23) is adjusted to remove the right pedal. Then, hold the M8 Locknuts and tighten the M8 x 16mm Screws. 40 9 10...
English Manual
Page 21
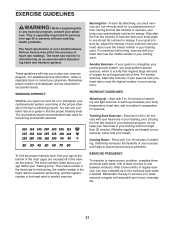
... with pre-existing health problems. The heart rate monitor is near the highest number in your body begin to prevent post-exercise problems. EXERCISE FREQUENCY To maintain or improve your condition, complete three workouts each week, if desired. This is especially important for aerobic exercise. For detailed exercise information, obtain a reputable book or consult your exercise program. During the first few minutes of the chart (ages are...
... with pre-existing health problems. The heart rate monitor is near the highest number in your body begin to prevent post-exercise problems. EXERCISE FREQUENCY To maintain or improve your condition, complete three workouts each week, if desired. This is especially important for aerobic exercise. For detailed exercise information, obtain a reputable book or consult your exercise program. During the first few minutes of the chart (ages are...

English Manual
Page 22
... 1 Seat Knob 12 1 Seat 13 1 Pulley/Crank 14 1 Rear Stabilizer 15 2 Wheel 16 2 Pulley Magnet 17 1 Left Shield 18 1 Right Shield 19 1 Console Plate 20 1 Seat Post Bushing 21 1 Reed Switch/Wire 22 1 Reed Switch Clamp 23 1 Drive Belt 24 1 Left Pedal/Strap 25 1 Idler 26 1 Right Pedal/Strap 27 1 Crank Bearing Set 28 1 Seat Post Cap 29 1 Resistance Motor 30 1 Seat Carriage 31 1 Main Wire 32 1 M10 Flange Nut 33 1 M10 x 50mm Screw 34 1 Resistance Cable 35 3 M4.2 x 16mm Screw...
... 1 Seat Knob 12 1 Seat 13 1 Pulley/Crank 14 1 Rear Stabilizer 15 2 Wheel 16 2 Pulley Magnet 17 1 Left Shield 18 1 Right Shield 19 1 Console Plate 20 1 Seat Post Bushing 21 1 Reed Switch/Wire 22 1 Reed Switch Clamp 23 1 Drive Belt 24 1 Left Pedal/Strap 25 1 Idler 26 1 Right Pedal/Strap 27 1 Crank Bearing Set 28 1 Seat Post Cap 29 1 Resistance Motor 30 1 Seat Carriage 31 1 Main Wire 32 1 M10 Flange Nut 33 1 M10 x 50mm Screw 34 1 Resistance Cable 35 3 M4.2 x 16mm Screw...


