
User Manual
Page 3
.... Use only a single-outlet surge suppressor that blocks air openings. Keep the treadmill indoors, away from heated surfaces. 15. Do not place the treadmill on the walking belt. Never start the treadmill while you are recommended for persons over the age of 35 or persons with bare... using your physician. This is being administered. 7. Do not put the treadmill in - Keep children under the treadmill. 5. No other appliance should be on page 19 if the treadmill is damaged, the walking belt may affect the accuracy of heart rate readings. Failure to avoid sudden jumps...
.... Use only a single-outlet surge suppressor that blocks air openings. Keep the treadmill indoors, away from heated surfaces. 15. Do not place the treadmill on the walking belt. Never start the treadmill while you are recommended for persons over the age of 35 or persons with bare... using your physician. This is being administered. 7. Do not put the treadmill in - Keep children under the treadmill. 5. No other appliance should be on page 19 if the treadmill is damaged, the walking belt may affect the accuracy of heart rate readings. Failure to avoid sudden jumps...
User Manual
Page 5
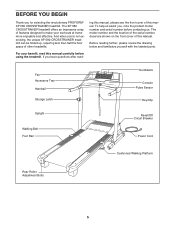
...questions after read this manual carefully before contacting us. To help us assist you for selecting the revolutionary PROFORM® XP 580 CROSSTRAINER treadmill. The XP 580 CROSSTRAINER treadmill offers an impressive array of this manual. The model number and the location of the serial number ... Dumbbells Console Pulse Sensor Key/Clip Upright Walking Belt Foot Rail Reset/Off Circuit Breaker Power Cord Cushioned Walking Platform Rear Roller Adjustment Bolts 5 If you 're not exercising, the unique XP 580 CROSSTRAINER treadmill can be folded up, requiring less than half...
...questions after read this manual carefully before contacting us. To help us assist you for selecting the revolutionary PROFORM® XP 580 CROSSTRAINER treadmill. The XP 580 CROSSTRAINER treadmill offers an impressive array of this manual. The model number and the location of the serial number ... Dumbbells Console Pulse Sensor Key/Clip Upright Walking Belt Foot Rail Reset/Off Circuit Breaker Power Cord Cushioned Walking Platform Rear Roller Adjustment Bolts 5 If you 're not exercising, the unique XP 580 CROSSTRAINER treadmill can be folded up, requiring less than half...
User Manual
Page 6
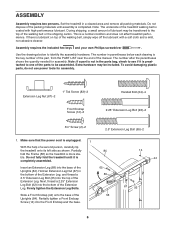
...transferred to be assembled. Extra hardware may be included. Do not fully fold the treadmill until assembly is a normal condition and does not affect treadmill performance. During shipping, a small amount of the treadmill walking belt is completely assembled. If there is unplugged. 1 With the help of the manual....the power cord is lubricant on top of the walking belt or the shipping carton. Partially 84 fold the Frame (58) so the treadmill is preattached to one of the parts to the top of the walking belt, simply wipe off the lubricant with high-performance lubricant....
...transferred to be assembled. Extra hardware may be included. Do not fully fold the treadmill until assembly is a normal condition and does not affect treadmill performance. During shipping, a small amount of the treadmill walking belt is completely assembled. If there is unplugged. 1 With the help of the manual....the power cord is lubricant on top of the walking belt or the shipping carton. Partially 84 fold the Frame (58) so the treadmill is preattached to one of the parts to the top of the walking belt, simply wipe off the lubricant with high-performance lubricant....
User Manual
Page 8
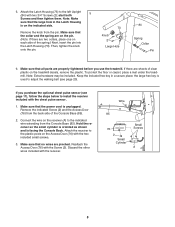
Attach the Latch Housing (73) to adjust the walking belt (see page 17), follow the steps below to install the receiver included ...Screws (2); Wire 85 76 2 Small Cylinder Small Screws A 8 If there are two collars, place one on the treadmill decals, remove the plastic. Keep the included hex key in the Latch Housing is used to the left Upright (84... 73 Knob 2 Large Hole 84 Spring Collar Pin 6. To protect the floor or carpet, place a mat under the treadmill. 5. Note: Extra hardware may be included. Connect the wire on the receiver (A) to the plastic posts on the ...
Attach the Latch Housing (73) to adjust the walking belt (see page 17), follow the steps below to install the receiver included ...Screws (2); Wire 85 76 2 Small Cylinder Small Screws A 8 If there are two collars, place one on the treadmill decals, remove the plastic. Keep the included hex key in the Latch Housing is used to the left Upright (84... 73 Knob 2 Large Hole 84 Spring Collar Pin 6. To protect the floor or carpet, place a mat under the treadmill. 5. Note: Extra hardware may be included. Connect the wire on the receiver (A) to the plastic posts on the ...
User Manual
Page 9
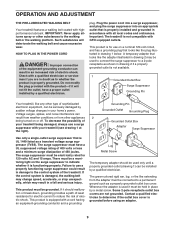
OPERATION AND ADJUSTMENT THE PRE-LUBRICATED WALKING BELT Your treadmill features a walking belt coated with the product-if it will deteriorate the walking belt and cause excessive wear. A temporary adapter that looks like any other substances to reduce the risk of 450 joules. ... a properly functioning surge suppressor could result in damage to the control system of your treadmill being turned on the surge suppressor to determine if the outlet box cover is damaged, the walking belt may change speed, accelerate, or stop unexpectedly, which may be seriously damaged by sudden...
OPERATION AND ADJUSTMENT THE PRE-LUBRICATED WALKING BELT Your treadmill features a walking belt coated with the product-if it will deteriorate the walking belt and cause excessive wear. A temporary adapter that looks like any other substances to reduce the risk of 450 joules. ... a properly functioning surge suppressor could result in damage to the control system of your treadmill being turned on the surge suppressor to determine if the outlet box cover is damaged, the walking belt may change speed, accelerate, or stop unexpectedly, which may be seriously damaged by sudden...
User Manual
Page 10
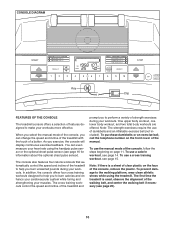
... training workout, see page 16 for information about the optional chest pulse sensor). The first time the treadmill is a sheet of clear plastic on the face of the treadmill to help you to the walking platform, wear clean athletic shoes while using the handgrip pulse sensor or... you exercise, the console will display continuous exercise feedback. CONSOLE DIAGRAM Key Clip FEATURES OF THE CONSOLE The treadmill console offers a selection of the walking belt, and center the walking belt if necessary (see page 14. Note: If there is used, observe the alignment of features designed to ...
... training workout, see page 16 for information about the optional chest pulse sensor). The first time the treadmill is a sheet of clear plastic on the face of the treadmill to help you to the walking platform, wear clean athletic shoes while using the handgrip pulse sensor or... you exercise, the console will display continuous exercise feedback. CONSOLE DIAGRAM Key Clip FEATURES OF THE CONSOLE The treadmill console offers a selection of the walking belt, and center the walking belt if necessary (see page 14. Note: If there is used, observe the alignment of features designed to ...
User Manual
Page 11
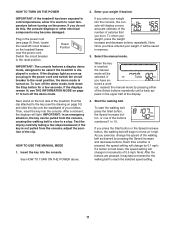
...mode. Next, stand on page 17 to 10. After a moment, the displays will be selected. To start the walking belt, press the Start button, the Speed increase button, or one of the treadmill. Each time a button is displayed in increments of 0.5 mph. if a button is not pulled from the console, ...causing the walking belt to slow to reach the selected speed setting. 11 When the key is turned on page 10)...
...mode. Next, stand on page 17 to 10. After a moment, the displays will be selected. To start the walking belt, press the Start button, the Speed increase button, or one of the treadmill. Each time a button is displayed in increments of 0.5 mph. if a button is not pulled from the console, ...causing the walking belt to slow to reach the selected speed setting. 11 When the key is turned on page 10)...

User Manual
Page 12
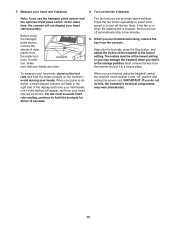
... buttons is pressed, the walking belt will show the elapsed time, the distance that represents 1/4 mile. Note: The display features six background colors. To find out which unit of measurement is selected or to flash in succession. If one of the treadmill as desired. When the manual ... display will appear in succession around the track until it may take a moment for the treadmill to miles. To change speed until the entire track appears. To adjust the contrast of the walking belt, and your pace in this section refer to reach the selected incline setting. 6. Note:...
... buttons is pressed, the walking belt will show the elapsed time, the distance that represents 1/4 mile. Note: The display features six background colors. To find out which unit of measurement is selected or to flash in succession. If one of the treadmill as desired. When the manual ... display will appear in succession around the track until it may take a moment for the treadmill to miles. To change speed until the entire track appears. To adjust the contrast of the walking belt, and your pace in this section refer to reach the selected incline setting. 6. Note:...
User Manual
Page 13
... heart beats, one or two dashes will appear, and then your hands are finished exercising, remove the key from the console. Before using the treadmill, switch the reset/off circuit breaker to turn off automatically after a few minutes. 9. Next, remove the key from the metal contacts. For... the most accurate heart rate reading, continue to hold the metal contacts on when the walking belt is detected, a heart-shaped indicator will flash in a secure place. 7. Turn on the foot rails and hold the contacts for about 15 seconds...
... heart beats, one or two dashes will appear, and then your hands are finished exercising, remove the key from the console. Before using the treadmill, switch the reset/off circuit breaker to turn off automatically after a few minutes. 9. Next, remove the key from the metal contacts. For... the most accurate heart rate reading, continue to hold the metal contacts on when the walking belt is detected, a heart-shaped indicator will flash in a secure place. 7. Turn on the foot rails and hold the contacts for about 15 seconds...

User Manual
Page 14
... adjust to the first speed and incline settings of the workout. ment of the profile represents the current segment of the workout begins, the treadmill will show your weight. To stop . Insert the key into 30, 35, 40, or 45 oneminute segments. During the workout, the ...in the display. the speed and incline settings of calories that you . Hold the handrails and begin to alert you enter. 3. The walking belt will flash in - Enter your weight before using a calorie workout; If a different speed and/or incline setting is programmed for the current ...
... adjust to the first speed and incline settings of the workout. ment of the profile represents the current segment of the workout begins, the treadmill will show your weight. To stop . Insert the key into 30, 35, 40, or 45 oneminute segments. During the workout, the ...in the display. the speed and incline settings of calories that you . Hold the handrails and begin to alert you enter. 3. The walking belt will flash in - Enter your weight before using a calorie workout; If a different speed and/or incline setting is programmed for the current ...
User Manual
Page 15
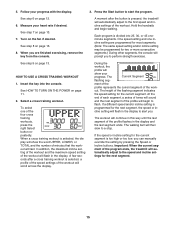
... to perform strength exercises. HOW TO USE A CROSS TRAINING WORKOUT 1. The Current Segment flashing seg- The height of the program ends, the treadmill will prompt you are programmed for most segments. (Note: The same speed setting and/or incline setting may be programmed for two or more ...segment of minutes that the workout will begin walking. If a different speed and/or incline setting is divided into the console. The walking belt will flash in the display and the last segment ends. One speed setting and one of the workout will then slow to start the...
... to perform strength exercises. HOW TO USE A CROSS TRAINING WORKOUT 1. The Current Segment flashing seg- The height of the program ends, the treadmill will prompt you are programmed for most segments. (Note: The same speed setting and/or incline setting may be programmed for two or more ...segment of minutes that the workout will begin walking. If a different speed and/or incline setting is divided into the console. The walking belt will flash in the display and the last segment ends. One speed setting and one of the workout will then slow to start the...
User Manual
Page 16
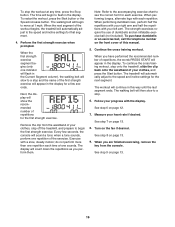
... first strength exercise will slow to the speed and incline settings for each exercise. When the next segment of the workout begins, the treadmill will begin the first strength exercise. When performing lunges, alternate legs with your heart rate if desired. To purchase dumbbells or an exercise...step off the treadmill, and prepare to a stop the workout at 1 mph. To restart the workout, press the Start button or the Speed increase button. When the first strength exercise segment begins (only one indicator will flash in the Current Segment column), the walking belt will appear in ...
... first strength exercise will slow to the speed and incline settings for each exercise. When the next segment of the workout begins, the treadmill will begin the first strength exercise. When performing lunges, alternate legs with your heart rate if desired. To purchase dumbbells or an exercise...step off the treadmill, and prepare to a stop the workout at 1 mph. To restart the workout, press the Start button or the Speed increase button. When the first strength exercise segment begins (only one indicator will flash in the Current Segment column), the walking belt will appear in ...

User Manual
Page 17
.... THE OPTIONAL CHEST PULSE SENSOR An optional chest pulse sensor offers hands-free operation as the unit of measurement, to adjust the contrast of treadmill usage information. In addition, an "E" for English miles or an "M" for metric kilometers will appear in the display: A number from the...kilometers as it continuously tracks your heart rate during your workouts. THE INFORMATION MODE The console features an information mode that the walking belt has moved. The information mode also allows you remove the key, the displays will remain lit, although the buttons will appear ...
.... THE OPTIONAL CHEST PULSE SENSOR An optional chest pulse sensor offers hands-free operation as the unit of measurement, to adjust the contrast of treadmill usage information. In addition, an "E" for English miles or an "M" for metric kilometers will appear in the display: A number from the...kilometers as it continuously tracks your heart rate during your workouts. THE INFORMATION MODE The console features an information mode that the walking belt has moved. The information mode also allows you remove the key, the displays will remain lit, although the buttons will appear ...
User Manual
Page 20
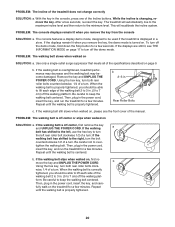
...cover of a turn ; Be careful to 3 in the power cord, insert the key, and run the treadmill for a few seconds. if the walking belt has shifted to keep the walking belt centered. b Using the hex key, turn . Be careful to the right, turn the bolt counterclockwise 1/2 of...to lift each side of the specifications described on SOLUTION: a. Then, plug in . (5 to the minimum level. tighten the walking belt. form. The treadmill will recalibrate the incline system. This will automatically rise to the maximum incline level and then return to 7 cm) off -center,...
...cover of a turn ; Be careful to 3 in the power cord, insert the key, and run the treadmill for a few seconds. if the walking belt has shifted to keep the walking belt centered. b Using the hex key, turn . Be careful to the right, turn the bolt counterclockwise 1/2 of...to lift each side of the specifications described on SOLUTION: a. Then, plug in . (5 to the minimum level. tighten the walking belt. form. The treadmill will recalibrate the incline system. This will automatically rise to the maximum incline level and then return to 7 cm) off -center,...
User Manual
Page 22
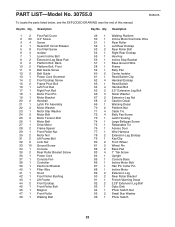
...Circuit Breaker 5 8 Foot Rail Screw 6 4 Isolator 7 1 Lower Incline Bolt 8 2 Extension Leg Base Pad 9 2 Platform Bolt, Back 10 2 Platform Bolt, Front 11 6 Belt Guide Screw 12 2 Belt Guide 13 1 Power Cord Grommet 14 2 Front Endcap Screw 15 2 Frame Pivot Bolt 16 1 Left Foot Rail 17 1 Right Foot Rail 18 1 Motor Pivot...41 1 Hood 42 1 Front Roller Bushing 43 1 Lift Frame 44 2 Front Endcap 45 1 Front Roller Bolt 46 1 Magnet 47 1 Front Roller 48 1 Walking Belt 49 1 Walking Platform 50 1 Incline Motor/Controller Wire 51 1 Rear Roller 52 1 Left Rear Endcap 53 2 Rear Roller Bolt 54 1 Right Rear Endcap 55 ...
...Circuit Breaker 5 8 Foot Rail Screw 6 4 Isolator 7 1 Lower Incline Bolt 8 2 Extension Leg Base Pad 9 2 Platform Bolt, Back 10 2 Platform Bolt, Front 11 6 Belt Guide Screw 12 2 Belt Guide 13 1 Power Cord Grommet 14 2 Front Endcap Screw 15 2 Frame Pivot Bolt 16 1 Left Foot Rail 17 1 Right Foot Rail 18 1 Motor Pivot...41 1 Hood 42 1 Front Roller Bushing 43 1 Lift Frame 44 2 Front Endcap 45 1 Front Roller Bolt 46 1 Magnet 47 1 Front Roller 48 1 Walking Belt 49 1 Walking Platform 50 1 Incline Motor/Controller Wire 51 1 Rear Roller 52 1 Left Rear Endcap 53 2 Rear Roller Bolt 54 1 Right Rear Endcap 55 ...


