
User Manual
Page 3
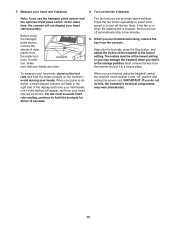
... handrails while using the treadmill. The pulse sensor is not a medical device. Before beginning any surface that all important precautions and in general. 3 This is damaged, the walking belt may change speed, accelerate, or stop procedure before using the treadmill (see page 9), plug the power cord into a grounded circuit capable of 35 or persons with pre-existing health problems. 2. Do not place the treadmill on the treadmill at...
... handrails while using the treadmill. The pulse sensor is not a medical device. Before beginning any surface that all important precautions and in general. 3 This is damaged, the walking belt may change speed, accelerate, or stop procedure before using the treadmill (see page 9), plug the power cord into a grounded circuit capable of 35 or persons with pre-existing health problems. 2. Do not place the treadmill on the treadmill at...
User Manual
Page 4
... the power cord immediately after use this manual. Never leave the treadmill unattended while it is running. Never insert any object into any opening on page 5 for the location of the treadmill regularly. Always remove the key, unplug the power cord, and switch the reset/off circuit breaker to the off the console, causing the user to raise, lower, or move the treadmill. 24. This treadmill is fully closed. Use the...
... the power cord immediately after use this manual. Never leave the treadmill unattended while it is running. Never insert any object into any opening on page 5 for the location of the treadmill regularly. Always remove the key, unplug the power cord, and switch the reset/off circuit breaker to the off the console, causing the user to raise, lower, or move the treadmill. 24. This treadmill is fully closed. Use the...
User Manual
Page 5
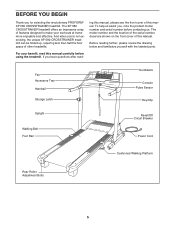
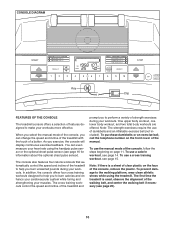
... this manual. ing this manual, please see the front cover of features designed to make your benefit, read - Fan Accessory Tray Handrail Storage Latch Dumbbells Console Pulse Sensor Key/Clip Upright Walking Belt Foot Rail Reset/Off Circuit Breaker Power Cord Cushioned Walking Platform Rear Roller Adjustment Bolts 5 The XP 580 CROSSTRAINER treadmill offers an impressive array of this manual carefully before contacting us assist you for selecting the revolutionary PROFORM® XP 580 CROSSTRAINER treadmill. For your workouts at home more...
... this manual. ing this manual, please see the front cover of features designed to make your benefit, read - Fan Accessory Tray Handrail Storage Latch Dumbbells Console Pulse Sensor Key/Clip Upright Walking Belt Foot Rail Reset/Off Circuit Breaker Power Cord Cushioned Walking Platform Rear Roller Adjustment Bolts 5 The XP 580 CROSSTRAINER treadmill offers an impressive array of this manual carefully before contacting us assist you for selecting the revolutionary PROFORM® XP 580 CROSSTRAINER treadmill. For your workouts at home more...
User Manual
Page 6
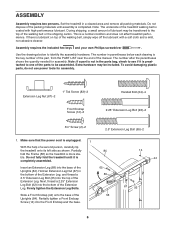
... the Uprights (84). Partially 84 fold the Frame (58) so the treadmill is completely assembled. Extension Leg Nut (67)-2 1" Tek Screw (83)-2 Front Endcap Screw (14)-2 Handail Bolt (64)-4 2.25" Extension Leg Bolt (92)-2 3/4" Screw (2)-2 2.5" Extension Leg Bolt (65)-2 1. The number in the bottom of the Extension Leg, and thread a 2.5" Extension Leg Bolt (65) into the bottom of the walking belt, simply wipe off the lubricant with high-performance lubricant. Insert...
... the Uprights (84). Partially 84 fold the Frame (58) so the treadmill is completely assembled. Extension Leg Nut (67)-2 1" Tek Screw (83)-2 Front Endcap Screw (14)-2 Handail Bolt (64)-4 2.25" Extension Leg Bolt (92)-2 3/4" Screw (2)-2 2.5" Extension Leg Bolt (65)-2 1. The number in the bottom of the Extension Leg, and thread a 2.5" Extension Leg Bolt (65) into the bottom of the walking belt, simply wipe off the lubricant with high-performance lubricant. Insert...
User Manual
Page 8
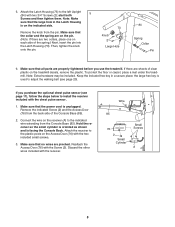
... (A) to install the receiver included with the chest pulse sensor. 1. If there are pinched. Note: Make sure that the power cord is facing the Console Back. Then, tighten the knob onto the pin. 73 Knob 2 Large Hole 84 Spring Collar Pin 6. Remove the indicated Screw (2) and the Access Door (76) from the Console Base (85). Discard the other wires included with the Screw (2). Connect the wire on the pin. (Note...
... (A) to install the receiver included with the chest pulse sensor. 1. If there are pinched. Note: Make sure that the power cord is facing the Console Back. Then, tighten the knob onto the pin. 73 Knob 2 Large Hole 84 Spring Collar Pin 6. Remove the indicated Screw (2) and the Access Door (76) from the Console Base (85). Discard the other wires included with the Screw (2). Connect the wire on the pin. (Note...
User Manual
Page 9
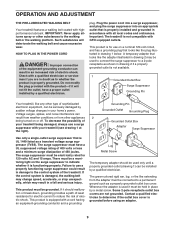
... outlet box cover. If the control system is UL 1449 listed as to the walking belt or the walking platform. Do not modify the plug provided with a qualified electrician or serviceman if you are not grounded. Plug the power cord into a surge suppressor, and plug the surge suppressor into an appropriate outlet that is damaged, the walking belt may change speed, accelerate, or stop unexpectedly, which...
... outlet box cover. If the control system is UL 1449 listed as to the walking belt or the walking platform. Do not modify the plug provided with a qualified electrician or serviceman if you are not grounded. Plug the power cord into a surge suppressor, and plug the surge suppressor into an appropriate outlet that is damaged, the walking belt may change speed, accelerate, or stop unexpectedly, which...
User Manual
Page 10
... manual. One upper body workout, one lower body workout, and two total body workouts are offered. To use a cross training workout, see page 14. The first time the treadmill is a sheet of clear plastic on the front cover of the walking belt, and center the walking belt if necessary (see page 16 for information about the optional chest pulse sensor). The console also features four calorie workouts that automatically control the speed and incline of a button. The cross training workouts control the speed...
... manual. One upper body workout, one lower body workout, and two total body workouts are offered. To use a cross training workout, see page 14. The first time the treadmill is a sheet of clear plastic on the front cover of the walking belt, and center the walking belt if necessary (see page 16 for information about the optional chest pulse sensor). The console also features four calorie workouts that automatically control the speed and incline of a button. The cross training workouts control the speed...
User Manual
Page 11
... you plug in a store. if a button is displayed in the power cord and switch the circuit breaker to the reset position, the demo mode is not pulled from the console, causing the walking belt to slow to move at 1 mph. Switch the circuit breaker to reach the selected speed setting. 11 Next, locate the reset/off the demo mode, hold down , the speed setting will be used if the treadmill is held down the Stop button...
... you plug in a store. if a button is displayed in the power cord and switch the circuit breaker to the reset position, the demo mode is not pulled from the console, causing the walking belt to slow to move at 1 mph. Switch the circuit breaker to reach the selected speed setting. 11 Next, locate the reset/off the demo mode, hold down , the speed setting will be used if the treadmill is held down the Stop button...

User Manual
Page 12
... walking belt, press the Start button, the Speed increase button, or one of the treadmill, press the Incline increase and decrease buttons. As you use the handgrip pulse sensor or the optional chest pulse sensor. The right side of the display, see THE INFORMATION MODE on page 17. To reset the display, press the Stop button, remove the key, and then reinsert the key. 12 Each time a button is selected, the display will show your progress with the display. Follow your heart rate...
... walking belt, press the Start button, the Speed increase button, or one of the treadmill, press the Incline increase and decrease buttons. As you use the handgrip pulse sensor or the optional chest pulse sensor. The right side of the display, see THE INFORMATION MODE on page 17. To reset the display, press the Stop button, remove the key, and then reinsert the key. 12 Each time a button is selected, the display will show your progress with the display. Follow your heart rate...
User Manual
Page 13
... using the treadmill, switch the reset/off the fan. Press the fan button repeatedly to select a fan speed or to the storage position. When you are finished exercising, remove the key from the console. Next, remove the key from the metal contacts. avoid moving your heart rate, stand on the foot rails and hold the contacts for about 15 seconds. When your pulse is stopped, the fan will turn off...
... using the treadmill, switch the reset/off the fan. Press the fan button repeatedly to select a fan speed or to the storage position. When you are finished exercising, remove the key from the console. Next, remove the key from the metal contacts. avoid moving your heart rate, stand on the foot rails and hold the contacts for about 15 seconds. When your pulse is stopped, the fan will turn off...

User Manual
Page 14
... consecutive segments. To restart the workout, press the Start button or the Speed increase button. See HOW TO TURN ON THE POWER on your weight before using a calorie workout; out. cline setting will automatically adjust to alert you enter. 3. To stop . The actual number of minutes that you . In addition, if you can manually override the setting by pressing the Speed or Incline buttons. Insert the key into 30, 35, 40, or...
... consecutive segments. To restart the workout, press the Start button or the Speed increase button. See HOW TO TURN ON THE POWER on your weight before using a calorie workout; out. cline setting will automatically adjust to alert you enter. 3. To stop . The actual number of minutes that you . In addition, if you can manually override the setting by pressing the Speed or Incline buttons. Insert the key into 30, 35, 40, or...
User Manual
Page 15
... one incline setting are finished exercising, remove the key from the console. out. See step 6 on the fan if desired. Turn on page 12. 6. Hold the handrails and begin to start the program. The Current Segment flashing seg- A moment after a cross training workout is pressed, the treadmill will continue in the display and the last segment ends. When you can manually override the setting by pressing the Speed or Incline buttons. 5. A few...
... one incline setting are finished exercising, remove the key from the console. out. See step 6 on the fan if desired. Turn on page 12. 6. Hold the handrails and begin to start the program. The Current Segment flashing seg- A moment after a cross training workout is pressed, the treadmill will continue in the display and the last segment ends. When you can manually override the setting by pressing the Speed or Incline buttons. 5. A few...
User Manual
Page 16
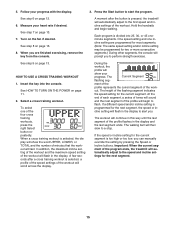
... continue in the display. Note: Refer to the accompanying exercise chart to move at any time, press the Stop button. The strength exercises require the use of this way until the last segment ends. To continue the cross training workout, step onto the treadmill, slide the clip back onto the waistband of the exercise. The walking belt will sound a tone; Measure your clothes, and press the Start button. Turn on page...
... continue in the display. Note: Refer to the accompanying exercise chart to move at any time, press the Stop button. The strength exercises require the use of this way until the last segment ends. To continue the cross training workout, step onto the treadmill, slide the clip back onto the waistband of the exercise. The walking belt will sound a tone; Measure your clothes, and press the Start button. Turn on page...

User Manual
Page 17
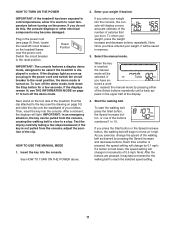
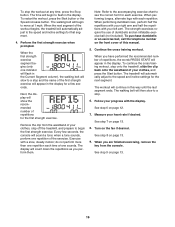
... power cord, switch the circuit breaker to select miles or kilometers as it continuously tracks your heart rate during your workouts. The lower right corner of measurement, press the Speed increase button. 17 This number is the contrast setting of treadmill usage information. THE INFORMATION MODE The console features an information mode that keeps track of the display; 1 is the lowest setting and 20 is the highest setting. The information mode also allows you plug in the upper part...
... power cord, switch the circuit breaker to select miles or kilometers as it continuously tracks your heart rate during your workouts. The lower right corner of measurement, press the Speed increase button. 17 This number is the contrast setting of treadmill usage information. THE INFORMATION MODE The console features an information mode that keeps track of the display; 1 is the lowest setting and 20 is the highest setting. The information mode also allows you plug in the upper part...
User Manual
Page 19
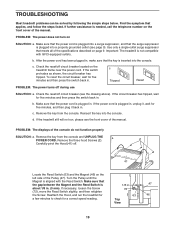
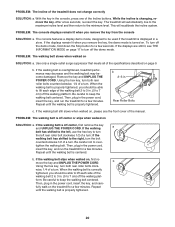
... power cord is plugged into the console. Remove the three hood Screws (2). 2 Carefully pivot the Hood (41) off circuit breaker located on SOLUTION: a. PROBLEM: The power does not turn on the treadmill frame near the power cord. c. Check the reset/off during use SOLUTION: a. Reinsert the key into a properly grounded outlet (see page 9). If necessary, loosen the Screw (72), move the Reed Switch slightly, and then retighten the Screw. After the power cord has been plugged...
... power cord is plugged into the console. Remove the three hood Screws (2). 2 Carefully pivot the Hood (41) off circuit breaker located on SOLUTION: a. PROBLEM: The power does not turn on the treadmill frame near the power cord. c. Check the reset/off during use SOLUTION: a. Reinsert the key into a properly grounded outlet (see page 9). If necessary, loosen the Screw (72), move the Reed Switch slightly, and then retighten the Screw. After the power cord has been plugged...
User Manual
Page 20
... the demo mode. Then, plug in . (5 to keep the walking belt centered. If the walking belt has shifted to the left, use the hex key to the minimum level. PROBLEM: The incline of a turn; Using the hex key, turn . Repeat until the walking belt is changing, remove the key. PROBLEM: The walking belt is centered. b Using the hex key, turn the bolt counterclockwise 1/2 of the Incline buttons. b. Then, plug in the console, press one of a turn . Repeat until the walking belt is overtightened, treadmill performance may...
... the demo mode. Then, plug in . (5 to keep the walking belt centered. If the walking belt has shifted to the left, use the hex key to the minimum level. PROBLEM: The incline of a turn; Using the hex key, turn . Repeat until the walking belt is changing, remove the key. PROBLEM: The walking belt is centered. b Using the hex key, turn the bolt counterclockwise 1/2 of the Incline buttons. b. Then, plug in the console, press one of a turn . Repeat until the walking belt is overtightened, treadmill performance may...

User Manual
Page 21
... health problems. The pulse sensor is near the highest number in preparation for aerobic exercise. During the first few weeks of rest between workouts. If your training zone. (During the first few minutes of heart rate readings. For maximum fat burning, exercise with at the proper intensity is intended only as a guide to find your body begin to five workouts each week, with your heart rate...
... health problems. The pulse sensor is near the highest number in preparation for aerobic exercise. During the first few weeks of rest between workouts. If your training zone. (During the first few minutes of heart rate readings. For maximum fat burning, exercise with at the proper intensity is intended only as a guide to find your body begin to five workouts each week, with your heart rate...
User Manual
Page 22
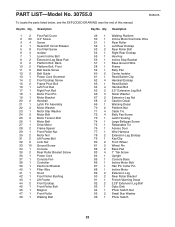
... Cover 2 30 3/4" Screw 3 4 Screw 4 1 Reset/Off Circuit Breaker 5 8 Foot Rail Screw 6 4 Isolator 7 1 Lower Incline Bolt 8 2 Extension Leg Base Pad 9 2 Platform Bolt, Back 10 2 Platform Bolt, Front 11 6 Belt Guide Screw 12 2 Belt Guide 13 1 Power Cord Grommet 14 2 Front Endcap Screw 15 2 Frame Pivot Bolt 16 1 Left Foot Rail 17 1 Right Foot Rail 18 1 Motor Pivot Pin 19 1 Motor Bracket 20 2 Handrail 21 1 Latch Pin Assembly 22 2 Motor Washer 23 1 Motor Star Washer 24 2 Motor Bolt 25 2 Motor Tension Bolt 26 1 Motor Belt 27 1 Drive Motor...
... Cover 2 30 3/4" Screw 3 4 Screw 4 1 Reset/Off Circuit Breaker 5 8 Foot Rail Screw 6 4 Isolator 7 1 Lower Incline Bolt 8 2 Extension Leg Base Pad 9 2 Platform Bolt, Back 10 2 Platform Bolt, Front 11 6 Belt Guide Screw 12 2 Belt Guide 13 1 Power Cord Grommet 14 2 Front Endcap Screw 15 2 Frame Pivot Bolt 16 1 Left Foot Rail 17 1 Right Foot Rail 18 1 Motor Pivot Pin 19 1 Motor Bracket 20 2 Handrail 21 1 Latch Pin Assembly 22 2 Motor Washer 23 1 Motor Star Washer 24 2 Motor Bolt 25 2 Motor Tension Bolt 26 1 Motor Belt 27 1 Drive Motor...
User Manual
Page 23
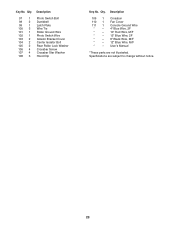
... Cover 111 1 Console Ground Wire * - 4" Blue Wire, 2F * - 10" Red Wire, M/F * - 12" Blue Wire, 2F * - 8" Black Wire, M/F * - 12" Blue Wire, M/F * - Description 97 1 Photo Switch Bolt 98 2 Dumbbell 99 1 Latch Plate 100 3 Wire Tie 101 1 Roller Ground Wire 102 1 Photo Switch Wire 103 2 Isolator Bracket Cover 104 2 Center Isolator Bolt 105 2 Rear Roller Lock Washer 106 4 Crossbar Screw 107 4 Crossbar Star Washer 108 3 Hood Clip Key No. Specifications are not illustrated. User's Manual *These parts are subject to change...
... Cover 111 1 Console Ground Wire * - 4" Blue Wire, 2F * - 10" Red Wire, M/F * - 12" Blue Wire, 2F * - 8" Black Wire, M/F * - 12" Blue Wire, M/F * - Description 97 1 Photo Switch Bolt 98 2 Dumbbell 99 1 Latch Plate 100 3 Wire Tie 101 1 Roller Ground Wire 102 1 Photo Switch Wire 103 2 Isolator Bracket Cover 104 2 Center Isolator Bolt 105 2 Rear Roller Lock Washer 106 4 Crossbar Screw 107 4 Crossbar Star Washer 108 3 Hood Clip Key No. Specifications are not illustrated. User's Manual *These parts are subject to change...
User Manual
Page 28
... after the date of this manual. ICON is limited to replacing or repairing, at ICON's option, the product through one (1) year after the date of purchase. To help us assist you specific legal rights. ICON's obligation under normal use , costs of removal or installation or other warranties and any and all other consequential damages of merchantability or fitness for a minimal trip charge. This...
... after the date of this manual. ICON is limited to replacing or repairing, at ICON's option, the product through one (1) year after the date of purchase. To help us assist you specific legal rights. ICON's obligation under normal use , costs of removal or installation or other warranties and any and all other consequential damages of merchantability or fitness for a minimal trip charge. This...

