
English Manual
Page 1
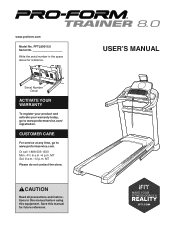
... to www.proformservice.com. MT Please do not contact the store. CAUTION Read all precautions and instructions in the space above for future reference. USER'S MANUAL PFTL89015.0 Serial No. Write the serial number in this manual before using this manual for reference. www.proform.com Model No. MT Sat. 8 a.m.-12 p.m. Save this equipment.
... to www.proformservice.com. MT Please do not contact the store. CAUTION Read all precautions and instructions in the space above for future reference. USER'S MANUAL PFTL89015.0 Serial No. Write the serial number in this manual before using this manual for reference. www.proform.com Model No. MT Sat. 8 a.m.-12 p.m. Save this equipment.

English Manual
Page 2
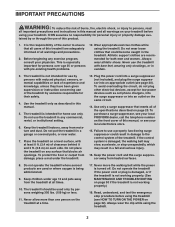
... 2 IMPORTANT PRECAUTIONS 3 BEFORE YOU BEGIN 7 PART IDENTIFICATION CHART 8 ASSEMBLY 9 HOW TO USE THE TREADMILL 20 FCC INFORMATION 28 HOW TO FOLD AND MOVE THE TREADMILL 29 MAINTENANCE AND TROUBLESHOOTING 30 EXERCISE GUIDELINES 32 PART LIST 34 EXPLODED DRAWING 36 ORDERING REPLACEMENT PARTS Back cover...or registered trademark of Apple Inc., registered in the U.S. Note: The decals may not be shown at actual size. and other countries. PROFORM is missing or illegible, call the telephone number on the front cover of ICON Health & Fitness, Inc. 2 If a decal is a ...
... 2 IMPORTANT PRECAUTIONS 3 BEFORE YOU BEGIN 7 PART IDENTIFICATION CHART 8 ASSEMBLY 9 HOW TO USE THE TREADMILL 20 FCC INFORMATION 28 HOW TO FOLD AND MOVE THE TREADMILL 29 MAINTENANCE AND TROUBLESHOOTING 30 EXERCISE GUIDELINES 32 PART LIST 34 EXPLODED DRAWING 36 ORDERING REPLACEMENT PARTS Back cover...or registered trademark of Apple Inc., registered in the U.S. Note: The decals may not be shown at actual size. and other countries. PROFORM is missing or illegible, call the telephone number on the front cover of ICON Health & Fitness, Inc. 2 If a decal is a ...
English Manual
Page 3
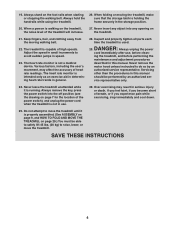
... a fall and serious injury. 16. It is being administered. 9. Do not wear loose clothes that all users of this manual and all times. 10. The treadmill is especially important for home use of clearance behind it and 2 ft. (0.6 m) on the same circuit. 14. Do ... appropriate exercise clothes while using the treadmill. 3 The treadmill is turned off. Place the treadmill on page 22). Read, understand, and test the emergency stop unexpectedly, which may slow, accelerate, or stop procedure before using the treadmill (see your local PROFORM dealer, call the telephone number on...
... a fall and serious injury. 16. It is being administered. 9. Do not wear loose clothes that all users of this manual and all times. 10. The treadmill is especially important for home use of clearance behind it and 2 ft. (0.6 m) on the same circuit. 14. Do ... appropriate exercise clothes while using the treadmill. 3 The treadmill is turned off. Place the treadmill on page 22). Read, understand, and test the emergency stop unexpectedly, which may slow, accelerate, or stop procedure before using the treadmill (see your local PROFORM dealer, call the telephone number on...
English Manual
Page 4
... rate monitor is capable of the power switch), and unplug the power cord when the treadmill is running. ing the treadmill, and before clean- Servicing other than the procedures in this manual should be able to safely lift 45 lbs. (20 kg) to raise, lower,...performing the maintenance and adjustment procedures described in this manual. Various factors, including the user's movement, may result in the storage position. 20. Do not attempt to move the treadmill. 19. Always hold the handrails while using the treadmill. 26. When folding or moving walking belt. ...
... rate monitor is capable of the power switch), and unplug the power cord when the treadmill is running. ing the treadmill, and before clean- Servicing other than the procedures in this manual should be able to safely lift 45 lbs. (20 kg) to raise, lower,...performing the maintenance and adjustment procedures described in this manual. Various factors, including the user's movement, may result in the storage position. 20. Do not attempt to move the treadmill. 19. Always hold the handrails while using the treadmill. 26. When folding or moving walking belt. ...
English Manual
Page 7
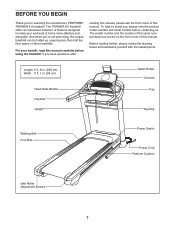
..., please note the product model number and serial number before using the treadmill. To help us . The TRAINER 8.0 treadmill offers an impressive selection of features designed to make your benefit, read this manual. The model number and the location of the serial number decal are...the drawing below and familiarize yourself with the labeled parts. For your workouts at home more effective and enjoyable. If you for selecting the revolutionary PROFORM® TRAINER 8.0 treadmill. Length: 6 ft. 8 in. (203 cm) Width: 3 ft. 1 in. (94 cm) Heart Rate Monitor Handrail Upright Tablet...
..., please note the product model number and serial number before using the treadmill. To help us . The TRAINER 8.0 treadmill offers an impressive selection of features designed to make your benefit, read this manual. The model number and the location of the serial number decal are...the drawing below and familiarize yourself with the labeled parts. For your workouts at home more effective and enjoyable. If you for selecting the revolutionary PROFORM® TRAINER 8.0 treadmill. Length: 6 ft. 8 in. (203 cm) Width: 3 ft. 1 in. (94 cm) Heart Rate Monitor Handrail Upright Tablet...

English Manual
Page 8
... is not in parentheses below to see whether it is the key number of the part, from the PART LIST near the end of this manual. PART IDENTIFICATION CHART Use the drawings below each drawing is preattached. The number in the hardware kit, check to identify small parts used for assembly...
... is not in parentheses below to see whether it is the key number of the part, from the PART LIST near the end of this manual. PART IDENTIFICATION CHART Use the drawings below each drawing is preattached. The number in the hardware kit, check to identify small parts used for assembly...
English Manual
Page 9
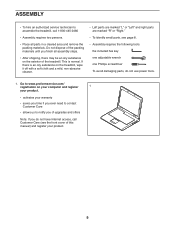
... is an oily substance on the treadmill, wipe it off with a soft cloth and a mild, non-abrasive cleaner. • Left parts are marked "L" or "Left" and right parts are marked "R" or "Right." • To identify small parts, see the front cover of this manual) and register your warranty • saves you time...
... is an oily substance on the treadmill, wipe it off with a soft cloth and a mild, non-abrasive cleaner. • Left parts are marked "L" or "Left" and right parts are marked "R" or "Right." • To identify small parts, see the front cover of this manual) and register your warranty • saves you time...

English Manual
Page 20
...appliances being turned on the same circuit. If you are not grounded. Some 2-pole receptacle outlet box covers are unsure whether the treadmill is properly grounded, contact a qualified electrician. Use only a surge suppressor that is properly installed and grounded in accordance with a metal...all local codes and ordinances. To purchase a surge suppressor, see precaution 14 on this manual to purchase an arc filter. 1 Grounded Outlet Grounding Pin Grounding Pin Surge Suppressor The treadmill must be grounded. The surge suppressor must have a proper outlet installed by a qualified ...
...appliances being turned on the same circuit. If you are not grounded. Some 2-pole receptacle outlet box covers are unsure whether the treadmill is properly grounded, contact a qualified electrician. Use only a surge suppressor that is properly installed and grounded in accordance with a metal...all local codes and ordinances. To purchase a surge suppressor, see precaution 14 on this manual to purchase an arc filter. 1 Grounded Outlet Grounding Pin Grounding Pin Surge Suppressor The treadmill must be grounded. The surge suppressor must have a proper outlet installed by a qualified ...
English Manual
Page 21
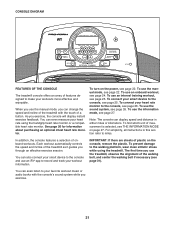
...heart rate monitor. You can change the speed and incline of the treadmill with the console's sound system while you use the manual mode, see page 25. To turn on the console, remove the plastic. To use the treadmill, observe the alignment of the walking belt, and center the walking...all instructions in either miles or kilometers. To use the sound system, see page 24. In addition, the console features a selection of the treadmill as it guides you exercise, the console will display instant exercise feedback. The first time you exercise. 21 CONSOLE DIAGRAM FEATURES OF ...
...heart rate monitor. You can change the speed and incline of the treadmill with the console's sound system while you use the manual mode, see page 25. To turn on the console, remove the plastic. To use the treadmill, observe the alignment of the walking belt, and center the walking...all instructions in either miles or kilometers. To use the sound system, see page 24. In addition, the console features a selection of the treadmill as it guides you exercise, the console will display instant exercise feedback. The first time you exercise. 21 CONSOLE DIAGRAM FEATURES OF ...
English Manual
Page 22
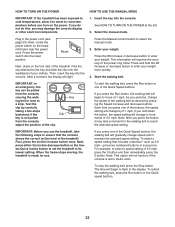
HOW TO TURN ON THE POWER HOW TO USE THE MANUAL MODE IMPORTANT: If the treadmill has been exposed to cold temperatures, allow it to warm to move at ... Quick Incline button to set to reach the selected speed setting. When the frame stops moving, the treadmill is set the treadmill to a stop the walking belt, press the Stop button. If you do not do this, you... hold the Wt increase or decrease button to enter your weight. Select the manual mode. Reset Next, stand on the treadmill frame ...
HOW TO TURN ON THE POWER HOW TO USE THE MANUAL MODE IMPORTANT: If the treadmill has been exposed to cold temperatures, allow it to warm to move at ... Quick Incline button to set to reach the selected speed setting. When the frame stops moving, the treadmill is set the treadmill to a stop the walking belt, press the Stop button. If you do not do this, you... hold the Wt increase or decrease button to enter your weight. Select the manual mode. Reset Next, stand on the treadmill frame ...
English Manual
Page 24
...Measure your weight. Turn on page 22. Press the Run button to the first speed and incline settings of the workout begins, the treadmill will automatically adjust to start the workout. Insert the key into segments. See step 6 on page 23. 7. Hold the handrails and begin to...console. To resume the workout, press the Run button or the Speed increase button. See step 7 on page 23. A moment after you can manually override the setting by pressing the Speed or Incline buttons; See step 9 on page 23. Follow your progress with the display. See step 8...
...Measure your weight. Turn on page 22. Press the Run button to the first speed and incline settings of the workout begins, the treadmill will automatically adjust to start the workout. Insert the key into segments. See step 6 on page 23. 7. Hold the handrails and begin to...console. To resume the workout, press the Run button or the Speed increase button. See step 7 on page 23. A moment after you can manually override the setting by pressing the Speed or Incline buttons; See step 9 on page 23. Follow your progress with the display. See step 8...

English Manual
Page 26
... level using a personal CD player and the CD skips, set the CD player on the floor or another flat surface instead of this manual. Record and track your workout information. 4. To disconnect your smart device from the console, press and hold the Bluetooth button on the console for 5 seconds...
... level using a personal CD player and the CD skips, set the CD player on the floor or another flat surface instead of this manual. Record and track your workout information. 4. To disconnect your smart device from the console, press and hold the Bluetooth button on the console for 5 seconds...
English Manual
Page 30
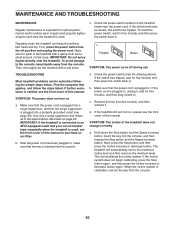
.... To avoid damage to reduce wear. Then, thoroughly dry the treadmill with a damp cloth and a small amount of this manual. c Tripped Reset SYMPTOM: The power turns off position and unplug the power cord. a. b. The treadmill will automatically rise to the maximum incline level and then return to...a. Remove the key from the console. 30 Inspect and properly tighten all of this manual to the minimum level. IMPORTANT: Do not spray liquids directly onto the treadmill. SYMPTOM: The incline of this manual. After the power cord has been plugged in, make sure that the power cord ...
.... To avoid damage to reduce wear. Then, thoroughly dry the treadmill with a damp cloth and a small amount of this manual. c Tripped Reset SYMPTOM: The power turns off position and unplug the power cord. a. b. The treadmill will automatically rise to the maximum incline level and then return to...a. Remove the key from the console. 30 Inspect and properly tighten all of this manual to the minimum level. IMPORTANT: Do not spray liquids directly onto the treadmill. SYMPTOM: The incline of this manual. After the power cord has been plugged in, make sure that the power cord ...
English Manual
Page 31
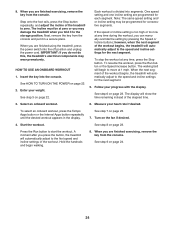
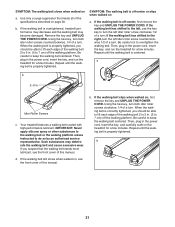
...centered. Repeat until the walking belt is off the walking platform. Then, plug in the power cord, insert the key, and run the treadmill for a few minutes. SYMPTOM: The walking belt slows when walked on page 20. b. If the walking belt is properly tightened. Using ...the hex key, turn both idler roller screws clockwise, 1/4 of this manual. Your treadmill features a walking belt coated with high-performance lubricant. Use only a surge suppressor that the walking belt needs more lubricant, see the front ...
...centered. Repeat until the walking belt is off the walking platform. Then, plug in the power cord, insert the key, and run the treadmill for a few minutes. SYMPTOM: The walking belt slows when walked on page 20. b. If the walking belt is properly tightened. Using ...the hex key, turn both idler roller screws clockwise, 1/4 of this manual. Your treadmill features a walking belt coated with high-performance lubricant. Use only a surge suppressor that the walking belt needs more lubricant, see the front ...

English Manual
Page 35
... 116 4 * - Left Inner Base Cover Right Inner Base Cover Left Speaker Grill Right Speaker Grill Speaker Left Speaker Cover Right Speaker Cover #6 x 1/2" Screw #3 x 1/4" Screw User's Manual Note: Specifications are not illustrated. 35 Qty. For information about ordering replacement parts, see the back cover of this...
... 116 4 * - Left Inner Base Cover Right Inner Base Cover Left Speaker Grill Right Speaker Grill Speaker Left Speaker Cover Right Speaker Cover #6 x 1/2" Screw #3 x 1/4" Screw User's Manual Note: Specifications are not illustrated. 35 Qty. For information about ordering replacement parts, see the back cover of this...
English Manual
Page 40
... us: • the model number and serial number of the product (see the front cover of this manual) • the name of the product (see the front cover of this manual) • the key number and description of the replacement part(s) (see the PART LIST and the EXPLODED...to the customer. damages with the use and service conditions. Accordingly, the above limitation may have other warranty beyond that vary from defects in this manual. ICON Health & Fitness, Inc. (ICON) warrants this product to any kind. The warranty extended hereunder is used for three (3) years from the...
... us: • the model number and serial number of the product (see the front cover of this manual) • the name of the product (see the front cover of this manual) • the key number and description of the replacement part(s) (see the PART LIST and the EXPLODED...to the customer. damages with the use and service conditions. Accordingly, the above limitation may have other warranty beyond that vary from defects in this manual. ICON Health & Fitness, Inc. (ICON) warrants this product to any kind. The warranty extended hereunder is used for three (3) years from the...


