

English Manual
Page 2
... 7 PART IDENTIFICATION CHART 8 ASSEMBLY 9 HOW TO USE THE TREADMILL 20 FCC INFORMATION 28 HOW TO FOLD AND MOVE THE TREADMILL 29 MAINTENANCE AND TROUBLESHOOTING 30 EXERCISE GUIDELINES 32 PART LIST 34 EXPLODED DRAWING 36 ORDERING REPLACEMENT PARTS Back cover LIMITED WARRANTY Back Cover WARNING DECAL PLACEMENT This drawing shows the locations of this manual and request a free replacement decal. Note: The decals may not be shown at actual size. PROFORM is a trademark or registered trademark of ICON Health & Fitness...
... 7 PART IDENTIFICATION CHART 8 ASSEMBLY 9 HOW TO USE THE TREADMILL 20 FCC INFORMATION 28 HOW TO FOLD AND MOVE THE TREADMILL 29 MAINTENANCE AND TROUBLESHOOTING 30 EXERCISE GUIDELINES 32 PART LIST 34 EXPLODED DRAWING 36 ORDERING REPLACEMENT PARTS Back cover LIMITED WARRANTY Back Cover WARNING DECAL PLACEMENT This drawing shows the locations of this manual and request a free replacement decal. Note: The decals may not be shown at actual size. PROFORM is a trademark or registered trademark of ICON Health & Fitness...
English Manual
Page 3
... surge suppressor away from moisture and dust. The treadmill should be used or where oxygen is damaged, the walking belt may slow, accelerate, or stop procedure before using the treadmill (see your treadmill. Do not operate the treadmill if the power cord or plug is damaged, or if the treadmill is not working properly. (See MAINTENANCE AND TROUBLESHOOTING on page 20. Read, understand, and test the...
... surge suppressor away from moisture and dust. The treadmill should be used or where oxygen is damaged, the walking belt may slow, accelerate, or stop procedure before using the treadmill (see your treadmill. Do not operate the treadmill if the power cord or plug is damaged, or if the treadmill is not working properly. (See MAINTENANCE AND TROUBLESHOOTING on page 20. Read, understand, and test the...
English Manual
Page 4
... instructed to avoid sudden jumps in small increments to do so by an authorized ser- Never leave the treadmill unattended while it is running. Always unplug the power cord immediately after use . 30. When folding or moving walking belt. 22. Adjust the speed in speed. 23. Do not attempt to move the treadmill. Always remove the key, press the power switch into any opening on the foot rails when starting or stopping...
... instructed to avoid sudden jumps in small increments to do so by an authorized ser- Never leave the treadmill unattended while it is running. Always unplug the power cord immediately after use . 30. When folding or moving walking belt. 22. Adjust the speed in speed. 23. Do not attempt to move the treadmill. Always remove the key, press the power switch into any opening on the foot rails when starting or stopping...
English Manual
Page 7
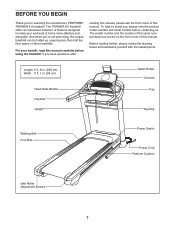
...) Heart Rate Monitor Handrail Upright Tablet Holder Console Tray Key/Clip Walking Belt Foot Rail Power Switch Power Cord Platform Cushion Idler Roller Adjustment Screws 7 If you for selecting the revolutionary PROFORM® TRAINER 8.0 treadmill. The model number and the location of the serial number decal are shown on the front cover of this manual. For your workouts at home more effective and enjoyable. Before reading further, please review the drawing below and familiarize yourself with the labeled parts...
...) Heart Rate Monitor Handrail Upright Tablet Holder Console Tray Key/Clip Walking Belt Foot Rail Power Switch Power Cord Platform Cushion Idler Roller Adjustment Screws 7 If you for selecting the revolutionary PROFORM® TRAINER 8.0 treadmill. The model number and the location of the serial number decal are shown on the front cover of this manual. For your workouts at home more effective and enjoyable. Before reading further, please review the drawing below and familiarize yourself with the labeled parts...

English Manual
Page 13
... (86); See the inset drawing. Connect the pulse wires (G, H). Attach the console assembly (F) with the four 1/4" x 1/2" Screws (4) that you removed in step 8 and four 1/4" Star Washers (27); Remove and save the four 1/4" x 1/2" Screws (4). 8 4 F 4 9. do not pinch any wires. Hold the console assembly (F) near the Pulse Crossbar (93). do not fully tighten the Screws yet. 9 F 86 27 4 G 86 93 H 27 4 G H 13 Next, set the console assembly (F) on the brackets on a soft...
... (86); See the inset drawing. Connect the pulse wires (G, H). Attach the console assembly (F) with the four 1/4" x 1/2" Screws (4) that you removed in step 8 and four 1/4" Star Washers (27); Remove and save the four 1/4" x 1/2" Screws (4). 8 4 F 4 9. do not pinch any wires. Hold the console assembly (F) near the Pulse Crossbar (93). do not fully tighten the Screws yet. 9 F 86 27 4 G 86 93 H 27 4 G H 13 Next, set the console assembly (F) on the brackets on a soft...

English Manual
Page 14
Then, remove the wire tie from the Upright Wire. Pull the tie (I 81 11. F 50 14 10. Connect the Upright Wire (81) to the console wire (J). If they do not, turn one connector and try again. F J I ) tight around the Upright Wire (81) and cut off the end of the console assembly (F) in the location 11 shown. Tighten two #8 x 1" Screws (50) into place. The connectors should slide together easily...
Then, remove the wire tie from the Upright Wire. Pull the tie (I 81 11. F 50 14 10. Connect the Upright Wire (81) to the console wire (J). If they do not, turn one connector and try again. F J I ) tight around the Upright Wire (81) and cut off the end of the console assembly (F) in the location 11 shown. Tighten two #8 x 1" Screws (50) into place. The connectors should slide together easily...

English Manual
Page 19
... plastic. Keep the included hex keys in the console assembly (F). Do not overtighten the Machine Screws. Make sure that all parts are sheets of direct sunlight. Tip: Start the two upper Machine Screws first, and then start the two lower Machine Screws. To protect the floor or carpet, place a mat under the treadmill. To avoid damage to adjust the walking belt (see page 31). 20. Do...
... plastic. Keep the included hex keys in the console assembly (F). Do not overtighten the Machine Screws. Make sure that all parts are sheets of direct sunlight. Tip: Start the two upper Machine Screws first, and then start the two lower Machine Screws. To protect the floor or carpet, place a mat under the treadmill. To avoid damage to adjust the walking belt (see page 31). 20. Do...

English Manual
Page 20
... available. 2 2-pole Receptacle Adapter Lug Metal Screw The lug or wire extending from other appliances being turned on this manual to a 2-pole receptacle if a properly grounded outlet is properly installed and grounded in damage to users. IMPORTANT: If the treadmill is connected to indicate whether it should be used , see the front cover of electric shock. Plug the power cord into a surge suppressor, and...
... available. 2 2-pole Receptacle Adapter Lug Metal Screw The lug or wire extending from other appliances being turned on this manual to a 2-pole receptacle if a properly grounded outlet is properly installed and grounded in damage to users. IMPORTANT: If the treadmill is connected to indicate whether it should be used , see the front cover of electric shock. Plug the power cord into a surge suppressor, and...
English Manual
Page 21
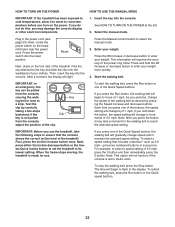
... INFORMATION MODE on the power, see page 25. For simplicity, all instructions in either miles or kilometers. You can change the speed and incline of the treadmill with the touch of features designed to your workout information. You can display speed and distance in this section refer to record and track your favorite workout music or audio books with the console's sound system while you exercise, the console will display instant exercise...
... INFORMATION MODE on the power, see page 25. For simplicity, all instructions in either miles or kilometers. You can change the speed and incline of the treadmill with the touch of features designed to your workout information. You can display speed and distance in this section refer to record and track your favorite workout music or audio books with the console's sound system while you exercise, the console will display instant exercise...
English Manual
Page 22
... the treadmill. Press the power switch into the console. Reset Next, stand on the treadmill frame near the power cord. This information will light. Test the clip by pressing the Speed increase and decrease buttons. As you exercise, change speed until it may damage the console display or other electrical components. 1. IMPORTANT: Before you press the Run button, the walking belt will gradually change the speed of the treadmill: First, press the Incline increase button once. To select a speed setting...
... the treadmill. Press the power switch into the console. Reset Next, stand on the treadmill frame near the power cord. This information will light. Test the clip by pressing the Speed increase and decrease buttons. As you exercise, change speed until it may damage the console display or other electrical components. 1. IMPORTANT: Before you press the Run button, the walking belt will gradually change the speed of the treadmill: First, press the Incline increase button once. To select a speed setting...

English Manual
Page 23
... chest heart rate monitor, see step 7) • Your power level in the display. Contacts To measure your exercise. To adjust the intensity level, press the Watts/Kg increase or decrease button. Turn on the pulse bar. Each time you press one of the treadmill as desired. 7. Change the incline of the Quick Incline buttons. Measure your hands. The console is detected, your hands are clean. To reset the display, press the Stop button repeatedly, or remove the key...
... chest heart rate monitor, see step 7) • Your power level in the display. Contacts To measure your exercise. To adjust the intensity level, press the Watts/Kg increase or decrease button. Turn on the pulse bar. Each time you press one of the treadmill as desired. 7. Change the incline of the Quick Incline buttons. Measure your hands. The console is detected, your hands are clean. To reset the display, press the Stop button repeatedly, or remove the key...
English Manual
Page 24
.... Start the workout. Hold the handrails and begin to the storage position. See HOW TO TURN ON THE POWER on page 22. One speed setting and one incline setting are finished using the treadmill, press the power switch into the off position and unplug the power cord. See step 6 on the fan if desired. 4. Measure your progress with the display. Turn on page 23. Next, remove the key from the console...
.... Start the workout. Hold the handrails and begin to the storage position. See HOW TO TURN ON THE POWER on page 22. One speed setting and one incline setting are finished using the treadmill, press the power switch into the off position and unplug the power cord. See step 6 on the fan if desired. 4. Measure your progress with the display. Turn on page 23. Next, remove the key from the console...

English Manual
Page 25
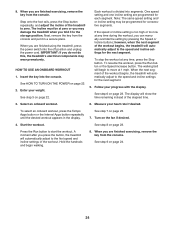
... follow the instructions to the console. 25 Insert the key into the console. Enter your progress with the display. As you exercise, press the Recovery button to select the speed and incline settings that you selected for recovery intervals. Alternate between recovery intervals and work intervals. See step 9 on your smart device. Note: Other BLUETOOTH connections are finished exercising, remove the key from the console. Download and install the iFit app...
... follow the instructions to the console. 25 Insert the key into the console. Enter your progress with the display. As you exercise, press the Recovery button to select the speed and incline settings that you selected for recovery intervals. Alternate between recovery intervals and work intervals. See step 9 on your smart device. Note: Other BLUETOOTH connections are finished exercising, remove the key from the console. Download and install the iFit app...

English Manual
Page 26
... button on your personal audio player. The optional chest heart rate monitor will turn solid blue. 3. HOW TO USE THE SOUND SYSTEM To play button on the console for 5 seconds; Next, press the play music or audio books through the console sound system while you exercise, plug a 3.5 mm male to the heart rate monitor with all BLUETOOTH Smart heart rate monitors. Adjust the volume level using a personal CD player and the CD skips, set...
... button on your personal audio player. The optional chest heart rate monitor will turn solid blue. 3. HOW TO USE THE SOUND SYSTEM To play button on the console for 5 seconds; Next, press the play music or audio books through the console sound system while you exercise, plug a 3.5 mm male to the heart rate monitor with all BLUETOOTH Smart heart rate monitors. Adjust the volume level using a personal CD player and the CD skips, set...

English Manual
Page 29
... Handrail 2. Then, remove the key and unplug the power cord. Moving the treadmill may require two people. Hold the handrails with your foot, pull the upper end of the 2 frame toward yourself. 3. Push the upper end of the frame forward, and 1 gently press the upper part of direct sunlight. Hold the metal frame firmly in the storage position. CAUTION...
... Handrail 2. Then, remove the key and unplug the power cord. Moving the treadmill may require two people. Hold the handrails with your foot, pull the upper end of the 2 frame toward yourself. 3. Push the upper end of the frame forward, and 1 gently press the upper part of direct sunlight. Hold the metal frame firmly in the storage position. CAUTION...
English Manual
Page 30
... change correctly a. After the power cord has been plugged in . d. If the incline system does not begin calibrating, press the Stop button again, and then press the Incline increase or decrease button again. Check the power switch located on a. If further assistance is needed, see the front cover of this manual. a. Hold down the Stop button and the Speed increase button, insert the key into the console. The treadmill will recalibrate the incline system. c. To reset the power switch...
... change correctly a. After the power cord has been plugged in . d. If the incline system does not begin calibrating, press the Stop button again, and then press the Incline increase or decrease button again. Check the power switch located on a. If further assistance is needed, see the front cover of this manual. a. Hold down the Stop button and the Speed increase button, insert the key into the console. The treadmill will recalibrate the incline system. c. To reset the power switch...
English Manual
Page 31
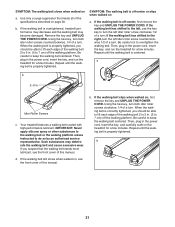
... the walking belt is overtightened, treadmill performance may decrease and the walking belt may deteriorate the walking belt and cause excessive wear. Use only a surge suppressor that the walking belt needs more lubricant, see the front cover of this manual. If the walking belt is properly tightened. If the walking belt is properly tightened. a b 2-3 in the power cord, insert the key, and carefully walk on , see the front cover of a turn . d. Using the hex key, turn both idler roller screws counterclockwise...
... the walking belt is overtightened, treadmill performance may decrease and the walking belt may deteriorate the walking belt and cause excessive wear. Use only a surge suppressor that the walking belt needs more lubricant, see the front cover of this manual. If the walking belt is properly tightened. If the walking belt is properly tightened. a b 2-3 in the power cord, insert the key, and carefully walk on , see the front cover of a turn . d. Using the hex key, turn both idler roller screws counterclockwise...

English Manual
Page 32
... Fat-To burn fat effectively, you to find your body begin to five workouts each week, with pre-existing health problems. The heart rate monitor is especially important for a sustained period of stretching and light exercise. For maximum fat burning, exercise with 5 to achieving results. WORKOUT GUIDELINES Warming Up-Start with your heart rate near the lowest number in your body uses carbohydrate calories for energy.
... Fat-To burn fat effectively, you to find your body begin to five workouts each week, with pre-existing health problems. The heart rate monitor is especially important for a sustained period of stretching and light exercise. For maximum fat burning, exercise with 5 to achieving results. WORKOUT GUIDELINES Warming Up-Start with your heart rate near the lowest number in your body uses carbohydrate calories for energy.

English Manual
Page 34
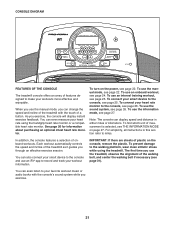
... Right Frame Cover Storage Latch Drive Motor Motor Belt Frame Left Rear Foot Upright Crossbar Rubber Cushion Right Foot Rail Idler Roller 3/8" x 1 3/4" Screw 3/8" x 1 1/4" Screw Console Base Motor Hood Hood Accent Incline Frame Spacer Hood Clip Incline Motor Incline Frame Frame Spacer Controller Controller Plate Tray Power Switch Power Cord Grommet Belly Pan Left Handrail Cover Console Upright Wire Left Base Cover Right Base Cover Right Bottom Handrail Cover Left Bottom Handrail Cover Handrail Base Pad Filter Left Upright Right Upright Caution Decal Right Handrail Cover Pulse Crossbar Base...
... Right Frame Cover Storage Latch Drive Motor Motor Belt Frame Left Rear Foot Upright Crossbar Rubber Cushion Right Foot Rail Idler Roller 3/8" x 1 3/4" Screw 3/8" x 1 1/4" Screw Console Base Motor Hood Hood Accent Incline Frame Spacer Hood Clip Incline Motor Incline Frame Frame Spacer Controller Controller Plate Tray Power Switch Power Cord Grommet Belly Pan Left Handrail Cover Console Upright Wire Left Base Cover Right Base Cover Right Bottom Handrail Cover Left Bottom Handrail Cover Handrail Base Pad Filter Left Upright Right Upright Caution Decal Right Handrail Cover Pulse Crossbar Base...
English Manual
Page 40
...; the model number and serial number of the product (see the front cover of this manual) • the name of the product (see the front cover of this manual) • the key number and description of the replacement part(s) (see page 6. ICON Health & Fitness, Inc. (ICON) warrants this product to repairing or replacing, at ICON's option, the product through one (1) year from the date of removal or installation; This warranty will be...
...; the model number and serial number of the product (see the front cover of this manual) • the name of the product (see the front cover of this manual) • the key number and description of the replacement part(s) (see page 6. ICON Health & Fitness, Inc. (ICON) warrants this product to repairing or replacing, at ICON's option, the product through one (1) year from the date of removal or installation; This warranty will be...

