
English Manual
Page 1
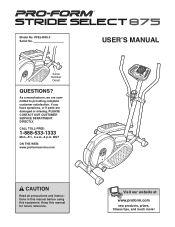
... at www.proform.com new products, prizes, fitness tips, and much more! MST ON THE WEB: www.proformservice.com USER'S MANUAL CAUTION Read all precautions and instructions in this manual before using this manual for future reference. PFEL4905.0 Serial No. _ Serial Number Decal QUESTIONS? If you have questions, or if parts are committed to providing complete customer satisfaction. CALL TOLL-FREE: 1-888-533...
... at www.proform.com new products, prizes, fitness tips, and much more! MST ON THE WEB: www.proformservice.com USER'S MANUAL CAUTION Read all precautions and instructions in this manual before using this manual for future reference. PFEL4905.0 Serial No. _ Serial Number Decal QUESTIONS? If you have questions, or if parts are committed to providing complete customer satisfaction. CALL TOLL-FREE: 1-888-533...

English Manual
Page 2
TABLE OF CONTENTS IMPORTANT PRECAUTIONS 3 BEFORE YOU BEGIN 4 ASSEMBLY 5 HOW TO USE THE ELLIPTICAL EXERCISER 10 MAINTENANCE AND TROUBLESHOOTING 15 CONDITIONING GUIDELINES 16 PART LIST 17 EXPLODED DRAWING 18 HOW TO ORDER REPLACEMENT PARTS Back Cover LIMITED WARRANTY Back Cover PROFORM is a registered trademark of ICON IP, Inc. 2
TABLE OF CONTENTS IMPORTANT PRECAUTIONS 3 BEFORE YOU BEGIN 4 ASSEMBLY 5 HOW TO USE THE ELLIPTICAL EXERCISER 10 MAINTENANCE AND TROUBLESHOOTING 15 CONDITIONING GUIDELINES 16 PART LIST 17 EXPLODED DRAWING 18 HOW TO ORDER REPLACEMENT PARTS Back Cover LIMITED WARRANTY Back Cover PROFORM is a registered trademark of ICON IP, Inc. 2
English Manual
Page 3
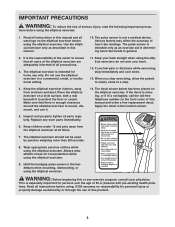
..., call the toll-free telephone number on a level surface, with pre-existing health problems. Read all instructions before using . Do not use it. 14. When you feel pain or dizziness while exercising, stop . 4. If the decal is missing, or if it to mount, dismount, and use the elliptical exerciser in a commercial, rental, or institutional setting. 11. Replace any exercise program, consult your physician. ICON assumes no responsibility...
..., call the toll-free telephone number on a level surface, with pre-existing health problems. Read all instructions before using . Do not use it. 14. When you feel pain or dizziness while exercising, stop . 4. If the decal is missing, or if it to mount, dismount, and use the elliptical exerciser in a commercial, rental, or institutional setting. 11. Replace any exercise program, consult your physician. ICON assumes no responsibility...

English Manual
Page 4
... elliptical exerciser (see the front cover of this manual, see the front cover of your home. To help you achieve your knees and ankles. The serial number can be found on your fitness goals in the convenience of this manual). To avoid a registration fee for selecting the new PROFORM® STRIDE SELECT 875 elliptical exerciser. Handgrip Pulse Sensor Console Fan Handlebar Water Bottle Holder* FRONT Pedal Disk BACK Wheel Pedal Adjustment Knob...
... elliptical exerciser (see the front cover of this manual, see the front cover of your home. To help you achieve your knees and ankles. The serial number can be found on your fitness goals in the convenience of this manual). To avoid a registration fee for selecting the new PROFORM® STRIDE SELECT 875 elliptical exerciser. Handgrip Pulse Sensor Console Fan Handlebar Water Bottle Holder* FRONT Pedal Disk BACK Wheel Pedal Adjustment Knob...
English Manual
Page 5
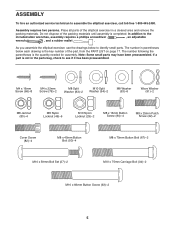
... Screw (22)-2 Cover Screw (82)-4 M8 x 45mm Button Bolt (50)-4 M8 x 70mm Button Bolt (67)-2 M10 x 59mm Bolt Set (27)-2 M10 x 75mm Carriage Bolt (34)-2 M10 x 83mm Button Screw (63)-2 5 The number in parentheses below to assemble the elliptical exerciser, call toll-free 1-800-445-2480. If a part is the key number of the part, from the PART LIST on page 17. Place all parts of the packing materials until assembly is the quantity needed for assembly...
... Screw (22)-2 Cover Screw (82)-4 M8 x 45mm Button Bolt (50)-4 M8 x 70mm Button Bolt (67)-2 M10 x 59mm Bolt Set (27)-2 M10 x 75mm Carriage Bolt (34)-2 M10 x 83mm Button Screw (63)-2 5 The number in parentheses below to assemble the elliptical exerciser, call toll-free 1-800-445-2480. If a part is the key number of the part, from the PART LIST on page 17. Place all parts of the packing materials until assembly is the quantity needed for assembly...

English Manual
Page 6
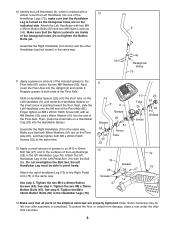
... another person 1 lifts the rear of the two M10 x 83mm Button Screws (63). Insert the connectors on the Wire Harnesses into the Front Stabilizer (3). Do not tighten the Button Screws yet. Make sure that the Wire Harnesses (87, 95) do not get pinched and damaged during this step. 35 3 Pull 15 3...15) and the Front Stabilizer (3) near the Frame (1), connect the Extension Wire Harness (95) to remove any slack. Slide an M10 Split Washer (94) onto each of the Frame (1), attach the Rear Stabilizer to the Frame with two M10 x 75mm Carriage Bolts (34) and two M10 Nylon Locknuts (29). 29...
... another person 1 lifts the rear of the two M10 x 83mm Button Screws (63). Insert the connectors on the Wire Harnesses into the Front Stabilizer (3). Do not tighten the Button Screws yet. Make sure that the Wire Harnesses (87, 95) do not get pinched and damaged during this step. 35 3 Pull 15 3...15) and the Front Stabilizer (3) near the Frame (1), connect the Extension Wire Harness (95) to remove any slack. Slide an M10 Split Washer (94) onto each of the Frame (1), attach the Rear Stabilizer to the Frame with two M10 x 75mm Carriage Bolts (34) and two M10 Nylon Locknuts (29). 29...

English Manual
Page 7
... not tighten the Button Bolts yet. Insert four batteries into the Mast (15); Insert the excess wire harness down into the Upright. Attach the Upright with four M4 x 16mm Screws (66). Make sure that the batteries are recommended. 4. While another person holds the Upright (2) in the position shown, connect the Upper Wire Harness (86) to avoid pinching the wire harnesses. 6 5 86 66 5 Batteries Batteries Battery Cover Wire Harness Make...
... not tighten the Button Bolts yet. Insert four batteries into the Mast (15); Insert the excess wire harness down into the Upright. Attach the Upright with four M4 x 16mm Screws (66). Make sure that the batteries are recommended. 4. While another person holds the Upright (2) in the position shown, connect the Upper Wire Harness (86) to avoid pinching the wire harnesses. 6 5 86 66 5 Batteries Batteries Battery Cover Wire Harness Make...

English Manual
Page 8
... 8 Attach two Pedal Posts (16) to the Right Crank Arm (38) with two M4 x 16mm Screws (66). 12 Attach the other Pedal Posts (not shown) to the Right Pedal Arm (not shown) in the Pedal Disk (8). 7. Then, tighten an Adjustment Knob (45) onto the right Adjustment Pin (17). 7 Cutout Welded Bolts 80 48 8. Attach one of the Pedals (12) to the Left Pedal Arm 9 (14) with four Cover Screws (82). Then, fully tighten...
... 8 Attach two Pedal Posts (16) to the Right Crank Arm (38) with two M4 x 16mm Screws (66). 12 Attach the other Pedal Posts (not shown) to the Right Pedal Arm (not shown) in the Pedal Disk (8). 7. Then, tighten an Adjustment Knob (45) onto the right Adjustment Pin (17). 7 Cutout Welded Bolts 80 48 8. Attach one of the Pedals (12) to the Left Pedal Arm 9 (14) with four Cover Screws (82). Then, fully tighten...
English Manual
Page 9
... Pedal Arm (14) with an M8 Washer (53) and a Wave Washer (91) into the Upright (2) and center it. Make sure that the Handlebar Leg is completed. See step 4. Reapply grease to both Wave Washers (91) are inside of the Pivot Axle (81). Attach the right Handlebar Leg (79) to the surfaces of the Pivot Axle. Tighten the M8 x 45mm Button Bolts...
... Pedal Arm (14) with an M8 Washer (53) and a Wave Washer (91) into the Upright (2) and center it. Make sure that the Handlebar Leg is completed. See step 4. Reapply grease to both Wave Washers (91) are inside of the Pivot Axle (81). Attach the right Handlebar Leg (79) to the surfaces of the Pivot Axle. Tighten the M8 x 45mm Button Bolts...

English Manual
Page 10
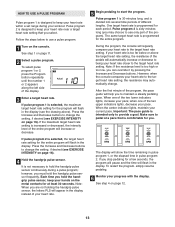
... adjustment pin is engaged in one of the elliptical exerciser in the crank arm, and gently release the knob. the pedals will continue to a complete stop. Push the pedals until the adjustment bracket can be pivoted freely. Note: The elliptical exerciser does not have a free wheel; Then, step off the highest pedal first. Pulse Sensor Handlebars To exercise only your workouts. HOW TO ADJUST THE STRIDE OF THE ELLIPTICAL EXERCISER To adjust the stride of the elliptical exerciser...
... adjustment pin is engaged in one of the elliptical exerciser in the crank arm, and gently release the knob. the pedals will continue to a complete stop. Push the pedals until the adjustment bracket can be pivoted freely. Note: The elliptical exerciser does not have a free wheel; Then, step off the highest pedal first. Pulse Sensor Handlebars To exercise only your workouts. HOW TO ADJUST THE STRIDE OF THE ELLIPTICAL EXERCISER To adjust the stride of the elliptical exerciser...

English Manual
Page 11
... you exercise. Before using the console, make your heart rate using the built-in handgrip pulse sensor. the console will light for a moment; In addition, the console features two pulse programs that batteries are installed (see assembly step 5 on page 7). If there is selected, the resistance of the pedals can even measure your workouts more effective. DIAGRAM OF THE CONSOLE Fan Button Program Profiles Increase Button Program Button Program Indicator Display Pace Guide Decrease Button FEATURES OF THE CONSOLE The advanced console...
... you exercise. Before using the console, make your heart rate using the built-in handgrip pulse sensor. the console will light for a moment; In addition, the console features two pulse programs that batteries are installed (see assembly step 5 on page 7). If there is selected, the resistance of the pedals can even measure your workouts more effective. DIAGRAM OF THE CONSOLE Fan Button Program Profiles Increase Button Program Button Program Indicator Display Pace Guide Decrease Button FEATURES OF THE CONSOLE The advanced console...

English Manual
Page 12
... display will be reset. 12 never use the handgrip pulse sensor (see step 5). 5 Measure your pedaling speed (revolutions per minute [RPM]) and the approximate number of calories you have pedaled, and the resistance level of the display will show your heart rate along with the other every few seconds. If the pedals are not moved for a few seconds, the time will begin to flash and the console...
... display will be reset. 12 never use the handgrip pulse sensor (see step 5). 5 Measure your pedaling speed (revolutions per minute [RPM]) and the approximate number of calories you have pedaled, and the resistance level of the display will show your heart rate along with the other every few seconds. If the pedals are not moved for a few seconds, the time will begin to flash and the console...
English Manual
Page 13
... progress with the display. Press the Increase and Decrease buttons to change the setting, if desired (see EXERCISE INTENSITY on page 16). 4 Hold the handgrip pulse sensor. When one of different lengths. Pulse program 2 is designed to keep your heart rate to the target heart rate setting, the resistance may choose to use a pulse program. 1 Turn on page 11. 2 Select a pulse program. To select pulse program 1 or 2, press the Program button repeatedly until the number 1 or 2 appears along...
... progress with the display. Press the Increase and Decrease buttons to change the setting, if desired (see EXERCISE INTENSITY on page 16). 4 Hold the handgrip pulse sensor. When one of different lengths. Pulse program 2 is designed to keep your heart rate to the target heart rate setting, the resistance may choose to use a pulse program. 1 Turn on page 11. 2 Select a pulse program. To select pulse program 1 or 2, press the Program button repeatedly until the number 1 or 2 appears along...

English Manual
Page 14
... of the display. Make sure to use a preset program. 1 Turn on page 12. 7 When you are finished exercising, the console will then automatically change if a different resistance level is too high or too low, you stop pedaling for the next period. To restart the program, simply resume pedaling. 4 Monitor your pace; See step 5 on page 12. 6 Turn on page 12. See step 6 on the console. See step 6 on...
... of the display. Make sure to use a preset program. 1 Turn on page 12. 7 When you are finished exercising, the console will then automatically change if a different resistance level is too high or too low, you stop pedaling for the next period. To restart the program, simply resume pedaling. 4 Monitor your pace; See step 5 on page 12. 6 Turn on page 12. See step 6 on the console. See step 6 on...
English Manual
Page 15
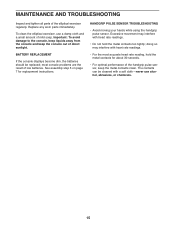
... contacts for replacement instructions. To clean the elliptical exerciser, use alcohol, abrasives, or chemicals. 15 MAINTENANCE AND TROUBLESHOOTING Inspect and tighten all parts of low batteries. Replace any worn parts immediately. Important: To avoid damage to the console, keep liquids away from the console and keep the metal contacts clean. HANDGRIP PULSE SENSOR TROUBLESHOOTING • Avoid moving your hands while using the handgrip pulse sensor. Excessive movement may interfere with heart rate readings...
... contacts for replacement instructions. To clean the elliptical exerciser, use alcohol, abrasives, or chemicals. 15 MAINTENANCE AND TROUBLESHOOTING Inspect and tighten all parts of low batteries. Replace any worn parts immediately. Important: To avoid damage to the console, keep liquids away from the console and keep the metal contacts clean. HANDGRIP PULSE SENSOR TROUBLESHOOTING • Avoid moving your hands while using the handgrip pulse sensor. Excessive movement may interfere with heart rate readings...
English Manual
Page 16
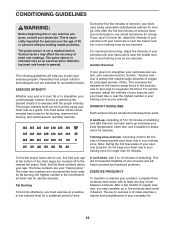
... the three numbers above your physician. The key to prevent post-exercise problems. EXERCISE FREQUENCY To maintain or improve your heart rate is intended only as a guide. For maximum fat burning, adjust the intensity of stretching. The proper intensity level can be "aerobic." WORKOUT GUIDELINES Each workout should include the following guidelines will help you must be found by using your exercise program. Remember...
... the three numbers above your physician. The key to prevent post-exercise problems. EXERCISE FREQUENCY To maintain or improve your heart rate is intended only as a guide. For maximum fat burning, adjust the intensity of stretching. The proper intensity level can be "aerobic." WORKOUT GUIDELINES Each workout should include the following guidelines will help you must be found by using your exercise program. Remember...

English Manual
Page 17
Specifications are subject to change without notice. See the back cover of this manual for information about ordering replacement parts. 17 PFEL4905.0 R0106B Key No. Description 1 1 Frame 2 1 Upright 3 1 Front Stabilizer 4 1 Rear Stabilizer 5 1 Console 6 1 Left Side Shield 7 1 Right Side Shield 8 2 Pedal Disc 9 1 Left Handlebar 10 1 Right Handlebar 11 2 Foam Grip 12 2 Pedal 13 1 Upright Endcap 14 1 Left Pedal Arm 15 1 Mast 16 4 Pedal Post 17 2 Adjustment Pin 18 4 Pedal Arm Bushing 19 2 Adjustment Spring...
Specifications are subject to change without notice. See the back cover of this manual for information about ordering replacement parts. 17 PFEL4905.0 R0106B Key No. Description 1 1 Frame 2 1 Upright 3 1 Front Stabilizer 4 1 Rear Stabilizer 5 1 Console 6 1 Left Side Shield 7 1 Right Side Shield 8 2 Pedal Disc 9 1 Left Handlebar 10 1 Right Handlebar 11 2 Foam Grip 12 2 Pedal 13 1 Upright Endcap 14 1 Left Pedal Arm 15 1 Mast 16 4 Pedal Post 17 2 Adjustment Pin 18 4 Pedal Arm Bushing 19 2 Adjustment Spring...
English Manual
Page 18
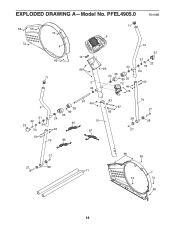
PFEL4905.0 R0106B 66 66 74 74 6 66 71 13 66 2 24 71 5 24 66 24 26 89 25 72 46 76 10 23 91 22 53 24 50 9 91 22 23 24 53 26 89 25 24 95 46 50 79 86 81 46 15 87 83 67 83 79 27 28 28 27 27 27 28 11 66 59 7 74 74 66 18 EXPLODED DRAWING A-Model No.
PFEL4905.0 R0106B 66 66 74 74 6 66 71 13 66 2 24 71 5 24 66 24 26 89 25 72 46 76 10 23 91 22 53 24 50 9 91 22 23 24 53 26 89 25 24 95 46 50 79 86 81 46 15 87 83 67 83 79 27 28 28 27 27 27 28 11 66 59 7 74 74 66 18 EXPLODED DRAWING A-Model No.
English Manual
Page 19
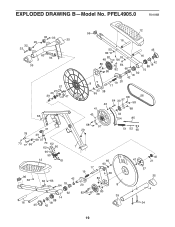
PFEL4905.0 R0106B 32 33 35 29 32 33 63 3 94 35 57 21 40 39 47 66 12 96 16 53 84 82 48 80 80 45 53 66 84 82 66 16 42 88 18 75 92 18 42 8 19 20 17 93 65 38 68 56 64 30 97 46 58 41 68 43 44 54 85 31 78 49 68 97 29 51 52 60 69 37 73 77 66 70 62 62 90 1 90 55 12 61 96 66 19 42 84 66 18 53 84 20 92 82 14 88 16 45 18 42 65 93 17 36 80 8 80 48 35 40 47 21 57 35 4 34 19 EXPLODED DRAWING B-Model No.
PFEL4905.0 R0106B 32 33 35 29 32 33 63 3 94 35 57 21 40 39 47 66 12 96 16 53 84 82 48 80 80 45 53 66 84 82 66 16 42 88 18 75 92 18 42 8 19 20 17 93 65 38 68 56 64 30 97 46 58 41 68 43 44 54 85 31 78 49 68 97 29 51 52 60 69 37 73 77 66 70 62 62 90 1 90 55 12 61 96 66 19 42 84 66 18 53 84 20 92 82 14 88 16 45 18 42 65 93 17 36 80 8 80 48 35 40 47 21 57 35 4 34 19 EXPLODED DRAWING B-Model No.
English Manual
Page 20
... product (PROFORM STRIDE SELECT 875 elliptical exerciser) • the SERIAL NUMBER of the product (see the front cover of this manual) • the KEY NUMBER and DESCRIPTION of the part(s) (see the front cover of this product to any economic loss, loss of property, loss of revenues or profits, loss of removal or installation or other warranty beyond that specifically set forth herein. Accordingly, the above is limited in...
... product (PROFORM STRIDE SELECT 875 elliptical exerciser) • the SERIAL NUMBER of the product (see the front cover of this manual) • the KEY NUMBER and DESCRIPTION of the part(s) (see the front cover of this product to any economic loss, loss of property, loss of revenues or profits, loss of removal or installation or other warranty beyond that specifically set forth herein. Accordingly, the above is limited in...

