
English Manual
Page 5
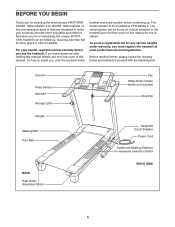
...us assist you for selecting the revolutionary PROFORM® SPORT 1200 treadmill. The model number of other treadmills. BEFORE YOU BEGIN Thank you , note the product model number and serial number before you 're not exercising, the unique SPORT 1200 treadmill can be folded up, requiring less than... half the floor space of the treadmill is PFTL59506.0. The serial number can be found on a decal attached to make your benefit, read this manual carefully before contacting us. Console Pulse Sensor ...
...us assist you for selecting the revolutionary PROFORM® SPORT 1200 treadmill. The model number of other treadmills. BEFORE YOU BEGIN Thank you , note the product model number and serial number before you 're not exercising, the unique SPORT 1200 treadmill can be folded up, requiring less than... half the floor space of the treadmill is PFTL59506.0. The serial number can be found on a decal attached to make your benefit, read this manual carefully before contacting us. Console Pulse Sensor ...
English Manual
Page 6
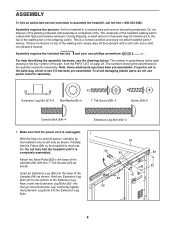
...all packing materials. Extension Leg Nut (67)-4 Star Washer (8)-4 1" Tek Screw (83)-4 Screw (43)-2 Console Bolt (64)-4 Extension Leg Bolt (65)-4 1. Partially fold the Frame (58) so the treadmill is completely assembled. 84 65 82 82 Attach two Base Pads (82) to the base of the part,...the power cord is unplugged. 1 With the help identifying the assembly hardware, see if it is more stable. Assembly requires two persons. Set the treadmill in parentheses below . The number following the parentheses is the key number of the Uprights (84) with a soft cloth and a mild, non-...
...all packing materials. Extension Leg Nut (67)-4 Star Washer (8)-4 1" Tek Screw (83)-4 Screw (43)-2 Console Bolt (64)-4 Extension Leg Bolt (65)-4 1. Partially fold the Frame (58) so the treadmill is completely assembled. 84 65 82 82 Attach two Base Pads (82) to the base of the part,...the power cord is unplugged. 1 With the help identifying the assembly hardware, see if it is more stable. Assembly requires two persons. Set the treadmill in parentheses below . The number following the parentheses is the key number of the Uprights (84) with a soft cloth and a mild, non-...

English Manual
Page 7
...Bolts into place, turn one connector and then try again. start all four Console Bolts and then firmly tighten them. 3 Console Assembly 66 77 4 Console Assembly 77, 66 8 64 84 66 77 84 8 64 84 7 2. Do not fully fold the treadmill until it with two 1" Tek Screws (83) as shown. Have the ...second person hold the console assembly near the Uprights (84) as shown. Make sure to the Console Wire (66). Next, connect the Wire Harness to connect the connectors properly...
...Bolts into place, turn one connector and then try again. start all four Console Bolts and then firmly tighten them. 3 Console Assembly 66 77 4 Console Assembly 77, 66 8 64 84 66 77 84 8 64 84 7 2. Do not fully fold the treadmill until it with two 1" Tek Screws (83) as shown. Have the ...second person hold the console assembly near the Uprights (84) as shown. Make sure to the Console Wire (66). Next, connect the Wire Harness to connect the connectors properly...

English Manual
Page 8
...the power cord is on the indicated side. If there are two collars, place one on the treadmill decals, remove the plastic. the large hex key is used to adjust the walking belt (see...sheets of clear plastic on each side of the Console Base (85). 2. To protect the floor or carpet, place a mat under the treadmill. If you use the treadmill. Keep the included hex key in the Latch ...84) with the two included small screws. 3. Note: Make sure that the key is facing the Console Back. Make sure that no wires are properly tightened before you purchase the optional chest pulse sensor (...
...the power cord is on the indicated side. If there are two collars, place one on the treadmill decals, remove the plastic. the large hex key is used to adjust the walking belt (see...sheets of clear plastic on each side of the Console Base (85). 2. To protect the floor or carpet, place a mat under the treadmill. If you use the treadmill. Keep the included hex key in the Latch ...84) with the two included small screws. 3. Note: Make sure that the key is facing the Console Back. Make sure that no wires are properly tightened before you purchase the optional chest pulse sensor (...

English Manual
Page 10
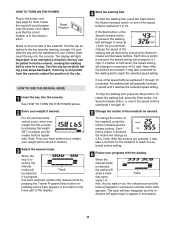
... an impressive array of grams that control the speed and incline of the treadmill features designed to make your heart rate using the built-in - You can change the speed and incline of the console, remove it guides you through an effec- To use a preset can even .... page 16). effective. To use a calorie program, the touch of the treadmill as it . ment of the console, you burn unwanted pounds. To use the manual mode of the console, follow the When you exercise, the console will see page 20). 10 tive workout. As you select the manual mode...
... an impressive array of grams that control the speed and incline of the treadmill features designed to make your heart rate using the built-in - You can change the speed and incline of the console, remove it guides you through an effec- To use a preset can even .... page 16). effective. To use a calorie program, the touch of the treadmill as it . ment of the console, you burn unwanted pounds. To use the manual mode of the console, follow the When you exercise, the console will see page 20). 10 tive workout. As you select the manual mode...
English Manual
Page 11
... again begin to reach the selected speed setting. Next, insert the key into the console. Important: In an emergency situation, the key can be selected. peatedly until it may take a moment for the treadmill to a stop the walking belt, press the Stop button. If one of the... the walking belt to slow to reach the selected incline setting. 6 Follow your weight will Track be pulled from the console, adjust the position of the treadmill, press the Incline increase and decrease buttons. if the key is pressed, the speed setting will change by 0.5%. Note: After ...
... again begin to reach the selected speed setting. Next, insert the key into the console. Important: In an emergency situation, the key can be selected. peatedly until it may take a moment for the treadmill to a stop the walking belt, press the Stop button. If one of the... the walking belt to slow to reach the selected incline setting. 6 Follow your weight will Track be pulled from the console, adjust the position of the treadmill, press the Incline increase and decrease buttons. if the key is pressed, the speed setting will change by 0.5%. Note: After ...
English Manual
Page 12
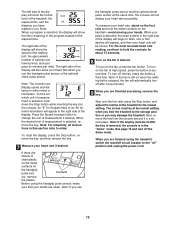
...the walking belt, the approximate number of calories you have walked or run. Note: The console can display speed and distance in a secure place. The incline must be shown. When the desired unit of the treadmill to the lowest setting. To reset the display, press the Stop button, remove the key... foot rails and hold down the Stop button while inserting the key into the console. When you use the handgrip pulse sensor and the optional chest pulse sensor at the lowest setting when you fold the treadmill to change the unit of the display will appear in the "demo" mode....
...the walking belt, the approximate number of calories you have walked or run. Note: The console can display speed and distance in a secure place. The incline must be shown. When the desired unit of the treadmill to the lowest setting. To reset the display, press the Stop button, remove the key... foot rails and hold down the Stop button while inserting the key into the console. When you use the handgrip pulse sensor and the optional chest pulse sensor at the lowest setting when you fold the treadmill to change the unit of the display will appear in the "demo" mode....
English Manual
Page 13
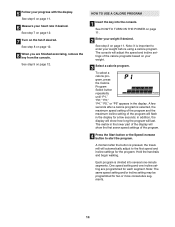
... flash in the display to the speed and incline settings for the current segment is divided into the console. Important: When the current segment of the treadmill is selected, the maximum speed setting of the program and the maximum incline setting of the four preset programs, press the ...automatically adjust to the speed and incline settings for the next four segments will be shown in the flashing Current Segment column and the treadmill will then slow to move downward so that segment. To restart the program, press the Start button or the Speed increase button. ...
... flash in the display to the speed and incline settings for the current segment is divided into the console. Important: When the current segment of the treadmill is selected, the maximum speed setting of the program and the maximum incline setting of the four preset programs, press the ...automatically adjust to the speed and incline settings for the next four segments will be shown in the flashing Current Segment column and the treadmill will then slow to move downward so that segment. To restart the program, press the Start button or the Speed increase button. ...
English Manual
Page 14
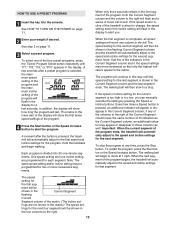
... heart rate if desired. HOW TO USE A CALORIE PROGRAM 1 Insert the key into several one incline setting are finished exercising, remove the key from the console. The console will last. To select a calorie program, press the Calorie Program Select button repeatedly until "P1," "P2," "P3," "P4," "P5," or "P6.... 3 Select a calorie program. See step 6 on page 11. 6 Measure your progress with the display. A moment after a calorie program is pressed, the treadmill will flash in the lower part of the program. 4 Press the Start button or the Speed increase button to start the program.
... heart rate if desired. HOW TO USE A CALORIE PROGRAM 1 Insert the key into several one incline setting are finished exercising, remove the key from the console. The console will last. To select a calorie program, press the Calorie Program Select button repeatedly until "P1," "P2," "P3," "P4," "P5," or "P6.... 3 Select a calorie program. See step 6 on page 11. 6 Measure your progress with the display. A moment after a calorie program is pressed, the treadmill will flash in the lower part of the program. 4 Press the Start button or the Speed increase button to start the program.
English Manual
Page 15
...the speed setting for the next segment. 5 Follow your heart rate if desired. Note: If you . tings are finished exercising, remove the key from the console. The program will then be shown in the display to a stop the program at 1 mph. Important: When the current segment of the matrix. (The...to the right will flash and a series of tones will be shown in the Current Segment flashing Current Segment column of the program ends, the treadmill will then slow to alert you change , the speed setting and/or the incline setting will move at any time, press the Stop button. ...
...the speed setting for the next segment. 5 Follow your heart rate if desired. Note: If you . tings are finished exercising, remove the key from the console. The program will then be shown in the display to a stop the program at 1 mph. Important: When the current segment of the matrix. (The...to the right will flash and a series of tones will be shown in the Current Segment flashing Current Segment column of the program ends, the treadmill will then slow to alert you change , the speed setting and/or the incline setting will move at any time, press the Stop button. ...
English Manual
Page 16
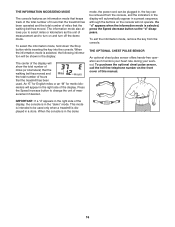
...change the unit of miles that the walking belt has moved. THE INFORMATION MODE/DEMO MODE The console features an information mode that keeps track of the total number of hours that the treadmill has been operated and the total number of mea- If a "d" appears when the information mode... mode is selected, press the Speed decrease button so the "d" disappears. mode, the power cord can be removed from the console. meters will show the total number of miles (or kilometers) that the treadmill has been used only when a treadmill is displayed in , the key can be plugged in a store.
...change the unit of miles that the walking belt has moved. THE INFORMATION MODE/DEMO MODE The console features an information mode that keeps track of the total number of hours that the treadmill has been operated and the total number of mea- If a "d" appears when the information mode... mode is selected, press the Speed decrease button so the "d" disappears. mode, the power cord can be removed from the console. meters will show the total number of miles (or kilometers) that the treadmill has been used only when a treadmill is displayed in , the key can be plugged in a store.
English Manual
Page 19
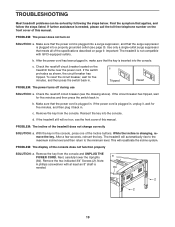
... of this manual. Reinsert the key into the console. If the treadmill still will not run, see the drawing above). TROUBLESHOOTING Most treadmill problems can be solved by following the steps below. c. d. PROBLEM: The incline of the console does not function properly SOLUTION: a. This will ... minutes and then press the switch back in . c. With the key in . The treadmill will recalibrate the incline system. Make sure that the power cord is inserted into the console. While the incline is plugged in, unplug it back in , make sure that meets ...
... of this manual. Reinsert the key into the console. If the treadmill still will not run, see the drawing above). TROUBLESHOOTING Most treadmill problems can be solved by following the steps below. c. d. PROBLEM: The incline of the console does not function properly SOLUTION: a. This will ... minutes and then press the switch back in . c. With the key in . The treadmill will recalibrate the incline system. Make sure that the power cord is inserted into the console. While the incline is plugged in, unplug it back in , make sure that meets ...
English Manual
Page 23
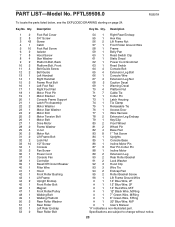
... 1 Left Handrail 14 1 Right Handrail 15 2 Frame Pivot Bolt 16 1 Left Foot Rail 17 1 Right Foot Rail 18 1 Motor Pivot Pin 19 1 Motor Bracket 20 1 Console Frame Support 21 1 Latch Pin Assembly 22 2 Motor Washer 23 1 Motor Star Washer 24 2 Motor Bolt 25 2 Motor Tension Bolt 26 1 Motor Belt 27 1 Drive... 77 1 Wire Harness 78 2 Extension Leg Endcap 79 1 Key/Clip 80 2 Front Wheel 81 2 Wheel Pin 82 4 Base Pad 83 8 1" Tek Screw 84 1 Uprights 85 1 Console Base 86 1 Incline Motor Pin 87 3 Hair Pin Cotter Pin 88 1 Incline Motor 89 2 Extension Leg 90 2 Rear Roller Bracket 91 2 Lock Washer 92 3 Hood...
... 1 Left Handrail 14 1 Right Handrail 15 2 Frame Pivot Bolt 16 1 Left Foot Rail 17 1 Right Foot Rail 18 1 Motor Pivot Pin 19 1 Motor Bracket 20 1 Console Frame Support 21 1 Latch Pin Assembly 22 2 Motor Washer 23 1 Motor Star Washer 24 2 Motor Bolt 25 2 Motor Tension Bolt 26 1 Motor Belt 27 1 Drive... 77 1 Wire Harness 78 2 Extension Leg Endcap 79 1 Key/Clip 80 2 Front Wheel 81 2 Wheel Pin 82 4 Base Pad 83 8 1" Tek Screw 84 1 Uprights 85 1 Console Base 86 1 Incline Motor Pin 87 3 Hair Pin Cotter Pin 88 1 Incline Motor 89 2 Extension Leg 90 2 Rear Roller Bracket 91 2 Lock Washer 92 3 Hood...


