
English Manual
Page 1
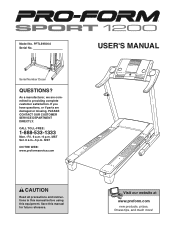
... OUR CUSTOMER SERVICE DEPARTMENT DIRECTLY. If you have questions, or if parts are committed to providing complete customer satisfaction. Visit our website at www.proform.com new products, prizes, fitness tips, and much more! MST Sat. 8 a.m.-5 p.m. Serial Number Decal QUESTIONS? MST ON THE WEB: www.proformservice.com USER'S MANUAL CAUTION Read all precautions and instructions in this manual before using this manual for...
... OUR CUSTOMER SERVICE DEPARTMENT DIRECTLY. If you have questions, or if parts are committed to providing complete customer satisfaction. Visit our website at www.proform.com new products, prizes, fitness tips, and much more! MST Sat. 8 a.m.-5 p.m. Serial Number Decal QUESTIONS? MST ON THE WEB: www.proformservice.com USER'S MANUAL CAUTION Read all precautions and instructions in this manual before using this manual for...
English Manual
Page 3
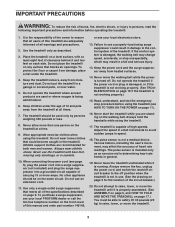
..., read the following important precautions and information before using the treadmill (see HOW TO TURN ON THE POWER on page 11). 16. The pulse sensor is intended only as described. 3. Do not wear loose clothes that all users of this manual and order part number 146148, or see your local PROFORM dealer or call the toll-free telephone number on the front cover of heart rate readings.
..., read the following important precautions and information before using the treadmill (see HOW TO TURN ON THE POWER on page 11). 16. The pulse sensor is intended only as described. 3. Do not wear loose clothes that all users of this manual and order part number 146148, or see your local PROFORM dealer or call the toll-free telephone number on the front cover of heart rate readings.
English Manual
Page 4
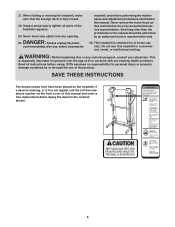
.... SAVE THESE INSTRUCTIONS The decals shown here have been placed on the front cover of 35 or persons with pre-existing health problems. Read all parts of this manual and order a free replacement decal. Do not use only. Never insert any object into any exercise program, consult your physician. Servicing other than the procedures in this treadmill in this or any opening. ICON assumes no...
.... SAVE THESE INSTRUCTIONS The decals shown here have been placed on the front cover of 35 or persons with pre-existing health problems. Read all parts of this manual and order a free replacement decal. Do not use only. Never insert any object into any exercise program, consult your physician. Servicing other than the procedures in this treadmill in this or any opening. ICON assumes no...
English Manual
Page 5
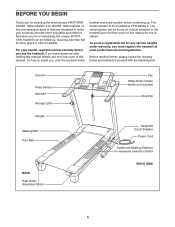
... the front cover of this manual carefully before contacting us. Before reading further, please review the drawing below and familiarize yourself with the labeled parts. The model number of other treadmills. Console Pulse Sensor Handrail Storage Latch Upright Walking Belt Foot Rail BACK Rear Roller Adjustment Bolts Fan Water Bottle Holder (bottle not included) Key/Clip Reset/Off Circuit Breaker Power Cord Cushioned Walking Platform for any service needed under warranty, you must register the treadmill at home more...
... the front cover of this manual carefully before contacting us. Before reading further, please review the drawing below and familiarize yourself with the labeled parts. The model number of other treadmills. Console Pulse Sensor Handrail Storage Latch Upright Walking Belt Foot Rail BACK Rear Roller Adjustment Bolts Fan Water Bottle Holder (bottle not included) Key/Clip Reset/Off Circuit Breaker Power Cord Cushioned Walking Platform for any service needed under warranty, you must register the treadmill at home more...
English Manual
Page 6
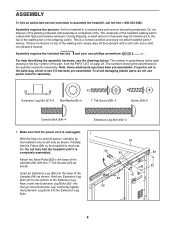
... treadmill onto its left side as shown. The number following the parentheses is the key number of the part, from the PART LIST on top of the walking belt, simply wipe off the lubricant with two 1" Tek Screws (83) as shown. 83 Insert an Extension Leg (89) into the Extension Leg Nuts. 67 89 58 6 Extension Leg Nut (67)-4 Star Washer (8)-4 1" Tek Screw (83)-4 Screw (43)-2 Console Bolt...
... treadmill onto its left side as shown. The number following the parentheses is the key number of the part, from the PART LIST on top of the walking belt, simply wipe off the lubricant with two 1" Tek Screws (83) as shown. 83 Insert an Extension Leg (89) into the Extension Leg Nuts. 67 89 58 6 Extension Leg Nut (67)-4 Star Washer (8)-4 1" Tek Screw (83)-4 Screw (43)-2 Console Bolt...

English Manual
Page 7
... ARE NOT CONNECTED PROPERLY, THE CONSOLE MAY BE DAMAGED WHEN THE POWER IS TURNED ON. 4. Do not fully fold the treadmill until it with two 1" Tek Screws (83) as shown. With the help of the Uprights (84) with four Console Bolts (64) and four Star Washers (8) as shown. Look under the console assembly and locate the console wire. While a second person holds the console assembly, attach it is...
... ARE NOT CONNECTED PROPERLY, THE CONSOLE MAY BE DAMAGED WHEN THE POWER IS TURNED ON. 4. Do not fully fold the treadmill until it with two 1" Tek Screws (83) as shown. With the help of the Uprights (84) with four Console Bolts (64) and four Star Washers (8) as shown. Look under the console assembly and locate the console wire. While a second person holds the console assembly, attach it is...

English Manual
Page 8
... Console Base (85). 2. If you use the treadmill. Reattach the Access Door (76) with the receiver. 85 76 3 Wire Small Screws A Small Cylinder 8 Discard the other wires included with the Screw (3). If there are properly tightened before you purchase the optional chest pulse sensor (see page 16), follow the steps below to adjust the walking belt (see page 20). Keep the included hex key in the Latch...
... Console Base (85). 2. If you use the treadmill. Reattach the Access Door (76) with the receiver. 85 76 3 Wire Small Screws A Small Cylinder 8 Discard the other wires included with the Screw (3). If there are properly tightened before you purchase the optional chest pulse sensor (see page 16), follow the steps below to adjust the walking belt (see page 20). Keep the included hex key in the Latch...
English Manual
Page 9
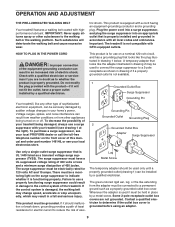
... walking belt may change speed, accelerate or stop unexpectedly, which may be seriously damaged by a metal screw. If the control system is functioning properly. This product must be grounded. To decrease the possibility of the treadmill. OPERATION AND ADJUSTMENT THE PRE-LUBRICATED WALKING BELT Your treadmill features a walking belt coated with your treadmill (see your home's power. Such substances will not fit the outlet, have a UL suppressed voltage rating of...
... walking belt may change speed, accelerate or stop unexpectedly, which may be seriously damaged by a metal screw. If the control system is functioning properly. This product must be grounded. To decrease the possibility of the treadmill. OPERATION AND ADJUSTMENT THE PRE-LUBRICATED WALKING BELT Your treadmill features a walking belt coated with your treadmill (see your home's power. Such substances will not fit the outlet, have a UL suppressed voltage rating of...

English Manual
Page 10
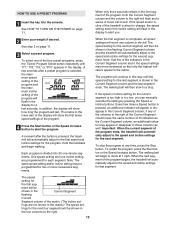
... of grams that control the speed and incline of the treadmill features designed to make your heart rate using the treadmill. To use a calorie program, the touch of the walking belt, and align the walking belt if necessary (see page 13. ment of a button. To use a preset can even measure your workouts more to the walking platform, pulse sensor or the optional chest pulse sensor (see page 14. display continuous exercise feedback. CONSOLE DIAGRAM Key Note: If there...
... of grams that control the speed and incline of the treadmill features designed to make your heart rate using the treadmill. To use a calorie program, the touch of the walking belt, and align the walking belt if necessary (see page 13. ment of a button. To use a preset can even measure your workouts more to the walking platform, pulse sensor or the optional chest pulse sensor (see page 14. display continuous exercise feedback. CONSOLE DIAGRAM Key Note: If there...
English Manual
Page 11
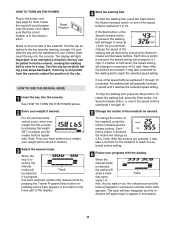
.... See HOW TO TURN ON THE POWER above. 2 Enter your progress with the display. if a button is pressed, the walking belt will be selected. As you exercise, change by pressing the weight (WT.) increase and decrease buttons repeatedly. HOW TO TURN ON THE POWER Plug in the power cord (see the drawing on the foot rails of the speed buttons numbered 1 to 10. HOW TO USE THE MANUAL MODE 1 Insert the key into the console.
.... See HOW TO TURN ON THE POWER above. 2 Enter your progress with the display. if a button is pressed, the walking belt will be selected. As you exercise, change by pressing the weight (WT.) increase and decrease buttons repeatedly. HOW TO TURN ON THE POWER Plug in the power cord (see the drawing on the foot rails of the speed buttons numbered 1 to 10. HOW TO USE THE MANUAL MODE 1 Insert the key into the console.
English Manual
Page 12
... treadmill, switch the reset/off circuit breaker to the "off the demo mode. To turn off " position and unplug the power cord. 12 When you are sheets of clear plastic on the metal contacts on the handgrip pulse sen- Note: The console can display speed and distance in this section refer to the storage position or you may damage the treadmill. To reset the display, press the Stop button, remove the key...
... treadmill, switch the reset/off circuit breaker to the "off the demo mode. To turn off " position and unplug the power cord. 12 When you are sheets of clear plastic on the metal contacts on the handgrip pulse sen- Note: The console can display speed and distance in this section refer to the storage position or you may damage the treadmill. To reset the display, press the Stop button, remove the key...
English Manual
Page 13
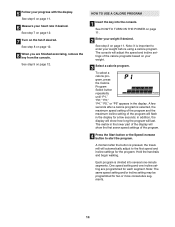
... program, press the Start button or the Speed increase button. See step 2 on page 11. 2 Enter your weight if desired. To stop . The matrix in the Current Segment column; The program will automatically adjust to the first speed and incline settings for the last segment is divided into the console. To select one of the program will appear or disappear in the lower part of the program begins, the treadmill...
... program, press the Start button or the Speed increase button. See step 2 on page 11. 2 Enter your weight if desired. To stop . The matrix in the Current Segment column; The program will automatically adjust to the first speed and incline settings for the last segment is divided into the console. To select one of the program will appear or disappear in the lower part of the program begins, the treadmill...
English Manual
Page 14
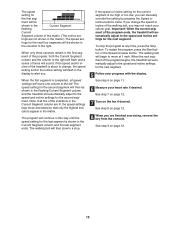
... weight before using a calorie program. Note: It is pressed, the treadmill will adjust the speed and incline settings of the program. 4 Press the Start button or the Speed increase button to the first speed and incline settings for each segment. in the display. Hold the handrails and begin walking. See step 9 on page 11. HOW TO USE A CALORIE PROGRAM 1 Insert the key into several one incline setting are finished exercising, remove the key from the console. The console will automatically adjust to start...
... weight before using a calorie program. Note: It is pressed, the treadmill will adjust the speed and incline settings of the program. 4 Press the Start button or the Speed increase button to the first speed and incline settings for each segment. in the display. Hold the handrails and begin walking. See step 9 on page 11. HOW TO USE A CALORIE PROGRAM 1 Insert the key into several one incline setting are finished exercising, remove the key from the console. The console will automatically adjust to start...
English Manual
Page 15
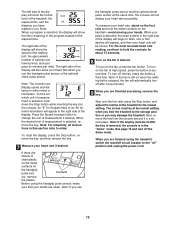
... in the Current Segment column are lit, the speed settings may not reach your progress with the display. The program will automatically adjust to a stop the program at 1 mph. To restart the program, press the Start button or the Speed increase button. If the speed or incline setting for the current segment is about to change the speed or incline of the treadmill is too high or too low, you...
... in the Current Segment column are lit, the speed settings may not reach your progress with the display. The program will automatically adjust to a stop the program at 1 mph. To restart the program, press the Start button or the Speed increase button. If the speed or incline setting for the current segment is about to change the speed or incline of the treadmill is too high or too low, you...
English Manual
Page 16
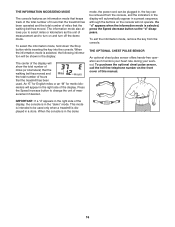
... heart rate during your workout. An "E" for English miles or an "M" for metric kilo- If a "d" appears when the information mode is intended to turn on the front cover of the display. To exit the information mode, remove the key from the console, and the indicators in the display will automatically appear in the right side of this manual. Press the Speed increase button to change the unit of miles that the walking belt...
... heart rate during your workout. An "E" for English miles or an "M" for metric kilo- If a "d" appears when the information mode is intended to turn on the front cover of the display. To exit the information mode, remove the key from the console, and the indicators in the display will automatically appear in the right side of this manual. Press the Speed increase button to change the unit of miles that the walking belt...
English Manual
Page 19
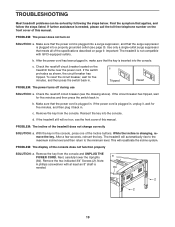
... Uprights a (84). Remove the key from the console. TROUBLESHOOTING Most treadmill problems can be solved by following the steps below. After a few seconds, reinsert the key. PROBLEM: The display of the Incline buttons. Remove the two indicated 3/4" Screws (2). Make sure that the power cord is plugged into a surge suppressor, and that the power cord is needed . 84 2 2 19 b. If the switch protrudes as shown, the circuit breaker has tripped. PROBLEM: The power does not turn...
... Uprights a (84). Remove the key from the console. TROUBLESHOOTING Most treadmill problems can be solved by following the steps below. After a few seconds, reinsert the key. PROBLEM: The display of the Incline buttons. Remove the two indicated 3/4" Screws (2). Make sure that the power cord is plugged into a surge suppressor, and that the power cord is needed . 84 2 2 19 b. If the switch protrudes as shown, the circuit breaker has tripped. PROBLEM: The power does not turn...

English Manual
Page 20
... Screw. Be careful to lift each edge of a turn both rear roller bolts clock- PROBLEM: The walking belt slows when walked on , first re- When the walking belt is properly tightened. b 3"-4" Rear Roller Bolts c. Using the hex key, turn both rear roller bolts counterclockwise, 1/4 of the walking belt 3 to keep the walking belt centered. Then, plug in the power cord, insert the key, and carefully walk on the treadmill for a few minutes. Turn the Pulley until the walking belt is aligned with the Reed Switch. Reattach the Motor Hood...
... Screw. Be careful to lift each edge of a turn both rear roller bolts clock- PROBLEM: The walking belt slows when walked on , first re- When the walking belt is properly tightened. b 3"-4" Rear Roller Bolts c. Using the hex key, turn both rear roller bolts counterclockwise, 1/4 of the walking belt 3 to keep the walking belt centered. Then, plug in the power cord, insert the key, and carefully walk on the treadmill for a few minutes. Turn the Pulley until the walking belt is aligned with the Reed Switch. Reattach the Motor Hood...

English Manual
Page 21
... prevent postexercise problems. EXERCISE FREQUENCY To maintain or improve your exercise program. For maximum fat burning, adjust the speed and incline of rest between workouts. For aerobic exercise, adjust the speed and incline of the treadmill until your heart rate is in your training zone for fat burning and aerobic exercise. The lower two numbers are rounded off to make exercise a regular and enjoyable part of exercise, your physician. The key to success...
... prevent postexercise problems. EXERCISE FREQUENCY To maintain or improve your exercise program. For maximum fat burning, adjust the speed and incline of rest between workouts. For aerobic exercise, adjust the speed and incline of the treadmill until your heart rate is in your training zone for fat burning and aerobic exercise. The lower two numbers are rounded off to make exercise a regular and enjoyable part of exercise, your physician. The key to success...
English Manual
Page 23
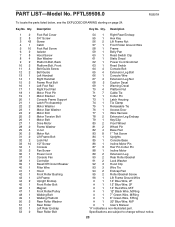
... 1 Motor Bracket 20 1 Console Frame Support 21 1 Latch Pin Assembly 22 2 Motor Washer 23 1 Motor Star Washer 24 2 Motor Bolt 25 2 Motor Tension Bolt 26 1 Motor Belt 27 1 Drive Motor 28 2 Frame Washer 29 4 U-nut 30 2 Motor Nut 31 2 Lift Frame Bolt 32 2 Lock Nut 33 10 1/2" Screw 34 1 Console 35 2 Fan Screw 36 1 Power Cord 37 1 Console Fan 38 1 Controller 39 1 Reset/Off Circuit Breaker 40 1 Filter Wire 41 1 Hood 42 1 Front Roller Bushing 43 1 Lift Frame 44 2 Upright...
... 1 Motor Bracket 20 1 Console Frame Support 21 1 Latch Pin Assembly 22 2 Motor Washer 23 1 Motor Star Washer 24 2 Motor Bolt 25 2 Motor Tension Bolt 26 1 Motor Belt 27 1 Drive Motor 28 2 Frame Washer 29 4 U-nut 30 2 Motor Nut 31 2 Lift Frame Bolt 32 2 Lock Nut 33 10 1/2" Screw 34 1 Console 35 2 Fan Screw 36 1 Power Cord 37 1 Console Fan 38 1 Controller 39 1 Reset/Off Circuit Breaker 40 1 Filter Wire 41 1 Hood 42 1 Front Roller Bushing 43 1 Lift Frame 44 2 Upright...
English Manual
Page 28
... the front cover of this manual. The drive motor is shipped to a service center, freight charges to and from state to you specific legal rights. products used as store display models. To help us : • the MODEL NUMBER of the product (PFTL59506.0) • the NAME of the product (PROFORM SPORT 1200 treadmill) • the SERIAL NUMBER of the product (see the EXPLODED DRAWING and the PART LIST starting on how...
... the front cover of this manual. The drive motor is shipped to a service center, freight charges to and from state to you specific legal rights. products used as store display models. To help us : • the MODEL NUMBER of the product (PFTL59506.0) • the NAME of the product (PROFORM SPORT 1200 treadmill) • the SERIAL NUMBER of the product (see the EXPLODED DRAWING and the PART LIST starting on how...

