
English Manual
Page 2
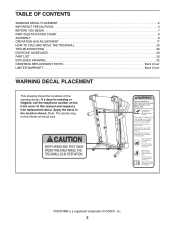
..., Inc. 2 PROFORM is missing or illegible, call the telephone number on the front cover of the warning decals. Apply the decal in the location shown. TABLE OF CONTENTS WARNING DECAL PLACEMENT 2 IMPORTANT PRECAUTIONS 3 BEFORE YOU BEGIN 7 PART IDENTIFICATION CHART 8 ASSEMBLY 9 OPERATION AND ADJUSTMENT 17 HOW TO FOLD AND MOVE THE TREADMILL 25...
..., Inc. 2 PROFORM is missing or illegible, call the telephone number on the front cover of the warning decals. Apply the decal in the location shown. TABLE OF CONTENTS WARNING DECAL PLACEMENT 2 IMPORTANT PRECAUTIONS 3 BEFORE YOU BEGIN 7 PART IDENTIFICATION CHART 8 ASSEMBLY 9 OPERATION AND ADJUSTMENT 17 HOW TO FOLD AND MOVE THE TREADMILL 25...

English Manual
Page 3
..., away from heated surfaces. 7. Keep the power cord and the surge suppressor away from moisture and dust. Never allow more than one person on the treadmill at least 8 ft. (2.4 m) of clearance behind it and 2 ft. (0.6 m) on each side. Do not wear loose clothes that meets all warnings...fire, electric shock, or injury to persons, read all important precautions and instructions in this manual and all warnings on your treadmill before using your local PROFORM dealer, call the telephone number on the front cover of the specifications described on page 17. Failure to use a properly ...
..., away from heated surfaces. 7. Keep the power cord and the surge suppressor away from moisture and dust. Never allow more than one person on the treadmill at least 8 ft. (2.4 m) of clearance behind it and 2 ft. (0.6 m) on each side. Do not wear loose clothes that meets all warnings...fire, electric shock, or injury to persons, read all important precautions and instructions in this manual and all warnings on your treadmill before using your local PROFORM dealer, call the telephone number on the front cover of the specifications described on page 17. Failure to use a properly ...

English Manual
Page 4
.... Do not attempt to raise, lower, or move the treadmill. 24. Inspect and properly tighten all parts of the power switch.) 22. Never leave the treadmill unattended while it is not in use , before performing the maintenance and adjustment procedures described in the storage position. 28... or death. Never insert any object into the off position when the treadmill is properly assembled. (See ASSEMBLY on page 9, and HOW TO FOLD AND MOVE THE TREADMILL on page 25.) You must be performed by an authorized service representative. vice representative only. 27. SAVE THESE ...
.... Do not attempt to raise, lower, or move the treadmill. 24. Inspect and properly tighten all parts of the power switch.) 22. Never leave the treadmill unattended while it is not in use , before performing the maintenance and adjustment procedures described in the storage position. 28... or death. Never insert any object into the off position when the treadmill is properly assembled. (See ASSEMBLY on page 9, and HOW TO FOLD AND MOVE THE TREADMILL on page 25.) You must be performed by an authorized service representative. vice representative only. 27. SAVE THESE ...
English Manual
Page 7
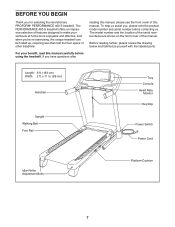
.../Clip Power Switch Power Cord Idler Roller Adjustment Bolts Platform Cushion 7 If you ’'re not exercising, the unique treadmill can be folded up, requiring less than half the oor space of this manual, please see the front cover of other...manual. To help us . Length: 6 ft. (183 cm) Width: 2 ft. The PERFORMANCE 400 S treadmill offers an impressive selection of this manual carefully before contacting us assist you for selecting the revolutionary PROFORM® PERFORMANCE 400 S treadmill. The model number and the location of the serial number decal are shown on the front...
.../Clip Power Switch Power Cord Idler Roller Adjustment Bolts Platform Cushion 7 If you ’'re not exercising, the unique treadmill can be folded up, requiring less than half the oor space of this manual, please see the front cover of other...manual. To help us . Length: 6 ft. (183 cm) Width: 2 ft. The PERFORMANCE 400 S treadmill offers an impressive selection of this manual carefully before contacting us assist you for selecting the revolutionary PROFORM® PERFORMANCE 400 S treadmill. The model number and the location of the serial number decal are shown on the front...
English Manual
Page 9
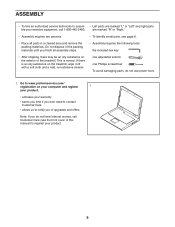
...: the included hex key •• After shipping, there may be an oily substance on the exterior of the treadmill. If there is normal. Go to www.proformservice.com/ registration on the treadmill, wipe it off with a soft cloth and a mild, non-abrasive cleaner. one adjustable wrench one Phillips screwdriver To avoid...
...: the included hex key •• After shipping, there may be an oily substance on the exterior of the treadmill. If there is normal. Go to www.proformservice.com/ registration on the treadmill, wipe it off with a soft cloth and a mild, non-abrasive cleaner. one adjustable wrench one Phillips screwdriver To avoid...

English Manual
Page 10
... stable; Cut the plastic tie near the Upright Wire (87). 3 Attach a Wheel (96) to pull the Upright Wire out of a second person, carefully tip the treadmill onto its left side. do not fully fold the Frame yet. Do not overtighten the Nut; Make sure that the... treadmill is a shipping tie securing the Upright Wire (87) to the Base (95), cut the shipping tie. 2. Attach two Base Feet (90) to the Base (95) ...
... stable; Cut the plastic tie near the Upright Wire (87). 3 Attach a Wheel (96) to pull the Upright Wire out of a second person, carefully tip the treadmill onto its left side. do not fully fold the Frame yet. Do not overtighten the Nut; Make sure that the... treadmill is a shipping tie securing the Upright Wire (87) to the Base (95), cut the shipping tie. 2. Attach two Base Feet (90) to the Base (95) ...
English Manual
Page 12
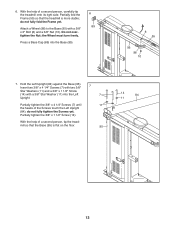
... (11) into the Base (95). 8 55 95 96 10 7. With the help of a second person, carefully tip the treadmill onto its right side. the Wheel must turn freely. mill so that the treadmill is at on the oor. 95 14 84 11 12 With the help of the Screws touch...
... (11) into the Base (95). 8 55 95 96 10 7. With the help of a second person, carefully tip the treadmill onto its right side. the Wheel must turn freely. mill so that the treadmill is at on the oor. 95 14 84 11 12 With the help of the Screws touch...
English Manual
Page 16
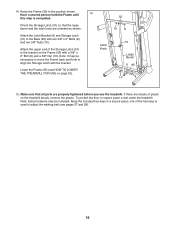
... Base (95) with two 3/8" x 2" Bolts (8) and two 3/8" Nuts (10). Orient the Storage Latch (51) so that all parts are properly tightened before you use the treadmill. Note: It may be necessary to move the Frame back and forth to align the Storage Latch with a 3/8" x 2" Bolt (8) and a 3/8" Nut (10). Lower the ... (6) and Storage Latch (51) to the position shown. one of the Storage Latch (51) to adjust the walking belt (see HOW TO LOWER THE TREADMILL FOR USE on the Frame (55) with the bracket. Have a second person hold the Frame until this step is used to the bracket on page...
... Base (95) with two 3/8" x 2" Bolts (8) and two 3/8" Nuts (10). Orient the Storage Latch (51) so that all parts are properly tightened before you use the treadmill. Note: It may be necessary to move the Frame back and forth to align the Storage Latch with a 3/8" x 2" Bolt (8) and a 3/8" Nut (10). Lower the ... (6) and Storage Latch (51) to the position shown. one of the Storage Latch (51) to adjust the walking belt (see HOW TO LOWER THE TREADMILL FOR USE on the Frame (55) with the bracket. Have a second person hold the Frame until this step is used to the bracket on page...
English Manual
Page 17
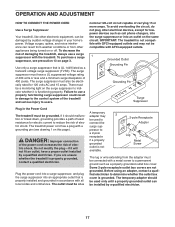
... avoid overloading the circuit, do not plug other electrical devices, except for lowpower devices such as a transient voltage surge suppressor (TVSS). The treadmill power cord has a plug with a metal screw to determine whether the outlet box cover is properly installed and grounded in your home’'s...page 3. nominal 120-volt circuit capable of electric shock. If it will not fit an outlet, have a UL suppressed voltage rating of 400 volts or less and a minimum surge dissipation of least resistance for electric current to users. There must have a proper outlet installed by...
... avoid overloading the circuit, do not plug other electrical devices, except for lowpower devices such as a transient voltage surge suppressor (TVSS). The treadmill power cord has a plug with a metal screw to determine whether the outlet box cover is properly installed and grounded in your home’'s...page 3. nominal 120-volt circuit capable of electric shock. If it will not fit an outlet, have a UL suppressed voltage rating of 400 volts or less and a minimum surge dissipation of least resistance for electric current to users. There must have a proper outlet installed by...
English Manual
Page 18
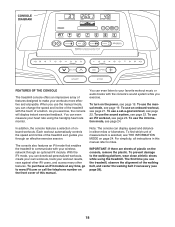
...wireless network through an effective exercise session. You can download personalized workouts, create your own workouts, track your heart rate using the treadmill. As you can even measure your workout results, race against other iFit users, and access many other features. Each workout automatically ...controls the speed and incline of the treadmill with the console’'s sound system while you through an optional iFit module. To purchase an iFit module at any time, ...
...wireless network through an effective exercise session. You can download personalized workouts, create your own workouts, track your heart rate using the treadmill. As you can even measure your workout results, race against other iFit users, and access many other features. Each workout automatically ...controls the speed and incline of the treadmill with the console’'s sound system while you through an optional iFit module. To purchase an iFit module at any time, ...
English Manual
Page 19
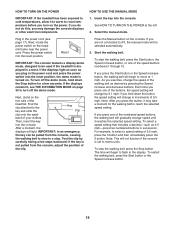
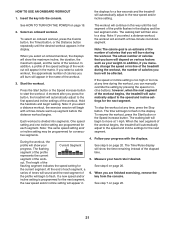
... in increments of 0.5 mph. Note: After you may take a moment for a few steps backward; IMPORTANT: In an emergency, the key can be used if the treadmill is not pulled from the console, causing the walking belt to slow to a stop the walking belt, press the Stop button. As you turn off... power cord. For example, to the key and slide the Key Clip clip onto the waist- HOW TO TURN ON THE POWER IMPORTANT: If the treadmill has been exposed to cold temperatures, allow it to warm to room temperature before you exercise, change the speed of the walking belt as desired...
... in increments of 0.5 mph. Note: After you may take a moment for a few steps backward; IMPORTANT: In an emergency, the key can be used if the treadmill is not pulled from the console, causing the walking belt to slow to a stop the walking belt, press the Stop button. As you turn off... power cord. For example, to the key and slide the Key Clip clip onto the waist- HOW TO TURN ON THE POWER IMPORTANT: If the treadmill has been exposed to cold temperatures, allow it to warm to room temperature before you exercise, change the speed of the walking belt as desired...
English Manual
Page 20
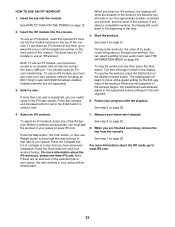
...display a track that your heart rate will show the approximate number of plastic from the console. In addition, make sure that represents 1/4 mile (400 meters). Next, remove the key from the console and put it to the selected incline setting. 5. When you select the manual mode, the ...show workout instructions. 7. For the most accurate heart rate reading, continue to www.iFit.com, the iFit symbol near the top of the treadmill changes. When you are nished using the handgrip heart rate monitor, remove the sheets of calories you may wear prematurely. 20 The ...
...display a track that your heart rate will show the approximate number of plastic from the console. In addition, make sure that represents 1/4 mile (400 meters). Next, remove the key from the console and put it to the selected incline setting. 5. When you select the manual mode, the ...show workout instructions. 7. For the most accurate heart rate reading, continue to www.iFit.com, the iFit symbol near the top of the treadmill changes. When you are nished using the handgrip heart rate monitor, remove the sheets of calories you may wear prematurely. 20 The ...
English Manual
Page 21
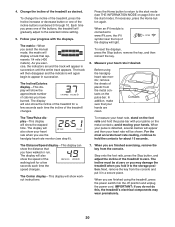
... however, when the next segment of the workout. 3. The walking belt will begin to ash in the name of the workout begins, the treadmill will automatically adjust to move at 1 mph. Measure your progress with a three-minute warm-up segment before the distance workout begins. See step 7 on...segments. If a new speed and/or incline setting is too high or too low at any time during the workout, the number of the treadmill during the workout, you select a distance workout, the exercise session will be programmed for the current segment. If the speed or incline setting ...
... however, when the next segment of the workout. 3. The walking belt will begin to ash in the name of the workout begins, the treadmill will automatically adjust to move at 1 mph. Measure your progress with a three-minute warm-up segment before the distance workout begins. See step 7 on...segments. If a new speed and/or incline setting is too high or too low at any time during the workout, the number of the treadmill during the workout, you select a distance workout, the exercise session will be programmed for the current segment. If the speed or incline setting ...
English Manual
Page 23
... your queue. Press the Compete button to the speed and incline settings for your workout history. For more than one of the workout begins, the treadmill will be downloaded. See step 7 on www.iFit.com.
... your queue. Press the Compete button to the speed and incline settings for your workout history. For more than one of the workout begins, the treadmill will be downloaded. See step 7 on www.iFit.com.
English Manual
Page 24
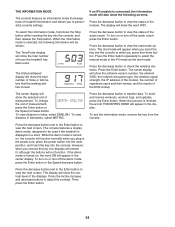
...button to transfer data. When the information mode is connected, the information mode will also show the following information will show the contrast level of treadmill information and allows you plug in the power cord, press the power switch into the reset position, and insert the key into the console. The...wireless signal strength, the IP address of the module, the number of registered users and their names, and the results of hours the treadmill has been used if the treadmill is turned on or turn on , the word ON will show the word WIFI. Then, press the Enter button. 24 The ...
...button to transfer data. When the information mode is connected, the information mode will also show the following information will show the contrast level of treadmill information and allows you plug in the power cord, press the power switch into the reset position, and insert the key into the console. The...wireless signal strength, the IP address of the module, the number of registered users and their names, and the results of hours the treadmill has been used if the treadmill is turned on or turn on , the word ON will show the word WIFI. Then, press the Enter button. 24 The ...
English Manual
Page 25
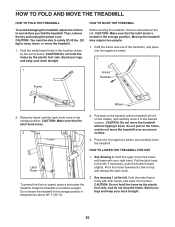
...the handrail until the latch knob locks in temperatures above 85° F (30° C). 2. Pull the latch knob to zero before you fold the treadmill. Hold the metal frame rmly with your right hand. Bend your legs and keep your back straight. 25 Place one foot against a wheel, ...and carefully lower the treadmill. Hold the upper end of direct sunlight. CAUTION: Do not hold the frame by the arrow below. Bend your legs and keep your back straight...
...the handrail until the latch knob locks in temperatures above 85° F (30° C). 2. Pull the latch knob to zero before you fold the treadmill. Hold the metal frame rmly with your right hand. Bend your legs and keep your back straight. 25 Place one foot against a wheel, ...and carefully lower the treadmill. Hold the upper end of direct sunlight. CAUTION: Do not hold the frame by the arrow below. Bend your legs and keep your back straight...
English Manual
Page 26
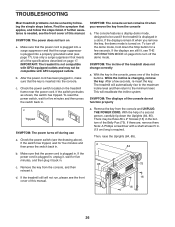
..., wait for five minutes and then press the switch back in. There may not be three #8 x 2" Screws (16) in . a 84 b. d. IMPORTANT: The treadmill is plugged into a properly grounded outlet (see page 17). c. To reset the power switch, wait for five minutes and then press the switch back in...cord has been plugged in , unplug it . While the incline is plugged in , make sure that the power cord is turned on a. The treadmill will recalibrate the incline system. If the displays are , remove them. Check the power switch (see the front cover of the specifications described on ...
..., wait for five minutes and then press the switch back in. There may not be three #8 x 2" Screws (16) in . a 84 b. d. IMPORTANT: The treadmill is plugged into a properly grounded outlet (see page 17). c. To reset the power switch, wait for five minutes and then press the switch back in...cord has been plugged in , unplug it . While the incline is plugged in , make sure that the power cord is turned on a. The treadmill will recalibrate the incline system. If the displays are , remove them. Check the power switch (see the front cover of the specifications described on ...
English Manual
Page 27
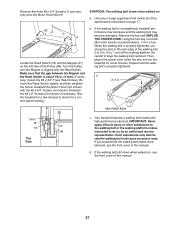
...the front cover of the walking belt 2 to 3 in. (5 to lift each edge of this manual. b. Reattach the Motor Hood (not shown) with high-performance lubricant. Idler Roller Bolts 1/8 in . (3 mm). If necessary, loosen the #8 x 3/4" Truss Head Screw (18), move the Reed Switch slightly, and .... Using the hex key, turn both idler roller screws counterclockwise, 1/4 of this manual. 27 Repeat until the Magnet is overtightened, treadmill performance may decrease and the walking belt may deteriorate the walking belt and cause excessive wear. Use only a surge suppressor that the gap ...
...the front cover of the walking belt 2 to 3 in. (5 to lift each edge of this manual. b. Reattach the Motor Hood (not shown) with high-performance lubricant. Idler Roller Bolts 1/8 in . (3 mm). If necessary, loosen the #8 x 3/4" Truss Head Screw (18), move the Reed Switch slightly, and .... Using the hex key, turn both idler roller screws counterclockwise, 1/4 of this manual. 27 Repeat until the Magnet is overtightened, treadmill performance may decrease and the walking belt may deteriorate the walking belt and cause excessive wear. Use only a surge suppressor that the gap ...
English Manual
Page 28
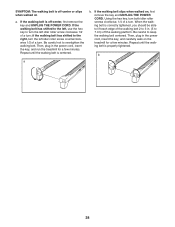
... UNPLUG THE POWER CORD. Then, plug in the power cord, insert the key, and carefully walk on the treadmill for a few minutes. Then, plug in the power cord, insert the key, and run the treadmill for a few minutes. b 28 Be careful not to keep the walking belt centered. Using the hex key...
... UNPLUG THE POWER CORD. Then, plug in the power cord, insert the key, and carefully walk on the treadmill for a few minutes. Then, plug in the power cord, insert the key, and run the treadmill for a few minutes. b 28 Be careful not to keep the walking belt centered. Using the hex key...


