
English Manual
Page 2
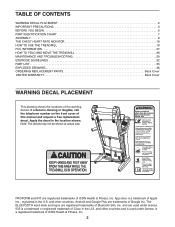
... decal in the U.S. is missing or illegible, call the telephone number on the front cover of ICON Health & Fitness, Inc. PROFORM and IFIT are trademarks of Apple Inc., registered in the location shown. The BLUETOOTH word mark and logos are used under license....DECAL PLACEMENT 2 IMPORTANT PRECAUTIONS 3 BEFORE YOU BEGIN 6 PART IDENTIFICATION CHART 7 ASSEMBLY 8 THE CHEST HEART RATE MONITOR 18 HOW TO USE THE TREADMILL 19 FCC INFORMATION 27 HOW TO FOLD AND MOVE THE TREADMILL 28 MAINTENANCE AND TROUBLESHOOTING 29 EXERCISE GUIDELINES 32 PART LIST 35 EXPLODED DRAWING 36...
... decal in the U.S. is missing or illegible, call the telephone number on the front cover of ICON Health & Fitness, Inc. PROFORM and IFIT are trademarks of Apple Inc., registered in the location shown. The BLUETOOTH word mark and logos are used under license....DECAL PLACEMENT 2 IMPORTANT PRECAUTIONS 3 BEFORE YOU BEGIN 6 PART IDENTIFICATION CHART 7 ASSEMBLY 8 THE CHEST HEART RATE MONITOR 18 HOW TO USE THE TREADMILL 19 FCC INFORMATION 27 HOW TO FOLD AND MOVE THE TREADMILL 28 MAINTENANCE AND TROUBLESHOOTING 29 EXERCISE GUIDELINES 32 PART LIST 35 EXPLODED DRAWING 36...

English Manual
Page 4
...the handrails while using the treadmill. 20. When a person is properly assembled. (See ASSEMBLY on page 8 and HOW TO FOLD AND MOVE THE TREADMILL on page 28.) You must be performed by placing objects under the treadmill. 28. able to safely lift 45 lbs. (20 kg) to move the treadmill. 26. Never insert ... of high speeds. 19. Adjust the speed in use , before performing the maintenance and adjustment procedures described in serious injury or death. Always remove the key, press the power switch into any opening on the treadmill, the noise level of the power switch), and unplug the power...
...the handrails while using the treadmill. 20. When a person is properly assembled. (See ASSEMBLY on page 8 and HOW TO FOLD AND MOVE THE TREADMILL on page 28.) You must be performed by placing objects under the treadmill. 28. able to safely lift 45 lbs. (20 kg) to move the treadmill. 26. Never insert ... of high speeds. 19. Adjust the speed in use , before performing the maintenance and adjustment procedures described in serious injury or death. Always remove the key, press the power switch into any opening on the treadmill, the noise level of the power switch), and unplug the power...

English Manual
Page 7
...the part, from the PART LIST near the end of this manual. The number following the key number is the quantity used for assembly. Note: If a part is preattached. The number in parentheses below to see whether it is not in the hardware kit, check... to identify small parts used for assembly. Extra parts may be included. 5/16" Star Washer (8)-8 3/8" Star Washer (25)-8 #8 x 1/2" Silver Screw (13)-1 #8 x 3/4" Truss Head Screw (24)-16 #10 x 3/4" Screw (6)-2 #8 x 5/8" Screw (...
...the part, from the PART LIST near the end of this manual. The number following the key number is the quantity used for assembly. Note: If a part is preattached. The number in parentheses below to see whether it is not in the hardware kit, check... to identify small parts used for assembly. Extra parts may be included. 5/16" Star Washer (8)-8 3/8" Star Washer (25)-8 #8 x 1/2" Silver Screw (13)-1 #8 x 3/4" Truss Head Screw (24)-16 #10 x 3/4" Screw (6)-2 #8 x 5/8" Screw (...
English Manual
Page 8
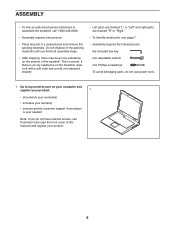
... hire an authorized service technician to my.proform.com on your computer and register your product. 1 • documents your ownership • activates your product. 8 Go to assemble the treadmill, call Customer Care (see page 7. • Assembly requires the following tools: the included hex key one ... damaging parts, do not have internet access, call 1-800-445-2480. • Assembly requires two persons. • Place all assembly steps. • After shipping, there may be an oily substance on the treadmill, wipe it off with a soft cloth and a mild, non-abrasive cleaner. &#...
... hire an authorized service technician to my.proform.com on your computer and register your product. 1 • documents your ownership • activates your product. 8 Go to assemble the treadmill, call Customer Care (see page 7. • Assembly requires the following tools: the included hex key one ... damaging parts, do not have internet access, call 1-800-445-2480. • Assembly requires two persons. • Place all assembly steps. • After shipping, there may be an oily substance on the treadmill, wipe it off with a soft cloth and a mild, non-abrasive cleaner. &#...

English Manual
Page 12
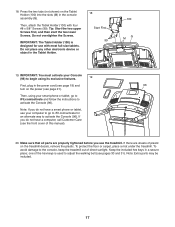
Then, remove the Pulse Crossbar (80). Set the console assembly (G) face down on the right side. Remove and discard the four indicated screws (H). 8. Then, remove and discard the two indicated screws (F). 8 2 8 F 74 2 74 83 8 F 91 84 9. H 80 H 12 Be careful not to pinch the Upright Wire (83) on a soft surface to the Right and Left Uprights (84, 91) with two of the 5/16" x 2" Screws (2) that you removed in step 5 and two 5/16" Star Washers (8); do not fully tighten the Screws yet. Attach the two Handrails (74) to avoid scratching the console 9 G assembly.
Then, remove the Pulse Crossbar (80). Set the console assembly (G) face down on the right side. Remove and discard the four indicated screws (H). 8. Then, remove and discard the two indicated screws (F). 8 2 8 F 74 2 74 83 8 F 91 84 9. H 80 H 12 Be careful not to pinch the Upright Wire (83) on a soft surface to the Right and Left Uprights (84, 91) with two of the 5/16" x 2" Screws (2) that you removed in step 5 and two 5/16" Star Washers (8); do not fully tighten the Screws yet. Attach the two Handrails (74) to avoid scratching the console 9 G assembly.

English Manual
Page 13
...) as shown. Connect the Upright Wire (83) to the console wire (I 83 13 Attach the Pulse Crossbar with two of a second person, hold the console assembly (G) near the Handrails (74) (only 11 one connector and try again.
...) as shown. Connect the Upright Wire (83) to the console wire (I 83 13 Attach the Pulse Crossbar with two of a second person, hold the console assembly (G) near the Handrails (74) (only 11 one connector and try again.

English Manual
Page 14
start all four Screws, and then tighten them ; 13 do not overtighten the Truss Head Screws. 80 24 24 14 Do not pinch the wires. 12. Then, insert the wires (J) upward into the Pulse Crossbar (80), and then tighten them . Start four #8 x 3/4" Truss Head Screws (24) into the console assembly (G). 74 J 8 2 74 8 2 13. Attach the console assembly (G) to the Handrails (74) with four 5/16" x 2" Screws (2) and four 12 G 5/16" Star Washers (8);
start all four Screws, and then tighten them ; 13 do not overtighten the Truss Head Screws. 80 24 24 14 Do not pinch the wires. 12. Then, insert the wires (J) upward into the Pulse Crossbar (80), and then tighten them . Start four #8 x 3/4" Truss Head Screws (24) into the console assembly (G). 74 J 8 2 74 8 2 13. Attach the console assembly (G) to the Handrails (74) with four 5/16" x 2" Screws (2) and four 12 G 5/16" Star Washers (8);

English Manual
Page 15
... (24) into the Left Handrail Bottom Cover (75), the left Handrail (74). Next, slide the Left Handrail Top and Bottom Covers forward against the console assembly (G) as shown. Then, tighten all four Truss Head Screws. Attach the Right Handrail Top and Bottom Covers (81, 82) to the position shown. Raise the...
... (24) into the Left Handrail Bottom Cover (75), the left Handrail (74). Next, slide the Left Handrail Top and Bottom Covers forward against the console assembly (G) as shown. Then, tighten all four Truss Head Screws. Attach the Right Handrail Top and Bottom Covers (81, 82) to the position shown. Raise the...
English Manual
Page 17
... not have a smart phone or tablet, use the treadmill. If you do not have a computer, call Customer Care (see the front cover of direct sunlight. Do not overtighten the Screws. Keep the included hex keys in the console assembly (G). Do not place any other electronic device or object... in the power cord (see page 19) and 96 turn on the treadmill decals, remove the plastic. Then, using its exclusive features. 19 First, plug...
... not have a smart phone or tablet, use the treadmill. If you do not have a computer, call Customer Care (see the front cover of direct sunlight. Do not overtighten the Screws. Keep the included hex keys in the console assembly (G). Do not place any other electronic device or object... in the power cord (see page 19) and 96 turn on the treadmill decals, remove the plastic. Then, using its exclusive features. 19 First, plug...
English Manual
Page 20
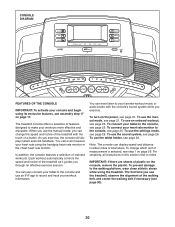
... rate using its exclusive features, see page 25. IMPORTANT: If there are sheets of onboard workouts. To prevent damage to the console, see assembly step 17 on the console, remove the plastic. You can even listen to miles. To use an iFit® app to the console and...all instructions in either miles or kilometers. The first time you use the manual mode, you exercise. As you through an effective exercise session. The treadmill console offers a selection of measurement is selected, see step 1 on the power, see page 30). 20 You can also connect your tablet to ...
... rate using its exclusive features, see page 25. IMPORTANT: If there are sheets of onboard workouts. To prevent damage to the console, see assembly step 17 on the console, remove the plastic. You can even listen to miles. To use an iFit® app to the console and...all instructions in either miles or kilometers. The first time you use the manual mode, you exercise. As you through an effective exercise session. The treadmill console offers a selection of measurement is selected, see step 1 on the power, see page 30). 20 You can also connect your tablet to ...
English Manual
Page 29
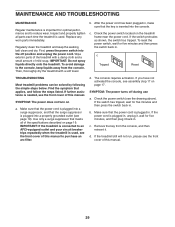
...into a properly grounded outlet (see the front cover of the specifications described on page 17. c Tripped Reset TROUBLESHOOTING Most treadmill problems can be solved by following the simple steps below. Use only a surge suppressor that the surge suppressor is plugged into the console... worn parts immediately. Check the power switch located on a. To reset the power switch, wait for optimal performance and to purchase an arc filter. d. Check the power switch (see assembly step 17 on page 19. b. Make sure that applies, and follow the steps listed. c.
...into a properly grounded outlet (see the front cover of the specifications described on page 17. c Tripped Reset TROUBLESHOOTING Most treadmill problems can be solved by following the simple steps below. Use only a surge suppressor that the surge suppressor is plugged into the console... worn parts immediately. Check the power switch located on a. To reset the power switch, wait for optimal performance and to purchase an arc filter. d. Check the power switch (see assembly step 17 on page 19. b. Make sure that applies, and follow the steps listed. c.


