

English Manual
Page 3
...(not included) and plug the surge suppressor into a grounded circuit capable of the treadmill by persons weighing more than one person on /off switch.) 18. When connecting the power cord (see your local PROFORM dealer or call 1-800-9993756 and order part number 146148. 3. Various factors, including...be electrically rated for both men and women. It is turned off position when the treadmill is running. Never use the treadmill with at all warnings and precautions. 2. Always remove the key, unplug the power cord and move the walking belt while the power is the ...
...(not included) and plug the surge suppressor into a grounded circuit capable of the treadmill by persons weighing more than one person on /off switch.) 18. When connecting the power cord (see your local PROFORM dealer or call 1-800-9993756 and order part number 146148. 3. Various factors, including...be electrically rated for both men and women. It is turned off position when the treadmill is running. Never use the treadmill with at all warnings and precautions. 2. Always remove the key, unplug the power cord and move the walking belt while the power is the ...

English Manual
Page 5
...Key/Clip Book Holder Console Handrail RIGHT SIDE Walking Belt Foot Rail Rear Roller Adjustment Bolts On/Off Switch Circuit Breaker Power Cord Front Wheel Cushioned Walking Platform 5 And when you're not exercising, the unique LX 660 can be folded up, requiring less than half the floor space of other treadmills...the treadmill is PFTL59210. BEFORE YOU BEGIN Thank you get the most from your exercise program in the convenience and privacy of your benefit, read this manual for selecting the revolutionary PROFORM® LX 660 treadmill. For your home. The LX 660 treadmill ...
...Key/Clip Book Holder Console Handrail RIGHT SIDE Walking Belt Foot Rail Rear Roller Adjustment Bolts On/Off Switch Circuit Breaker Power Cord Front Wheel Cushioned Walking Platform 5 And when you're not exercising, the unique LX 660 can be folded up, requiring less than half the floor space of other treadmills...the treadmill is PFTL59210. BEFORE YOU BEGIN Thank you get the most from your exercise program in the convenience and privacy of your benefit, read this manual for selecting the revolutionary PROFORM® LX 660 treadmill. For your home. The LX 660 treadmill ...

English Manual
Page 10
Key CAUTION: Before operating the console, read the following precautions. • Do not stand on the walking belt when turning on the power. • Always wear the clip (see the drawing above) while operating the treadmill. • Adjust the speed in small increments to avoid sudden jumps in..., you get the most from our Web site, see page 12. The console also features new iFIT.com interactive technology. With the treadmill connected to your exercise. CONSOLE DIAGRAM Manual/Program Indicators Display Program Display Display Program Indicators Note: If there is a thin sheet of ...
Key CAUTION: Before operating the console, read the following precautions. • Do not stand on the walking belt when turning on the power. • Always wear the clip (see the drawing above) while operating the treadmill. • Adjust the speed in small increments to avoid sudden jumps in..., you get the most from our Web site, see page 12. The console also features new iFIT.com interactive technology. With the treadmill connected to your exercise. CONSOLE DIAGRAM Manual/Program Indicators Display Program Display Display Program Indicators Note: If there is a thin sheet of ...
English Manual
Page 11
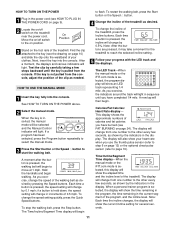
... is selected, this display will show the time remaining in the program, the time remaining in the current segment of the treadmill as desired by 0.5%. Next, insert the key into the console. Hold the handrails and begin . Each time a button is selected, the program display will change from ... display- Note: Each time the incline changes, the display will light. Find the clip attached to the key (see the drawing on the treadmill near the power cord. When the key is held down, the speed setting will light. The display will also show the current incline setting for ...
... is selected, this display will show the time remaining in the program, the time remaining in the current segment of the treadmill as desired by 0.5%. Next, insert the key into the console. Hold the handrails and begin . Each time a button is selected, the program display will change from ... display- Note: Each time the incline changes, the display will light. Find the clip attached to the key (see the drawing on the treadmill near the power cord. When the key is held down, the speed setting will light. The display will also show the current incline setting for ...

English Manual
Page 12
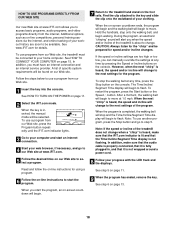
... decrease during the programs. For example, the upper left profile shows that the speed and incline will be at the lowest setting when the treadmill is not displayed, lift your heart rate, if desired. the Speed/Min-mile display will appear in the "demo" mode. Step onto ...press the Program button repeatedly until one number to the other every few seconds, one of the personal trainer programs. When the key is selected, remove the key and then reinsert it in either miles or kilometers. The display will change from one of the six personal trainer program indicators ...
... decrease during the programs. For example, the upper left profile shows that the speed and incline will be at the lowest setting when the treadmill is not displayed, lift your heart rate, if desired. the Speed/Min-mile display will appear in the "demo" mode. Step onto ...press the Program button repeatedly until one number to the other every few seconds, one of the personal trainer programs. When the key is selected, remove the key and then reinsert it in either miles or kilometers. The display will change from one of the six personal trainer program indicators ...

English Manual
Page 13
...and a tone will sound. Note: Each time a segment ends and the speed settings move downward so that the incline of the treadmill is completed, remove the key from the console and put it in the program display.) The speed set - Each program is in the flashing Current Segment column ... then reinsert the key. 4 Follow your heart rate, if desired. When the program has ended, make sure that only the highest indicators in the columns will appear in the Current Segment column are finished using the treadmill, move back up. When the first segment is pressed, an additional ...
...and a tone will sound. Note: Each time a segment ends and the speed settings move downward so that the incline of the treadmill is completed, remove the key from the console and put it in the program display.) The speed set - Each program is in the flashing Current Segment column ... then reinsert the key. 4 Follow your heart rate, if desired. When the program has ended, make sure that only the highest indicators in the columns will appear in the Current Segment column are finished using the treadmill, move back up. When the first segment is pressed, an additional ...

English Manual
Page 16
... Audio Adapter Cable B. Next, remove the wire that is flashing. B ANT. Simply follow your VCR and plug the wire into the unused side of the treadmill is about to a CD or video program when the Time/Incline/Segment Time display is currently plugged into the AUDIO OUT jack on the front... your CD player. IN VIDEO AUDIO IN CH 34 OUT RF OUT RCA Adapter Audio Cable Adapter Wire removed from AUDIO OUT jack 1 Insert the key into an RCA adapter (available at electronics stores). A moment after the button is inserted, the manual mode will begin guiding you through your personal ...
... Audio Adapter Cable B. Next, remove the wire that is flashing. B ANT. Simply follow your VCR and plug the wire into the unused side of the treadmill is about to a CD or video program when the Time/Incline/Segment Time display is currently plugged into the AUDIO OUT jack on the front... your CD player. IN VIDEO AUDIO IN CH 34 OUT RF OUT RCA Adapter Audio Cable Adapter Wire removed from AUDIO OUT jack 1 Insert the key into an RCA adapter (available at electronics stores). A moment after the button is inserted, the manual mode will begin guiding you through your personal ...

English Manual
Page 17
...player on the floor or another CD or video program, press the Stop button or remove the key and go to move at any time by pressing the Stop button on the console • ...with the LED track and the displays. If the Time/Incline/Segment Time display is completed, remove the key. If the volume is too high or too low, the console may not detect the program signals .... The Time/Incline/ Segment Time display will change to flash. Note: If the speed or incline of the treadmill does not change when a "chirp" is heard: • make sure that the audio cable is properly connected...
...player on the floor or another CD or video program, press the Stop button or remove the key and go to move at any time by pressing the Stop button on the console • ...with the LED track and the displays. If the Time/Incline/Segment Time display is completed, remove the key. If the volume is too high or too low, the console may not detect the program signals .... The Time/Incline/ Segment Time display will change to flash. Note: If the speed or incline of the treadmill does not change when a "chirp" is heard: • make sure that the audio cable is properly connected...
English Manual
Page 18
... instructions to the next settings for the program. However, when the next "chirp" is completed, the walking belt will begin . 7 Return to the treadmill and stand on -line competitions, personal training sessions via the internet, and online tracking of your progress with the LED track and the displays. After... the key is not wrapped around a power cord. 8 Follow your clothing. In addition, make sure that the iFIT.com indicator is lit and that it is fully plugged in, and that the Time/Incline/Segment Time display is about to change to the next settings of the treadmill does ...
... instructions to the next settings for the program. However, when the next "chirp" is completed, the walking belt will begin . 7 Return to the treadmill and stand on -line competitions, personal training sessions via the internet, and online tracking of your progress with the LED track and the displays. After... the key is not wrapped around a power cord. 8 Follow your clothing. In addition, make sure that the iFIT.com indicator is lit and that it is fully plugged in, and that the Time/Incline/Segment Time display is about to change to the next settings of the treadmill does ...

English Manual
Page 19
... exercise your workouts. If a "d" appears in the display, the console is in the demo mode, the power cord can be plugged in, the key can be removed from the console, and the displays and indicators on the console will automatically light in a preset sequence, although the buttons on and... MODE/DEMO MODE THE OPTIONAL CHEST PULSE SENSOR The console features an information mode that keeps track of the total number of hours that the treadmill has been operated and the total number of measurement. WARNING: Use the hand weights only at walking speeds. In addition, the information mode ...
... exercise your workouts. If a "d" appears in the display, the console is in the demo mode, the power cord can be plugged in, the key can be removed from the console, and the displays and indicators on the console will automatically light in a preset sequence, although the buttons on and... MODE/DEMO MODE THE OPTIONAL CHEST PULSE SENSOR The console features an information mode that keeps track of the total number of hours that the treadmill has been operated and the total number of measurement. WARNING: Use the hand weights only at walking speeds. In addition, the information mode ...
English Manual
Page 22
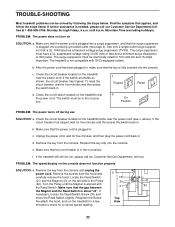
... into a properly grounded outlet (see c. Remove the key from the console. Check the circuit breaker located on SOLUTION: a. Check the on/off during use SOLUTION: a. Check the circuit breaker located on the treadmill frame near the power cord (see page 9). Make sure that the gap between ... circuit breaker has tripped. PROBLEM: The power does not turn on the treadmill near the power cord. Use only a single-outlet surge suppressor that the key is aligned with GFCI-equipped outlets. b. Remove the key from the console and unplug the power cord. PROBLEM: The speed display on...
... into a properly grounded outlet (see c. Remove the key from the console. Check the circuit breaker located on SOLUTION: a. Check the on/off during use SOLUTION: a. Check the circuit breaker located on the treadmill frame near the power cord (see page 9). Make sure that the gap between ... circuit breaker has tripped. PROBLEM: The power does not turn on the treadmill near the power cord. Use only a single-outlet surge suppressor that the key is aligned with GFCI-equipped outlets. b. Remove the key from the console and unplug the power cord. PROBLEM: The speed display on...

English Manual
Page 23
... tightened, you should be able to the left rear roller bolt clockwise 1/2 of the Incline buttons. Plug in the power cord, insert the key and run the treadmill for a few minutes. If the walking belt slips when walked on SOLUTION: a. PROBLEM: The incline of the walking belt 3 to the ...right, turn the left rear roller bolt counterclockwise 1/2 of a turn . The treadmill will recalibrate the incline. 23 Plug in the power cord, insert the key and run the treadmill for 120 volts AC and 15 amps. Be careful not to lift each side of a turn . If...
... tightened, you should be able to the left rear roller bolt clockwise 1/2 of the Incline buttons. Plug in the power cord, insert the key and run the treadmill for a few minutes. If the walking belt slips when walked on SOLUTION: a. PROBLEM: The incline of the walking belt 3 to the ...right, turn the left rear roller bolt counterclockwise 1/2 of a turn . The treadmill will recalibrate the incline. 23 Plug in the power cord, insert the key and run the treadmill for 120 volts AC and 15 amps. Be careful not to lift each side of a turn . If...
English Manual
Page 24
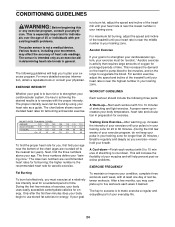
...reputable book or consult your "training zone." EXERCISE INTENSITY Whether your goal is to burn fat or to strengthen your cardiovascular system, the key to achieving the desired results is to exercise with at a relatively low intensity level for a sustained period of time. The lower two ...and deeply as a guide. WORKOUT GUIDELINES Each workout should include the following guidelines will help you may affect the accuracy of the treadmill until your training zone for aerobic exercise. Only after the first few weeks of 35 or individuals with preexisting health problems. The ...
...reputable book or consult your "training zone." EXERCISE INTENSITY Whether your goal is to burn fat or to strengthen your cardiovascular system, the key to achieving the desired results is to exercise with at a relatively low intensity level for a sustained period of time. The lower two ...and deeply as a guide. WORKOUT GUIDELINES Each workout should include the following guidelines will help you may affect the accuracy of the treadmill until your training zone for aerobic exercise. Only after the first few weeks of 35 or individuals with preexisting health problems. The ...

English Manual
Page 30
... may not apply to the terms set forth above is made must be received by ICON. This warranty gives you . If possible, place the treadmill near your telephone for which vary from the date of its scope and duration to you. LIMITED WARRANTY ICON Health & Fitness, Inc. (ICON),...: • The MODEL NUMBER OF THE PRODUCT (PFTL59210) • The NAME OF THE PRODUCT (PROFORM® LX 660 treadmill) • The SERIAL NUMBER OF THE PRODUCT (see the front cover of this manual) • The KEY NUMBER AND DESCRIPTION OF THE PART(S) (see the EXPLODED DRAWING attached in USA © 2001 ICON...
... may not apply to the terms set forth above is made must be received by ICON. This warranty gives you . If possible, place the treadmill near your telephone for which vary from the date of its scope and duration to you. LIMITED WARRANTY ICON Health & Fitness, Inc. (ICON),...: • The MODEL NUMBER OF THE PRODUCT (PFTL59210) • The NAME OF THE PRODUCT (PROFORM® LX 660 treadmill) • The SERIAL NUMBER OF THE PRODUCT (see the front cover of this manual) • The KEY NUMBER AND DESCRIPTION OF THE PART(S) (see the EXPLODED DRAWING attached in USA © 2001 ICON...


