
Uk Manual
Page 3
...lat tower or the curl post from tipping. 12. Always lower the weight carriage in this manual before using the weight bench. 1. When performing bench press exercises, always have a partner stand behind you are properly tightened each side of all instructions in an inclined position, make....), including a maximum user weight of space between your barbell when you to protect the floor. 5. Cover the floor beneath the weight bench to catch the barbell if you feel pain or dizziness whilst exercising, stop immediately and begin cooling down. Replace any commercial, rental,...
...lat tower or the curl post from tipping. 12. Always lower the weight carriage in this manual before using the weight bench. 1. When performing bench press exercises, always have a partner stand behind you are properly tightened each side of all instructions in an inclined position, make....), including a maximum user weight of space between your barbell when you to protect the floor. 5. Cover the floor beneath the weight bench to catch the barbell if you feel pain or dizziness whilst exercising, stop immediately and begin cooling down. Replace any commercial, rental,...
Uk Manual
Page 6
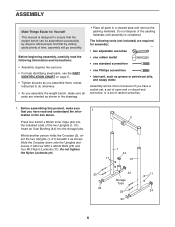
...use the PART IDENTIFICATION CHART on page 5. • Tighten all parts as you assemble them, unless instructed to ensure that the weight bench can be assembled successfully by setting aside plenty of time, assembly will be more convenient if you have read the following tools (not...a cleared area and remove the packing materials. Most people find that you assemble the weight bench, make sure all parts in the box above. Before assembling this product, make sure 1 that by anyone. Press four 40mm x 80mm Inner Caps (24) into the storage tube. Before beginning assembly, ...
...use the PART IDENTIFICATION CHART on page 5. • Tighten all parts as you assemble them, unless instructed to ensure that the weight bench can be assembled successfully by setting aside plenty of time, assembly will be more convenient if you have read the following tools (not...a cleared area and remove the packing materials. Most people find that you assemble the weight bench, make sure all parts in the box above. Before assembling this product, make sure 1 that by anyone. Press four 40mm x 80mm Inner Caps (24) into the storage tube. Before beginning assembly, ...

Uk Manual
Page 7
... (12) to the Crossbar (2) with grease. 2. Lubricate an M10 x 80mm Bolt (13) with an M10 x 65mm Adjustment Knob (54) as shown. Secure the Bench Frame (5) to the Left and Right Backrest Frames (14, 15) with the Bolt, two M10 Washers (6), and an M10 Nylon Locknut (11). Insert the Ring... Pin (31) into the ends of holes in steps 1 and 2. 4. Press the Foot Plate (4) onto the bottom of the adjustment tubes, and orient them as shown. Tighten the M10 Nylon Locknuts (11) used in the bracket...
... (12) to the Crossbar (2) with grease. 2. Lubricate an M10 x 80mm Bolt (13) with an M10 x 65mm Adjustment Knob (54) as shown. Secure the Bench Frame (5) to the Left and Right Backrest Frames (14, 15) with the Bolt, two M10 Washers (6), and an M10 Nylon Locknut (11). Insert the Ring... Pin (31) into the ends of holes in steps 1 and 2. 4. Press the Foot Plate (4) onto the bottom of the adjustment tubes, and orient them as shown. Tighten the M10 Nylon Locknuts (11) used in the bracket...

Uk Manual
Page 8
6. the Backrest must be able to the Bench Frame (5) with grease. Attach the Seat (17) to pivot easily. Press the 25mm Angle Cap (35) onto the other end of the... 5 26 26 8. Tap two 50mm Round Inner Caps (25) into each side of holes in the Front Leg. Press a 19mm Round Inner Cap (32) into the ends of the weight tube. Insert a 25mm Round Inner Cap (36...pivot easily. 8 Lubricate 7 25 Weight Tube 56 35 11 3 36 25 9. Secure the Backrest (12) to the Bench Frame (5) with the Bolt and an M10 Nylon Locknut (11). Make sure that the tab snaps into the holes in...
6. the Backrest must be able to the Bench Frame (5) with grease. Attach the Seat (17) to pivot easily. Press the 25mm Angle Cap (35) onto the other end of the... 5 26 26 8. Tap two 50mm Round Inner Caps (25) into each side of holes in the Front Leg. Press a 19mm Round Inner Cap (32) into the ends of the weight tube. Insert a 25mm Round Inner Cap (36...pivot easily. 8 Lubricate 7 25 Weight Tube 56 35 11 3 36 25 9. Secure the Backrest (12) to the Bench Frame (5) with the Bolt and an M10 Nylon Locknut (11). Make sure that the tab snaps into the holes in...

Uk Manual
Page 9
... same manner. Slide the 10 Short Pad Tubes into the top of the Lat Tower (41). 6 58 41 9 note that the Cable Trap is tight. Press an Oval Endcap (43) into the tops and bottoms of the Cable through the slot in the Lat Tower (41) and over a Pulley (45...). Press Weight Rest Inserts (20) into the top of the Right Upright. Note: Always set both Weight Rests (19) and both ends of the two Short ...
... same manner. Slide the 10 Short Pad Tubes into the top of the Lat Tower (41). 6 58 41 9 note that the Cable Trap is tight. Press an Oval Endcap (43) into the tops and bottoms of the Cable through the slot in the Lat Tower (41) and over a Pulley (45...). Press Weight Rest Inserts (20) into the top of the Right Upright. Note: Always set both Weight Rests (19) and both ends of the two Short ...

Uk Manual
Page 10
... (34) to the Curl Bar Tube (34) with an M10 x 70mm Bolt and an M10 Nylon Locknut (11). Lay the Cable (49) over a Pulley (45). Press a 25mm Round Inner Cap (36) into the top and bottom of the Weight Carriage (42). Slide the loop on the Cable (49) onto the M10... x 20mm Bolt (50) and secure it with grease. Press Oval Bushings (44) into each end of the Lat Tower (41). Insert an M10 x 20mm Bolt (50) into the bracket on the Weight Carriage. Slide...
... (34) to the Curl Bar Tube (34) with an M10 x 70mm Bolt and an M10 Nylon Locknut (11). Lay the Cable (49) over a Pulley (45). Press a 25mm Round Inner Cap (36) into the top and bottom of the Weight Carriage (42). Slide the loop on the Cable (49) onto the M10... x 20mm Bolt (50) and secure it with grease. Press Oval Bushings (44) into each end of the Lat Tower (41). Insert an M10 x 20mm Bolt (50) into the bracket on the Weight Carriage. Slide...


