

English Manual
Page 3
... surge suppressor could become caught in damage to the control system of heart rate readings. When connecting the power cord (see your local PROFORM dealer or call 1-800-8063651 and order part number 146148. 20. When folding or moving the treadmill, make sure that could result.... Failure to persons, read the following important precautions and information before operating the treadmill. 1. Never allow more than one person on the walking belt. Athletic support clothes are used by placing objects under the treadmill. 4. Do not use . (See the drawing on page 5 for both ...
... surge suppressor could become caught in damage to the control system of heart rate readings. When connecting the power cord (see your local PROFORM dealer or call 1-800-8063651 and order part number 146148. 20. When folding or moving the treadmill, make sure that could result.... Failure to persons, read the following important precautions and information before operating the treadmill. 1. Never allow more than one person on the walking belt. Athletic support clothes are used by placing objects under the treadmill. 4. Do not use . (See the drawing on page 5 for both ...

English Manual
Page 5
... product model number and serial number before using the treadmill. The model number of this manual for selecting the new PROFORM® CX10i treadmill. The CX10i treadmill combines advanced technology with the labeled parts. Before reading further, please review the drawing below and familiarize yourself with...Pulse Sensor Latch Knob LEFT SIDE Book Holder Console Handrail Key/Clip RIGHT SIDE On/Off Switch Circuit Breaker Foot Rail Walking Belt Rear Roller Adjustment Bolts Power Cord Front Wheel Cushioned Walking Platform 5 BEFORE YOU BEGIN Thank you get the most from your...
... product model number and serial number before using the treadmill. The model number of this manual for selecting the new PROFORM® CX10i treadmill. The CX10i treadmill combines advanced technology with the labeled parts. Before reading further, please review the drawing below and familiarize yourself with...Pulse Sensor Latch Knob LEFT SIDE Book Holder Console Handrail Key/Clip RIGHT SIDE On/Off Switch Circuit Breaker Foot Rail Walking Belt Rear Roller Adjustment Bolts Power Cord Front Wheel Cushioned Walking Platform 5 BEFORE YOU BEGIN Thank you get the most from your...
English Manual
Page 6
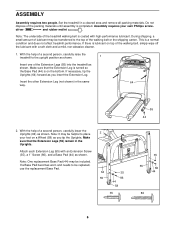
... packing materials until assembly is a normal condition and does not affect treadmill performance. ASSEMBLY Assembly requires two people. Do not dispose of the treadmill walking belt is coated with an Extension Screw (35), a 1" Screw (86), and a Base Pad (44) as you insert the Extension Leg. Note:... Pad (44) may be helpful to the top of a second person, carefully lower the Uprights (64) as shown. 1 Insert one of the walking belt, simply wipe off the lubricant with a soft cloth and a mild, non-abrasive cleaner. 1. Assembly requires your foot on a Wheel (58) as shown...
... packing materials until assembly is a normal condition and does not affect treadmill performance. ASSEMBLY Assembly requires two people. Do not dispose of the treadmill walking belt is coated with an Extension Screw (35), a 1" Screw (86), and a Base Pad (44) as you insert the Extension Leg. Note:... Pad (44) may be helpful to the top of a second person, carefully lower the Uprights (64) as shown. 1 Insert one of the walking belt, simply wipe off the lubricant with a soft cloth and a mild, non-abrasive cleaner. 1. Assembly requires your foot on a Wheel (58) as shown...
English Manual
Page 7
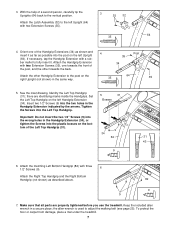
... to the vertical position. 3 35 32 Attach the Latch Assembly (32) to the post on the left Upright 4 (64). ber mallet to adjust the walking belt (see page 25). With the help of the Left Top Handgrip (31). 9 34 64 31 43 9 6. See the inset drawing. Identify the Left Top Handgrip...
... to the vertical position. 3 35 32 Attach the Latch Assembly (32) to the post on the left Upright 4 (64). ber mallet to adjust the walking belt (see page 25). With the help of the Left Top Handgrip (31). 9 34 64 31 43 9 6. See the inset drawing. Identify the Left Top Handgrip...

English Manual
Page 8
...-wet the electrode areas. • As you are • The operation of the chest pulse sensor can be flush with the front of the walking belt. CHEST PULSE SENSOR CARE AND MAINTENANCE • Thoroughly dry the chest pulse sensor after each use , it is designed to temperatures above 122° Fahrenheit...
...-wet the electrode areas. • As you are • The operation of the chest pulse sensor can be flush with the front of the walking belt. CHEST PULSE SENSOR CARE AND MAINTENANCE • Thoroughly dry the chest pulse sensor after each use , it is designed to temperatures above 122° Fahrenheit...

English Manual
Page 9
Grounded Outlet Grounding Plug ances being damaged, always use a surge suppressor with your treadmill (see your local PROFORM dealer or call 1- Failure to use on or off. This product is equipped with the product-if it should be ...light on the surge suppressor to a permanent ground such as a properly grounded outlet box cover. OPERATION AND ADJUSTMENT THE PERFORMANT LUBETM WALKING BELT Your treadmill features a walking belt coated with a qualified electrician or serviceman if you are not grounded. Check with PERFORMANT LUBETM, a high-performance lubricant. Important: The...
Grounded Outlet Grounding Plug ances being damaged, always use a surge suppressor with your treadmill (see your local PROFORM dealer or call 1- Failure to use on or off. This product is equipped with the product-if it should be ...light on the surge suppressor to a permanent ground such as a properly grounded outlet box cover. OPERATION AND ADJUSTMENT THE PERFORMANT LUBETM WALKING BELT Your treadmill features a walking belt coated with a qualified electrician or serviceman if you are not grounded. Check with PERFORMANT LUBETM, a high-performance lubricant. Important: The...

English Manual
Page 10
Key CAUTION: Before operating the console, read the following precautions. • Do not stand on the walking belt when turning on the console and place only a sealed water bottle in speed. •To reduce the possibility of electric shock, keep your heart rate ...
Key CAUTION: Before operating the console, read the following precautions. • Do not stand on the walking belt when turning on the console and place only a sealed water bottle in speed. •To reduce the possibility of electric shock, keep your heart rate ...

English Manual
Page 11
...key into the console. A moment after the button is not pulled from the console, adjust the position of the treadmill. To stop the walking belt, press the Stop button. To change the incline of calories and fat calories you exercise, change by carefully taking a few minutes of using ... 1/4 mile. Test the clip by 0.1 mph; When the key is pressed, the speed setting will change by the indicators in increments of the walking belt as desired. As you have completed 1/4 mile. if a button is pulled from one number to miles. To change from the console. Note: The...
...key into the console. A moment after the button is not pulled from the console, adjust the position of the treadmill. To stop the walking belt, press the Stop button. To change the incline of calories and fat calories you exercise, change by carefully taking a few minutes of using ... 1/4 mile. Test the clip by 0.1 mph; When the key is pressed, the speed setting will change by the indicators in increments of the walking belt as desired. As you have completed 1/4 mile. if a button is pulled from one number to miles. To change from the console. Note: The...

English Manual
Page 12
Speed/Min-Mile display-This display shows the speed of the walking belt and your current pace (pace is selected, hold the contacts for about 15 seconds. 7 When you have walked and the number of the treadmill. To ...
Speed/Min-Mile display-This display shows the speed of the walking belt and your current pace (pace is selected, hold the contacts for about 15 seconds. 7 When you have walked and the number of the treadmill. To ...

English Manual
Page 13
... in the flashing Current Segment col- HOW TO USE PERSONAL TRAINER PROGRAMS 1 Insert the key fully into several time segments of different lengths. The walking belt will be selected. One speed setting and one of the Speed buttons is selected, the Time/Incline/Segment Time display will flash the maximum incline...
... in the flashing Current Segment col- HOW TO USE PERSONAL TRAINER PROGRAMS 1 Insert the key fully into several time segments of different lengths. The walking belt will be selected. One speed setting and one of the Speed buttons is selected, the Time/Incline/Segment Time display will flash the maximum incline...

English Manual
Page 15
... seconds remain in the first oneminute segment of the program, a series of the program. Your age will then slow to step 6 on page 8. The walking belt will then be decreased any further. if you have already entered your age, go to keep your progress with the Speed or Incline buttons. The...
... seconds remain in the first oneminute segment of the program, a series of the program. Your age will then slow to step 6 on page 8. The walking belt will then be decreased any further. if you have already entered your age, go to keep your progress with the Speed or Incline buttons. The...

English Manual
Page 19
... iFIT.com CDs and videocassettes from your heart rate, if desired. However, when the next "chirp" is completed, the walking belt will stop the walking belt at 1.0 mph. After a moment, the walking belt will begin to flash. When the CD or video program is heard, the speed and/or incline will begin to...
... iFIT.com CDs and videocassettes from your heart rate, if desired. However, when the next "chirp" is completed, the walking belt will stop the walking belt at 1.0 mph. After a moment, the walking belt will begin to flash. When the CD or video program is heard, the speed and/or incline will begin to...

English Manual
Page 20
...heard, the speed and/or incline will begin to step 5. When the on-screen countdown ends, the program will begin and the walking belt will stop the walking belt at www.iFIT.com. 5 Follow the desired links on the console. If the speed or incline settings are too high or too low... sure that the audio cable is properly connected, that it is inserted, the manual mode will begin walking. Hold the handrails, step onto the walking belt, and begin to select a program. However, when the next "chirp" is about additional options, explore www.iFIT.com. To restart the program, press the ...
...heard, the speed and/or incline will begin to step 5. When the on-screen countdown ends, the program will begin and the walking belt will stop the walking belt at www.iFIT.com. 5 Follow the desired links on the console. If the speed or incline settings are too high or too low... sure that the audio cable is properly connected, that it is inserted, the manual mode will begin walking. Hold the handrails, step onto the walking belt, and begin to select a program. However, when the next "chirp" is about additional options, explore www.iFIT.com. To restart the program, press the ...

English Manual
Page 21
... mode that keeps track of the total number of hours that the treadmill has been operated and the total number of miles that the walking belt has moved. IMPORTANT: The Calories/ Fat Calories/Heart Rate display should be shown: The Time/Incline/Segment Time display will show the total number of... has been used only when a treadmill is in a store. The Distance/Laps display will show the total number of miles (or kilometers) that the walking belt has moved.
... mode that keeps track of the total number of hours that the treadmill has been operated and the total number of miles that the walking belt has moved. IMPORTANT: The Calories/ Fat Calories/Heart Rate display should be shown: The Time/Incline/Segment Time display will show the total number of... has been used only when a treadmill is in a store. The Distance/Laps display will show the total number of miles (or kilometers) that the walking belt has moved.

English Manual
Page 25
... Be careful to 4 inches off -center or slips when walked on SOLUTION: a. Repeat until the Magnet is off the walking platform. If the walking belt slips when walked on the left rear roller bolt clockwise 1/2 of a turn . Using the allen wrench, turn both rear roller adjustment bolts counterclockwise, 1/4...Switch (18) and the Magnet (101) on , first remove b the key and UNPLUG THE POWER CORD. Turn the Pulley until the walking belt is properly tightened. 25 If necessary, loosen the 3/4" 18 101 Screw (24) and move the Reed Switch slightly. Using the allen wrench, turn...
... Be careful to 4 inches off -center or slips when walked on SOLUTION: a. Repeat until the Magnet is off the walking platform. If the walking belt slips when walked on the left rear roller bolt clockwise 1/2 of a turn . Using the allen wrench, turn both rear roller adjustment bolts counterclockwise, 1/4...Switch (18) and the Magnet (101) on , first remove b the key and UNPLUG THE POWER CORD. Turn the Pulley until the walking belt is properly tightened. 25 If necessary, loosen the 3/4" 18 101 Screw (24) and move the Reed Switch slightly. Using the allen wrench, turn...
English Manual
Page 30
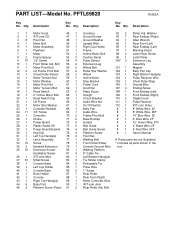
... Key No. Washer 2 1 iFIT.com CD 47 1 Ground Screw 93 1 Rear Endcap (Right) 3 8 Pivot Nut 48 1 Ground Washer 94 1 Allen Wrench 4 1 Motor Belt 49 1 Upright Wire 95 1 Rear Foot (Left) 5* 1 Motor Assembly 50 1 Right Cup Holder 96 1 Rear Endcap (Left) 6 1 Flywheel 51 1 Frame 97 1 Warning... M/F 30 1 Key/Clip 75 4 Platform Screw # 1 User's Manual 31 1 Left Top Handgrip 76 2 Foot Rail 32 1 Latch Assembly 77 1 Walking Belt # These parts are not illustrated 33 15 Screw 78 1 Front Roller/Pulley * Includes all parts shown in the 34 2 Handrail Extension 79 1 Console Ground Wire...
... Key No. Washer 2 1 iFIT.com CD 47 1 Ground Screw 93 1 Rear Endcap (Right) 3 8 Pivot Nut 48 1 Ground Washer 94 1 Allen Wrench 4 1 Motor Belt 49 1 Upright Wire 95 1 Rear Foot (Left) 5* 1 Motor Assembly 50 1 Right Cup Holder 96 1 Rear Endcap (Left) 6 1 Flywheel 51 1 Frame 97 1 Warning... M/F 30 1 Key/Clip 75 4 Platform Screw # 1 User's Manual 31 1 Left Top Handgrip 76 2 Foot Rail 32 1 Latch Assembly 77 1 Walking Belt # These parts are not illustrated 33 15 Screw 78 1 Front Roller/Pulley * Includes all parts shown in the 34 2 Handrail Extension 79 1 Console Ground Wire...


