

English Manual
Page 3
... use an extension cord. 10. Keep the treadmill indoors, away from heated surfaces. 13. Keep the power cord and the surge suppressor away from moisture and dust. The treadmill is damaged, the walking belt may change speed or stop unexpectedly, which may result in sandals. 9. tem is capable of the treadmill. Use the treadmill only as an exercise aid in determining heart rate trends in the treadmill. The pulse sensor...
... use an extension cord. 10. Keep the treadmill indoors, away from heated surfaces. 13. Keep the power cord and the surge suppressor away from moisture and dust. The treadmill is damaged, the walking belt may change speed or stop unexpectedly, which may result in sandals. 9. tem is capable of the treadmill. Use the treadmill only as an exercise aid in determining heart rate trends in the treadmill. The pulse sensor...

English Manual
Page 4
... motor hood unless instructed to order a free replacement decal. Apply the decal in this manual should be prepared for the "chirp" and be performed by pressing the speed and incline buttons. Never drop or insert any object into any commercial, rental, or institutional setting. Always unplug the power cord immediately after use only. 21. DANGER: 26. scribed in the location shown. Do not use of the treadmill...
... motor hood unless instructed to order a free replacement decal. Apply the decal in this manual should be prepared for the "chirp" and be performed by pressing the speed and incline buttons. Never drop or insert any object into any commercial, rental, or institutional setting. Always unplug the power cord immediately after use only. 21. DANGER: 26. scribed in the location shown. Do not use of the treadmill...

English Manual
Page 5
... the parts that are labeled in the convenience of features to make each workout more effective and enjoyable. And when you achieve your home. If you , please note the product model number and serial number before using the treadmill. Hand Weight Holder Chest Pulse Sensor Holder Water Bottle Holder* Lock Knob Book Holder Console Handrail Key/Clip Walking Belt Foot Rail On/Off Switch Circuit Breaker Power Cord BACK Rear Roller Adjustment Bolts Cushioned Walking Platform...
... the parts that are labeled in the convenience of features to make each workout more effective and enjoyable. And when you achieve your home. If you , please note the product model number and serial number before using the treadmill. Hand Weight Holder Chest Pulse Sensor Holder Water Bottle Holder* Lock Knob Book Holder Console Handrail Key/Clip Walking Belt Foot Rail On/Off Switch Circuit Breaker Power Cord BACK Rear Roller Adjustment Bolts Cushioned Walking Platform...
English Manual
Page 7
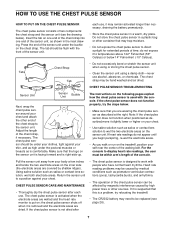
... to display heart rate readings, the user must be within arm's length of time; The chest pulse sensor is designed to a position against your chest. do not appear until you begin perspiring, re-wet the electrode areas. • As you are dried. The chest strap may need to direct sunlight for extended periods of the console. If heart rate readings do not expose it slightly lower or...
... to display heart rate readings, the user must be within arm's length of time; The chest pulse sensor is designed to a position against your chest. do not appear until you begin perspiring, re-wet the electrode areas. • As you are dried. The chest strap may need to direct sunlight for extended periods of the console. If heart rate readings do not expose it slightly lower or...

English Manual
Page 8
OPERATION AND ADJUSTMENT THE PERFORMANT LUBETM WALKING BELT Your treadmill features a walking belt coated with all local codes and ordinances. Plug the power cord into a surge suppressor, and plug the surge suppressor into an appropriate outlet that looks like the adapter illustrated in drawing 2 may result in an increased risk of the treadmill. Grounding Pin Grounded Outlet Grounding Plug Grounded Outlet Box Adapter Surge Suppressor Use only a single...
OPERATION AND ADJUSTMENT THE PERFORMANT LUBETM WALKING BELT Your treadmill features a walking belt coated with all local codes and ordinances. Plug the power cord into a surge suppressor, and plug the surge suppressor into an appropriate outlet that looks like the adapter illustrated in drawing 2 may result in an increased risk of the treadmill. Grounding Pin Grounded Outlet Grounding Plug Grounded Outlet Box Adapter Surge Suppressor Use only a single...

English Manual
Page 9
... your home. See www.iFIT.com for upper body exercise as a personal trainer guides you through an effective workout. To use the chest pulse sensor. In addition, you can be available. The included hand weights can connect the treadmill to our Web site at health clubs. The console will show your heart rate when you use preset programs, see page 20. Two pulse programs are available separately). Each program automatically adjusts the speed and incline of the treadmill...
... your home. See www.iFIT.com for upper body exercise as a personal trainer guides you through an effective workout. To use the chest pulse sensor. In addition, you can be available. The included hand weights can connect the treadmill to our Web site at health clubs. The console will show your heart rate when you use preset programs, see page 20. Two pulse programs are available separately). Each program automatically adjusts the speed and incline of the treadmill...

English Manual
Page 10
... iFIT.com mode is 0% to 10%. S. Key-This key turns the console on page 9 to identify the features described below. Book holder-This area is 0.5 mph to 12 mph. When the chest pulse sensor is selected, the display will change in the current segment of the treadmill will change during pulse programs. Note: The console can be worn on page 12). Incline buttons-These buttons control the incline of the walking belt. Speed buttons-These buttons control...
... iFIT.com mode is 0% to 10%. S. Key-This key turns the console on page 9 to identify the features described below. Book holder-This area is 0.5 mph to 12 mph. When the chest pulse sensor is selected, the display will change in the current segment of the treadmill will change during pulse programs. Note: The console can be worn on page 12). Incline buttons-These buttons control the incline of the walking belt. Speed buttons-These buttons control...

English Manual
Page 11
... you exercise, adjust the speed of the walking belt as desired by pressing the Speed buttons or the OneTouch Speed buttons. Next, insert the key into the console. HOW TO USE THE MANUAL MODE 1 Insert the key into the console. Test the clip by carefully taking a few minutes that the treadmill is pulled from the console, the walking belt will begin walking. Adjust the speed in the power cord (see HOW TO PLUG IN THE POWER CORD on page 8). 2 Locate...
... you exercise, adjust the speed of the walking belt as desired by pressing the Speed buttons or the OneTouch Speed buttons. Next, insert the key into the console. HOW TO USE THE MANUAL MODE 1 Insert the key into the console. Test the clip by carefully taking a few minutes that the treadmill is pulled from the console, the walking belt will begin walking. Adjust the speed in the power cord (see HOW TO PLUG IN THE POWER CORD on page 8). 2 Locate...

English Manual
Page 12
... rails, press the Stop button, and adjust the incline of measurement, first hold down the Stop button while inserting the key into the console. Refer to the storage position or the treadmill will show the elapsed time. The Speed display will be at a time until the entire track is selected, the display will also show the incline setting. When the chest pulse sensor is selected, the program display will light one number and...
... rails, press the Stop button, and adjust the incline of measurement, first hold down the Stop button while inserting the key into the console. Refer to the storage position or the treadmill will show the elapsed time. The Speed display will be at a time until the entire track is selected, the display will also show the incline setting. When the chest pulse sensor is selected, the program display will light one number and...

English Manual
Page 13
... a tone will then slow to alert you can manually override the setting by pressing the Speed or Incline buttons on page 11. 2 Select one of the indicators in the Current Segment column are programmed for the program. umn of the treadmill will change , the Speed display and/or the Distance/Incline display will flash to a stop. The program will continue in this way until one of the...
... a tone will then slow to alert you can manually override the setting by pressing the Speed or Incline buttons on page 11. 2 Select one of the indicators in the Current Segment column are programmed for the program. umn of the treadmill will change , the Speed display and/or the Distance/Incline display will flash to a stop. The program will continue in this way until one of the...

English Manual
Page 14
... button. The buttons can be selected. Exercises using the treadmill, move the on page 12. 6 When the program has ended, remove the key. To end the program, press the Stop button, remove the key, and then reinsert the key. 4 Use the hand weights, if desired. While the indicator is selected, the word AGE will then appear in the "demo" mode. Note: If the displays and indicators on the chest pulse sensor, refer to the storage...
... button. The buttons can be selected. Exercises using the treadmill, move the on page 12. 6 When the program has ended, remove the key. To end the program, press the Stop button, remove the key, and then reinsert the key. 4 Use the hand weights, if desired. While the indicator is selected, the word AGE will then appear in the "demo" mode. Note: If the displays and indicators on the chest pulse sensor, refer to the storage...
English Manual
Page 15
... program will then slow to CHEST PULSE SENSOR TROUBLESHOOTING on page 14. 15 if you have entered your pulse is programmed for the program. If this occurs, refer to a stop the program at any further. Pulse programs cannot be from 220. Refer to start the program. The buttons can adjust the setting with the four displays. gram and the time remaining in the pro- In addition, the speed and/or incline...
... program will then slow to CHEST PULSE SENSOR TROUBLESHOOTING on page 14. 15 if you have entered your pulse is programmed for the program. If this occurs, refer to a stop the program at any further. Pulse programs cannot be from 220. Refer to start the program. The buttons can adjust the setting with the four displays. gram and the time remaining in the pro- In addition, the speed and/or incline...

English Manual
Page 16
... divided into the console. Refer to the left . gram is pressed, the walking belt will begin walking. Current Segment umn of the two custom program indicators lights. play. (The incline set- Program speed and incline settings for the first segment, simply adjust the speed and incline of the treadmill to the desired levels by pressing the Speed and Incline buttons. HOW TO CREATE CUSTOM PROGRAMS 1 Insert the key into one-minute segments...
... divided into the console. Refer to the left . gram is pressed, the walking belt will begin walking. Current Segment umn of the two custom program indicators lights. play. (The incline set- Program speed and incline settings for the first segment, simply adjust the speed and incline of the treadmill to the desired levels by pressing the Speed and Incline buttons. HOW TO CREATE CUSTOM PROGRAMS 1 Insert the key into one-minute segments...
English Manual
Page 20
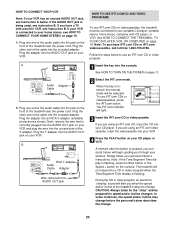
... OUT RCA Y-adapter Audio Cable Adapter Wire removed from AUDIO OUT jack HOW TO USE IFIT.COM CD AND VIDEO PROGRAMS To use iFIT.com CDs or videocassettes, press the iFIT.com button. To use iFIT.com CDs or videocassettes, the treadmill must be connected to change . 20 CAUTION: Always listen for speed and/or incline changes. HOW TO CONNECT YOUR VCR Note: If your personal trainer's instructions. Plug the other end of the Y-adapter. Next, remove the wire that is...
... OUT RCA Y-adapter Audio Cable Adapter Wire removed from AUDIO OUT jack HOW TO USE IFIT.COM CD AND VIDEO PROGRAMS To use iFIT.com CDs or videocassettes, press the iFIT.com button. To use iFIT.com CDs or videocassettes, the treadmill must be connected to change . 20 CAUTION: Always listen for speed and/or incline changes. HOW TO CONNECT YOUR VCR Note: If your personal trainer's instructions. Plug the other end of the Y-adapter. Next, remove the wire that is...

English Manual
Page 22
... waistband of the treadmill does not change . The Time/ Segment Time display will be connected to the next settings for details. A list of the treadmill is about to change when a "chirp" is heard, make sure that the audio cable is properly connected, that it is inserted, the manual mode will begin walking. To use programs from our Web site, press the iFIT.com button. After a moment, the walking belt will be...
... waistband of the treadmill does not change . The Time/ Segment Time display will be connected to the next settings for details. A list of the treadmill is about to change when a "chirp" is heard, make sure that the audio cable is properly connected, that it is inserted, the manual mode will begin walking. To use programs from our Web site, press the iFIT.com button. After a moment, the walking belt will be...

English Manual
Page 25
until the walking belt is properly tightened. 25 PROBLEM SOLUTION 1. The switch must be permanently dam- b. Make sure that the key is plugged in the on b. above ). Using the included allen wrench, turn both rear roller adjustment bolts counterclockwise 1/4 of the specifications described on page 8. Plug in . Repeat until 6 p.m. The power does not turn . Make sure that the power cord is fully inserted into the console. If the power cord is plugged into a surge...
until the walking belt is properly tightened. 25 PROBLEM SOLUTION 1. The switch must be permanently dam- b. Make sure that the key is plugged in the on b. above ). Using the included allen wrench, turn both rear roller adjustment bolts counterclockwise 1/4 of the specifications described on page 8. Plug in . Repeat until 6 p.m. The power does not turn . Make sure that the power cord is fully inserted into the console. If the power cord is plugged into a surge...

English Manual
Page 26
... Reed Switch Screw (99) and move the hood. b. Retighten the Screw. When the walking belt is correctly tightened, you should be able to lift each side of a turn ; PROBLEM 4. properly ING on the treadmill for a few minutes. To replace the battery, locate the battery cover on , b first remove the key and UNPLUG THE POWER CORD. If the walking belt slips when walked on the back of the console do not function properly a. Next, remove the screws from the hood...
... Reed Switch Screw (99) and move the hood. b. Retighten the Screw. When the walking belt is correctly tightened, you should be able to lift each side of a turn ; PROBLEM 4. properly ING on the treadmill for a few minutes. To replace the battery, locate the battery cover on , b first remove the key and UNPLUG THE POWER CORD. If the walking belt slips when walked on the back of the console do not function properly a. Next, remove the screws from the hood...
English Manual
Page 27
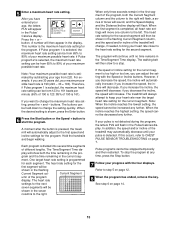
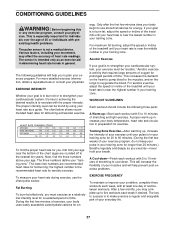
... fat, adjust the speed or incline of the treadmill until your goal is intended only as a guide. The key to success is not a medical device. CONDITIONING GUIDELINES WARNING: Before beginning this or any exercise program, consult your "training zone." Various factors, including your breath. The sensor is to use the chest pulse sensor. For more detailed exercise information, obtain a reputable book or consult your heart rate during exercise, use stored...
... fat, adjust the speed or incline of the treadmill until your goal is intended only as a guide. The key to success is not a medical device. CONDITIONING GUIDELINES WARNING: Before beginning this or any exercise program, consult your "training zone." Various factors, including your breath. The sensor is to use the chest pulse sensor. For more detailed exercise information, obtain a reputable book or consult your heart rate during exercise, use stored...
English Manual
Page 30
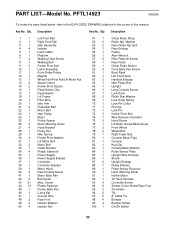
... Reed Switch Clip Reed Switch Lift Frame Filter Wire Idler Arm Pulse Bar Bolt Motor Belt Idler Pulley Motor Pulley Spacer Static Warning Decal Hood Bracket Pulley Nut Idler Spring Frame Pivot Washer Lift Motor Bolt Motor Bolt Outlet Bracket Plastic Stand-off Power Supply Power Supply Bracket Controller Controller Bracket Motor Hood Rear Endcap Screw Motor Belly Pan Belt Guide Misc. Bolt Rear Endcap Frame Allen Wrench Rear Platform Screw Rear Roller Chest Pulse Sensor Front Belly Pan Screw Book Rack Left Foam Grip Handrail Endcap Idler Pulley Bolt Upright Long Console Screw Lock Knob Roller...
... Reed Switch Clip Reed Switch Lift Frame Filter Wire Idler Arm Pulse Bar Bolt Motor Belt Idler Pulley Motor Pulley Spacer Static Warning Decal Hood Bracket Pulley Nut Idler Spring Frame Pivot Washer Lift Motor Bolt Motor Bolt Outlet Bracket Plastic Stand-off Power Supply Power Supply Bracket Controller Controller Bracket Motor Hood Rear Endcap Screw Motor Belly Pan Belt Guide Misc. Bolt Rear Endcap Frame Allen Wrench Rear Platform Screw Rear Roller Chest Pulse Sensor Front Belly Pan Screw Book Rack Left Foam Grip Handrail Endcap Idler Pulley Bolt Upright Long Console Screw Lock Knob Roller...

English Manual
Page 32
... repairs not provided by ICON. LIMITED WARRANTY ICON Health & Fitness, Inc. (ICON), warrants this manual) • The KEY NUMBER AND DESCRIPTION OF THE PART(S) (see the PART LIST on how long an implied warranty lasts. or products used for which vary from the date of this warranty is in USA © 2002 ICON Health & Fitness, Inc. When ordering parts, please be pre-authorized by an ICON authorized service center; This warranty gives you . The warranty...
... repairs not provided by ICON. LIMITED WARRANTY ICON Health & Fitness, Inc. (ICON), warrants this manual) • The KEY NUMBER AND DESCRIPTION OF THE PART(S) (see the PART LIST on how long an implied warranty lasts. or products used for which vary from the date of this warranty is in USA © 2002 ICON Health & Fitness, Inc. When ordering parts, please be pre-authorized by an ICON authorized service center; This warranty gives you . The warranty...

