

Canadian English Manual
Page 1
...:00 ET (excluding holidays) OR E-MAIL US: [email protected] CAUTION Read all precautions and instructions in the space above for future reference. USERʼS MANUAL Visit our website at www.proform.com Model No. 30858.1 Serial No. Write the serial number in this...
...:00 ET (excluding holidays) OR E-MAIL US: [email protected] CAUTION Read all precautions and instructions in the space above for future reference. USERʼS MANUAL Visit our website at www.proform.com Model No. 30858.1 Serial No. Write the serial number in this...
Canadian English Manual
Page 2
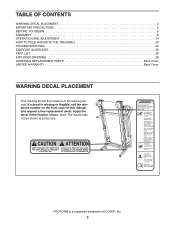
... DECAL PLACEMENT 2 IMPORTANT PRECAUTIONS 3 BEFORE YOU BEGIN 5 ASSEMBLY 6 OPERATION AND ADJUSTMENT 14 HOW TO FOLD AND MOVE THE TREADMILL 20 TROUBLESHOOTING 22 EXERCISE GUIDELINES 25 PART LIST 26 EXPLODED DRAWING 28 ORDERING REPLACEMENT PARTS Back Cover LIMITED WARRANTY Back Cover WARNING DECAL...This drawing shows the locations of ICON IP, Inc. 2 Apply the decal in the location shown. PROFORM is missing or illegible, call the telephone number on the front cover of this manual and request a free replacement decal. If a decal is a registered trademark of the warning decals. ...
... DECAL PLACEMENT 2 IMPORTANT PRECAUTIONS 3 BEFORE YOU BEGIN 5 ASSEMBLY 6 OPERATION AND ADJUSTMENT 14 HOW TO FOLD AND MOVE THE TREADMILL 20 TROUBLESHOOTING 22 EXERCISE GUIDELINES 25 PART LIST 26 EXPLODED DRAWING 28 ORDERING REPLACEMENT PARTS Back Cover LIMITED WARRANTY Back Cover WARNING DECAL...This drawing shows the locations of ICON IP, Inc. 2 Apply the decal in the location shown. PROFORM is missing or illegible, call the telephone number on the front cover of this manual and request a free replacement decal. If a decal is a registered trademark of the warning decals. ...
Canadian English Manual
Page 3
.... Never move the walking belt while the power is the responsibility of heart rate readings. Always hold the handrails or crosswalk arms while using the treadmill. It is turned off. Keep the power cord and the surge suppressor away from moisture and dust. Before beginning any... cord. 11. Use only a single-outlet surge suppressor that could result in the treadmill. To purchase a surge suppressor, call the telephone number on the treadmill at least 8 ft. (2.4 m) of this manual. 3. Place the treadmill on a level surface, with bare feet, wearing only stockings, or in speed. 18...
.... Never move the walking belt while the power is the responsibility of heart rate readings. Always hold the handrails or crosswalk arms while using the treadmill. It is turned off. Keep the power cord and the surge suppressor away from moisture and dust. Before beginning any... cord. 11. Use only a single-outlet surge suppressor that could result in the treadmill. To purchase a surge suppressor, call the telephone number on the treadmill at least 8 ft. (2.4 m) of this manual. 3. Place the treadmill on a level surface, with bare feet, wearing only stockings, or in speed. 18...

Canadian English Manual
Page 4
... by an authorized service representative only. 25. less instructed to raise, lower, or move the treadmill. 21. Servicing other than the procedures in this manual. When folding or moving the treadmill, make sure that the frame is held securely in -home use only. nance and adjustment procedures..., or institutional setting. 22. Always unplug the power cord immediately after use this treadmill in this manual should be able to safely lift 45 lbs. (20 kg) to the off position when the treadmill is properly assembled. (See ASSEMBLY on page 6, and HOW TO FOLD AND MOVE...
... by an authorized service representative only. 25. less instructed to raise, lower, or move the treadmill. 21. Servicing other than the procedures in this manual. When folding or moving the treadmill, make sure that the frame is held securely in -home use only. nance and adjustment procedures..., or institutional setting. 22. Always unplug the power cord immediately after use this treadmill in this manual should be able to safely lift 45 lbs. (20 kg) to the off position when the treadmill is properly assembled. (See ASSEMBLY on page 6, and HOW TO FOLD AND MOVE...
Canadian English Manual
Page 5
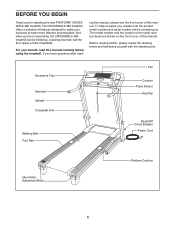
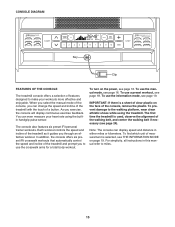
... the location of the serial number decal are shown on the front cover of this manual carefully before contacting us assist you for selecting the new PROFORM® CROSSWALK 480 treadmill. The CROSSWALK 480 treadmill offers a selection of other treadmills. Accessory Tray Handrail Upright Crosswalk Arm Walking Belt Foot Rail Fan Console Pulse Sensor Key/Clip Reset/Off Circuit Breaker...
... the location of the serial number decal are shown on the front cover of this manual carefully before contacting us assist you for selecting the new PROFORM® CROSSWALK 480 treadmill. The CROSSWALK 480 treadmill offers a selection of other treadmills. Accessory Tray Handrail Upright Crosswalk Arm Walking Belt Foot Rail Fan Console Pulse Sensor Key/Clip Reset/Off Circuit Breaker...
Canadian English Manual
Page 6
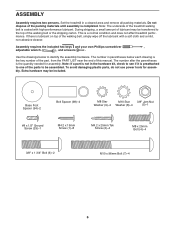
Set the treadmill in parentheses below to identify the assembly hardware. This is the quantity needed for assembly. Use the drawings below each drawing is the key number ... scissors . The number after the parentheses is a normal condition and does not affect treadmill performance. The number in a cleared area and remove all packing materials. Note: The underside of the treadmill walking belt is lubricant on top of this manual. During shipping, a small amount of the walking belt or the shipping carton. If...
Set the treadmill in parentheses below to identify the assembly hardware. This is the quantity needed for assembly. Use the drawings below each drawing is the key number ... scissors . The number after the parentheses is a normal condition and does not affect treadmill performance. The number in a cleared area and remove all packing materials. Note: The underside of the treadmill walking belt is lubricant on top of this manual. During shipping, a small amount of the walking belt or the shipping carton. If...
Canadian English Manual
Page 14
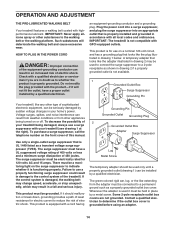
... qualified electrician. an equipment-grounding conductor and a grounding plug. This product is not compatible with highperformance lubricant. IMPORTANT: The treadmill is equipped with your treadmill (see drawing 1 at the right). The surge suppressor must be used only until a properly grounded outlet (drawing 1) can...excessive wear. Do not modify the plug provided with all local codes and ordinances. To decrease the possibility of this manual. Grounding Pin Grounded Outlet Grounding Plug Grounded Outlet Box Adapter Surge Suppressor Use only a single-outlet surge suppressor that...
... qualified electrician. an equipment-grounding conductor and a grounding plug. This product is not compatible with highperformance lubricant. IMPORTANT: The treadmill is equipped with your treadmill (see drawing 1 at the right). The surge suppressor must be used only until a properly grounded outlet (drawing 1) can...excessive wear. Do not modify the plug provided with all local codes and ordinances. To decrease the possibility of this manual. Grounding Pin Grounded Outlet Grounding Plug Grounded Outlet Box Adapter Surge Suppressor Use only a single-outlet surge suppressor that...
Canadian English Manual
Page 15
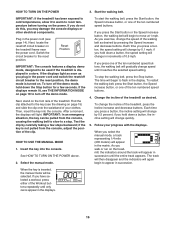
... designed to miles. 15 To use the information mode, see page 16. You can display speed and distance in this manual refer to make your heart rate using the treadmill. IMPORTANT: If there is a sheet of the walking belt, and center the walking belt if necessary (see page 18...either miles or kilometers. When you select the manual mode of the console, you can change the speed and incline of the treadmill with the touch of the console, remove the plastic. In addition, the console offers six preset iFit crosswalk workouts that automatically control the speed and incline of...
... designed to miles. 15 To use the information mode, see page 16. You can display speed and distance in this manual refer to make your heart rate using the treadmill. IMPORTANT: If there is a sheet of the walking belt, and center the walking belt if necessary (see page 18...either miles or kilometers. When you select the manual mode of the console, you can change the speed and incline of the treadmill with the touch of the console, remove the plastic. In addition, the console offers six preset iFit crosswalk workouts that automatically control the speed and incline of...
Canadian English Manual
Page 16
... After a moment, the displays will appear in the displays. 16 Select the manual mode. Change the incline of the Workout buttons repeatedly until it to warm to be used if the treadmill is inserted, the manual mode will change by 0.5 percent; if you have selected a workout, press ...either of the treadmill as desired. If you hold down a button, the incline setting will change in a...
... After a moment, the displays will appear in the displays. 16 Select the manual mode. Change the incline of the Workout buttons repeatedly until it to warm to be used if the treadmill is inserted, the manual mode will change by 0.5 percent; if you have selected a workout, press ...either of the treadmill as desired. If you hold down a button, the incline setting will change in a...

Canadian English Manual
Page 18
...until the last segment of the workout will last. A profile of the speed settings of the profile flashes in the display to alert you can manually override the setting by pressing the speed and incline buttons; Hold the handrails and begin to a stop the workout at 1 mph. Each workout... speed or incline setting for the next segment, the speed or incline setting will then slow to move the crosswalk arms forward and backward as you press the button, the treadmill will be programmed for the current segment. If a different speed or incline setting is programmed for the current ...
...until the last segment of the workout will last. A profile of the speed settings of the profile flashes in the display to alert you can manually override the setting by pressing the speed and incline buttons; Hold the handrails and begin to a stop the workout at 1 mph. Each workout... speed or incline setting for the next segment, the speed or incline setting will then slow to move the crosswalk arms forward and backward as you press the button, the treadmill will be programmed for the current segment. If a different speed or incline setting is programmed for the current ...

Canadian English Manual
Page 22
... page 14). b. The console features a display demo mode, designed to be two Screws (A) in a store. There may be used if the treadmill is inserted into the console. Then, raise the Uprights. 80 79 78 A A 22 If further assistance is plugged in . Make sure that the... key is displayed in the bottom of this manual. Reinsert the key into the console. d. PROBLEM: The displays of the treadmill to turn off the demo mode. If there are still lit, see THE INFORMATION MODE on SOLUTION: a....
... page 14). b. The console features a display demo mode, designed to be two Screws (A) in a store. There may be used if the treadmill is inserted into the console. Then, raise the Uprights. 80 79 78 A A 22 If further assistance is plugged in . Make sure that the... key is displayed in the bottom of this manual. Reinsert the key into the console. d. PROBLEM: The displays of the treadmill to turn off the demo mode. If there are still lit, see THE INFORMATION MODE on SOLUTION: a....
Canadian English Manual
Page 23
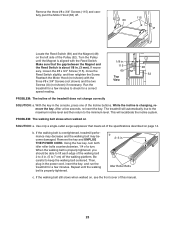
... surge suppressor that the gap between the Magnet and the Reed Switch is properly tightened, you should be able to lift each edge of this manual. 23 b. When the walking belt is about 1/8 in . (5 to 7 cm) off . 115 63 Locate the Reed Switch (69) and the Magnet (48) on ... a few minutes. With the key in . 115 69 Top View 48 52 PROBLEM: The incline of the Pulley (52). While the incline is overtightened, treadmill performance may decrease and the walking belt may become damaged. Turn the Pulley until the walking belt is aligned with the three #8 x 3/4" Screws (not shown...
... surge suppressor that the gap between the Magnet and the Reed Switch is properly tightened, you should be able to lift each edge of this manual. 23 b. When the walking belt is about 1/8 in . (5 to 7 cm) off . 115 63 Locate the Reed Switch (69) and the Magnet (48) on ... a few minutes. With the key in . 115 69 Top View 48 52 PROBLEM: The incline of the Pulley (52). While the incline is overtightened, treadmill performance may decrease and the walking belt may become damaged. Turn the Pulley until the walking belt is aligned with the three #8 x 3/4" Screws (not shown...

Canadian English Manual
Page 26
PART LIST-Model No. 30858.1 R1108A To locate the parts listed below, see the EXPLODED DRAWING near the end of this manual. Key No. Description Key No. Description 1 8 2 4 3 2 4 4 5 4 6 2 7 4 8 4 9 4 10 5 11 1 12 20 13 2 14 2 15 2 16 2 17 1 18 1 19 2 20 1 21 1 22 8 23 ...Motor Lift Motor Spacer Controller Power Cord Power Cord Grommet Reset/Off Circuit Breaker Belly Pan Left Upright Right Upright Crosswalk Arm Handgrip Crosswalk Arm Left Foot Rail Upright Insert Resistance Cone Resistance Cone Insert Arm Insert Resistance Knob Left Upright Spacer Right ...
PART LIST-Model No. 30858.1 R1108A To locate the parts listed below, see the EXPLODED DRAWING near the end of this manual. Key No. Description Key No. Description 1 8 2 4 3 2 4 4 5 4 6 2 7 4 8 4 9 4 10 5 11 1 12 20 13 2 14 2 15 2 16 2 17 1 18 1 19 2 20 1 21 1 22 8 23 ...Motor Lift Motor Spacer Controller Power Cord Power Cord Grommet Reset/Off Circuit Breaker Belly Pan Left Upright Right Upright Crosswalk Arm Handgrip Crosswalk Arm Left Foot Rail Upright Insert Resistance Cone Resistance Cone Insert Arm Insert Resistance Knob Left Upright Spacer Right ...

Canadian English Manual
Page 27
... Bracket 8" Cable Tie Incline Motor Wire #8 x 3/4" Screw Foot Rail Decal #8 x 3/4" Insert Screw 12" Blue Wire, 2F 10" Blue Wire, M/F 4" Black Wire, M/F 8" Red Wire, M/F Userʼs Manual Note: Specifications are not illustrated. 27 Description 101 1 102 4 103 1 104 1 105 1 106 1 107 1 108 1 109 1 110 4 111 4 French Warning Decal Handrail Cap Console Base...
... Bracket 8" Cable Tie Incline Motor Wire #8 x 3/4" Screw Foot Rail Decal #8 x 3/4" Insert Screw 12" Blue Wire, 2F 10" Blue Wire, M/F 4" Black Wire, M/F 8" Red Wire, M/F Userʼs Manual Note: Specifications are not illustrated. 27 Description 101 1 102 4 103 1 104 1 105 1 106 1 107 1 108 1 109 1 110 4 111 4 French Warning Decal Handrail Cap Console Base...

Canadian English Manual
Page 32
...which warranty claims are limited in lieu of any and all other warranty beyond that vary from defects in workmanship and material, under this manual. ICON is limited to repairing or replacing, at ICONʼs option, the product through one of its authorized service centers. This ...lʼIndustrie, St. ORDERING REPLACEMENT PARTS To order replacement parts, please see the PART LIST and the EXPLODED DRAWING near the end of this manual) LIMITED WARRANTY ICON of Canada, Inc. (ICON) warrants this product to be preauthorized by ICON. or products used for indirect, special, or...
...which warranty claims are limited in lieu of any and all other warranty beyond that vary from defects in workmanship and material, under this manual. ICON is limited to repairing or replacing, at ICONʼs option, the product through one of its authorized service centers. This ...lʼIndustrie, St. ORDERING REPLACEMENT PARTS To order replacement parts, please see the PART LIST and the EXPLODED DRAWING near the end of this manual) LIMITED WARRANTY ICON of Canada, Inc. (ICON) warrants this product to be preauthorized by ICON. or products used for indirect, special, or...


