
User Manual
Page 1
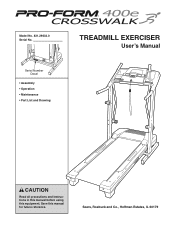
Model No. 831.29633.0 Serial No. Save this equipment. Serial Number Decal • Assembly • Operation • Maintenance • Part List and Drawing TREADMILL EXERCISER User's Manual CAUTION Read all precautions and instructions in this manual before using this manual for future reference. Sears, Roebuck and Co., Hoffman Estates, IL 60179
Model No. 831.29633.0 Serial No. Save this equipment. Serial Number Decal • Assembly • Operation • Maintenance • Part List and Drawing TREADMILL EXERCISER User's Manual CAUTION Read all precautions and instructions in this manual before using this manual for future reference. Sears, Roebuck and Co., Hoffman Estates, IL 60179
User Manual
Page 2
TABLE OF CONTENTS IMPORTANT PRECAUTIONS 3 BEFORE YOU BEGIN 5 ASSEMBLY 6 OPERATION AND ADJUSTMENT 10 HOW TO FOLD AND MOVE THE TREADMILL 15 TROUBLESHOOTING 17 CONDITIONING GUIDELINES 19 ORDERING REPLACEMENT PARTS Back Cover FULL 90 DAY WARRANTY Back Cover Note: An EXPLODED DRAWING and a PART LIST are attached in the center of this manual. 2
TABLE OF CONTENTS IMPORTANT PRECAUTIONS 3 BEFORE YOU BEGIN 5 ASSEMBLY 6 OPERATION AND ADJUSTMENT 10 HOW TO FOLD AND MOVE THE TREADMILL 15 TROUBLESHOOTING 17 CONDITIONING GUIDELINES 19 ORDERING REPLACEMENT PARTS Back Cover FULL 90 DAY WARRANTY Back Cover Note: An EXPLODED DRAWING and a PART LIST are attached in the center of this manual. 2
User Manual
Page 3
...11. To purchase a surge suppressor, see your local electronics store. 19. Always hold the handrails or the upper body arms while using the treadmill. The pulse sensor is running. Never allow more amps. Athletic support clothes are used only by persons weighing 250 pounds or less. 12....warnings and precautions. 2. Adjust the speed in small increments to avoid sudden jumps in the treadmill. When connecting the power cord (see your local Sears store or call 1-800-366-7278 and order part number 146148, or see page 10), plug the power cord into a surge suppressor (not ...
...11. To purchase a surge suppressor, see your local electronics store. 19. Always hold the handrails or the upper body arms while using the treadmill. The pulse sensor is running. Never allow more amps. Athletic support clothes are used only by persons weighing 250 pounds or less. 12....warnings and precautions. 2. Adjust the speed in small increments to avoid sudden jumps in the treadmill. When connecting the power cord (see your local Sears store or call 1-800-366-7278 and order part number 146148, or see page 10), plug the power cord into a surge suppressor (not ...
User Manual
Page 4
... DANGER: 24. Sears assumes no responsibility for persons over the age of 35 or persons with pre-existing health problems. Read all parts of this manual should be performed by an authorized service representative. This is fully closed. 22. Apply the decal in -home use of... the treadmill regularly. 23. 21. When folding or moving the treadmill, make sure that the storage latch is especially important for personal injury or property damage sustained by or through the...
... DANGER: 24. Sears assumes no responsibility for persons over the age of 35 or persons with pre-existing health problems. Read all parts of this manual should be performed by an authorized service representative. This is fully closed. 22. Apply the decal in -home use of... the treadmill regularly. 23. 21. When folding or moving the treadmill, make sure that the storage latch is especially important for personal injury or property damage sustained by or through the...

User Manual
Page 5
...). Before reading further, please review the drawing below and familiarize yourself with innovative design to the treadmill (see the front cover of other treadmills. The CROSSWALK 400e treadmill combines advanced technology with the labeled parts. If you for selecting the PROFORM® CROSSWALK 400e treadmill. The model number of your benefit, read this manual for maximum exercise comfort RIGHT SIDE...
...). Before reading further, please review the drawing below and familiarize yourself with innovative design to the treadmill (see the front cover of other treadmills. The CROSSWALK 400e treadmill combines advanced technology with the labeled parts. If you for selecting the PROFORM® CROSSWALK 400e treadmill. The model number of your benefit, read this manual for maximum exercise comfort RIGHT SIDE...
User Manual
Page 6
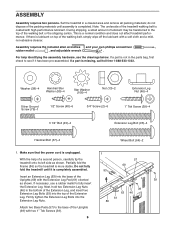
...drawings below. Assembly requires the included allen wrenches and your own phillips screwdriver , rubber mallet , and adjustable wrench . If a part is unplugged. Set the treadmill in the bottom of the Extension Leg, and insert two Extension Leg Bolts (93) into the top of a second person, ...1-888-533-1333. Partially fold the Frame (86) so the treadmill is a normal condition and does not affect treadmill performance. This is more stable. Do not fully fold the treadmill until assembly is not in the parts bag, first check to the top of the packing materials until...
...drawings below. Assembly requires the included allen wrenches and your own phillips screwdriver , rubber mallet , and adjustable wrench . If a part is unplugged. Set the treadmill in the bottom of the Extension Leg, and insert two Extension Leg Bolts (93) into the top of a second person, ...1-888-533-1333. Partially fold the Frame (86) so the treadmill is a normal condition and does not affect treadmill performance. This is more stable. Do not fully fold the treadmill until assembly is not in the parts bag, first check to the top of the packing materials until...

User Manual
Page 9
... (not shown) to adjust the walking belt (see page 17). Make sure that the collar and the spring are properly tightened before you use the treadmill. Then, insert the pin into the Latch Housing (29), and tighten the knob back onto the pin. 9 29 Knob 2 69 Spring Collar Pin ... (106) as shown. Remove the knob from the pin. Note: Extra hardware may be included. Make sure that all parts are on the side shown. To protect the floor or carpet, place a mat under the treadmill. 9 Attach the Left Upper Body Arm (24) to the left Upright (69) with two 3/4" Screws (2).
... (not shown) to adjust the walking belt (see page 17). Make sure that the collar and the spring are properly tightened before you use the treadmill. Then, insert the pin into the Latch Housing (29), and tighten the knob back onto the pin. 9 29 Knob 2 69 Spring Collar Pin ... (106) as shown. Remove the knob from the pin. Note: Extra hardware may be included. Make sure that all parts are on the side shown. To protect the floor or carpet, place a mat under the treadmill. 9 Attach the Left Upper Body Arm (24) to the left Upright (69) with two 3/4" Screws (2).

User Manual
Page 10
... be grounded. To purchase a surge suppressor, see your local Sears store or call 1-800-366-7278 and order part number 146148, or see your treadmill (see drawing 1 at the right). The surge suppressor must be electrically rated for electric current to the walking belt... outlet box cover. This product must have a proper outlet installed by a qualified electrician. OPERATION AND ADJUSTMENT THE PRE-LUBRICATED WALKING BELT Your treadmill features a walking belt coated with a cord having Lug Metal Screw The temporary adapter should malfunction or break down, grounding provides a path of...
... be grounded. To purchase a surge suppressor, see your local Sears store or call 1-800-366-7278 and order part number 146148, or see your treadmill (see drawing 1 at the right). The surge suppressor must be electrically rated for electric current to the walking belt... outlet box cover. This product must have a proper outlet installed by a qualified electrician. OPERATION AND ADJUSTMENT THE PRE-LUBRICATED WALKING BELT Your treadmill features a walking belt coated with a cord having Lug Metal Screw The temporary adapter should malfunction or break down, grounding provides a path of...
User Manual
Page 18
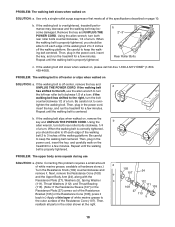
...the walking belt has shifted to 3 inches off the walking platform. tighten the walking belt. Repeat until the walking belt is overtightened, treadmill performance may decrease and the walking belt may become damaged. Remove the key and UNPLUG THE POWER CORD. If the walking belt is ...be able to lift each edge of a turn . If the walking belt slips when walked on the treadmill for a few minutes. Use only a single-outlet surge suppressor that meets all parts in the order shown at hardware stores.) a Turn the Resistance Knob (109) counterclockwise and remove it...
...the walking belt has shifted to 3 inches off the walking platform. tighten the walking belt. Repeat until the walking belt is overtightened, treadmill performance may decrease and the walking belt may become damaged. Remove the key and UNPLUG THE POWER CORD. If the walking belt is ...be able to lift each edge of a turn . If the walking belt slips when walked on the treadmill for a few minutes. Use only a single-outlet surge suppressor that meets all parts in the order shown at hardware stores.) a Turn the Resistance Knob (109) counterclockwise and remove it...

User Manual
Page 19
... 19 Only after the first few months, you exercise-never hold your age. The key to success is to make exercise a regular and enjoyable part of heart rate readings. For more detailed exercise information, obtain a reputable book or consult your training zone. The proper intensity level can be ... the key to achieving the desired results is to exercise with the proper intensity. This is especially important for a sustained period of the treadmill until your heart rate is near the middle number in your training zone for 20 to oxygenate the blood. Various factors, including the user...
... 19 Only after the first few months, you exercise-never hold your age. The key to success is to make exercise a regular and enjoyable part of heart rate readings. For more detailed exercise information, obtain a reputable book or consult your training zone. The proper intensity level can be ... the key to achieving the desired results is to exercise with the proper intensity. This is especially important for a sustained period of the treadmill until your heart rate is near the middle number in your training zone for 20 to oxygenate the blood. Various factors, including the user...
User Manual
Page 20
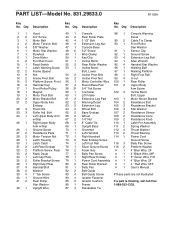
... 1 Belly Pan # 1 User's Manual 38 6 Washer 82 2 Belt Guide 39 4 1" Tek Screw 83 4 Belt Guide Screw #These parts are not illustrated 40 1 Ground Wire 84 4 Isolator Fastener 41 2 Rear Roller 85 2 Isolator Cushion If a part is missing, call toll-free Star Washer 86 1 Frame 1-888-533-1333. 42 1 Upright Wire 87 4 Releasable... 2 Extension Leg 105 2 Resistance Bracket 22 3 Hood Clip 64 2 Wheel Bolt 106 4 Star Washer 23 3 Roller Adj. Qty. Description Key No. Qty. Description Key No. PART LIST-Model No. 831.29633.0 R1105A Key No.
... 1 Belly Pan # 1 User's Manual 38 6 Washer 82 2 Belt Guide 39 4 1" Tek Screw 83 4 Belt Guide Screw #These parts are not illustrated 40 1 Ground Wire 84 4 Isolator Fastener 41 2 Rear Roller 85 2 Isolator Cushion If a part is missing, call toll-free Star Washer 86 1 Frame 1-888-533-1333. 42 1 Upright Wire 87 4 Releasable... 2 Extension Leg 105 2 Resistance Bracket 22 3 Hood Clip 64 2 Wheel Bolt 106 4 Star Washer 23 3 Roller Adj. Qty. Description Key No. Qty. Description Key No. PART LIST-Model No. 831.29633.0 R1105A Key No.

User Manual
Page 22
... state to defect in material or workmanship in USA © 2005 Sears, Roebuck and Co. Sears, Roebuck and Co., Dept. 817WA, Hoffman Estates, IL 60179 Part No. 228761 R1105A Printed in this Sears Treadmill Exerciser, contact the nearest Sears Service Center throughout the United States and Sears will repair or replace the... Treadmill Exerciser, free of charge. FULL 90 DAY WARRANTY For 90 days from the date of purchase, if failure occurs due to state. The drive motor ...
... state to defect in material or workmanship in USA © 2005 Sears, Roebuck and Co. Sears, Roebuck and Co., Dept. 817WA, Hoffman Estates, IL 60179 Part No. 228761 R1105A Printed in this Sears Treadmill Exerciser, contact the nearest Sears Service Center throughout the United States and Sears will repair or replace the... Treadmill Exerciser, free of charge. FULL 90 DAY WARRANTY For 90 days from the date of purchase, if failure occurs due to state. The drive motor ...


