
English Manual
Page 1
Serial Number Decal CAUTION Read all precautions and instructions in the space above for future reference. Write the serial number in this manual before using this manual for reference. The serial number is found in the location shown below. USER'S MANUAL SEARS, ROEBUCK AND CO., HOFFMAN ESTATES, IL 60179 ® Model No. 831.297381 Serial No. Save this equipment.
Serial Number Decal CAUTION Read all precautions and instructions in the space above for future reference. Write the serial number in this manual before using this manual for reference. The serial number is found in the location shown below. USER'S MANUAL SEARS, ROEBUCK AND CO., HOFFMAN ESTATES, IL 60179 ® Model No. 831.297381 Serial No. Save this equipment.
English Manual
Page 2
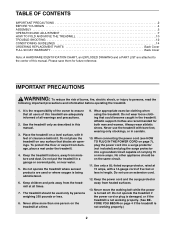
... 4 ASSEMBLY 5 OPERATION AND ADJUSTMENT 7 HOW TO FOLD AND MOVE THE TREADMILL 10 TROUBLE-SHOOTING 12 CONDITIONING GUIDELINES 14 ORDERING REPLACEMENT PARTS Back Cover FULL 90 DAY WARRANTY Back Cover Note: A HARDWARE IDENTIFICATION CHART, an EXPLODED DRAWING and a PART LIST are attached to the center of carrying 15 or more than one person on page 4 if the treadmill is turned off. Use the treadmill only as described in this treadmill are used...
... 4 ASSEMBLY 5 OPERATION AND ADJUSTMENT 7 HOW TO FOLD AND MOVE THE TREADMILL 10 TROUBLE-SHOOTING 12 CONDITIONING GUIDELINES 14 ORDERING REPLACEMENT PARTS Back Cover FULL 90 DAY WARRANTY Back Cover Note: A HARDWARE IDENTIFICATION CHART, an EXPLODED DRAWING and a PART LIST are attached to the center of carrying 15 or more than one person on page 4 if the treadmill is turned off. Use the treadmill only as described in this treadmill are used...
English Manual
Page 3
... heart rate readings. The treadmill is properly assembled. (See 23. Adjust the speed in small increments to order a free replacement decal (see the back cover of this treadmill in use this manual). The pulse sensor is not in any opening. 17. Always unplug the power cord before using the treadmill. Always hold the handrails or upper body arms while using . Never insert any object into any commercial, rental, or institutional setting. Always remove the key...
... heart rate readings. The treadmill is properly assembled. (See 23. Adjust the speed in small increments to order a free replacement decal (see the back cover of this treadmill in use this manual). The pulse sensor is not in any opening. 17. Always unplug the power cord before using the treadmill. Always hold the handrails or upper body arms while using . Never insert any object into any commercial, rental, or institutional setting. Always remove the key...
English Manual
Page 4
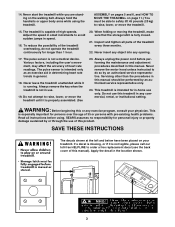
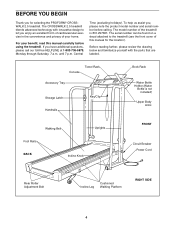
... form of cardiovascular exercise in the convenience and privacy of the treadmill is not included) Upper Body Arms Walking Belt Foot Rails BACK Incline Knob Uprights FRONT Circuit Breaker Power Cord Rear Roller Adjustment Bolt Incline Leg Cushioned Walking Platform RIGHT SIDE 4 Console Towel Rack Accessory Tray Storage Latch Handrails Key/Clip Book Rack Water Bottle Holder (Water Bottle is 831.297381. The model number of your benefit, read this manual for selecting the PROFORM® CROSSWALK 2.5 treadmill. The CROSSWALK 2.5 treadmill...
... form of cardiovascular exercise in the convenience and privacy of the treadmill is not included) Upper Body Arms Walking Belt Foot Rails BACK Incline Knob Uprights FRONT Circuit Breaker Power Cord Rear Roller Adjustment Bolt Incline Leg Cushioned Walking Platform RIGHT SIDE 4 Console Towel Rack Accessory Tray Storage Latch Handrails Key/Clip Book Rack Water Bottle Holder (Water Bottle is 831.297381. The model number of your benefit, read this manual for selecting the PROFORM® CROSSWALK 2.5 treadmill. The CROSSWALK 2.5 treadmill...
English Manual
Page 5
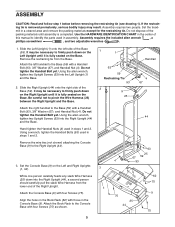
... Bolt yet. Set the Console Base (9) on the Base. Attach the Console Base (9) with those in assembly. Do not dispose of the Base (59). It may be necessary to the Console Base with a Handrail Bolt (93), 3/8" Washer (67), and Handrail Nut (4). Remove the wire ties (not shown) attaching the Console Base (9) to identify the parts used in the Console Base (9). Align the holes in steps 1 and 2. Attach...
... Bolt yet. Set the Console Base (9) on the Base. Attach the Console Base (9) with those in assembly. Do not dispose of the Base (59). It may be necessary to the Console Base with a Handrail Bolt (93), 3/8" Washer (67), and Handrail Nut (4). Remove the wire ties (not shown) attaching the Console Base (9) to identify the parts used in the Console Base (9). Align the holes in steps 1 and 2. Attach...
English Manual
Page 6
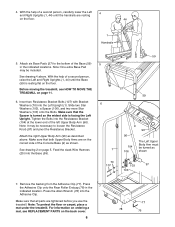
... Left Upright. Attach the right Upper Body Arm (96) as shown 103 97 103 7. For information on ordering a mat, see HOW TO MOVE THE TREADMILL on the back cover. 6 77 78 76 Make sure that all parts are tightened before you use the treadmill. Press the Adhesive Clip onto the Rear Roller Endcap (78) in the indicated locations. Attach six Base Pads (57) to loosen the Resistance Knob (97...
... Left Upright. Attach the right Upper Body Arm (96) as shown 103 97 103 7. For information on ordering a mat, see HOW TO MOVE THE TREADMILL on the back cover. 6 77 78 76 Make sure that all parts are tightened before you use the treadmill. Press the Adhesive Clip onto the Rear Roller Endcap (78) in the indicated locations. Attach six Base Pads (57) to loosen the Resistance Knob (97...
English Manual
Page 7
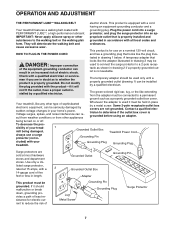
... down, grounding provides a path of least resistance for use a surge protector (not in an increased risk of Grounded Outlet Grounding Pin 2 Grounded Outlet Box Adapter Grounding Pin Grounding Plug Lug Metal Screw Surge Protector 7 trated in accordance with all local codes and form. not fit the outlet, have a proper outlet installed by sudden voltage changes in your home's power. Voltage surges, spikes, and noise...
... down, grounding provides a path of least resistance for use a surge protector (not in an increased risk of Grounded Outlet Grounding Pin 2 Grounded Outlet Box Adapter Grounding Pin Grounding Plug Lug Metal Screw Surge Protector 7 trated in accordance with all local codes and form. not fit the outlet, have a proper outlet installed by sudden voltage changes in your home's power. Voltage surges, spikes, and noise...

English Manual
Page 8
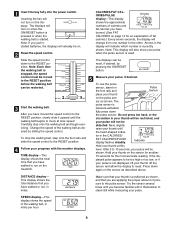
... using the treadmill. Speed Control Clip Pulse Key Sensor CAUTION: Before operating the console, read the following precautions. • Do not stand on the walking belt when turning on walking belt when starting treadmill. • Read User's Manual and follow warnings and operating instructions. • Keep fluids off electronic console. cluded). Press three batteries into the battery com- Battery Cover ative (-) ends of the batteries are recommended. Next, step onto the foot rails of the console, remove it...
... using the treadmill. Speed Control Clip Pulse Key Sensor CAUTION: Before operating the console, read the following precautions. • Do not stand on the walking belt when turning on walking belt when starting treadmill. • Read User's Manual and follow warnings and operating instructions. • Keep fluids off electronic console. cluded). Press three batteries into the battery com- Battery Cover ative (-) ends of the batteries are recommended. Next, step onto the foot rails of the console, remove it...
English Manual
Page 9
... the displays. pulse sensor is button. Do not press too hard, or the circulation in the display will also show your pulse when the pulse sensor is not displayed, lift your thumb off the sensor and allow the display to the RESET position 5 Measure your pulse will not turn on the treadmill. Inserting the key will be moved to reset. reset, if desired, by sliding the speed control. before the walking belt To use the pulse...
... the displays. pulse sensor is button. Do not press too hard, or the circulation in the display will also show your pulse when the pulse sensor is not displayed, lift your thumb off the sensor and allow the display to the RESET position 5 Measure your pulse will not turn on the treadmill. Inserting the key will be moved to reset. reset, if desired, by sliding the speed control. before the walking belt To use the pulse...
English Manual
Page 10
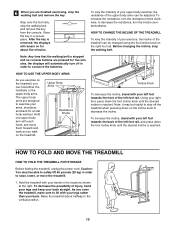
... move the treadmill. 1. HOW TO FOLD AND MOVE THE TREADMILL HOW TO FOLD THE TREADMILL FOR STORAGE Before folding the treadmill, unplug the power cord. Hold the treadmill with your left foot rail, and press down the foot incline knob until the desired incline is stopped and no console buttons are finished exercising, stop the walking belt and remove the key. After the key is reached. To vary the intensity of your hands in a secure place. Upper Body Arms Resistance Knobs Incline Knob...
... move the treadmill. 1. HOW TO FOLD AND MOVE THE TREADMILL HOW TO FOLD THE TREADMILL FOR STORAGE Before folding the treadmill, unplug the power cord. Hold the treadmill with your left foot rail, and press down the foot incline knob until the desired incline is stopped and no console buttons are finished exercising, stop the walking belt and remove the key. After the key is reached. To vary the intensity of your hands in a secure place. Upper Body Arms Resistance Knobs Incline Knob...
English Manual
Page 11
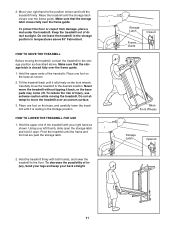
... direct sunlight. HOW TO LOWER THE TREADMILL FOR USE 1. Using your right hand to the position shown and hold it is closed fully over the frame guide. Make sure that the storage latch is resting in temperatures above . Keep the treadmill out of injury, use extreme caution while moving the treadmill, convert the treadmill to move the treadmill over the frame guide. HOW TO MOVE THE TREADMILL Before moving...
... direct sunlight. HOW TO LOWER THE TREADMILL FOR USE 1. Using your right hand to the position shown and hold it is closed fully over the frame guide. Make sure that the storage latch is resting in temperatures above . Keep the treadmill out of injury, use extreme caution while moving the treadmill, convert the treadmill to move the treadmill over the frame guide. HOW TO MOVE THE TREADMILL Before moving...
English Manual
Page 12
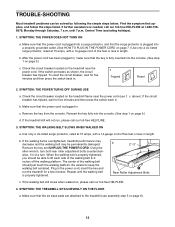
... treadmill (see 1. c. SYMPTOM: THE WALKING BELT SLOWS WHEN WALKED ON a. Use only a UL-listed surge protector, rated at 15 amps, with a 14-gauge cord of a turn both rear roller adjustment bolts counterclockwise, 1/4 of five feet or less in . 2. Repeat until 7 p.m. Make sure that the power cord is plugged into the console. (See step 1 on the treadmill frame near the power cord. Make sure that the power cord is plugged in. Remove the key and UNPLUG THE POWER CORD...
... treadmill (see 1. c. SYMPTOM: THE WALKING BELT SLOWS WHEN WALKED ON a. Use only a UL-listed surge protector, rated at 15 amps, with a 14-gauge cord of a turn both rear roller adjustment bolts counterclockwise, 1/4 of five feet or less in . 2. Repeat until 7 p.m. Make sure that the power cord is plugged into the console. (See step 1 on the treadmill frame near the power cord. Make sure that the power cord is plugged in. Remove the key and UNPLUG THE POWER CORD...
English Manual
Page 13
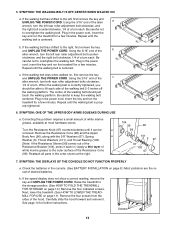
... key and UNPLUG THE POWER CORD. c. Using the 3/16" end of the c allen wrench, turn both rear roller adjustment bolts clockwise, 1/4 of a turn . Reattach all parts in the console. (See BATTERY INSTALLATION on , first remove the key and UNPLUG THE POWER CORD. SYMPTOM: THE DISPLAYS OF THE CONSOLE DO NOT FUNCTION PROPERLY a. Carefully slide the hood forward and remove it back in the power cord, insert the key and run the treadmill for further instructions. If the walking belt...
... key and UNPLUG THE POWER CORD. c. Using the 3/16" end of the c allen wrench, turn both rear roller adjustment bolts clockwise, 1/4 of a turn . Reattach all parts in the console. (See BATTERY INSTALLATION on , first remove the key and UNPLUG THE POWER CORD. SYMPTOM: THE DISPLAYS OF THE CONSOLE DO NOT FUNCTION PROPERLY a. Carefully slide the hood forward and remove it back in the power cord, insert the key and run the treadmill for further instructions. If the walking belt...
English Manual
Page 14
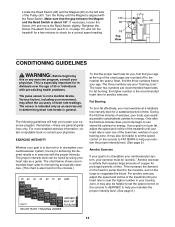
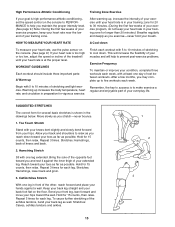
... must be helpful to set the speed control on the console to AEROBIC to help you , first find the three numbers below shows recommended heart rates for fat burning and aerobic exercise. (This chart is activity that the gap between the Magnet and the Reed Switch is aligned with pre-existing health problems. The pulse sensor is not a medical device. Re-attach the hood (see 8. Remember-these...
... must be helpful to set the speed control on the console to AEROBIC to help you , first find the three numbers below shows recommended heart rates for fat burning and aerobic exercise. (This chart is activity that the gap between the Magnet and the Reed Switch is aligned with pre-existing health problems. The pulse sensor is not a medical device. Re-attach the hood (see 8. Remember-these...
English Manual
Page 15
... and your back foot flat on the console. (See page 9.) If your heart rate is too high or too low, adjust the speed or incline of your training zone. Warming up to five workouts each leg. Remember, the key to success is to make exercise a regular and enjoyable part of stretching and light exercise. Toe Touch Stretch Stand with at the proper level...
... and your back foot flat on the console. (See page 9.) If your heart rate is too high or too low, adjust the speed or incline of your training zone. Warming up to five workouts each leg. Remember, the key to success is to make exercise a regular and enjoyable part of stretching and light exercise. Toe Touch Stretch Stand with at the proper level...
English Manual
Page 16
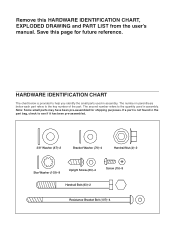
... pre-assembled for future reference. If a part is provided to the key number of the part. Save this HARDWARE IDENTIFICATION CHART, EXPLODED DRAWING and PART LIST from the user's manual. Remove this page for shipping purposes. The second number refers to see if it has been pre-assembled. 3/8" Washer (67)-2 Bracket Washer (70)-4 Handrail Nut (4)-2 Star Washer (103)-8 Upright Screw (63)-4 Screw (75)-8 Handrail Bolt (93)-2 Resistance Bracket Bolt...
... pre-assembled for future reference. If a part is provided to the key number of the part. Save this HARDWARE IDENTIFICATION CHART, EXPLODED DRAWING and PART LIST from the user's manual. Remove this page for shipping purposes. The second number refers to see if it has been pre-assembled. 3/8" Washer (67)-2 Bracket Washer (70)-4 Handrail Nut (4)-2 Star Washer (103)-8 Upright Screw (63)-4 Screw (75)-8 Handrail Bolt (93)-2 Resistance Bracket Bolt...

English Manual
Page 17
...Bolt 3 Wire Tie Holder 16 Latch-Frame Guide Screw 10 3/8" Washer 2 Roller Endcap Nut 1 Right Foot Rail 9 Endcap/Bracket Washer 1 Incline Leg 2 Incline Leg Wheel 2 Rear Roller Endcap Screw 2 Adjustment Bolt 14 Screw 1 Allen Wrench 1 Adhesive Clip 1 Rear Roller Endcap 1 Rear Roller 1 Incline Shock 1 Latch Decal 1 Battery Cover 4 8" Cable Tie 1 Walking Belt 1 Walking Platform 8 Platform Screw 8 Isolator 1 Incline Lever 1 Shock 1 Front Roller/Pulley 3 Releasable Cable Tie 1 Storage Latch Bracket 2 Handrail Bolt 2 Frame Guide Spacer 2 Foam Grip 2 Upper Body Arm w/Foam 2 Resistance Knob 2 Resistance...
...Bolt 3 Wire Tie Holder 16 Latch-Frame Guide Screw 10 3/8" Washer 2 Roller Endcap Nut 1 Right Foot Rail 9 Endcap/Bracket Washer 1 Incline Leg 2 Incline Leg Wheel 2 Rear Roller Endcap Screw 2 Adjustment Bolt 14 Screw 1 Allen Wrench 1 Adhesive Clip 1 Rear Roller Endcap 1 Rear Roller 1 Incline Shock 1 Latch Decal 1 Battery Cover 4 8" Cable Tie 1 Walking Belt 1 Walking Platform 8 Platform Screw 8 Isolator 1 Incline Lever 1 Shock 1 Front Roller/Pulley 3 Releasable Cable Tie 1 Storage Latch Bracket 2 Handrail Bolt 2 Frame Guide Spacer 2 Foam Grip 2 Upper Body Arm w/Foam 2 Resistance Knob 2 Resistance...
English Manual
Page 18
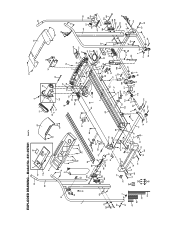
EXPLODED DRAWING-Model No. 831.297381 R0497A 47 8 7 82 95 6 18 10* 62 12 118 96 9 36 35 75 58 14 15 19 37 20 92 66 1 51 ...
EXPLODED DRAWING-Model No. 831.297381 R0497A 47 8 7 82 95 6 18 10* 62 12 118 96 9 36 35 75 58 14 15 19 37 20 92 66 1 51 ...
English Manual
Page 19
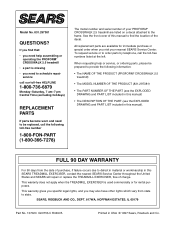
... your PROFORM® CROSSWALK 2.5 treadmill are available for rental purposes. If you need to schedule repair service call our toll-free HELPLINE 1-800-736-6879 Monday-Saturday, 7 am-7 pm Central Time (excluding holidays) REPLACEMENT PARTS If parts become worn and need help or service, or ordering parts, please be replaced, call the toll-free numbers listed at the left. Model No. 831.297381 QUESTIONS? This warranty gives you specific legal...
... your PROFORM® CROSSWALK 2.5 treadmill are available for rental purposes. If you need to schedule repair service call our toll-free HELPLINE 1-800-736-6879 Monday-Saturday, 7 am-7 pm Central Time (excluding holidays) REPLACEMENT PARTS If parts become worn and need help or service, or ordering parts, please be replaced, call the toll-free numbers listed at the left. Model No. 831.297381 QUESTIONS? This warranty gives you specific legal...

