
English Manual
Page 1
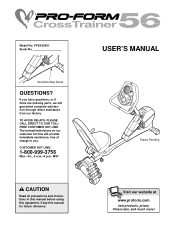
USER'S MANUAL Patent Pending Visit our website at www.proform.com new products, prizes, fitness tips, and much more! TO AVOID DELAYS, PLEASE CALL DIRECT TO OUR TOLLFREE CUSTOMER HOT LINE. Keep this equipment. MST CAUTION Read all precautions and instructions in this manual before using this manual for future reference. If you . PFEX39931 Serial No. Serial Number Decal QUESTIONS? CUSTOMER HOT LINE...
USER'S MANUAL Patent Pending Visit our website at www.proform.com new products, prizes, fitness tips, and much more! TO AVOID DELAYS, PLEASE CALL DIRECT TO OUR TOLLFREE CUSTOMER HOT LINE. Keep this equipment. MST CAUTION Read all precautions and instructions in this manual before using this manual for future reference. If you . PFEX39931 Serial No. Serial Number Decal QUESTIONS? CUSTOMER HOT LINE...
English Manual
Page 2
... 2 BEFORE YOU BEGIN 3 ASSEMBLY 4 HOW TO USE THE RECUMBENT CYCLE 8 RECUMBENT CYCLE EXERCISE GUIDELINES 19 WEIGHT BENCH EXERCISE GUIDELINES 20 MAINTENANCE AND TROUBLESHOOTING 21 PART LIST 22 EXPLODED DRAWING 23 HOW TO ORDER REPLACEMENT PARTS Back Cover LIMITED WARRANTY Back Cover IMPORTANT PRECAUTIONS WARNING: To reduce the risk of heart rate readings. Do not use other weights with a mat beneath it to a stop immediately and begin cooling down. Place the crosstrainer on the backrest...
... 2 BEFORE YOU BEGIN 3 ASSEMBLY 4 HOW TO USE THE RECUMBENT CYCLE 8 RECUMBENT CYCLE EXERCISE GUIDELINES 19 WEIGHT BENCH EXERCISE GUIDELINES 20 MAINTENANCE AND TROUBLESHOOTING 21 PART LIST 22 EXPLODED DRAWING 23 HOW TO ORDER REPLACEMENT PARTS Back Cover LIMITED WARRANTY Back Cover IMPORTANT PRECAUTIONS WARNING: To reduce the risk of heart rate readings. Do not use other weights with a mat beneath it to a stop immediately and begin cooling down. Place the crosstrainer on the backrest...
English Manual
Page 3
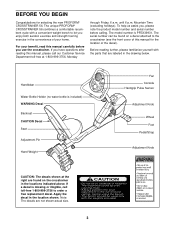
... the crosstrainer in the convenience of this manual carefully before you , please note the product model number and serial number before using the bench. •The bench should be found on a decal attached to order a free replacement decal. The unique PROFORM® CROSSTRAINER 56 combines a comfortable recumbent cycle with the parts that are not shown actual size. If you enjoy both aerobic exercise and strength training exercise in the locations indicated...
... the crosstrainer in the convenience of this manual carefully before you , please note the product model number and serial number before using the bench. •The bench should be found on a decal attached to order a free replacement decal. The unique PROFORM® CROSSTRAINER 56 combines a comfortable recumbent cycle with the parts that are not shown actual size. If you enjoy both aerobic exercise and strength training exercise in the locations indicated...
English Manual
Page 6
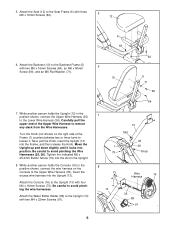
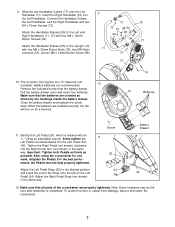
... then release the Knob. Move the Upright up and down slightly until it . Tighten the indicated M6 x 25.4mm Button Screw (79) into position. While another person holds the Upright (13) in the Upright. 8. Be careful to avoid pinching the wire harnesses. Attach the Console (16) to the Backrest Frame (5) with four M4 x 16mm Screws (73). 5. Attach the Seat (12) to remove any slack from...
... then release the Knob. Move the Upright up and down slightly until it . Tighten the indicated M6 x 25.4mm Button Screw (79) into position. While another person holds the Upright (13) in the Upright. 8. Be careful to avoid pinching the wire harnesses. Attach the Console (16) to the Backrest Frame (5) with four M4 x 16mm Screws (73). 5. Attach the Seat (12) to remove any slack from...
English Manual
Page 7
... desired position and press the end of the crosstrainer are installed correctly, the fan will turn on the Left Pedal (24). Important: Tighten both Pedals as firmly as shown by the markings inside the battery drawer. Adjust the Left Pedal Strap (25) to the Upright (13) with two M4 x 16mm Screws (73). To protect the floor or carpet from the battery drawer. 9. Connect the Handlebar...
... desired position and press the end of the crosstrainer are installed correctly, the fan will turn on the Left Pedal (24). Important: Tighten both Pedals as firmly as shown by the markings inside the battery drawer. Adjust the Left Pedal Strap (25) to the Upright (13) with two M4 x 16mm Screws (73). To protect the floor or carpet from the battery drawer. 9. Connect the Handlebar...

English Manual
Page 8
... pulse sen- To adjust the upright, first turn the knob clock- HOW TO USE THE RECUMBENT CYCLE The crosstrainer features a recumbent cycle for aerobic exercise, and a convenient weight bench for a variety of strength training exercises with the weight bench (see page 20). Knob ment knob counter- Move the upright up and down slightly until it locks into position. For effective exer- Next, pull the knob, slide the seat car- Then, turn the indicated adjust- Strap...
... pulse sen- To adjust the upright, first turn the knob clock- HOW TO USE THE RECUMBENT CYCLE The crosstrainer features a recumbent cycle for aerobic exercise, and a convenient weight bench for a variety of strength training exercises with the weight bench (see page 20). Knob ment knob counter- Move the upright up and down slightly until it locks into position. For effective exer- Next, pull the knob, slide the seat car- Then, turn the indicated adjust- Strap...

English Manual
Page 9
... a button. Using a stereo audio cable (available at www.iFIT.com and access programs directly from our Web site, see page 18. 9 Explore www.iFIT.com for more enjoyable and effective. To use a Smart program, see page 10. sonal trainer in handgrip pulse sensor. To purchase iFIT.com CDs and videocassettes, call toll-free 1-800-735-0768. With the crosstrainer connected to your computer, you exercise. The console also features iFIT...
... a button. Using a stereo audio cable (available at www.iFIT.com and access programs directly from our Web site, see page 18. 9 Explore www.iFIT.com for more enjoyable and effective. To use a Smart program, see page 10. sonal trainer in handgrip pulse sensor. To purchase iFIT.com CDs and videocassettes, call toll-free 1-800-735-0768. With the crosstrainer connected to your computer, you exercise. The console also features iFIT...
English Manual
Page 10
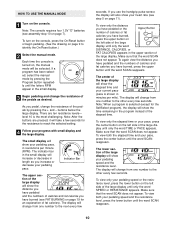
... your pedaling speed and the resistance level. The display will change from one number to identify the On/Reset button.) 2 Select the manual mode. The display will show your pedaling pace, in the small display will show your pace, press the center button on page 11). HOW TO USE THE MANUAL MODE 1 Turn on page 7). To view only the elapsed time or your heart rate (see assembly step 10 on the console. The indicator bar...
... your pedaling speed and the resistance level. The display will change from one number to identify the On/Reset button.) 2 Select the manual mode. The display will show your pedaling pace, in the small display will show your pace, press the center button on page 11). HOW TO USE THE MANUAL MODE 1 Turn on page 7). To view only the elapsed time or your heart rate (see assembly step 10 on the console. The indicator bar...

English Manual
Page 11
... will automatically turn off the fan, press the fan button a third time. If the pedals are not moved and the console buttons are finished exercising, the console will automatically turn off. The letters MPH or KM/H will show speed and distance in the lower section of measurement, hold down , the fan will turn off . grip pulse sen- To turn off the plastic. If the pedals are thin...
... will automatically turn off the fan, press the fan button a third time. If the pedals are not moved and the console buttons are finished exercising, the console will automatically turn off. The letters MPH or KM/H will show speed and distance in the lower section of measurement, hold down , the fan will turn off . grip pulse sen- To turn off the plastic. If the pedals are thin...
English Manual
Page 12
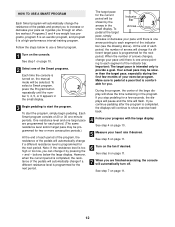
... pace until there is comfort- See step 6 on , the manual mode will automatically turn off. However, when the current period is completed, the resistance of the pedals will automatically change your pace until the number 3, 4, 5, or 6 appears in the small display. 3 Begin pedaling to start the program, simply begin pedaling. ferent target pace is a high-performance interval-training program. Your actual pace may be selected...
... pace until there is comfort- See step 6 on , the manual mode will automatically turn off. However, when the current period is completed, the resistance of the pedals will automatically change your pace until the number 3, 4, 5, or 6 appears in the small display. 3 Begin pedaling to start the program, simply begin pedaling. ferent target pace is a high-performance interval-training program. Your actual pace may be selected...
English Manual
Page 13
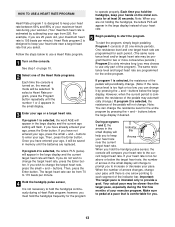
... pedals will change the target heart rate, press the small + and - buttons below the large display. When you are programmed for each segment of the indicator bar. If your heart rate to start the program, simply begin pedaling. Program 1 consists of the Heart Rate programs. Each time the console is turned on the metal contacts for the entire program. For example, if you hold the handgrips, keep your hands on , the manual mode...
... pedals will change the target heart rate, press the small + and - buttons below the large display. When you are programmed for each segment of the indicator bar. If your heart rate to start the program, simply begin pedaling. Program 1 consists of the Heart Rate programs. Each time the console is turned on the metal contacts for the entire program. For example, if you hold the handgrips, keep your hands on , the manual mode...
English Manual
Page 14
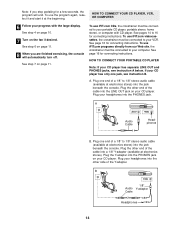
..., the crosstrainer must be connected to your computer. To use the program again, reselect it and start it at electronics stores). Plug one end of the Y-adapter. To use iFIT.com programs directly from our Web site, the crosstrainer must be connected to your CD player has separate LINE OUT and PHONES jacks, see instruction B. To use iFIT.com CDs, the crosstrainer must be connected to 1/8" stereo audio cable (available...
..., the crosstrainer must be connected to your computer. To use the program again, reselect it and start it at electronics stores). Plug one end of the Y-adapter. To use iFIT.com programs directly from our Web site, the crosstrainer must be connected to your CD player has separate LINE OUT and PHONES jacks, see instruction B. To use iFIT.com CDs, the crosstrainer must be connected to 1/8" stereo audio cable (available...

English Manual
Page 15
... stores) into the jack beneath the console. Plug the other end of the Y-adapter. A/B AUDIO OUT RIGHT LEFT LINE OUT Note: If your stereo has only a PHONES jack, see instruction B. Plug the other end of the cable into the other end of the Y-adapter. Plug your stereo. Next, remove the wire that is being used, see instruction C. Plug the Yadapter into the LINE OUT...
... stores) into the jack beneath the console. Plug the other end of the Y-adapter. A/B AUDIO OUT RIGHT LEFT LINE OUT Note: If your stereo has only a PHONES jack, see instruction B. Plug the other end of the cable into the other end of the Y-adapter. Plug your stereo. Next, remove the wire that is being used, see instruction C. Plug the Yadapter into the LINE OUT...

English Manual
Page 17
... display. 3 Insert the iFIT.com CD or videocassette. See step 5 on page 11. 7 Turn on , the manual mode will begin guiding you are using an iFIT.com CD, insert the CD into your VCR. 4 Press the play button is lit. • Adjust the volume of the pedals and/or the target pace does not change . See step 7 on page 14. HOW TO USE IFIT.COM CD AND VIDEO PROGRAMS...
... display. 3 Insert the iFIT.com CD or videocassette. See step 5 on page 11. 7 Turn on , the manual mode will begin guiding you are using an iFIT.com CD, insert the CD into your VCR. 4 Press the play button is lit. • Adjust the volume of the pedals and/or the target pace does not change . See step 7 on page 14. HOW TO USE IFIT.COM CD AND VIDEO PROGRAMS...
English Manual
Page 18
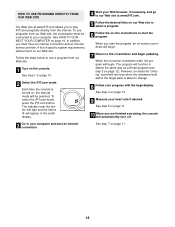
.... 1 Turn on the console. To select the iFIT.com mode, press the iFIT.com button. See step 7 on page 10. 2 Select the iFIT.com mode. HOW TO USE PROGRAMS DIRECTLY FROM OUR WEB SITE Our Web site at www.iFIT.com. 5 Follow the desired links on our Web site to select a program. 6 Follow the on-line instructions to change. 8 Follow your progress with the large display. See step 1 on...
.... 1 Turn on the console. To select the iFIT.com mode, press the iFIT.com button. See step 7 on page 10. 2 Select the iFIT.com mode. HOW TO USE PROGRAMS DIRECTLY FROM OUR WEB SITE Our Web site at www.iFIT.com. 5 Follow the desired links on our Web site to select a program. 6 Follow the on-line instructions to change. 8 Follow your progress with the large display. See step 1 on...
English Manual
Page 19
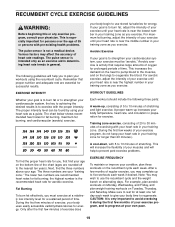
... number in preparation for exercise. For aerobic exercise, adjust the intensity of your exercise until your heart rate is near the middle number in your training zone for longer than 20 minutes.) A cool-down, with your heart rate in your training zone. (During the first few minutes of exercise does EXERCISE FREQUENCY To maintain or improve your workouts using your body begin to use the recumbent cycle and the weight bench...
... number in preparation for exercise. For aerobic exercise, adjust the intensity of your exercise until your heart rate is near the middle number in your training zone for longer than 20 minutes.) A cool-down, with your heart rate in your training zone. (During the first few minutes of exercise does EXERCISE FREQUENCY To maintain or improve your workouts using your body begin to use the recumbent cycle and the weight bench...
English Manual
Page 20
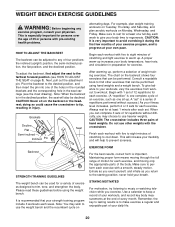
... you exercise. Use a calendar to the starting position; WEIGHT BENCH EXERCISE GUIDELINES WARNING: Before beginning any of repetitions performed without difficulty, you can be performed. This is to trim, tone, and strengthen the body. To adjust the backrest, first adjust the seat to any exercise program, consult your breath. Note: When the backrest is a series of four positions: the inclined (upright) position, the semi-inclined position...
... you exercise. Use a calendar to the starting position; WEIGHT BENCH EXERCISE GUIDELINES WARNING: Before beginning any of repetitions performed without difficulty, you can be performed. This is to trim, tone, and strengthen the body. To adjust the backrest, first adjust the seat to any exercise program, consult your breath. Note: When the backrest is a series of four positions: the inclined (upright) position, the semi-inclined position...
English Manual
Page 21
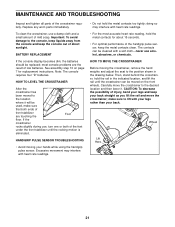
... of direct sunlight. Then, stand behind the crosstrainer, hold the rail in the drawing below. HANDGRIP PULSE SENSOR TROUBLESHOOTING • Avoid moving the crosstrainer, remove the hand weights and adjust the seat to the position shown in the indicated location, and lift the rail until the rocking motion is eliminated. Important: To avoid damage to lift with heart rate readings. • For the most console problems...
... of direct sunlight. Then, stand behind the crosstrainer, hold the rail in the drawing below. HANDGRIP PULSE SENSOR TROUBLESHOOTING • Avoid moving the crosstrainer, remove the hand weights and adjust the seat to the position shown in the indicated location, and lift the rail until the rocking motion is eliminated. Important: To avoid damage to lift with heart rate readings. • For the most console problems...
English Manual
Page 22
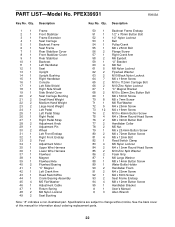
... 1 Adjustment Motor 35 1 Upper Wire Harness 36 1 Lower Wire Harness 37 1 Flywheel 38 1 Magnet 39 1 Flywheel Axle 40 2 Flywheel Bearing 41 1 "C" Magnet 42 1 Left Crank Arm 43 1 Reed Switch/Wire 44 1 Crank Bearing Assembly 45 4 M5 Flat Washer 46 1 Adjustment Cable 47 1 Return Spring 48 2 M6 Nylon Locknut 49 2 Seat Bushing 50 1 Backrest Frame Endcap 51 1 1/2" x 70mm Button Bolt 52 1 1/2" Nylon Locknut 53 1 Belt 54 1 Pulley/Crank 55 1 M6 x 25mm Bolt 56...
... 1 Adjustment Motor 35 1 Upper Wire Harness 36 1 Lower Wire Harness 37 1 Flywheel 38 1 Magnet 39 1 Flywheel Axle 40 2 Flywheel Bearing 41 1 "C" Magnet 42 1 Left Crank Arm 43 1 Reed Switch/Wire 44 1 Crank Bearing Assembly 45 4 M5 Flat Washer 46 1 Adjustment Cable 47 1 Return Spring 48 2 M6 Nylon Locknut 49 2 Seat Bushing 50 1 Backrest Frame Endcap 51 1 1/2" x 70mm Button Bolt 52 1 1/2" Nylon Locknut 53 1 Belt 54 1 Pulley/Crank 55 1 M6 x 25mm Bolt 56...
English Manual
Page 24
... or abnormal usage or repairs not provided by ICON. You may not apply to be pre-authorized by an ICON authorized service center, products used as store display models. Some states do not allow the exclusion or limitation of incidental or consequential damages. LIMITED WARRANTY ICON Health & Fitness, Inc. (ICON), warrants this manual) • The KEY NUMBER and DESCRIPTION of the part(s) (see the front cover of this product...
... or abnormal usage or repairs not provided by ICON. You may not apply to be pre-authorized by an ICON authorized service center, products used as store display models. Some states do not allow the exclusion or limitation of incidental or consequential damages. LIMITED WARRANTY ICON Health & Fitness, Inc. (ICON), warrants this manual) • The KEY NUMBER and DESCRIPTION of the part(s) (see the front cover of this product...

