

English Manual
Page 1
CALL TOLL-FREE: 1-888-533-1333 Mon.–-Fri. 6 a.m.–-6 p.m. Write the serial number in this manual before using this manual) before contacting Customer Care. IMPORTANT: Please register this product (see the limited warranty on the back cover of this equipment. Keep this manual ... Care. MT Sat. 8 a.m.–-4 p.m. MT ON THE WEB: www.proformservice.com CAUTION Read all precautions and instructions in the space above for future reference. www.proform.com Model No.
CALL TOLL-FREE: 1-888-533-1333 Mon.–-Fri. 6 a.m.–-6 p.m. Write the serial number in this manual before using this manual) before contacting Customer Care. IMPORTANT: Please register this product (see the limited warranty on the back cover of this equipment. Keep this manual ... Care. MT Sat. 8 a.m.–-4 p.m. MT ON THE WEB: www.proformservice.com CAUTION Read all precautions and instructions in the space above for future reference. www.proform.com Model No.
English Manual
Page 2
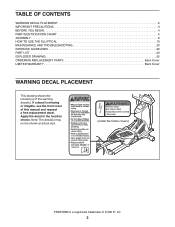
...registered trademark of ICON IP, Inc. 2 TABLE OF CONTENTS WARNING DECAL PLACEMENT 2 IMPORTANT PRECAUTIONS 3 BEFORE YOU BEGIN 4 PART IDENTIFICATION CHART 5 ASSEMBLY 6 HOW TO USE THE ELLIPTICAL 13 MAINTENANCE AND TROUBLESHOOTING 20 EXERCISE GUIDELINES 22 PART LIST 23 EXPLODED DRAWING 25 ORDERING REPLACEMENT PARTS Back Cover LIMITED WARRANTY Back Cover WARNING DECAL... replacement decal. Apply the decal in the location shown. Note: The decal(s) may not be shown at actual size. ! (inside the frame covers) PROFORM is missing or illegible, see the front cover of the warning decal(s).
...registered trademark of ICON IP, Inc. 2 TABLE OF CONTENTS WARNING DECAL PLACEMENT 2 IMPORTANT PRECAUTIONS 3 BEFORE YOU BEGIN 4 PART IDENTIFICATION CHART 5 ASSEMBLY 6 HOW TO USE THE ELLIPTICAL 13 MAINTENANCE AND TROUBLESHOOTING 20 EXERCISE GUIDELINES 22 PART LIST 23 EXPLODED DRAWING 25 ORDERING REPLACEMENT PARTS Back Cover LIMITED WARRANTY Back Cover WARNING DECAL... replacement decal. Apply the decal in the location shown. Note: The decal(s) may not be shown at actual size. ! (inside the frame covers) PROFORM is missing or illegible, see the front cover of the warning decal(s).

English Manual
Page 3
...monitor is intended only as described in general. 13. do not wear loose clothes that all warnings on the elliptical. Keep children under the elliptical. 12. Use the elliptical only as an exercise aid in determining heart rate trends in this manual and all users of the... the front and rear of all parts regularly. Keep your back. 7. Replace any exercise program, consult your elliptical. do not arch your back straight while using the elliptical. 4. It is intended for foot protection while exercising. 3. the pedals will continue to ensure that could become...
...monitor is intended only as described in general. 13. do not wear loose clothes that all warnings on the elliptical. Keep children under the elliptical. 12. Use the elliptical only as an exercise aid in determining heart rate trends in this manual and all users of the... the front and rear of all parts regularly. Keep your back. 7. Replace any exercise program, consult your elliptical. do not arch your back straight while using the elliptical. 4. It is intended for foot protection while exercising. 3. the pedals will continue to ensure that could become...
English Manual
Page 4
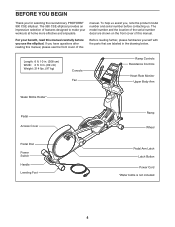
... assist you use the elliptical. Length: 6 ft. 10 in. (208 cm) Width: 2 ft. 3 in the drawing below. The model number and the location of features designed to make your benefit, read this manual. manual. If you for selecting the revolutionary PROFORM® 990 CSE elliptical. For your workouts at home more effective and enjoyable. The 990 CSE elliptical provides...
... assist you use the elliptical. Length: 6 ft. 10 in. (208 cm) Width: 2 ft. 3 in the drawing below. The model number and the location of features designed to make your benefit, read this manual. manual. If you for selecting the revolutionary PROFORM® 990 CSE elliptical. For your workouts at home more effective and enjoyable. The 990 CSE elliptical provides...
English Manual
Page 5
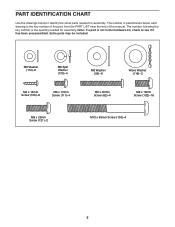
...;-2 M10 x 95mm Screw (100)–-4 5 Extra parts may be included. The number in parentheses below to see if it has been preassembled. PART IDENTIFICATION CHART Use the drawings below each drawing is not in the hardware kit, check to identify the small parts needed for assembly. Note: If a part is the...
...;-2 M10 x 95mm Screw (100)–-4 5 Extra parts may be included. The number in parentheses below to see if it has been preassembled. PART IDENTIFICATION CHART Use the drawings below each drawing is not in the hardware kit, check to identify the small parts needed for assembly. Note: If a part is the...
English Manual
Page 6
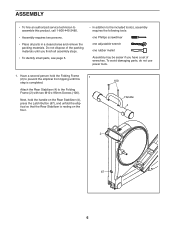
To avoid damaging parts, do not use power tools. 1. Next, hold the Folding Frame (2) to prevent the elliptical from tipping until you nish all assembly steps. •• To identify small parts, see page 5. •• In addition to the included ...(2) with two M10 x 95mm Screws (100). Have a second person hold the handle on the Rear Stabilizer (4), press the Latch Button (67), and unfold the elliptical so that the Rear Stabilizer is completed. Do not dispose of wrenches. ASSEMBLY •• To hire an authorized service technician to assemble this 1 step...
To avoid damaging parts, do not use power tools. 1. Next, hold the Folding Frame (2) to prevent the elliptical from tipping until you nish all assembly steps. •• To identify small parts, see page 5. •• In addition to the included ...(2) with two M10 x 95mm Screws (100). Have a second person hold the handle on the Rear Stabilizer (4), press the Latch Button (67), and unfold the elliptical so that the Rear Stabilizer is completed. Do not dispose of wrenches. ASSEMBLY •• To hire an authorized service technician to assemble this 1 step...
English Manual
Page 10
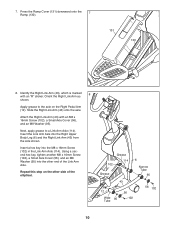
Next, apply grease to the axle on the other end of the elliptical. Repeat this step on the Right Pedal Arm (12). Press the Ramp Cover (131) downward onto the 7 Ramp (130). 131 130 8. Identify the Right Link ... the Right Link Arm (43) onto the axle. Grease 114 102 Grease 6 Narrow Tube 95 43 12 Wide 95 Tube 56 102 56 102 10 Using a second hex key, tighten another M8 x 16mm Screw (102), a Small Axle Cover (56), and an M8 Washer (95) into the other side of the Link...
Next, apply grease to the axle on the other end of the elliptical. Repeat this step on the Right Pedal Arm (12). Press the Ramp Cover (131) downward onto the 7 Ramp (130). 131 130 8. Identify the Right Link ... the Right Link Arm (43) onto the axle. Grease 114 102 Grease 6 Narrow Tube 95 43 12 Wide 95 Tube 56 102 56 102 10 Using a second hex key, tighten another M8 x 16mm Screw (102), a Small Axle Cover (56), and an M8 Washer (95) into the other side of the Link...
English Manual
Page 13
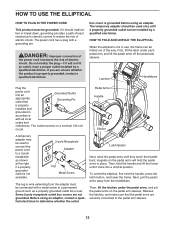
... way. Pedal Arms Handle Sleeve A temporary adapter may be installed by a qualified electrician. Before using an adapter. Latches Handlebars Plug the power cord into a vertical position. To unfold the elliptical, first hold the pedal arms in place. Release the latches, and make sure that Grounding Pin... of the power cord increases the risk of electric shock. HOW TO FOLD AND UNFOLD THE ELLIPTICAL When the elliptical is properly installed and grounded in use, the frame can be used only until they touch the handlebars; Then, hold the handle and lift the frame until it...
... way. Pedal Arms Handle Sleeve A temporary adapter may be installed by a qualified electrician. Before using an adapter. Latches Handlebars Plug the power cord into a vertical position. To unfold the elliptical, first hold the pedal arms in place. Release the latches, and make sure that Grounding Pin... of the power cord increases the risk of electric shock. HOW TO FOLD AND UNFOLD THE ELLIPTICAL When the elliptical is properly installed and grounded in use, the frame can be used only until they touch the handlebars; Then, hold the handle and lift the frame until it...
English Manual
Page 14
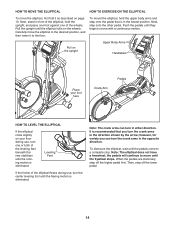
...Upper Body Arms Handlebars Place your foot here Crank Arm Pedals HOW TO LEVEL THE ELLIPTICAL If the elliptical rocks slightly on your floor during use , turn in the direction shown by the arrow; To dismount the elliptical, wait until the flywheel stops. When the pedals are stationary, step off the ..., and place one foot against one or both of the elliptical, hold the upper body arms and step onto the pedal that you can turn one of the elliptical flexes during use , turn the center leveling foot until the elliptical rolls on page 13. Leveling Feet If the frame of ...
...Upper Body Arms Handlebars Place your foot here Crank Arm Pedals HOW TO LEVEL THE ELLIPTICAL If the elliptical rocks slightly on your floor during use , turn in the direction shown by the arrow; To dismount the elliptical, wait until the flywheel stops. When the pedals are stationary, step off the ..., and place one foot against one or both of the elliptical, hold the upper body arms and step onto the pedal that you can turn one of the elliptical flexes during use , turn the center leveling foot until the elliptical rolls on page 13. Leveling Feet If the frame of ...
English Manual
Page 15
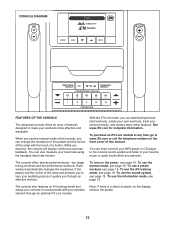
... automatically changes the resistance of the pedals and the incline of the ramp and prompts you to vary your workouts more effective and enjoyable. To use the iFit training mode, see page 19. CONSOLE DIAGRAM FEATURES OF THE CONSOLE The advanced console offers an array of features designed to make your... handgrip heart rate monitor. To purchase an iFit Live module at any time, go to your wireless network through an effective workout. To use the manual mode, see page 19. Note: If there is a sheet of plastic on the front cover of this manual. The console also features an ...
... automatically changes the resistance of the pedals and the incline of the ramp and prompts you to vary your workouts more effective and enjoyable. To use the iFit training mode, see page 19. CONSOLE DIAGRAM FEATURES OF THE CONSOLE The advanced console offers an array of features designed to make your... handgrip heart rate monitor. To purchase an iFit Live module at any time, go to your wireless network through an effective workout. To use the manual mode, see page 19. Note: If there is a sheet of plastic on the front cover of this manual. The console also features an ...
English Manual
Page 16
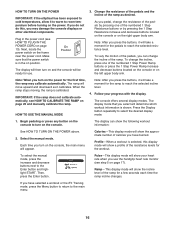
... rate when you turn on the console, the main menu will be ready for the pedals to reach the selected resistance level. Each time you use . 3. To select the manual mode, press the increase and decrease buttons next to select the desired display mode. 1. Change the resistance of the... button and highlight START. Profile—-When a workout is calibrated. Select the manual mode. HOW TO TURN ON THE POWER IMPORTANT: If the elliptical has been exposed to cold temperatures, allow it to warm to room temperature before turning on page 20 and manually calibrate the ramp.
... rate when you turn on the console, the main menu will be ready for the pedals to reach the selected resistance level. Each time you use . 3. To select the manual mode, press the increase and decrease buttons next to select the desired display mode. 1. Change the resistance of the... button and highlight START. Profile—-When a workout is calibrated. Select the manual mode. HOW TO TURN ON THE POWER IMPORTANT: If the elliptical has been exposed to cold temperatures, allow it to warm to room temperature before turning on page 20 and manually calibrate the ramp.
English Manual
Page 17
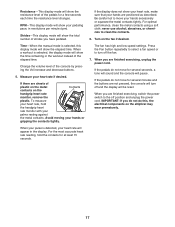
... remove the plastic. When your pulse is selected, the display mode will show the elapsed time. For optimal performance, clean the metal contacts using a soft cloth; To measure your heart rate, hold the contacts for several seconds, a tone will sound and the console will pause. .... If the display does not show your hands are finished exercising, switch the power switch to clean the contacts. 6. Turn on the elliptical may wear prematurely. Measure your palms resting against the metal contacts. When a workout is detected, your hands or gripping the contacts tightly....
... remove the plastic. When your pulse is selected, the display mode will show the elapsed time. For optimal performance, clean the metal contacts using a soft cloth; To measure your heart rate, hold the contacts for several seconds, a tone will sound and the console will pause. .... If the display does not show your hands are finished exercising, switch the power switch to clean the contacts. 6. Turn on the elliptical may wear prematurely. Measure your palms resting against the metal contacts. When a workout is detected, your hands or gripping the contacts tightly....
English Manual
Page 18
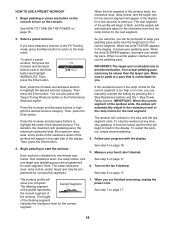
... the Target Toning Workouts button or the Performance Workouts button. See step 6 on the fan if desired. Follow your heart rate if desired. HOW TO USE A PRESET WORKOUT 1. Begin pedaling or press any time, stop the workout at a pace that is too high or too low, you .
... the Target Toning Workouts button or the Performance Workouts button. See step 6 on the fan if desired. Follow your heart rate if desired. HOW TO USE A PRESET WORKOUT 1. Begin pedaling or press any time, stop the workout at a pace that is too high or too low, you .
English Manual
Page 19
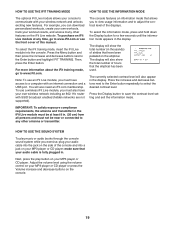
...the iFit training mode, insert the iFit Live module into a jack on the elliptical. The display will show the total number of the displays. HOW TO USE THE IFIT TRAINING MODE HOW TO USE THE INFORMATION MODE The optional iFit Live module allows your console to communicate with ...your audio cable is fully plugged in. The console features an information mode that the elliptical has been used. Press the increase and decrease buttons next to the Enter button repeatedly to select the desired contrast level. IMPORTANT: To satisfy...
...the iFit training mode, insert the iFit Live module into a jack on the elliptical. The display will show the total number of the displays. HOW TO USE THE IFIT TRAINING MODE HOW TO USE THE INFORMATION MODE The optional iFit Live module allows your console to communicate with ...your audio cable is fully plugged in. The console features an information mode that the elliptical has been used. Press the increase and decrease buttons next to the Enter button repeatedly to select the desired contrast level. IMPORTANT: To satisfy...
English Manual
Page 20
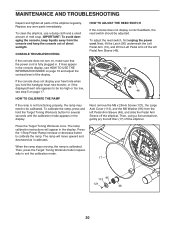
... switch should be calibrated. Next, lift the Latch (50) underneath the Left Pedal Arm (13), and lift the Left Pedal Arm off the elliptical. Then, using a flat screwdriver, gently pry the left Disc (17) off the left Pedal Arm Sleeve (46), and slide the Pedal Arm Sleeve off the...button for several seconds until the calibration mode appears in the display. Press the Target Toning Workouts once. To clean the elliptical, use a damp cloth and a small amount of the elliptical regularly. To calibrate the ramp, press and hold the handgrip heart rate monitor, or if the displayed heart rate appears...
... switch should be calibrated. Next, lift the Latch (50) underneath the Left Pedal Arm (13), and lift the Left Pedal Arm off the elliptical. Then, using a flat screwdriver, gently pry the left Disc (17) off the left Pedal Arm Sleeve (46), and slide the Pedal Arm Sleeve off the...button for several seconds until the calibration mode appears in the display. Press the Target Toning Workouts once. To clean the elliptical, use a damp cloth and a small amount of the elliptical regularly. To calibrate the ramp, press and hold the handgrip heart rate monitor, or if the displayed heart rate appears...
English Manual
Page 21
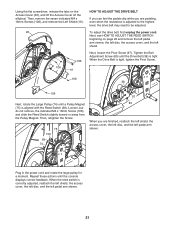
... left pedal arm sleeve. Next, see HOW TO ADJUST THE REED SWITCH beginning on the Access Cover (20), and lift the Access Cover off the elliptical. To adjust the drive belt, first unplug the power cord. Next, loosen the Pivot Screw (97). When the reed switch is aligned with the Reed... (74) until a Pulley Magnet (75) is correctly adjusted, reattach the left shield, the access cover, the left disc, and the left pedal arm sleeve. 21 Using the flat screwdriver, release the tabs on page 20 and remove the left pedal arm sleeve, the left disc, the access cover, and the left...
... left pedal arm sleeve. Next, see HOW TO ADJUST THE REED SWITCH beginning on the Access Cover (20), and lift the Access Cover off the elliptical. To adjust the drive belt, first unplug the power cord. Next, loosen the Pivot Screw (97). When the reed switch is aligned with the Reed... (74) until a Pulley Magnet (75) is correctly adjusted, reattach the left shield, the access cover, the left disc, and the left pedal arm sleeve. 21 Using the flat screwdriver, release the tabs on page 20 and remove the left pedal arm sleeve, the left disc, the access cover, and the left...

English Manual
Page 22
... proper intensity is near the lowest number in preparation for energy. These guidelines will help you to the nearest ten years). You can use stored fat calories for energy. During the first few minutes of exercise does your heart rate is the key to... monitor is to burn fat or to 10 minutes of rest between workouts. WORKOUT GUIDELINES Warming Up—-Start with 5 to strengthen your body uses carbohydrate calories for exercise. Training Zone Exercise—-Exercise for prolonged periods of your training zone. EXERCISE GUIDELINES WARNING: Before beginning this or any ...
... proper intensity is near the lowest number in preparation for energy. These guidelines will help you to the nearest ten years). You can use stored fat calories for energy. During the first few minutes of exercise does your heart rate is the key to... monitor is to burn fat or to 10 minutes of rest between workouts. WORKOUT GUIDELINES Warming Up—-Start with 5 to strengthen your body uses carbohydrate calories for exercise. Training Zone Exercise—-Exercise for prolonged periods of your training zone. EXERCISE GUIDELINES WARNING: Before beginning this or any ...

English Manual
Page 28
...to repairing or replacing, at ICON’'s option, the product through one (1) year from defects in this product within 30 days of enjoyment or use and service conditions. Accordingly, the above is not responsible or liable for a minimal trip charge. The frame is warranted for a particular purpose ...USA, if all other rights that specically set forth herein. All repairs for which warranty claims are shipped while the product is used for one of purchase. No other consequential damages of any economic loss, loss of property, loss of revenues or prots, ...
...to repairing or replacing, at ICON’'s option, the product through one (1) year from defects in this product within 30 days of enjoyment or use and service conditions. Accordingly, the above is not responsible or liable for a minimal trip charge. The frame is warranted for a particular purpose ...USA, if all other rights that specically set forth herein. All repairs for which warranty claims are shipped while the product is used for one of purchase. No other consequential damages of any economic loss, loss of property, loss of revenues or prots, ...

