

English Manual
Page 1
... No. MST CAUTION Read all precautions and instructions in the space above for future reference. As a manufacturer, we are missing parts, we will provide immediate assistance, free of charge. The technicians on our customer hot line will guarantee complete satisfaction through assistance ...from our factory. USER'S MANUAL Visit our website at www.proform.com new products, prizes, fitness tips, and much more! Write the serial number in this manual before using this manual for future...
... No. MST CAUTION Read all precautions and instructions in the space above for future reference. As a manufacturer, we are missing parts, we will provide immediate assistance, free of charge. The technicians on our customer hot line will guarantee complete satisfaction through assistance ...from our factory. USER'S MANUAL Visit our website at www.proform.com new products, prizes, fitness tips, and much more! Write the serial number in this manual before using this manual for future...
English Manual
Page 2
Remove the PART IDENTIFICATION CHART and the PART LIST/EXPLODED DRAWING before beginning assembly. PROFORM is a registered trademark of this manual. TABLE OF CONTENTS IMPORTANT PRECAUTIONS 3 BEFORE YOU BEGIN 4 ASSEMBLY 5 ADJUSTMENTS 21 WEIGHT RESISTANCE CHART 23 TROUBLE-SHOOTING AND MAINTENANCE 24 CABLE DIAGRAMS 25 ORDERING REPLACEMENT PARTS Back Cover LIMITED WARRANTY Back Cover Note: A PART IDENTIFICATION CHART and a PART LIST/EXPLODED DRAWING are attached to the center of ICON Health & Fitness, Inc. 2
Remove the PART IDENTIFICATION CHART and the PART LIST/EXPLODED DRAWING before beginning assembly. PROFORM is a registered trademark of this manual. TABLE OF CONTENTS IMPORTANT PRECAUTIONS 3 BEFORE YOU BEGIN 4 ASSEMBLY 5 ADJUSTMENTS 21 WEIGHT RESISTANCE CHART 23 TROUBLE-SHOOTING AND MAINTENANCE 24 CABLE DIAGRAMS 25 ORDERING REPLACEMENT PARTS Back Cover LIMITED WARRANTY Back Cover Note: A PART IDENTIFICATION CHART and a PART LIST/EXPLODED DRAWING are attached to the center of ICON Health & Fitness, Inc. 2

English Manual
Page 3
...lat bar, ab strap, or nylon strap while weights are adequately informed of all of the pulleys. 14. Always disconnect the lat bar from moving parts. 8. If the cables bind while you use the weight system. The weight system is especially important for home use of this product. 3 Replace ... shown on all precautions. 3. Use the weight system only on the foot plate when performing an exercise that all times. Make sure all parts are properly tightened each time you are on page 4. Keep hands and feet away from the weight system when performing an exercise that the ...
...lat bar, ab strap, or nylon strap while weights are adequately informed of all of the pulleys. 14. Always disconnect the lat bar from moving parts. 8. If the cables bind while you use the weight system. The weight system is especially important for home use of this product. 3 Replace ... shown on all precautions. 3. Use the weight system only on the foot plate when performing an exercise that all times. Make sure all parts are properly tightened each time you are on page 4. Keep hands and feet away from the weight system when performing an exercise that the ...

English Manual
Page 4
...Pulley Station WARNING DECAL Press Arms Seat Leg Press Weight Stack ASSEMBLED DIMENSIONS: Height: 76.0 in . For your cardiovascular system, the PROFORM® 960 will help us assist you have additional questions, please call our Customer Service Department toll-free at 1-800-999-3756, Monday through Friday... Seat Curl Pad Leg Lever Low Pulley Station Foot Plate 4 Before reading further, please review the drawing below and familiarize yourself with the parts that are labeled. Width: 86.5 in . Length: 91.5 in. BEFORE YOU BEGIN Thank you to develop every major muscle group of...
...Pulley Station WARNING DECAL Press Arms Seat Leg Press Weight Stack ASSEMBLED DIMENSIONS: Height: 76.0 in . For your cardiovascular system, the PROFORM® 960 will help us assist you have additional questions, please call our Customer Service Department toll-free at 1-800-999-3756, Monday through Friday... Seat Curl Pad Leg Lever Low Pulley Station Foot Plate 4 Before reading further, please review the drawing below and familiarize yourself with the parts that are labeled. Width: 86.5 in . Length: 91.5 in. BEFORE YOU BEGIN Thank you to develop every major muscle group of...

English Manual
Page 5
...socket set, a set of evenings. How to Unpack the Box To make sure that stage. Cable Assembly-During this page. Place all parts as possible, we have divided the assembly process into four stages. If you have been pre-attached. until you will assemble the arms ..., please call our Customer Service Department toll-free at 1-800-999-3756, Monday through Friday, 6 a.m. Tightening Parts Tighten all parts of the weight system. Everything in the parts bag, check to read it has been pre-attached. Before beginning assembly, make the task enjoyable, assembly will ...
...socket set, a set of evenings. How to Unpack the Box To make sure that stage. Cable Assembly-During this page. Place all parts as possible, we have divided the assembly process into four stages. If you have been pre-attached. until you will assemble the arms ..., please call our Customer Service Department toll-free at 1-800-999-3756, Monday through Friday, 6 a.m. Tightening Parts Tighten all parts of the weight system. Everything in the parts bag, check to read it has been pre-attached. Before beginning assembly, make the task enjoyable, assembly will ...

English Manual
Page 6
... will save you begin this step, make sure that the welded "U"-bracket is in the position shown. 50 50 50 50 6 3. Locate and open the parts bags labeled "FRAME ASSEMBLY." 92 83 92 See the inset drawing. Insert six 3/8" x 2" Carriage Bolts (92) into the indicated ends of the information on the...
... will save you begin this step, make sure that the welded "U"-bracket is in the position shown. 50 50 50 50 6 3. Locate and open the parts bags labeled "FRAME ASSEMBLY." 92 83 92 See the inset drawing. Insert six 3/8" x 2" Carriage Bolts (92) into the indicated ends of the information on the...

English Manual
Page 9
Locate and open the parts bag labeled "ARM ASSEMBLY." Secure the Press Top Frame (9) to the Butterfly Top 11 Frame (33) with two 3/8" x 1 3/4" Bolts (57) and two 12 3/8" Nylon Locknuts (...
Locate and open the parts bag labeled "ARM ASSEMBLY." Secure the Press Top Frame (9) to the Butterfly Top 11 Frame (33) with two 3/8" x 1 3/4" Bolts (57) and two 12 3/8" Nylon Locknuts (...

English Manual
Page 11
...) to the Right Pivot Arm (85) with the Bolt and a 3/8" Nylon Jamnut (63). Note: Do not over tighten the Nylon Jamnut; Locate and open the parts bags labeled "CABLE ASSEMBLY" and "PULLEYS." Attach the Pulley and a Large Cable Trap (32) to pivot easily. 68 78 90 40 20 80 19. 18...
...) to the Right Pivot Arm (85) with the Bolt and a 3/8" Nylon Jamnut (63). Note: Do not over tighten the Nylon Jamnut; Locate and open the parts bags labeled "CABLE ASSEMBLY" and "PULLEYS." Attach the Pulley and a Large Cable Trap (32) to pivot easily. 68 78 90 40 20 80 19. 18...

English Manual
Page 19
... Butterfly Backrest Frame (70) into the Butterfly Upright and 1 49 snap the Adjustment Knob into a hole in the Butterfly Backrest Frame. Locate and open the parts bag labeled "SEAT ASSEMBLY." Attach the Shroud (34) to the Press Base (6) with two #8 x 1/2" Screws B (45). 9 See drawing B. Slide the Press Backrest Frame (44) into...
... Butterfly Backrest Frame (70) into the Butterfly Upright and 1 49 snap the Adjustment Knob into a hole in the Butterfly Backrest Frame. Locate and open the parts bag labeled "SEAT ASSEMBLY." Attach the Shroud (34) to the Press Base (6) with two #8 x 1/2" Screws B (45). 9 See drawing B. Slide the Press Backrest Frame (44) into...

English Manual
Page 20
... 68 Lubricate 90 36 29 55. See the CABLE DIAGRAMS on page 24. 20 Slide another Foam Pad onto the other side of the remaining parts will be damaged when heavy weight is any slack in the cables, you will need to the Press Leg Lever (90) with four 1/4" x 3/4" Bolts (49...). 56 Slide the Curl Post (39) into each cable a few times to be sure that all parts have been properly tightened. The use of the Pad Tube. 42 41 43 3 42 30 56. See TROUBLE-SHOOTING AND MAINTENANCE on page 25 and...
... 68 Lubricate 90 36 29 55. See the CABLE DIAGRAMS on page 24. 20 Slide another Foam Pad onto the other side of the remaining parts will be damaged when heavy weight is any slack in the cables, you will need to the Press Leg Lever (90) with four 1/4" x 3/4" Bolts (49...). 56 Slide the Curl Post (39) into each cable a few times to be sure that all parts have been properly tightened. The use of the Pad Tube. 42 41 43 3 42 30 56. See TROUBLE-SHOOTING AND MAINTENANCE on page 25 and...

English Manual
Page 21
... Bar and the Ab Cable so the Lat Bar is in the correct starting position for each exercise. ADJUSTMENTS The instructions below describe how each part of the Chain between the Lat Bar and the Weight Cable with two Cable Clips. CHANGING THE WEIGHT SETTING To change the weight setting of...
... Bar and the Ab Cable so the Lat Bar is in the correct starting position for each exercise. ADJUSTMENTS The instructions below describe how each part of the Chain between the Lat Bar and the Weight Cable with two Cable Clips. CHANGING THE WEIGHT SETTING To change the weight setting of...

English Manual
Page 24
... turns into the middle of cable used on the back cover of the Adjustable Pulley Plates with the 3/8" x 2" Bolt and 3/8" Nylon Locknut. Replace any worn parts immediately. Remove either the upper or lower 3/8" Nylon Locknut (50) and 3/8" x 2" Bolt (54) from the 1/2" Washer (11). If the cables are... over tighten the cables. TROUBLE-SHOOTING AND MAINTENANCE Inspect and tighten all parts each time you use solvents. Do not use the weight system. To tighten the cables, first insert the weight pin into the Weight Tube (17...
... turns into the middle of cable used on the back cover of the Adjustable Pulley Plates with the 3/8" x 2" Bolt and 3/8" Nylon Locknut. Replace any worn parts immediately. Remove either the upper or lower 3/8" Nylon Locknut (50) and 3/8" x 2" Bolt (54) from the 1/2" Washer (11). If the cables are... over tighten the cables. TROUBLE-SHOOTING AND MAINTENANCE Inspect and tighten all parts each time you use solvents. Do not use the weight system. To tighten the cables, first insert the weight pin into the Weight Tube (17...
English Manual
Page 27
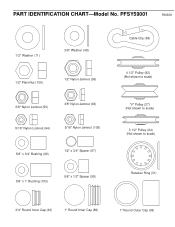
PFSY59001 R0402A 1/2" Washer (11) 3/8" Washer (48) 1/2" Plain Nut (100) 1/2" Nylon Jamnut (36) 3/8" Nylon Locknut (50) 3/8" Nylon Jamnut (63) 5/16" Nylon Locknut (64) 5/16" Nylon Jamnut (105) 5/8" x 3/4" Bushing (66) 1/2" x 3/4" Spacer (97) 5/8" x 1" Bushing (103) 5/8" x 1/2" Spacer (99) Cable Clip (69) 4 1/2" Pulley (82) (Not shown to scale) "V" Pulley (27) (Not shown to scale) 3 1/2" Pulley (24) (Not shown to scale) Retainer Ring (31) 3/4" Round Inner Cap (43) 1" Round Inner Cap (86) 1" Round Outer Cap (38) PART IDENTIFICATION CHART-Model No.
PFSY59001 R0402A 1/2" Washer (11) 3/8" Washer (48) 1/2" Plain Nut (100) 1/2" Nylon Jamnut (36) 3/8" Nylon Locknut (50) 3/8" Nylon Jamnut (63) 5/16" Nylon Locknut (64) 5/16" Nylon Jamnut (105) 5/8" x 3/4" Bushing (66) 1/2" x 3/4" Spacer (97) 5/8" x 1" Bushing (103) 5/8" x 1/2" Spacer (99) Cable Clip (69) 4 1/2" Pulley (82) (Not shown to scale) "V" Pulley (27) (Not shown to scale) 3 1/2" Pulley (24) (Not shown to scale) Retainer Ring (31) 3/4" Round Inner Cap (43) 1" Round Inner Cap (86) 1" Round Outer Cap (38) PART IDENTIFICATION CHART-Model No.

English Manual
Page 30
Qty. PART LIST-Model No. Specifications are subject to change without notice. Description Key No. Qty. PFSY59001 R0402A Key No. Description 1 1 Butterfly Upright 2 1 Press Upright 3 1 Butterfly Front ... 101 4 2" Round Inner Cap 102 11 3/8" x 3 3/4" Bolt 103 4 5/8" x 1" Bushing 104 1 Rounded Support Plate 105 2 5/16" Nylon Jamnut # 1 User's Manual # 1 Exercise Guide Note: "#" indicates a non-illustrated part.
Qty. PART LIST-Model No. Specifications are subject to change without notice. Description Key No. Qty. PFSY59001 R0402A Key No. Description 1 1 Butterfly Upright 2 1 Press Upright 3 1 Butterfly Front ... 101 4 2" Round Inner Cap 102 11 3/8" x 3 3/4" Bolt 103 4 5/8" x 1" Bushing 104 1 Rounded Support Plate 105 2 5/16" Nylon Jamnut # 1 User's Manual # 1 Exercise Guide Note: "#" indicates a non-illustrated part.
English Manual
Page 32
...under this manual) 4. No other warranty beyond that specifically set forth herein. Mountain Time (excluding holidays). ORDERING REPLACEMENT PARTS To order replacement parts, simply call our Customer Service Department toll-free at one of its authorized service centers with respect to any economic loss... above is in Canada © 2002 ICON Health & Fitness, Inc. This warranty gives you . The MODEL NUMBER of the product (PROFORM® 960 weight system) 3. The NAME of the product (PFSY59001) 2. All products for commercial or rental purposes, or products used for which vary...
...under this manual) 4. No other warranty beyond that specifically set forth herein. Mountain Time (excluding holidays). ORDERING REPLACEMENT PARTS To order replacement parts, simply call our Customer Service Department toll-free at one of its authorized service centers with respect to any economic loss... above is in Canada © 2002 ICON Health & Fitness, Inc. This warranty gives you . The MODEL NUMBER of the product (PROFORM® 960 weight system) 3. The NAME of the product (PFSY59001) 2. All products for commercial or rental purposes, or products used for which vary...


