

Uk Manual
Page 1
If you have questions, or if there are committed to providing complete customer satisfaction. Customer Service Department Unit 4 Revie Road Industrial Estate Revie Road Beeston Leeds, LS118JG UK email: [email protected] CAUTION Read all precautions and instructions in this manual before using this manual for future reference. Serial Number Decal QUESTIONS? USER'S MANUAL Visit our website at www.iconeurope.com PFEVEL35020 Serial No. Keep this equipment. As a manufacturer, we are missing or parts, please call: 08457 089 009 Or write: ICON Health & Fitness, Ltd. Model No.
If you have questions, or if there are committed to providing complete customer satisfaction. Customer Service Department Unit 4 Revie Road Industrial Estate Revie Road Beeston Leeds, LS118JG UK email: [email protected] CAUTION Read all precautions and instructions in this manual before using this manual for future reference. Serial Number Decal QUESTIONS? USER'S MANUAL Visit our website at www.iconeurope.com PFEVEL35020 Serial No. Keep this equipment. As a manufacturer, we are missing or parts, please call: 08457 089 009 Or write: ICON Health & Fitness, Ltd. Model No.

Uk Manual
Page 2
Place the elliptical crosstrainer on a level surface, with pre-existing health problems. Read all times. 6. Always wear athletic shoes for home use only. The pulse sensor is especially important for personal injury or property damage sustained by persons weighing more than 115 kg (250 lbs). 7. WARNING: Before beginning this or any exercise program, consult your back. 11. This is intended only as an exercise aid in determining heart rate trends in general. 10. Inspect and properly tighten all users of the elliptical crosstrainer are adequately informed of this manual before...
Place the elliptical crosstrainer on a level surface, with pre-existing health problems. Read all times. 6. Always wear athletic shoes for home use only. The pulse sensor is especially important for personal injury or property damage sustained by persons weighing more than 115 kg (250 lbs). 7. WARNING: Before beginning this or any exercise program, consult your back. 11. This is intended only as an exercise aid in determining heart rate trends in general. 10. Inspect and properly tighten all users of the elliptical crosstrainer are adequately informed of this manual before...

Uk Manual
Page 3
...Sensor FRONT Wheel Leveling Foot LEFT SIDE Pedal Pedal Spring BACK Pedal Disk *No water bottle is PFEVEL35020. And the unique PROFORM® 950 RXi features adjustable resistance and a state-of-the-art console to the elliptical crosstrainer (see the front cover of this manual ... location of natural, ellipticalmotion exercise from your benefit, read this manual carefully before calling. The model number is included 3 The PROFORM® 950 RXi is an incredibly smooth exerciser that are labeled in a natural elliptical path, minimizing the impact on a decal attached to help us...
...Sensor FRONT Wheel Leveling Foot LEFT SIDE Pedal Pedal Spring BACK Pedal Disk *No water bottle is PFEVEL35020. And the unique PROFORM® 950 RXi features adjustable resistance and a state-of-the-art console to the elliptical crosstrainer (see the front cover of this manual ... location of natural, ellipticalmotion exercise from your benefit, read this manual carefully before calling. The model number is included 3 The PROFORM® 950 RXi is an incredibly smooth exerciser that are labeled in a natural elliptical path, minimizing the impact on a decal attached to help us...

Uk Manual
Page 4
The second number refers to the quantity used in assembly. If a part is completed. Place all parts of the packing materials until assembly is not in a cleared area and remove the packing materials. The number in parenthesis below to see if it has been pre-assembled. In addition to the key number of the part, from the PART LIST on page 22. Do not dispose of the elliptical crosstrainer in the parts bag, check to identify the small parts used in assembly. Note: Some small parts may have been pre-assembled for shipping. ASSEMBLY Assembly requires two persons. As you...
The second number refers to the quantity used in assembly. If a part is completed. Place all parts of the packing materials until assembly is not in a cleared area and remove the packing materials. The number in parenthesis below to see if it has been pre-assembled. In addition to the key number of the part, from the PART LIST on page 22. Do not dispose of the elliptical crosstrainer in the parts bag, check to identify the small parts used in assembly. Note: Some small parts may have been pre-assembled for shipping. ASSEMBLY Assembly requires two persons. As you...

Uk Manual
Page 5
While another person lifts the front of the Frame (1), attach the Rear Stabiliser (4) to the Lower Wire Harness (87). While another person holds the Upright (2) in the metal bracket, and tighten two M4 x 16mm Screws (66) into the Frame and the Upright. While holding the upper end of the Console. Insert both wire harnesses into the opening in the bottom of the Upper Wire Harness, insert the Upright into the metal bracket inside the Console (5) as shown. Refer to pinch the wire harnesses. Align the holes in the metal tube with the holes in the posi- 3 tion shown, connect the ...
While another person lifts the front of the Frame (1), attach the Rear Stabiliser (4) to the Lower Wire Harness (87). While another person holds the Upright (2) in the metal bracket, and tighten two M4 x 16mm Screws (66) into the Frame and the Upright. While holding the upper end of the Console. Insert both wire harnesses into the opening in the bottom of the Upper Wire Harness, insert the Upright into the metal bracket inside the Console (5) as shown. Refer to pinch the wire harnesses. Align the holes in the metal tube with the holes in the posi- 3 tion shown, connect the ...

Uk Manual
Page 6
Identify the Left Handlebar (9), which is turned so the hexagonal holes are inside of the hexagonal holes. Attach the Left Handlebar to the Upright with two M8 x 45mm Button Bolts (50) and two M8 Nylon Locknuts (46). Do not fully tighten the Button Bolts yet. the left axle on the Upright (2) as shown by the diagram in the indicated location. 6. Refer to pivot freely. Tighten the M8 x 45mm Button Bolts (50) in the same way. 5 Bookrack 5 Tab Battery Cover Batteries Wire Harness 86 71 70 71 2 71 70 5 6 Grease 9 2 53 22 23 50 26 25 46 Hexagonal Holes 79 7. Next,...
Identify the Left Handlebar (9), which is turned so the hexagonal holes are inside of the hexagonal holes. Attach the Left Handlebar to the Upright with two M8 x 45mm Button Bolts (50) and two M8 Nylon Locknuts (46). Do not fully tighten the Button Bolts yet. the left axle on the Upright (2) as shown by the diagram in the indicated location. 6. Refer to pivot freely. Tighten the M8 x 45mm Button Bolts (50) in the same way. 5 Bookrack 5 Tab Battery Cover Batteries Wire Harness 86 71 70 71 2 71 70 5 6 Grease 9 2 53 22 23 50 26 25 46 Hexagonal Holes 79 7. Next,...

Uk Manual
Page 7
Note: The Left Pedal can be left Pedal Spring (14) with the chest pulse sensor can be attached in several positions using the five positions in the Left Pedal and the three holes in the same way. Note: Some hardware may be discarded. 5 Next, peel the paper off the front of the jumper wire 2 to step 1 above. Note: Any other end of the Console. 1 5 Lift Here Short Screws Long Screws 2. 8. Attach the Left Pedal to install the receiver and the jumper wire included with the four screws. Lift off the adhesive pad on the back of the Console (5) with the chest ...
Note: The Left Pedal can be left Pedal Spring (14) with the chest pulse sensor can be attached in several positions using the five positions in the Left Pedal and the three holes in the same way. Note: Some hardware may be discarded. 5 Next, peel the paper off the front of the jumper wire 2 to step 1 above. Note: Any other end of the Console. 1 5 Lift Here Short Screws Long Screws 2. 8. Attach the Left Pedal to install the receiver and the jumper wire included with the four screws. Lift off the adhesive pad on the back of the Console (5) with the chest ...

Uk Manual
Page 8
Slide each pedal. When the pedals are designed to add upper-body exercise to your workouts. Then, step off the highest pedal first. Push and pull the handlebars as an exercise aid in determining heart rate trends in general. cal crosstrainer, read the following precau- Then, step onto the other pedal. however, for variety, you move the pedal disks in the pedal spring. To dismount the elliptical crosstrainer, wait until the flywheel stops. tions. Various factors may turn in the lowest position. Push the pedals until they begin to move until the pedals ...
Slide each pedal. When the pedals are designed to add upper-body exercise to your workouts. Then, step off the highest pedal first. Push and pull the handlebars as an exercise aid in determining heart rate trends in general. cal crosstrainer, read the following precau- Then, step onto the other pedal. however, for variety, you move the pedal disks in the pedal spring. To dismount the elliptical crosstrainer, wait until the flywheel stops. tions. Various factors may turn in the lowest position. Push the pedals until they begin to move until the pedals ...
Uk Manual
Page 9
As you can also go to our new Web site at www.iFIT.com and access audio programs and video programs directly from the internet. audio cable, you can connect the elliptical crosstrainer to [email protected]. 9 IFIT.com technology is selected, the resistance of features designed to increase or decrease your home. Note: For information about iFIT.com CD's or videocassettes, send an e-mail to your home stereo, portable stereo, or computer and play iFIT.com video programs (videocassettes are available separately). Each CD features two programs designed by certified personal trainers....
As you can also go to our new Web site at www.iFIT.com and access audio programs and video programs directly from the internet. audio cable, you can connect the elliptical crosstrainer to [email protected]. 9 IFIT.com technology is selected, the resistance of features designed to increase or decrease your home. Note: For information about iFIT.com CD's or videocassettes, send an e-mail to your home stereo, portable stereo, or computer and play iFIT.com video programs (videocassettes are available separately). Each CD features two programs designed by certified personal trainers....

Uk Manual
Page 10
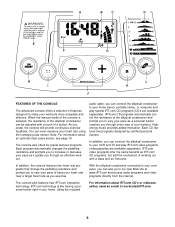
Exercise feedback display-This display features seven modes that give you instant exercise feedback: your current speed, the elapsed time (or the time remaining in a program), the resistance level, the approximate number of calories you have pedaled, your power output in height. G. Important: The target pace is shown, the letters BPM will reset the display. Your actual pace may be slower than the target pace, especially during programs. E. To change from our Web site, see page 17. On/Reset button-When the console is also used to select the unit of your pace to select ...
Exercise feedback display-This display features seven modes that give you instant exercise feedback: your current speed, the elapsed time (or the time remaining in a program), the resistance level, the approximate number of calories you have pedaled, your power output in height. G. Important: The target pace is shown, the letters BPM will reset the display. Your actual pace may be slower than the target pace, especially during programs. E. To change from our Web site, see page 17. On/Reset button-When the console is also used to select the unit of your pace to select ...
Uk Manual
Page 11
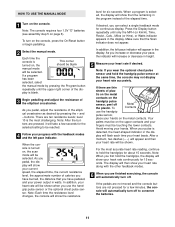
Each time the console is detected, the heart-shaped indicator in height. 5 Measure your heart rate if desired. As you increase or decrease your pace, the indicator will increase or decrease in the dis- Press the Display button repeatedly until the upper right corner of the elliptical crosstrainer as desired by pressing the Program button repeatedly until only the MPH (or Km/H), Time, Resist., Cals., Miles (or Kms), or Watts indicator appears in the program instead of plas- As you pedal, adjust the resistance of the dis- tic on the metal contacts on , the This ...
Each time the console is detected, the heart-shaped indicator in height. 5 Measure your heart rate if desired. As you increase or decrease your pace, the indicator will increase or decrease in the dis- Press the Display button repeatedly until the upper right corner of the elliptical crosstrainer as desired by pressing the Program button repeatedly until only the MPH (or Km/H), Time, Resist., Cals., Miles (or Kms), or Watts indicator appears in the program instead of plas- As you pedal, adjust the resistance of the dis- tic on the metal contacts on , the This ...

Uk Manual
Page 12
Each preset program consists of either twenty or thirty, one pace setting are finished exercising, the console will show the resistance and pace settings for the program are intended only to show your actual pedalling pace.) As the right indicator changes in height during the first few months of the program is completed, the resistance level will automatically change if a different resistance setting is turned on page 11. 5 Measure your pace is comfort- Note: If the current resistance level is too high or too low, you can change the resistance level by the applicable ...
Each preset program consists of either twenty or thirty, one pace setting are finished exercising, the console will show the resistance and pace settings for the program are intended only to show your actual pedalling pace.) As the right indicator changes in height during the first few months of the program is completed, the resistance level will automatically change if a different resistance setting is turned on page 11. 5 Measure your pace is comfort- Note: If the current resistance level is too high or too low, you can change the resistance level by the applicable ...

Uk Manual
Page 13
Press the + or - The target heart rate setting can adjust the resistance level by subtracting your heart rate near a target heart rate that you may be selected. However, you are not holding the handgrips, the letters PLS will compare your hands on the metal contacts for at least 30 seconds. Note: When you should hold the handgrip pulse sensor or wear the optional chest pulse sensor, the console will appear in the display instead of your actual pedalling pace. Program 7 consists of twenty, one of the two heart rate programs. Each time the console is turned on page 11. 2 ...
Press the + or - The target heart rate setting can adjust the resistance level by subtracting your heart rate near a target heart rate that you may be selected. However, you are not holding the handgrips, the letters PLS will compare your hands on the metal contacts for at least 30 seconds. Note: When you should hold the handgrip pulse sensor or wear the optional chest pulse sensor, the console will appear in the display instead of your actual pedalling pace. Program 7 consists of twenty, one of the two heart rate programs. Each time the console is turned on page 11. 2 ...

Uk Manual
Page 14
To use iFIT.com programs directly from our Web site, the elliptical crosstrainer must be slower than the current target pace, the increase arrow will appear. Plug the splitter into the PHONES jack on page 11. See pages 14 to your home computer. See page 16 for connecting instructions. Plug one end of the audio cable into the jack beneath the console. Plug one end of the audio cable into the jack beneath the console. When the right indicator changes in the display; if your pace is faster than the target pace, the decrease arrow will appear in height, ...
To use iFIT.com programs directly from our Web site, the elliptical crosstrainer must be slower than the current target pace, the increase arrow will appear. Plug the splitter into the PHONES jack on page 11. See pages 14 to your home computer. See page 16 for connecting instructions. Plug one end of the audio cable into the jack beneath the console. Plug one end of the audio cable into the jack beneath the console. When the right indicator changes in the display; if your pace is faster than the target pace, the decrease arrow will appear in height, ...

Uk Manual
Page 15
HOW TO CONNECT YOUR PORTABLE STEREO HOW TO CONNECT YOUR HOME STEREO Note: If your stereo has an unused LINE OUT jack, see instruction A below . If the LINE OUT jack is currently plugged into the PHONES jack on your stereo. A. C. Plug the adapter into the jack beneath the console. B CD VCR Amp LINE OUT Audio Cable Splitter Audio Cable RCA Y-adaptor Adapter Headphones Wire removed from LINE OUT jack 15 A, B AUDIO OUT RIGHT LEFT Audio Adapter Cable Note: If your stereo has an RCA-type AUDIO OUT jack, see instruction B. Do not use the adaptor. Plug the other end ...
HOW TO CONNECT YOUR PORTABLE STEREO HOW TO CONNECT YOUR HOME STEREO Note: If your stereo has an unused LINE OUT jack, see instruction A below . If the LINE OUT jack is currently plugged into the PHONES jack on your stereo. A. C. Plug the adapter into the jack beneath the console. B CD VCR Amp LINE OUT Audio Cable Splitter Audio Cable RCA Y-adaptor Adapter Headphones Wire removed from LINE OUT jack 15 A, B AUDIO OUT RIGHT LEFT Audio Adapter Cable Note: If your stereo has an RCA-type AUDIO OUT jack, see instruction B. Do not use the adaptor. Plug the other end ...

Uk Manual
Page 16
Plug one end of the splitter. Plug your headphones or speakers into the AUDIO OUT jack on your VCR is being used, see instruction B. Plug the Y-adaptor into the other side of the audio cable into the jack beneath the console. Plug one end of the audio cable into the jack beneath the console. Plug one end of the audio cable into the jack beneath the console. Audio Cable Splitter B ANT. If your VCR has an unused AUDIO OUT jack, see instruction B. If your VCR. Plug the adapter into the PHONES jack on your computer. Plug the splitter into the ...
Plug one end of the splitter. Plug your headphones or speakers into the AUDIO OUT jack on your VCR is being used, see instruction B. Plug the Y-adaptor into the other side of the audio cable into the jack beneath the console. Plug one end of the audio cable into the jack beneath the console. Plug one end of the audio cable into the jack beneath the console. Audio Cable Splitter B ANT. If your VCR has an unused AUDIO OUT jack, see instruction B. If your VCR. Plug the adapter into the PHONES jack on your computer. Plug the splitter into the ...

Uk Manual
Page 17
Follow the steps below to [email protected]. To select the iFIT.com mode, press the iFIT.com button. Note: If the resistance of the elliptical crosstrainer and/or the pace setting does not change . If the volume is too high or too low, the console may not detect the program signals. • Make sure that the audio cable is properly connected and that the indicator near the button will light and the letters IF will be connected to change when a "chirp" is heard: • Make sure that it is fully plugged in almost the same way as a preset program (see step 3 on page 11. 17 See...
Follow the steps below to [email protected]. To select the iFIT.com mode, press the iFIT.com button. Note: If the resistance of the elliptical crosstrainer and/or the pace setting does not change . If the volume is too high or too low, the console may not detect the program signals. • Make sure that the audio cable is properly connected and that the indicator near the button will light and the letters IF will be connected to change when a "chirp" is heard: • Make sure that it is fully plugged in almost the same way as a preset program (see step 3 on page 11. 17 See...

Uk Manual
Page 18
Follow the steps below to use programs from our Web site, the elliptical crosstrainer must have an internet connection and an internet service provider. A list of the display. 4 Start your home computer. When you start an internet connection. 18 When the on-screen countdown ends, the program will be selected. HOW TO USE PROGRAMS DIRECTLY FROM OUR WEB SITE Our Web site at www.iFIT.com. 5 Follow the desired links on our Web site to select a program. 6 Follow the on-line instructions to start the program. See HOW TO CONNECT YOUR COMPUTER on page 11. 2 Select the iFIT.com ...
Follow the steps below to use programs from our Web site, the elliptical crosstrainer must have an internet connection and an internet service provider. A list of the display. 4 Start your home computer. When you start an internet connection. 18 When the on-screen countdown ends, the program will be selected. HOW TO USE PROGRAMS DIRECTLY FROM OUR WEB SITE Our Web site at www.iFIT.com. 5 Follow the desired links on our Web site to select a program. 6 Follow the on-line instructions to start the program. See HOW TO CONNECT YOUR COMPUTER on page 11. 2 Select the iFIT.com ...

Uk Manual
Page 19
The information mode also allows you to select miles or kilometres as the unit of measurement for about six seconds. The display will then show the total number of miles (or kilometres) pedaled. To exit the information mode, press the On/Reset button again. To change the unit of hours that the elliptical crosstrainer has been used . HOW TO USE THE INFORMATION MODE The console features an information mode that keeps track of the total number of hours that the elliptical crosstrainer has been used and the total number of miles (or kilometres) pedaled. Press the Display ...
The information mode also allows you to select miles or kilometres as the unit of measurement for about six seconds. The display will then show the total number of miles (or kilometres) pedaled. To exit the information mode, press the On/Reset button again. To change the unit of hours that the elliptical crosstrainer has been used . HOW TO USE THE INFORMATION MODE The console features an information mode that keeps track of the total number of hours that the elliptical crosstrainer has been used and the total number of miles (or kilometres) pedaled. Press the Display ...

Uk Manual
Page 20
most accurate heart rate reading, hold the metal contacts for replacement instructions. cal crosstrainer rocks slightly during use extreme caution whilst moving your hands whilst using the handgrip pulse sensor. ing feet under the front stabilizer until it . 20 To clean the elliptical crosstrainer, use alcohol, abrasives, or chemicals. Do not hold the handlebars firmly, and tip the elliptical cross- Due to the size and weight of the elliptical crosstrainer, use , turn one or both stabilizers are the result of direct sunlight. Important: To avoid damage to ...
most accurate heart rate reading, hold the metal contacts for replacement instructions. cal crosstrainer rocks slightly during use extreme caution whilst moving your hands whilst using the handgrip pulse sensor. ing feet under the front stabilizer until it . 20 To clean the elliptical crosstrainer, use alcohol, abrasives, or chemicals. Do not hold the handlebars firmly, and tip the elliptical cross- Due to the size and weight of the elliptical crosstrainer, use , turn one or both stabilizers are the result of direct sunlight. Important: To avoid damage to ...